6.7 Assessing Cranial Nerves
Open Resources for Nursing (Open RN)
When performing a comprehensive neurological exam, examiners may assess the functioning of the cranial nerves. When performing these tests, examiners compare responses of opposite sides of the face and neck. Instructions for assessing each cranial nerve are provided below.
Cranial Nerve I – Olfactory
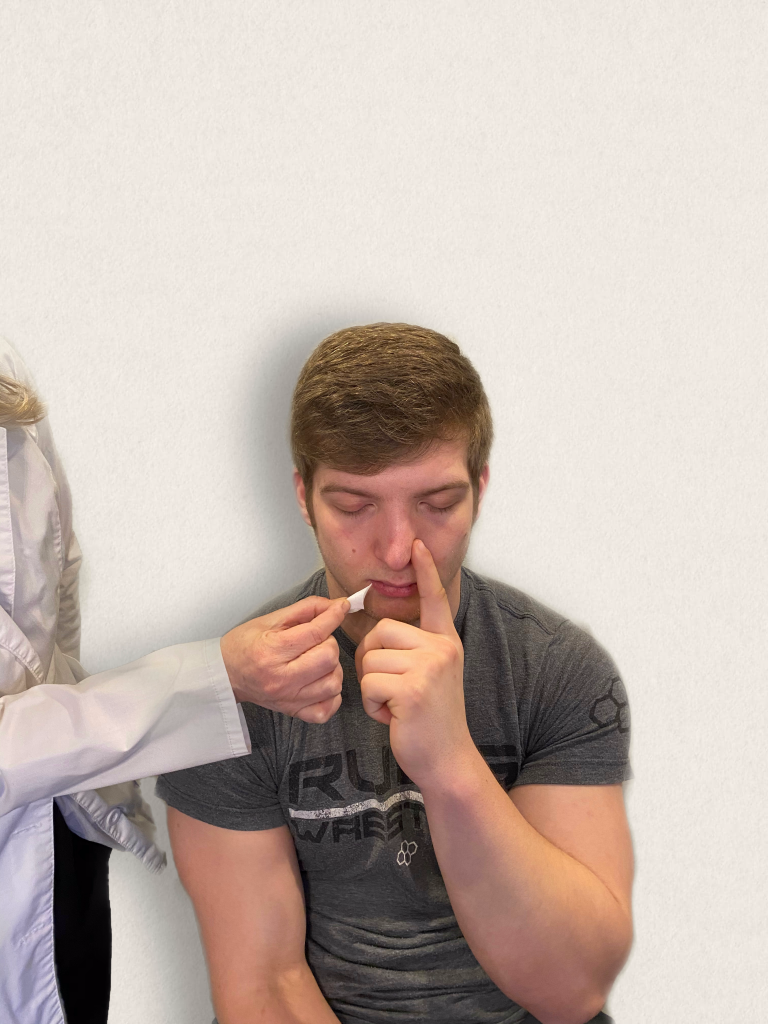
Ask the patient to identify a common odor, such as coffee or peppermint, with their eyes closed. See Figure 6.11[1] for an image of a nurse performing an olfactory assessment.
Cranial Nerve II – Optic
Be sure to provide adequate lighting when performing a vision assessment.
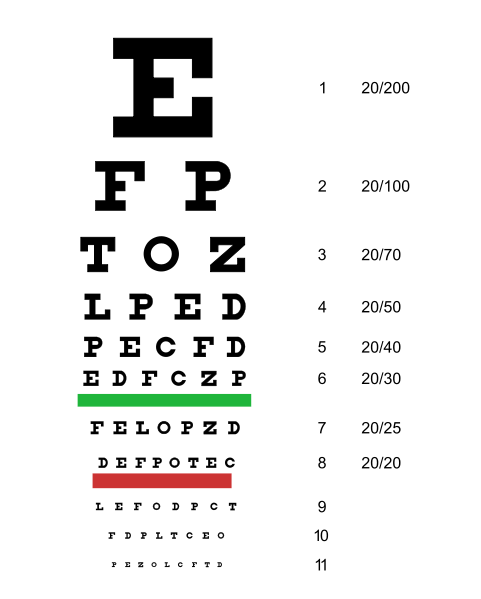
Far vision is tested using the Snellen chart. See Figure 6.12[2] for an image of a Snellen chart. The numerator of the fractions on the chart indicate what the individual can see at 20 feet, and the denominator indicates the distance at which someone with normal vision could see this line. For example, a result of 20/40 indicates this individual can see this line at 20 feet but someone with normal vision could see this line at 40 feet.
Test far vision by asking the patient to stand 20 feet away from a Snellen chart. Ask the patient to cover one eye and read the letters from the lowest line they can see.[3] Record the corresponding result in the furthermost right-hand column, such as 20/30. Repeat with the other eye. If the patient is wearing glasses or contact lens during this assessment, document the results as “corrected vision.” Repeat with each eye, having the patient cover the opposite eye. Alternative charts are available for children or adults who can’t read letters in English.
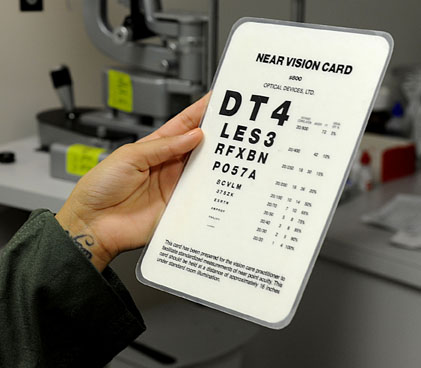
Near vision is assessed by having a patient read from a prepared card from 14 inches away. See Figure 6.13[4] for a card used to assess near vision.
Cranial Nerve III, IV, and VI – Oculomotor, Trochlear, Abducens
Cranial nerve III, IV, and VI (oculomotor, trochlear, abducens nerves) are tested together.
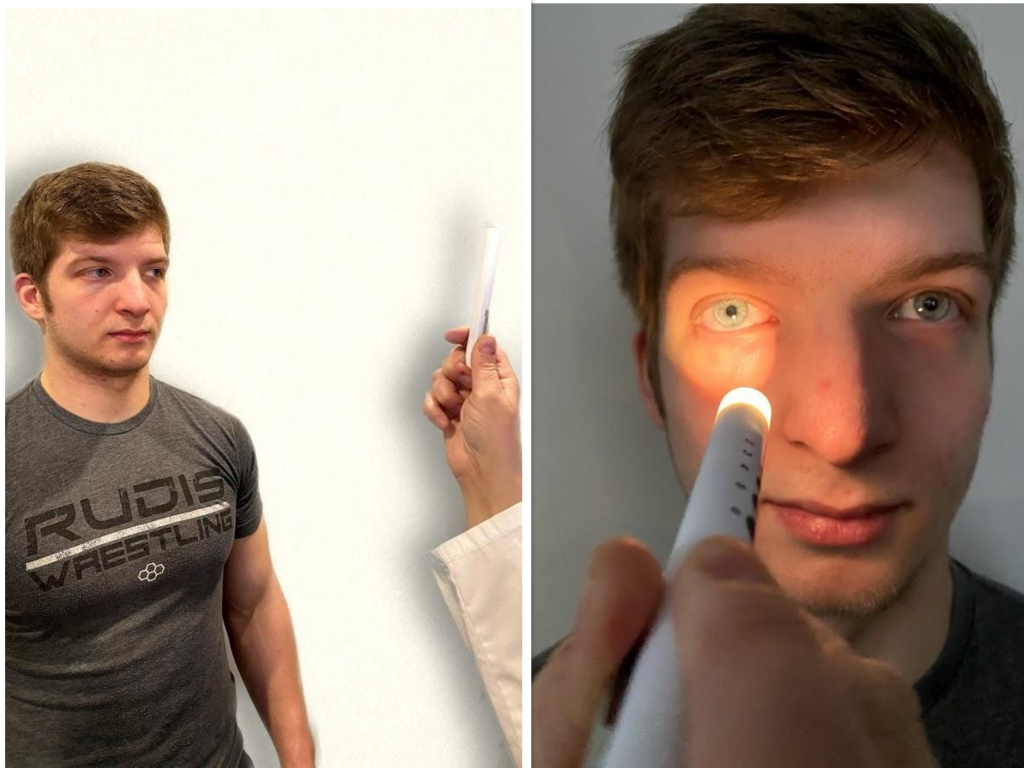
- Test eye movement by using a penlight. Stand 1 foot in front of the patient and ask them to follow the direction of the penlight with only their eyes. At eye level, move the penlight left to right, right to left, up and down, upper right to lower left, and upper left to lower right. Watch for smooth movement of the eyes in all fields. An unexpected finding is involuntary shaking of the eye as it moves, referred to as nystagmus.
- Test bilateral pupils to ensure they are equally round and reactive to light and accommodation. Dim the lights of the room before performing this test.
- Pupils should be round and bilaterally equal in size. The diameter of the pupils usually ranges from two to five millimeters. Emergency clinicians often encounter patients with the triad of pinpoint pupils, respiratory depression, and coma related to opioid overuse.
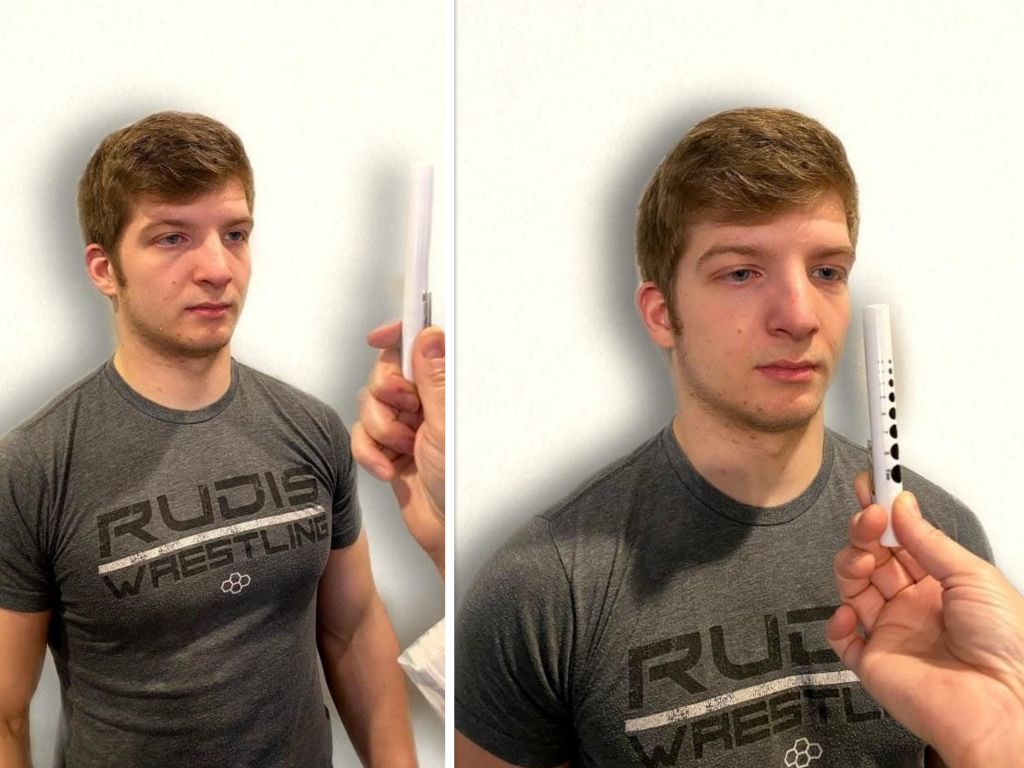
- Test pupillary reaction to light. Using a penlight, approach the patient from the side, and shine the penlight on one pupil. Observe the response of the lighted pupil, which is expected to quickly constrict. Repeat by shining the light on the other pupil. Both pupils should react in the same manner to light. See Figure 6.14[5] for an image of a nurse assessing a patient’s pupillary reaction to light. An unexpected finding is when one pupil is larger than the other or one pupil responds more slowly than the other to light, which is often referred to as a “sluggish response.”
- Test eye convergence and accommodation. Recall that accommodation refers to the ability of the eye to adjust from near to far vision, with pupils constricting for near vision and dilating for far vision. Convergence refers to the action of both eyes moving inward as they focus on a close object using near vision. Ask the patient to look at a near object (4-6 inches away from the eyes), and then move the object out to a distance of 12 inches. Pupils should constrict while viewing a near object and then dilate while looking at a distant object, and both eyes should move together. See Figure 6.15[6] for an image of a nurse assessing convergence and accommodation.
- The acronym PERRLA is commonly used in medical documentation and refers to, “pupils are equal, round and reactive to light and accommodation.”
Video Review for Assessment of the Cardinal Fields of Gaze[7]
Cranial Nerve V – Trigeminal
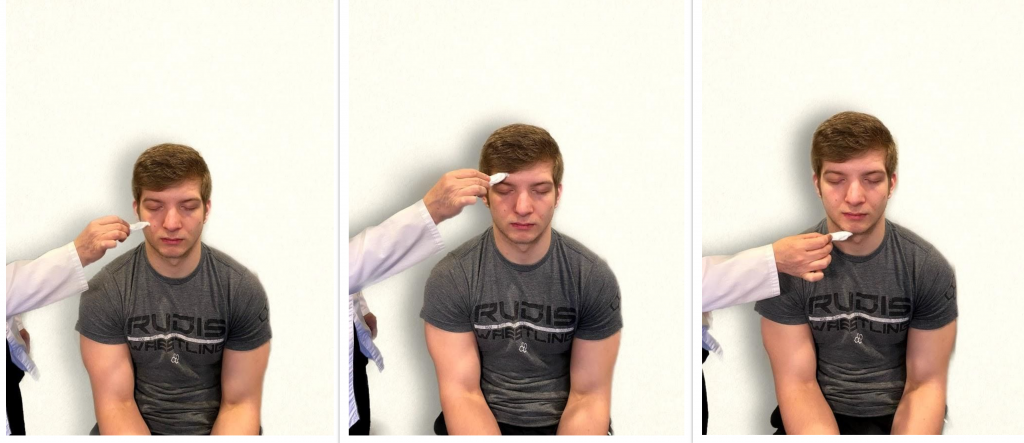
- Test sensory function. Ask the patient to close their eyes, and then use a wisp from a cotton ball to lightly touch their face, forehead, and chin. Instruct the patient to say ”Now” every time they feel the placement of the cotton wisp. See Figure 6.16[8] for an image of assessing trigeminal sensory function. The expected finding is that the patient will report every instance the cotton wisp is placed. An advanced technique is to assess the corneal reflex in comatose patients by touching the cotton wisp to the cornea of the eye to elicit a blinking response.
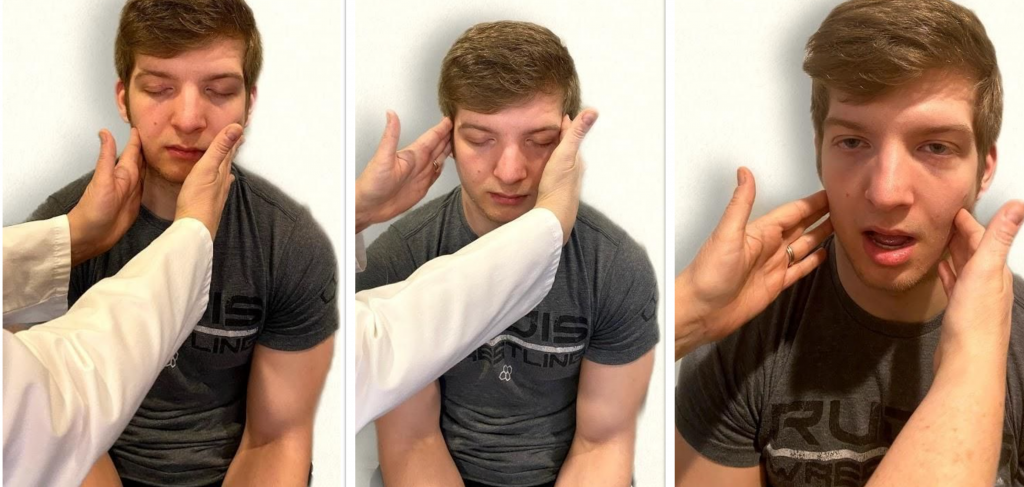
- Test motor function. Ask the patient to clench their teeth tightly while bilaterally palpating the temporalis and masseter muscles for strength. Ask the patient to open and close their mouth several times while observing muscle symmetry. See Figure 6.17[9] for an image of assessing trigeminal motor strength. The expected finding is the patient is able to clench their teeth and symmetrically open and close their mouth.
Cranial Nerve VII – Facial Nerve
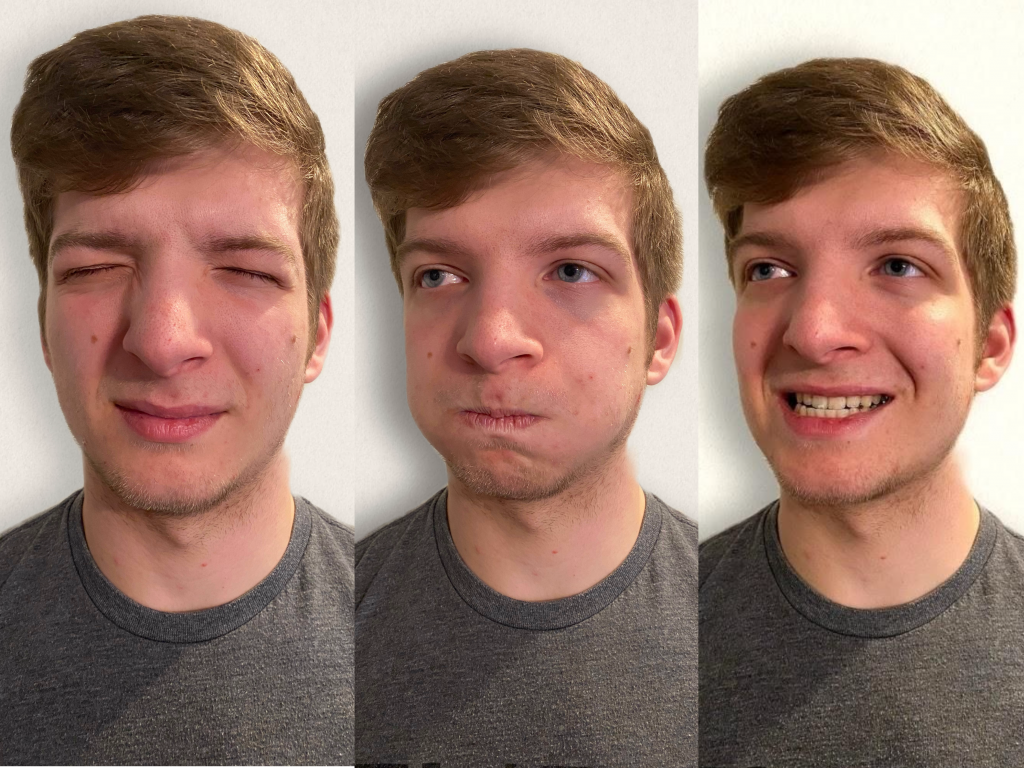
- Test motor function. Ask the patient to smile, show teeth, close both eyes, puff cheeks, frown, and raise eyebrows. Look for symmetry and strength of facial muscles. See Figure 6.18[10] for an image of assessing motor function of the facial nerve.
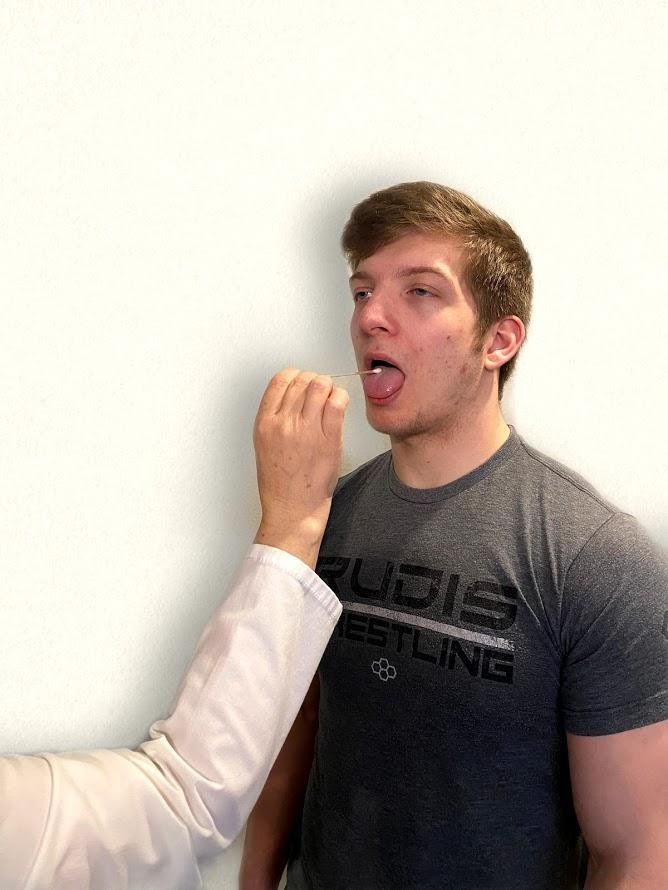
- Test sensory function. Test the sense of taste by moistening three different cotton applicators with salt, sugar, and lemon. Touch the patient’s anterior tongue with each swab separately, and ask the patient to identify the taste. See Figure 6.19[11] for an image of assessing taste.
Cranial Nerve VIII – Vestibulocochlear
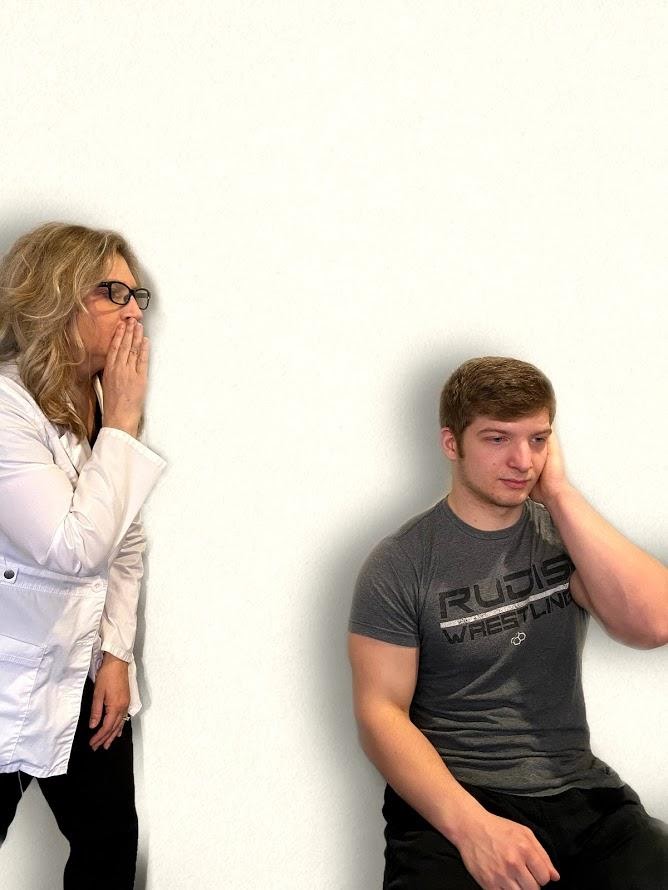
- Test auditory function. Perform the whispered voice test. The whispered voice test is a simple test for detecting hearing impairment if done accurately. See Figure 6.20[12] for an image assessing hearing using the whispered voice test. Complete the following steps to accurately perform this test:
- Stand at arm’s length behind the seated patient to prevent lip reading.
- Each ear is tested individually. The patient should be instructed to occlude the non-test ear with their finger.
- Exhale before whispering and use as quiet a voice as possible.
- Whisper a combination of numbers and letters (for example, 4-K-2), and then ask the patient to repeat the sequence.
- If the patient responds correctly, hearing is considered normal; if the patient responds incorrectly, the test is repeated using a different number/letter combination.
- The patient is considered to have passed the screening test if they repeat at least three out of a possible six numbers or letters correctly.
- The other ear is assessed similarly with a different combination of numbers and letters.
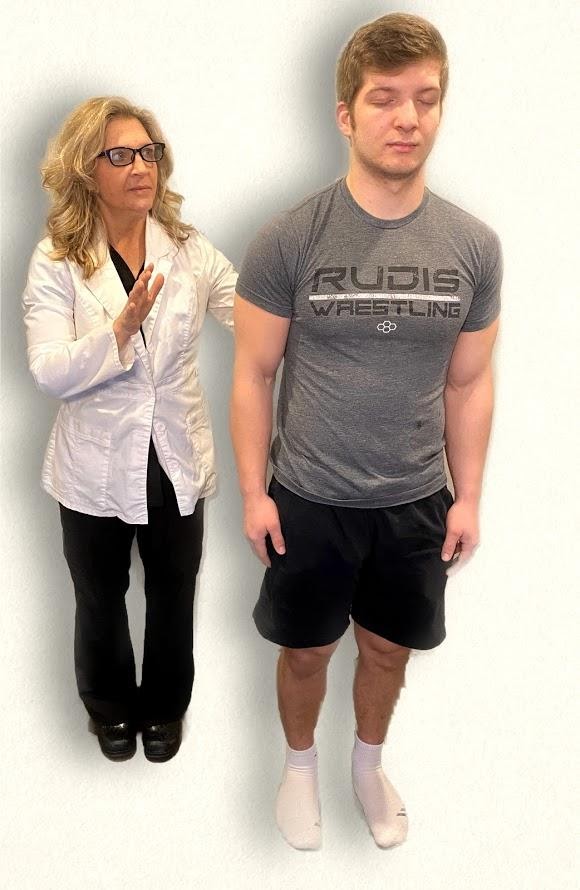
- Test balance. The Romberg test is used to test balance and is also used as a test for driving under the influence of an intoxicant. See Figure 6.21[13] for an image of the Romberg test. Ask the patient to stand with their feet together and eyes closed. Stand nearby and be prepared to assist if the patient begins to fall. It is expected that the patient will maintain balance and stand erect. A positive Romberg test occurs if the patient sways or is unable to maintain balance. The Romberg test is also a test of the body’s sense of positioning (proprioception), which requires healthy functioning of the spinal cord.
Cranial Nerve IX – Glossopharyngeal
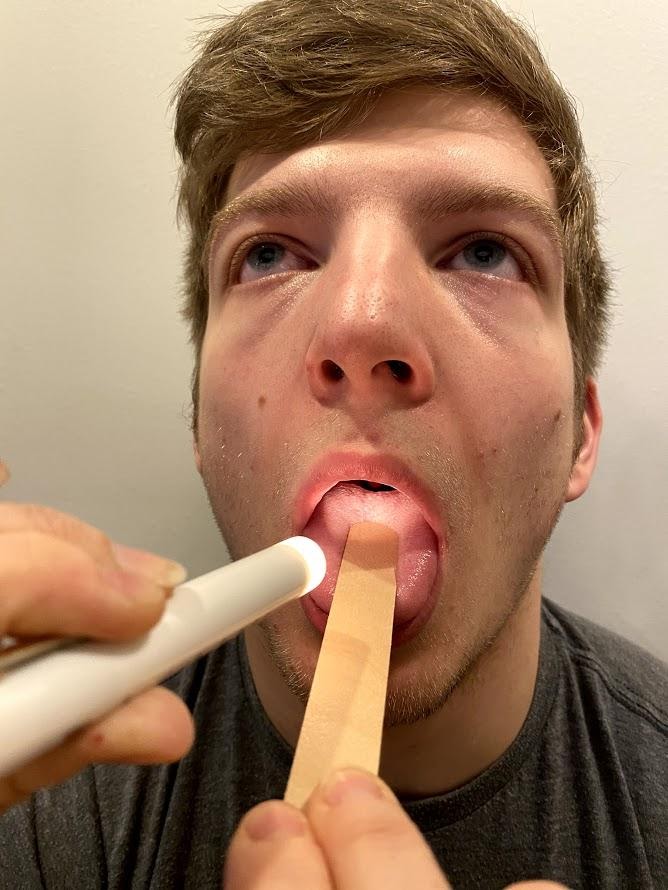
Ask the patient to open their mouth and say “Ah” and note symmetry of the upper palate. The uvula and tongue should be in a midline position and the uvula should rise symmetrically when the patient says “Ah.” (see Figure 6.22[14]).
Cranial Nerve X – Vagus
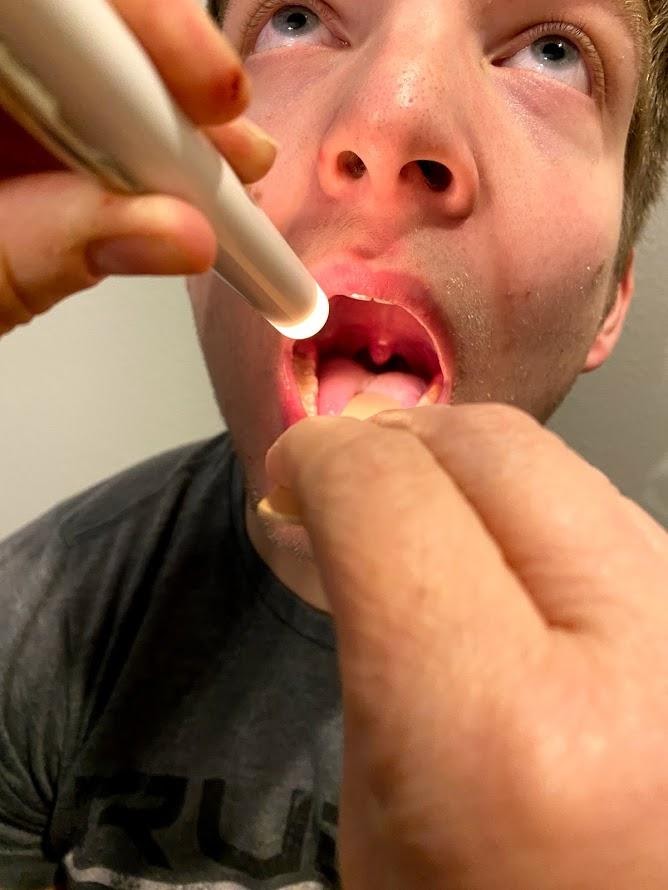
Use a cotton swab or tongue blade to touch the patient’s posterior pharynx and observe for a gag reflex followed by a swallow. The glossopharyngeal and vagus nerves work together for integration of gag and swallowing. See Figure 6.23[15] for an image of assessing the gag reflex.
Cranial Nerve XI – Spinal Accessory
Test the right sternocleidomastoid muscle. Face the patient and place your right palm laterally on the patient’s left cheek. Ask the patient to turn their head to the left while resisting the pressure you are exerting in the opposite direction. At the same time, observe and palpate the right sternocleidomastoid with your left hand. Then reverse the procedure to test the left sternocleidomastoid.
Continue to test the sternocleidomastoid by placing your hand on the patient’s forehead and pushing backward as the patient pushes forward. Observe and palpate the sternocleidomastoid muscles.
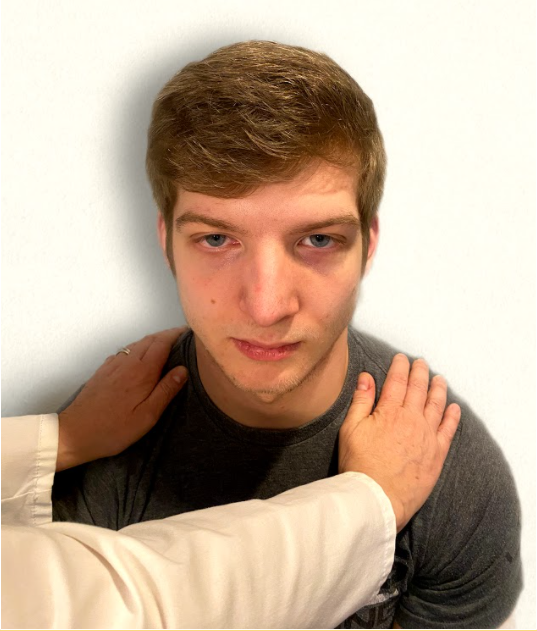
Test the trapezius muscle. Ask the patient to face away from you and observe the shoulder contour for hollowing, displacement, or winging of the scapula and observe for drooping of the shoulder. Place your hands on the patient’s shoulders and press down as the patient elevates or shrugs the shoulders and then retracts the shoulders.[16] See Figure 6.24[17] for an image of assessing the trapezius muscle.
Cranial Nerve XII – Hypoglossal
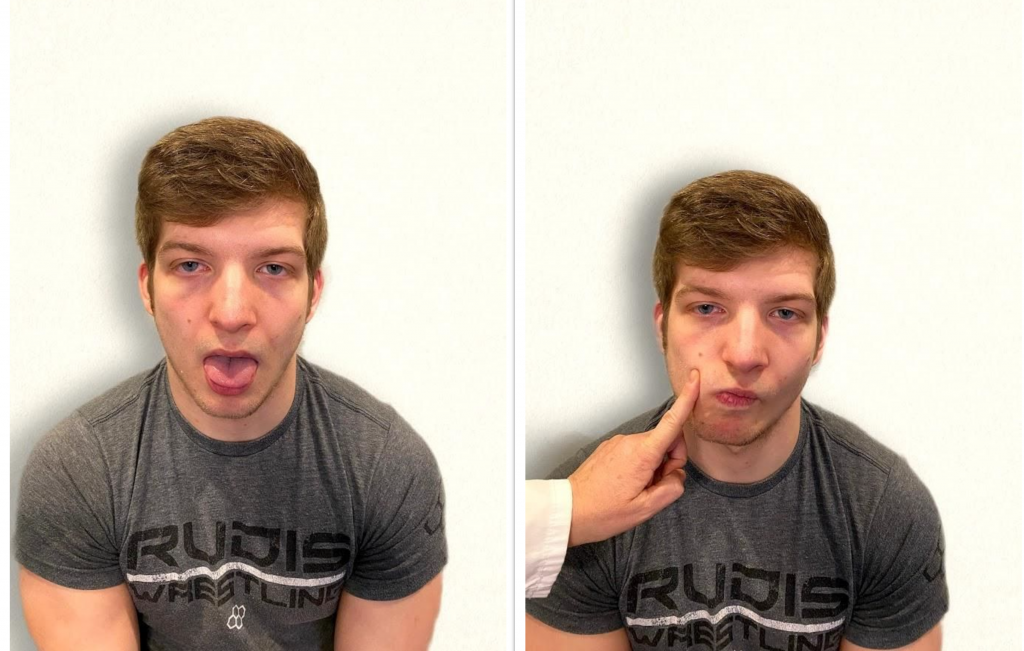
Ask the patient to protrude the tongue. If there is unilateral weakness present, the tongue will point to the affected side due to unopposed action of the normal muscle. An alternative technique is to ask the patient to press their tongue against their cheek while providing resistance with a finger placed on the outside of the cheek. See Figure 6.25[18] for an image of assessing the hypoglossal nerve.
Video Review of Cranial Nerve Assessment[19]
Expected Versus Unexpected Findings
See Table 6.5 for a comparison of expected versus unexpected findings when assessing the cranial nerves.
Table 6.5 Expected Versus Unexpected Findings of an Adult Cranial Nerve Assessment
| Cranial Nerve | Expected Finding | Unexpected Finding (Dysfunction) |
|---|---|---|
| I. Olfactory | Patient is able to describe odor. | Patient has inability to identify odors (anosmia). |
| II. Optic | Patient has 20/20 near and far vision. | Patient has decreased visual acuity and visual fields. |
| III. Oculomotor | Pupils are equal, round, and reactive to light and accommodation. | Patient has different sized or reactive pupils bilaterally. |
| IV. Trochlear | Both eyes move in the direction indicated as they follow the examiner’s penlight. | Patient has inability to look up, down, inward, outward, or diagonally. Ptosis refers to drooping of the eyelid and may be a sign of dysfunction. |
| V. Trigeminal | Patient feels touch on forehead, maxillary, and mandibular areas of face and chews without difficulty. | Patient has weakened muscles responsible for chewing; absent corneal reflex; and decreased sensation of forehead, maxillary, or mandibular area. |
| VI. Abducens | Both eyes move in coordination. | Patient has inability to look side to side (lateral); patient reports diplopia (double vision). |
| VII. Facial | Patient smiles, raises eyebrows, puffs out cheeks, and closes eyes without difficulty; patient can distinguish different tastes. | Patient has decreased ability to taste. Patient has facial paralysis or asymmetry of face such as facial droop. |
| VIII. Vestibulocochlear (Acoustic) | Patient hears whispered words or finger snaps in both ears; patient can walk upright and maintain balance. | Patient has decreased hearing in one or both ears and decreased ability to walk upright or maintain balance. |
| IX. Glossopharyngeal | Gag reflex is present. | Gag reflex is not present; patient has dysphagia. |
| X. Vagus | Patient swallows and speaks without difficulty. | Slurred speech or difficulty swallowing is present. |
| XI. Spinal Accessory | Patient shrugs shoulders and turns head side to side against resistance. | Patient has inability to shrug shoulders or turn head against resistance. |
| XII. Hypoglossal | Tongue is midline and can be moved without difficulty. | Tongue is not midline or is weak. |
- "Cranial Exam Image 11" by Meredith Pomietlo for Chippewa Valley Technical College is licensed under CC BY 4.0 ↵
- “Snellen chart.svg” by Jeff Dahl is licensed under CC BY-SA 3.0 ↵
- Koder-Anne, D., & Klahr, A. (2010). Training nurses in cognitive assessment: Uses and misuses of the mini-mental state examination. Educational Gerontology, 36(10/11), 827–833. https://doi.org/10.1080/03601277.2010.485027 ↵
- “111012-F-ZT401-067.JPG” by Airman 1st Class Brooke P. Beers for U.S. Air Force is licensed under CC0. Access for free at https://www.pacaf.af.mil/News/Article-Display/Article/593609/keeping-sight-all-right/ ↵
- "Cranial Exam Image 1" and "Pupillary Exam Image 1" by Meredith Pomietlo for Chippewa Valley Technical College are licensed under CC BY 4.0 ↵
- "Cranial Nerve Exam 8" and "Cranial Nerve Exam Image 3" by Meredith Pomietlo for Chippewa Valley Technical College are licensed under CC BY 4.0 ↵
- Registered NurseRN.(2018, June 5). Six cardinal fields of gaze nursing | Nystagmus eyes, cranial nerve 3, 4, 6, test. [Video]. YouTube. All rights reserved. Video used with permission. https://youtu.be/lrO4pLB95p0 ↵
- "Neuro Exam Image 28," "Cranial Exam Image 12," and Neuro Exam Image 36" by Meredith Pomietlo for Chippewa Valley Technical College are licensed under CC BY 4.0 ↵
- "Cranial Exam Image 11," "Neuro Exam Image 35," and "Neuro Exam Image 4" by Meredith Pomietlo for Chippewa Valley Technical College are licensed under CC BY 4.0 ↵
- "Cranial Exam image 15.png," "Cranial Exam Image 7.png," and "Cranial Exam Image 10.png" by Meredith Pomietlo for Chippewa Valley Technical College are licensed under CC BY 4.0 ↵
- "Neuro Exam Image 17.png" by Meredith Pomietlo for Chippewa Valley Technical College is licensed under CC BY 4.0 ↵
- "Whisper Test Image 1.png" by Meredith Pomietlo for Chippewa Valley Technical College is licensed under CC BY 4.0 ↵
- "Neuro Exam Image 9.png" by Meredith Pomietlo for Chippewa Valley Technical College is licensed under CC BY 4.0 ↵
- "Oral Exam Image 2.png" by Meredith Pomietlo for Chippewa Valley Technical College is licensed under CC BY 4.0 ↵
- "Oral Exam.png" by Meredith Pomietlo for Chippewa Valley Technical College is licensed under CC BY 4.0 ↵
- Walker, H. K. Cranial nerve XI: The spinal accessory nerve. In Walker, H. K., Hall, W. D., Hurst, J. W. (Eds.), Clinical methods: The history, physical, and laboratory examinations (3rd ed.). Butterworths. https://www.ncbi.nlm.nih.gov/books/NBK387/ ↵
- "Neuro Exam image 10" by Meredith Pomietlo for Chippewa Valley Technical College is licensed under CC BY 4.0 ↵
- "Cranial Nerve Exam Image 9.png" and "Cranial Nerve Exam Image 11.png" by Meredith Pomietlo for Chippewa Valley Technical College are licensed under CC BY 4.0 ↵
- RegisteredNurseRN. (2018, April 8). Cranial nerve examination nursing | Cranial nerve assessment I-XII (1-12). [Video]. YouTube. All rights reserved. Video used with permissions. https://youtu.be/oZGFrwogx14 ↵
A one-time order is a prescription for a medication to be administered only once.
Medication administered into the subcutaneous tissue just under the dermis.
Small glass containers of liquid medication ranging from 1 mL to 10 mL sizes.
A stat order is a one-time prescription that is administered without delay.
Five rights of administration have been identified by to prevent medication error, including Right Patient, Right Drug, Right Dose, Right Time, Route Route.
A culture established in health care agencies to empower staff to speak up about risks to patients and to report errors and near misses, all of which drive improvement in patient care and reduce the incident of patient harm.
Rigid device used to suction secretions from the mouth.
When assessing a patient’s oxygenation status, it is important for the nurse to have an understanding of the underlying structures of the respiratory system to best understand their assessment findings. Visit the “Respiratory Assessment" chapter for more information about the structures of the respiratory system.
Video Review for Oxygenation Basics
View the TED-Ed Oxygen's Journey video on YouTube[1]
Breathing Mechanics[2]
Gas Exchange[3]
Carbon Dioxide Transport[4]
Assessing Oxygenation Status
A patient’s oxygenation status is routinely assessed using pulse oximetry, referred to as SpO2. SpO2 is an estimated oxygenation level based on the saturation of hemoglobin measured by a pulse oximeter. Because the majority of oxygen carried in the blood is attached to hemoglobin within the red blood cell, SpO2 estimates how much hemoglobin is “saturated” with oxygen. The target range of SpO2 for an adult is 94-98%.[5] For patients with chronic respiratory conditions, such as COPD, the target range for SpO2 is often lower at 88% to 92%. Although SpO2 is an efficient, noninvasive method to assess a patient’s oxygenation status, it is an estimate and not always accurate. For example, if a patient is severely anemic and has a decreased level of hemoglobin in the blood, the SpO2 reading is affected. Decreased peripheral circulation can also cause a misleading low SpO2 level.
A more specific measurement of oxygen and carbon dioxide in the blood is obtained through an arterial blood gas (ABG). ABG results are often obtained for patients who have deteriorating or unstable respiratory status requiring urgent and emergency treatment. An ABG is a blood sample that is typically drawn from the radial artery by a respiratory therapist, emergency or critical care nurse, or health care provider. ABG results evaluate oxygen, carbon dioxide, pH, and bicarbonate levels. The partial pressure of oxygen in the blood is referred to as PaO2. The normal PaO2 level of a healthy adult is 80 to 100 mmHg. The PaO2 reading is more accurate than a SpO2 reading because it is not affected by hemoglobin levels. The PaCO2 level is the partial pressure of carbon dioxide in the blood. The normal PaCO2 level of a healthy adult is 35-45 mmHg. The normal range of pH level for arterial blood is 7.35-7.45, and the normal range for the bicarbonate (HCO3) level is 22-26. The SaO2 level is also obtained, which is the calculated arterial oxygen saturation level. See Table 11.2a for a summary of normal ranges of ABG values.[6]
Table 11.2a Normal Ranges of ABG Values
| Value | Description | Normal Range |
|---|---|---|
| pH | Acid-base balance of blood | 7.35-7.45 |
| PaO2 | Partial pressure of oxygen | 80-100 mmHg |
| PaCO2 | Partial pressure of carbon dioxide | 35-45 mmHg |
| HCO3 | Bicarbonate level | 22-26 mEq/L |
| SaO2 | Calculated oxygen saturation | 95-100% |
Hypoxia and Hypercapnia
Hypoxia is defined as a reduced level of tissue oxygenation. Hypoxia has many causes, ranging from respiratory and cardiac conditions to anemia. Hypoxemia is a specific type of hypoxia that is defined as decreased partial pressure of oxygen in the blood (PaO2), measured by an arterial blood gas (ABG).
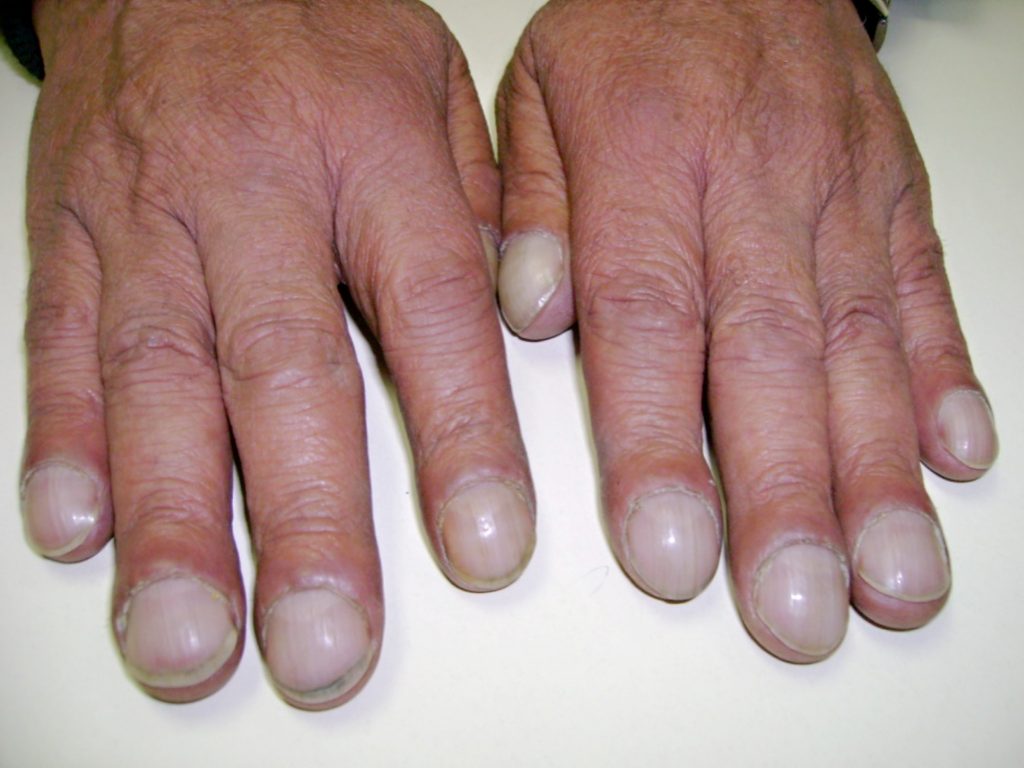
Early signs of hypoxia are anxiety, confusion, and restlessness. As hypoxia worsens, the patient’s level of consciousness and vital signs will worsen, with increased respiratory rate and heart rate and decreased pulse oximetry readings. Late signs of hypoxia include bluish discoloration of the skin and mucous membranes called cyanosis. Cyanosis is most easily seen around the lips and in the oral mucosa. A sign of chronic hypoxia is clubbing, a gradual enlargement of the fingertips (see Figure 11.1[7]). See Table 11.2b for symptoms and signs of hypoxia.[8]
Hypercapnia is an elevated level of carbon dioxide in the blood. This level is measured by the PaCO2 level in an ABG test and is indicated when the PaCO2 level is higher than 45. Hypercapnia is typically caused by hypoventilation or areas of the alveoli that are ventilated but not perfused. In a state of hypercapnia or hypoventilation, there is an accumulation of carbon dioxide in the blood. The increased carbon dioxide causes the pH of the blood to drop, leading to a state of respiratory acidosis. You can read more about respiratory acidosis in the “Fluids and Electrolytes” chapter of the Open RN Nursing Fundamentals book. Patients with hypercapnia can present with tachycardia, dyspnea, flushed skin, confusion, headaches, and dizziness. If the hypercapnia develops gradually over time, such as in a patient with chronic obstructive pulmonary disease (COPD), symptoms may be mild or may not be present at all. Hypercapnia is managed by addressing its underlying cause. A noninvasive positive pressure device such as a BiPAP may provide support to patients who are having trouble breathing normally, but if this is not sufficient, intubation may be required.[9]
Table 11.2b Symptoms and Signs of Hypoxia
| Signs & Symptoms | Description |
|---|---|
| Restlessness | Patient may become increasingly fidgety, move about the bed, demonstrate signs of anxiety and agitation. Restlessness is an early sign of hypoxia. |
| Tachycardia | An elevated heart rate (above 100 beats per minute in adults) can be an early sign of hypoxia. |
| Tachypnea | An increased respiration rate (above 20 breaths per minute in adults) is an indication of respiratory distress. |
| Shortness of breath (Dyspnea) | Shortness of breath is a subjective symptom of not getting enough air. Depending on severity, dyspnea causes increased levels of anxiety. |
| Oxygen saturation level (SpO2) | Oxygen saturation levels should be above 94% for an adult without an underlying respiratory condition. |
| Use of accessory muscles | Use of neck or intercostal muscles when breathing is an indication of respiratory distress. |
| Noisy breathing | Audible noises with breathing are an indication of respiratory conditions. Assess lung sounds with a stethoscope for adventitious sounds such as wheezing, rales, or crackles. Secretions can plug the airway, thereby decreasing the amount of oxygen available for gas exchange in the lungs. |
| Flaring of nostrils or pursed lip breathing | Flaring is a sign of hypoxia, especially in infants. Pursed-lip breathing is a technique often used in patients with COPD. This breathing technique increases the amount of carbon dioxide exhaled so that more oxygen can be inhaled. |
| Position of patient | Patients in respiratory distress may sit up or lean over by resting arms on their legs to enhance lung expansion. Patients who are hypoxic may not be able to lie flat in bed. |
| Ability of patient to speak in full sentences | Patients in respiratory distress may be unable to speak in full sentences or may need to catch their breath between sentences. |
| Skin color (Cyanosis) | Changes in skin color to bluish or gray are a late sign of hypoxia. |
| Confusion or loss of consciousness (LOC) | This is a worsening sign of hypoxia. |
| Clubbing | Clubbing, a gradual enlargement of the fingertips, is a sign of chronic hypoxia. |
Treating Hypoxia
Acute hypoxia is a medical emergency and should be treated promptly with oxygen therapy. Failure to initiate oxygen therapy when needed can result in serious harm or death of the patient. Although oxygen is considered a medication that requires a prescription, oxygen therapy may be initiated without a physician’s order in emergency situations as part of the nurse’s response to the “ABCs,” a common abbreviation for airway, breathing, and circulation. Most agencies have a protocol in place that allows nurses to apply oxygen in emergency situations. After applying oxygen as needed, the nurse then contacts the provider, respiratory therapist, or rapid response team, depending on the severity of hypoxia. Devices such high flow oxymasks, CPAP, BiPAP, or mechanical ventilation may be initiated by the respiratory therapist or provider to deliver higher amounts of inspired oxygen. Various types of oxygenation devices are further explained in the “Oxygenation Equipment” section.
Prescription orders for oxygen therapy will include two measurements of oxygen to be delivered - the oxygen flow rate and the fraction of inspired oxygen (FiO2). The oxygen flow rate is the number dialed up on the oxygen flow meter between 1 L/minute and 15 L/minute. Fio2 is the concentration of oxygen the patient inhales. Room air contains 21% oxygen concentration, so the FiO2 for supplementary oxygen therapy will range from 21% to 100% concentration.
In addition to administering oxygen therapy, there are several other interventions the nurse should consider implementing to a hypoxic patient. Additional interventions used to treat hypoxia in conjunction with oxygen therapy are outlined in Table 11.2c.[10]
Table 11.2c Interventions to Manage Hypoxia
| Interventions | Additional Information |
|---|---|
| Raise the Head of the Bed | Raising the head of the bed to high Fowler’s position promotes effective chest expansion and diaphragmatic descent, maximizes inhalation, and decreases the work of breathing. Patients with COPD who are short of breath may gain relief by sitting upright or leaning over a bedside table while in bed. |
| Encourage Enhanced Breathing and Coughing Techniques | Enhanced breathing and coughing techniques such as using pursed-lip breathing, coughing and deep breathing, huffing technique, incentive spirometry, and flutter valves may assist patients to clear their airway while maintaining their oxygen levels. See the following “Enhanced Breathing and Coughing Techniques” section for additional information regarding these techniques. |
| Manage Oxygen Therapy and Equipment | If the patient is already on supplemental oxygen, ensure the equipment is turned on, set at the required flow rate, correctly positioned on the patient, and properly connected to an oxygen supply source. If a portable tank is being used, check the oxygen level in the tank. Ensure the connecting oxygen tubing is not kinked, which could obstruct the flow of oxygen. Feel for the flow of oxygen from the exit ports on the oxygen equipment. In hospitals where medical air and oxygen are used, ensure the patient is connected to the oxygen flow port. Hospitals in America follow the national standard that oxygen flow ports are green and air outlets are yellow. |
| Assess the Need for Respiratory Medications | Pharmacological management is essential for patients with respiratory disease such as asthma, COPD, or severe allergic response. Bronchodilators effectively relax smooth muscles and open airways. Glucocorticoids relieve inflammation and also assist in opening air passages. Mucolytics decrease the thickness of pulmonary secretions so that they can be expectorated more easily. |
| Provide Oral Suctioning if Needed | Some patients may have a weakened cough that inhibits their ability to clear secretions from the mouth and throat. Patients with muscle disorders or those who have experienced a cerebral vascular accident (CVA) are at risk for aspiration pneumonia, which is caused by the accidental inhalation of material from the mouth or stomach. Provide oral suction if the patient is unable to clear secretions from the mouth and pharynx. See the chapter on “Tracheostomy Care and Suctioning” for additional details on suctioning. |
| Provide Pain Relief If Needed | Provide adequate pain relief if the patient is reporting pain. Pain increases anxiety and may inhibit the patient’s ability to take in full breaths. |
| Consider the Side Effects of Pain Medications | A common side effect of pain medication is sedation and respiratory depression. For more information about interventions to manage respiratory depression, see the “Oxygenation” chapter in the Open RN Nursing Fundamentals textbook. |
| Consider Other Devices to Enhance Clearance of Secretions | Chest physiotherapy and specialized devices assist with secretion clearance, such as handheld flutter valves or vests that inflate and vibrate the chest wall. Consider requesting a consultation with a respiratory therapist based on the patient’s situation. |
| Plan Frequent Rest Periods Between Activities | Patients experiencing hypoxia often feel short of breath and fatigue easily. Allow the patient to rest frequently, and space out interventions to decrease oxygen demand in patients whose reserves are likely limited. |
| Consider Other Potential Causes of Dyspnea | If a patient’s level of dyspnea is worsening, assess for other underlying causes in addition to the primary diagnosis. Are there other respiratory, cardiovascular, or hematological conditions such as anemia occurring? Start by reviewing the patient’s most recent hemoglobin and hematocrit lab results. Completing a thorough assessment may reveal abnormalities in these systems to report to the health care provider. |
| Consider Obstructive Sleep Apnea | Patients with obstructive sleep apnea (OSA) are often not previously diagnosed prior to hospitalization. The nurse may notice the patient snores, has pauses in breathing while snoring, or awakens not feeling rested. These signs may indicate the patient is unable to maintain an open airway while sleeping, resulting in periods of apnea and hypoxia. If these apneic periods are noticed but have not been previously documented, the nurse should report these findings to the health care provider for further testing and follow-up. Testing consists of using continuous pulse oximetry while the patient is sleeping to determine if the patient is hypoxic during these episodes and if a CPAP device should be prescribed. See the box below for additional information regarding OSA. |
| Anxiety | Anxiety often accompanies the feeling of dyspnea and can worsen it. Anxiety in patients with COPD is chronically undertreated. It is important for the nurse to address the feelings of anxiety and dyspnea. Anxiety can be relieved by teaching enhanced breathing and coughing techniques, encouraging relaxation techniques, or administering antianxiety medications. |
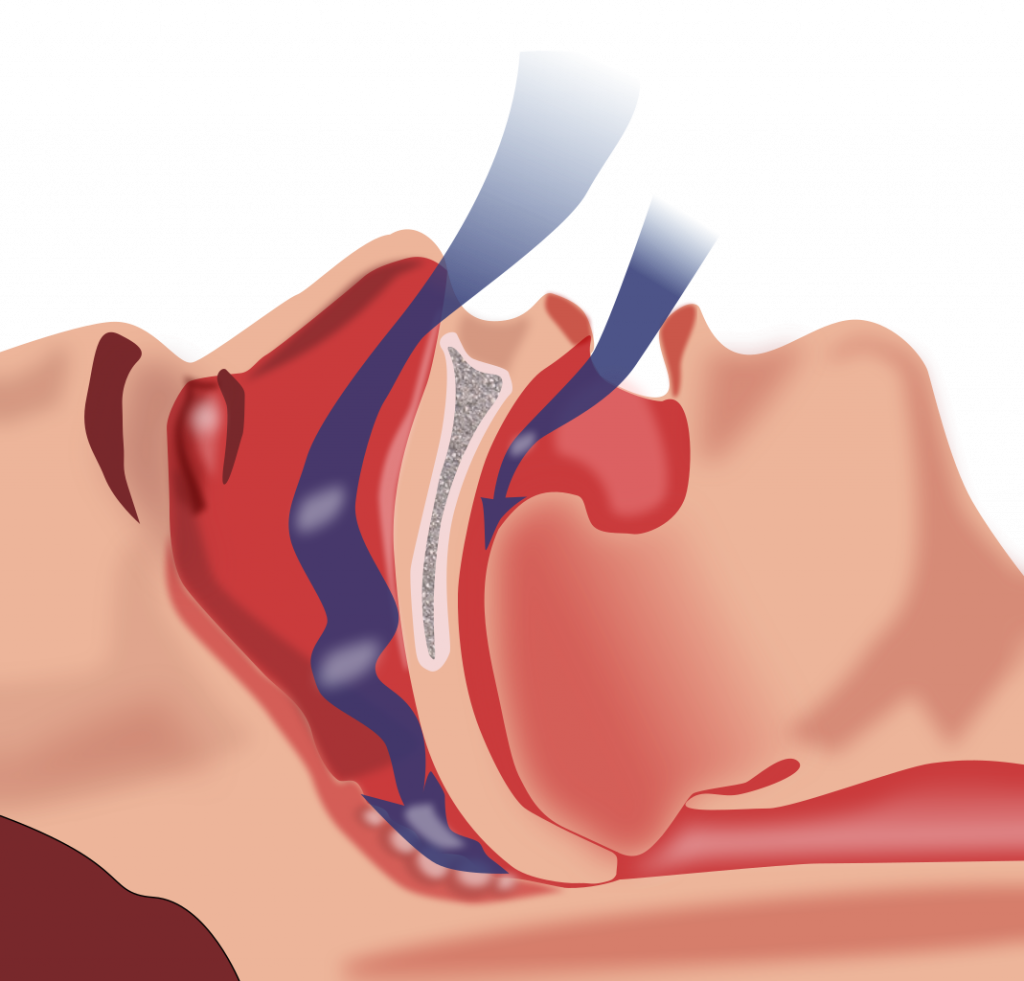
Obstructive Sleep Apnea (OSA) is the most common type of sleep apnea. See Figure 11.2[11] for an illustration of OSA. As soft tissue falls to the back of the throat, it impedes the passage of air (blue arrows) through the trachea and is characterized by repeated episodes of complete or partial obstructions of the upper airway during sleep. The episodes of breathing cessations are called “apneas,” meaning “without breath.” Despite the effort to breathe, apneas are associated with a reduction in blood oxygen saturation due to the obstruction of the airway. Treatment for OSA often includes the use of a CPAP device.
Enhanced Breathing and Coughing Techniques
In addition to oxygen therapy and the interventions listed in Table 11.2c to implement for a patient experiencing dyspnea and hypoxia, there are several techniques a nurse can teach a patient to use to enhance their breathing and coughing. These techniques include pursed-lip breathing, incentive spirometry, coughing and deep breathing, and the huffing technique.
Pursed-Lip Breathing
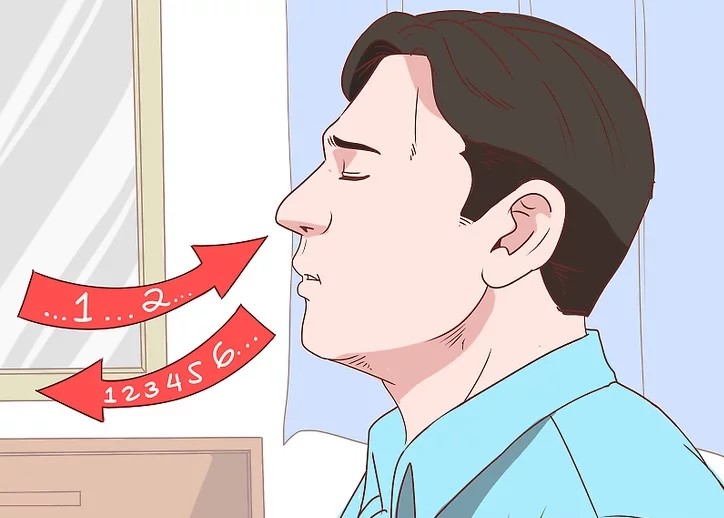
Pursed-lip breathing is a technique that allows people to control their oxygenation and ventilation. The technique requires a person to inspire through the nose and exhale through the mouth at a slow controlled flow. See Figure 11.3[12] for an illustration of pursed-lip breathing. This type of exhalation gives the person a puckered or pursed appearance. By prolonging the expiratory phase of respiration, a small amount of positive end-expiratory pressure (PEEP) is created in the airways that helps to keep them open so that more air can be exhaled, thus reducing air trapping that occurs in some conditions such as COPD. Pursed-lip breathing often relieves the feeling of shortness of breath, decreases the work of breathing, and improves gas exchange. People also regain a sense of control over their breathing while simultaneously increasing their relaxation.[13]
View the COPD Foundation's YouTube video to learn more about pursed-lip breathing:
Breathing Techniques[14]
Incentive Spirometry
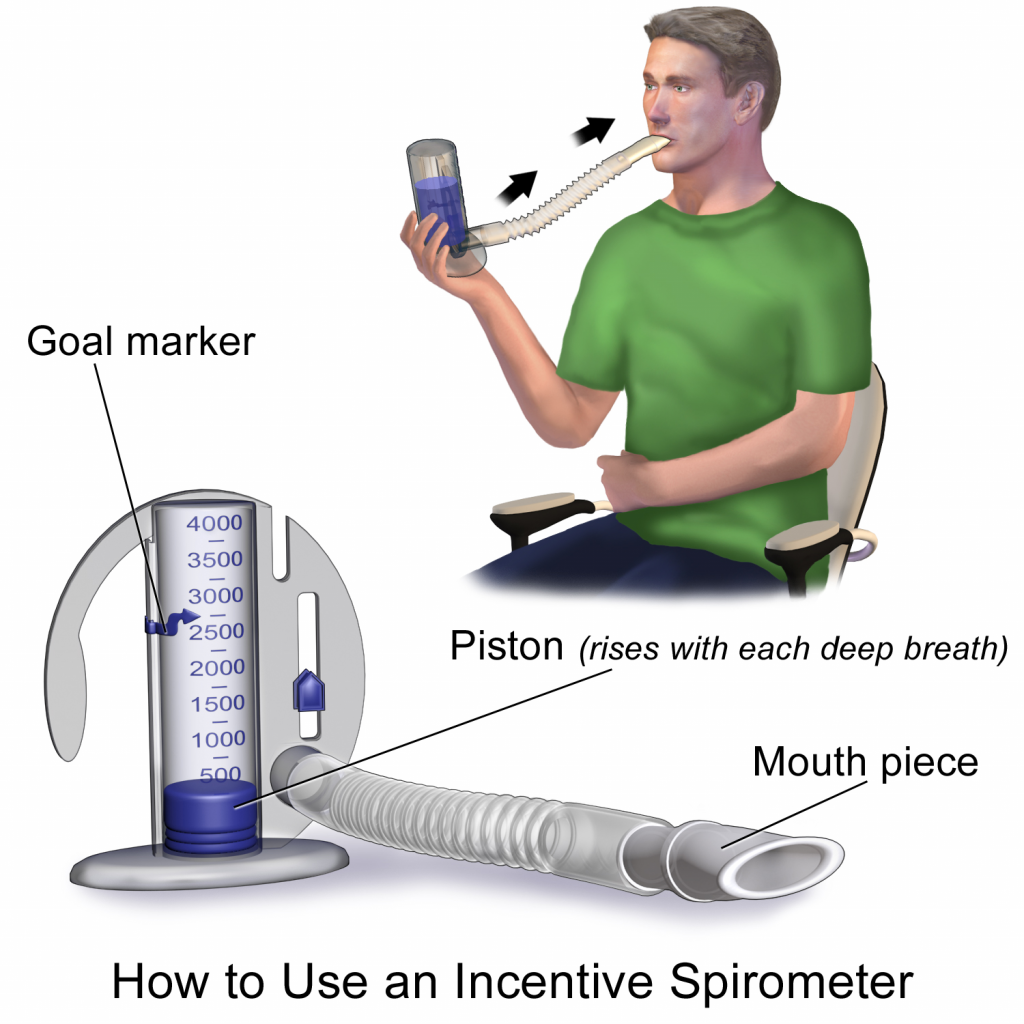
An incentive spirometer is a medical device often prescribed after surgery to prevent and treat atelectasis. Atelectasis occurs when alveoli become deflated or filled with fluid and can lead to pneumonia. See Figure 11.4[15] for an image of a patient using an incentive spirometer. While sitting upright, the patient should breathe in slowly and deeply through the tubing with the goal of raising the piston to a specified level. The patient should attempt to hold their breath for 5 seconds, or as long as tolerated, and then rest for a few seconds. This technique should be repeated by the patient 10 times every hour while awake.[16] The nurse may delegate this intervention to unlicensed assistive personnel, but the frequency in which it is completed and the volume achieved should be documented and monitored by the nurse.
Coughing and Deep Breathing
Teaching the coughing and deep breathing technique is similar to incentive spirometry but no device is required. The patient is encouraged to take deep, slow breaths and then exhale slowly. After each set of breaths, the patient should cough. This technique is repeated 3 to 5 times every hour.
Huffing Technique
The huffing technique is helpful for patients who have difficulty coughing. Teach the patient to inhale with a medium-sized breath and then make a sound like “Ha” to push the air out quickly with the mouth slightly open.
Vibratory PEP Therapy
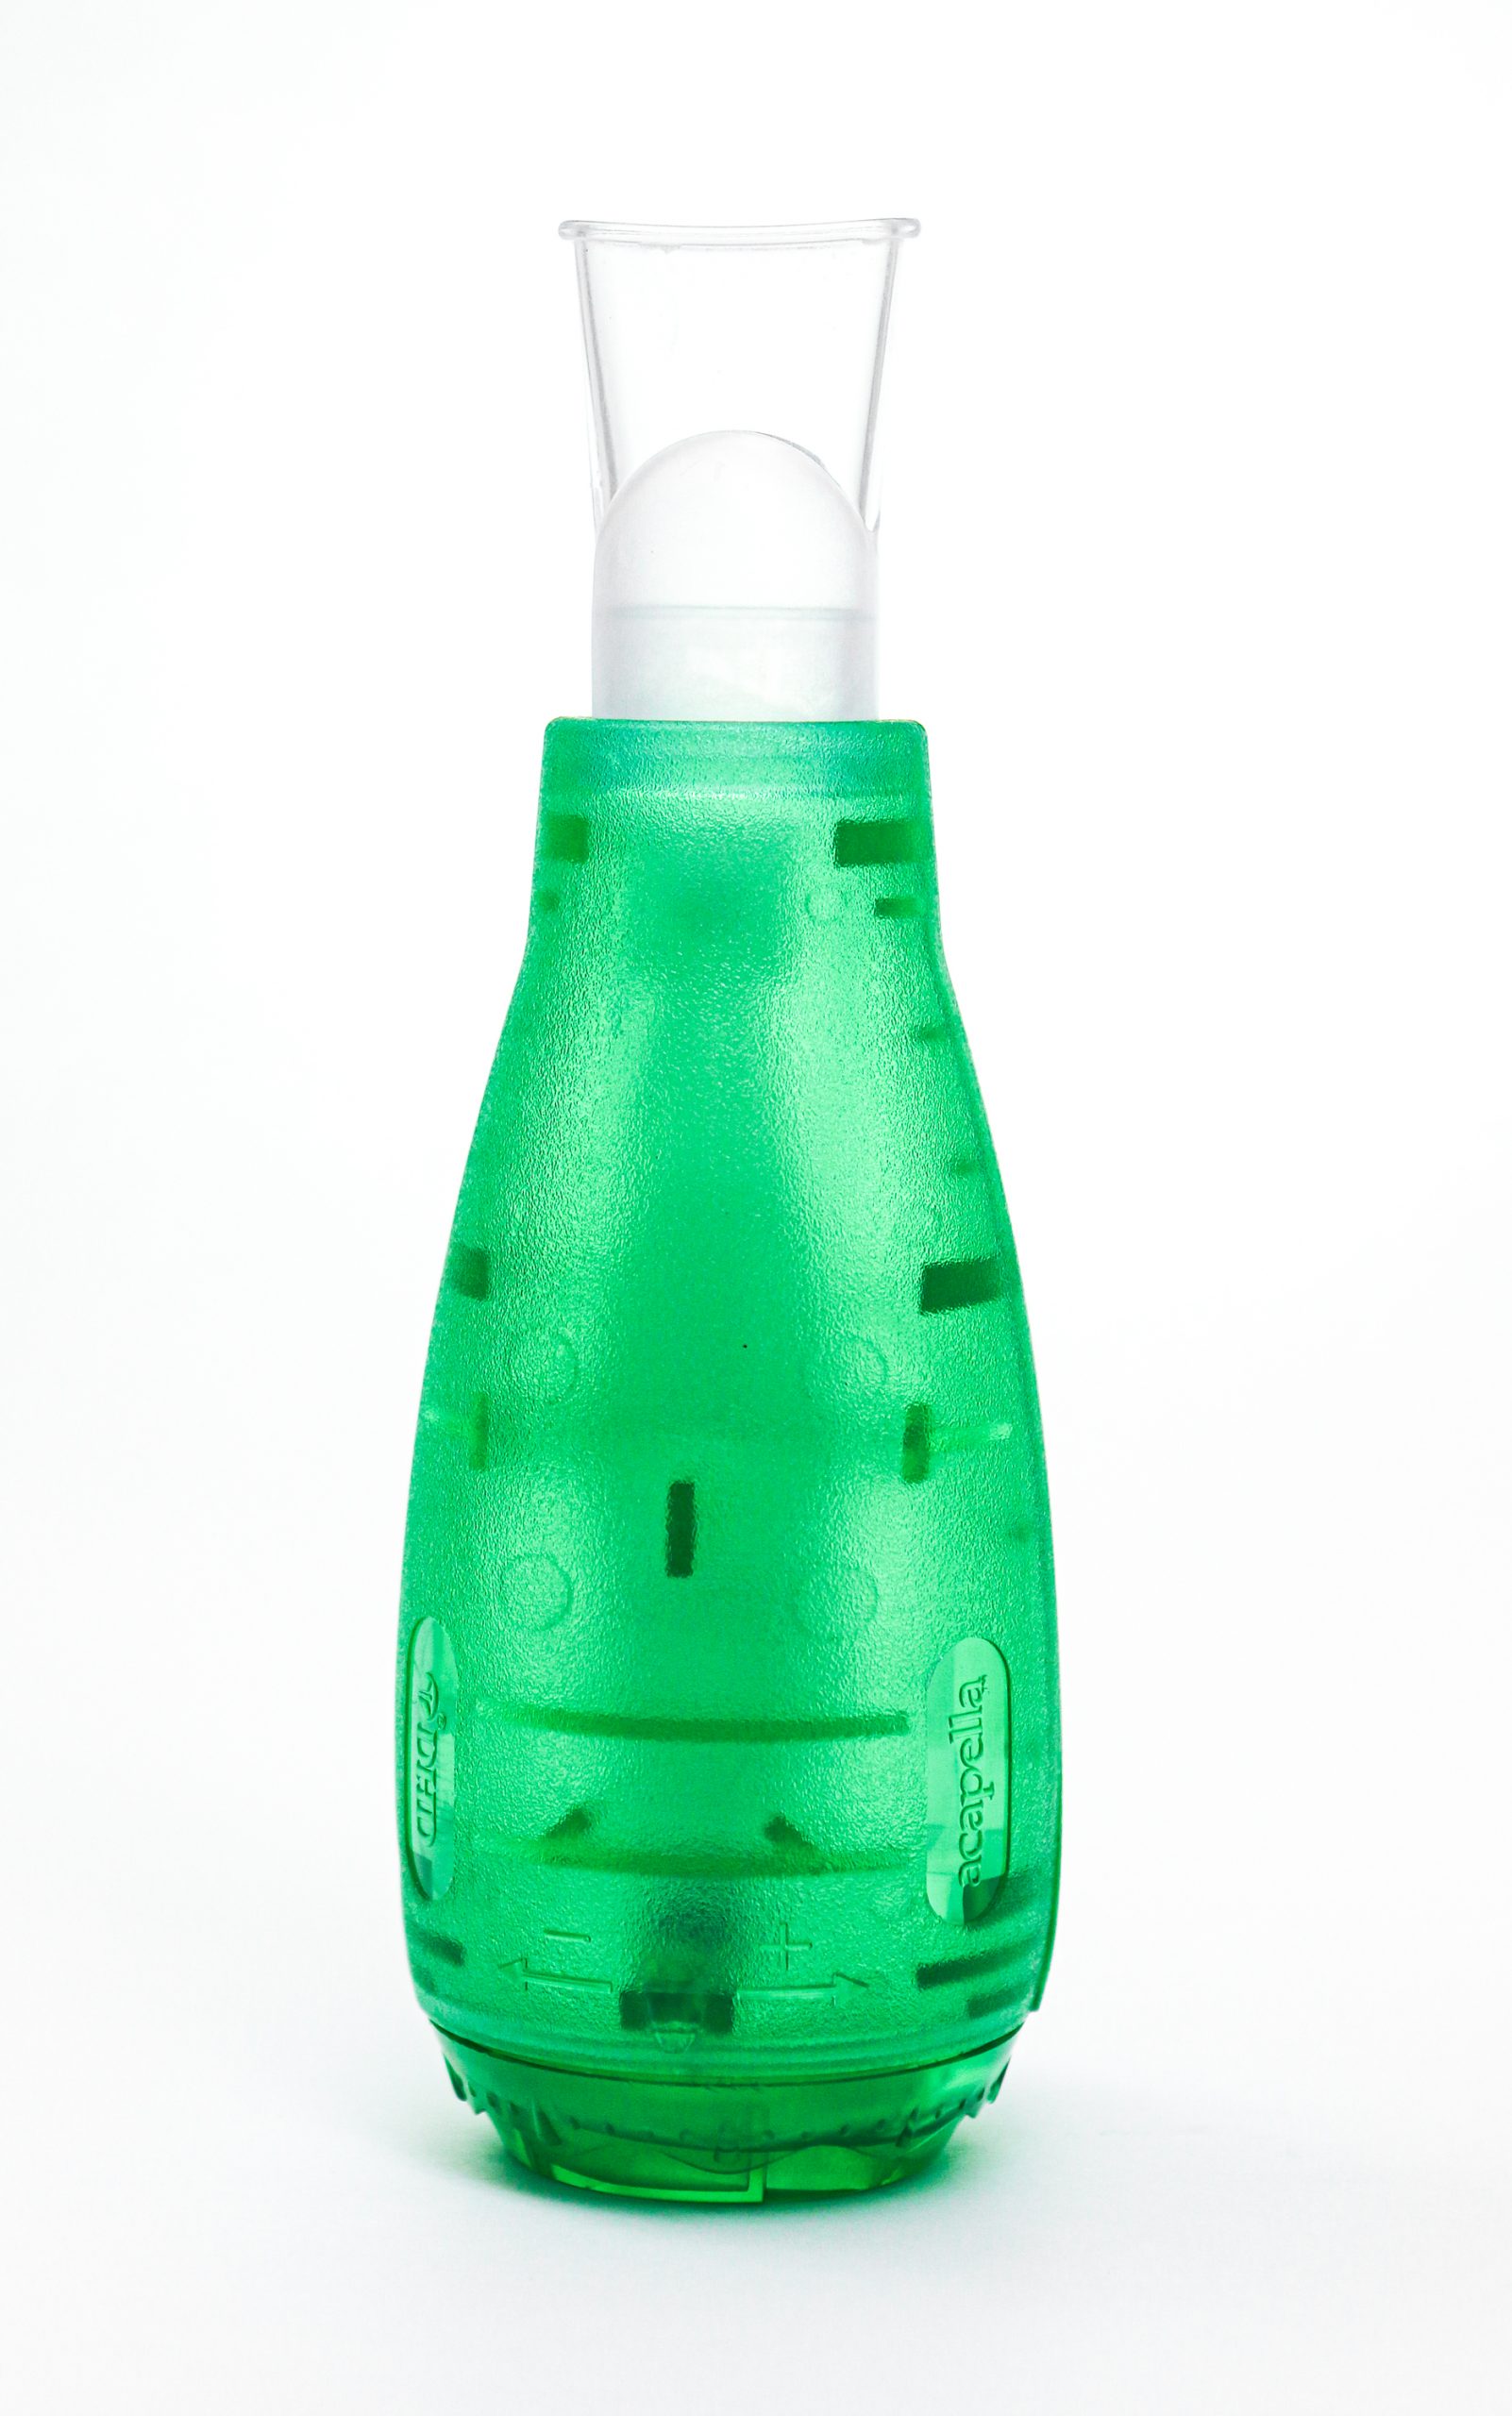
Vibratory Positive Expiratory Pressure (PEP) therapy uses handheld devices such as “flutter valves” or “Acapella” devices for patients who need assistance in clearing mucus from their airways. These devices (see Figure 11.5[17]) require a prescription and are used in collaboration with a respiratory therapist or advanced health care provider. To use Vibratory PEP therapy, the patient should sit up, take a deep breath, and blow into the device. A flutter valve within the device creates vibrations that help break up the mucus so the patient can cough it up and spit it out. Additionally, a small amount of positive end-expiratory pressure (PEEP) is created in the airways that helps to keep them open so that more air can be exhaled.
Visit NHS University Hospitals Plymouth Physiotherapy's "Acapella" video on YouTube to review using a flutter valve device[18]

