22.2 Basic Concepts Related to Suctioning
Open Resources for Nursing (Open RN)
Respiratory System Anatomy
It is important for the nurse to have an understanding of the underlying structures of the respiratory system before performing suctioning to ensure that care is given to protect sensitive tissues and that airways are appropriately assessed during the suctioning procedure. See Figure 22.1[1] for an illustration of the anatomy of the respiratory system.
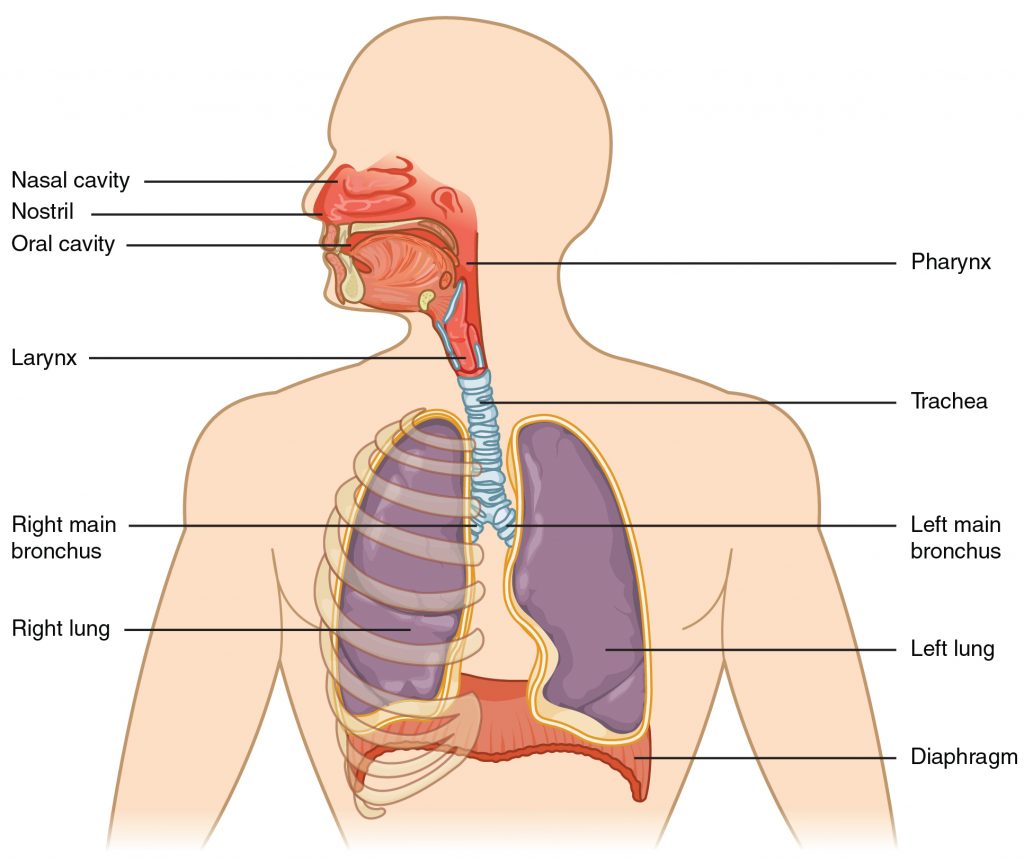
Maintaining a patent airway is a top priority and one of the “ABCs” of patient care (i.e., Airway, Breathing, and Circulation). Suctioning is often required in acute-care settings for patients who cannot maintain their own airway due to a variety of medical conditions such as respiratory failure, stroke, unconsciousness, or postoperative care. The suctioning procedure is useful for removing mucus that may obstruct the airway and compromise the patient’s breathing ability.
To read more details about the respiratory system, see the “Respiratory Assessment” chapter.
Respiratory Failure and Respiratory Arrest
Respiratory failure and respiratory arrest often require emergency suctioning. Respiratory failure is a life-threatening condition that is caused when the respiratory system cannot get enough oxygen from the lungs into the blood to oxygenate the tissues, or there are high levels of carbon dioxide in the blood that the body cannot effectively eliminate via the lungs. Acute respiratory failure can happen quickly without much warning. It is often caused by a disease or injury that affects breathing, such as pneumonia, opioid overdose, stroke, or a lung or spinal cord injury. Acute respiratory failure requires emergency treatment. Untreated respiratory failure can lead to respiratory arrest.
Signs and symptoms of respiratory failure include shortness of breath (dyspnea), rapid breathing (tachypnea), rapid heart rate (tachycardia), unusual sweating (diaphoresis), decreasing pulse oximetry readings below 90%, and air hunger (a feeling as if you can’t breathe in enough air). In severe cases, signs and symptoms may include cyanosis (a bluish color of the skin, lips, and fingernails), confusion, and sleepiness.
The main goal of treating respiratory failure is to ensure that sufficient oxygen reaches the lungs and is transported to the other organs while carbon dioxide is cleared from the body.[2] Treatment measures may include suctioning to clear the airway while also providing supplemental oxygen using various oxygenation devices. Severe respiratory distress may require intubation and mechanical ventilation, or the emergency placement of a tracheostomy may be performed if the airway is obstructed. For additional details about oxygenation and various oxygenation devices, go to the “Oxygen Therapy” chapter.
Tracheostomy
A tracheostomy is a surgically-created opening called a stoma that goes from the front of the patient’s neck into the trachea. A tracheostomy tube is placed through the stoma and directly into the trachea to maintain an open (patent) airway. See Figure 22.2[3]for an illustration of a patient with a tracheostomy tube in place.
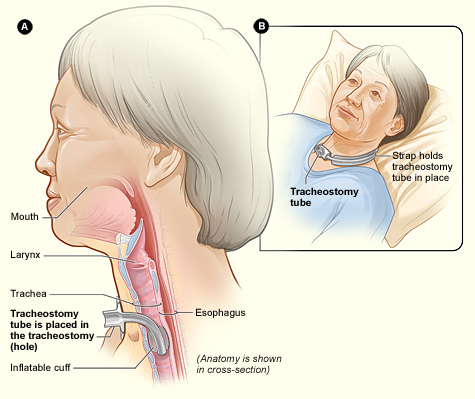
Placement of a tracheostomy tube may be performed emergently or as a planned procedure due to the following:
- A large object blocking the airway
- Respiratory failure or arrest
- Severe neck or mouth injuries
- A swollen or blocked airway due to inhalation of harmful material such as smoke, steam, or other toxic gases
- Cancer of the throat or neck, which can affect breathing by pressing on the airway
- Paralysis of the muscles that affect swallowing
- Surgery around the larynx that prevents normal breathing and swallowing
- Long-term oxygen therapy via a mechanical ventilator[4]
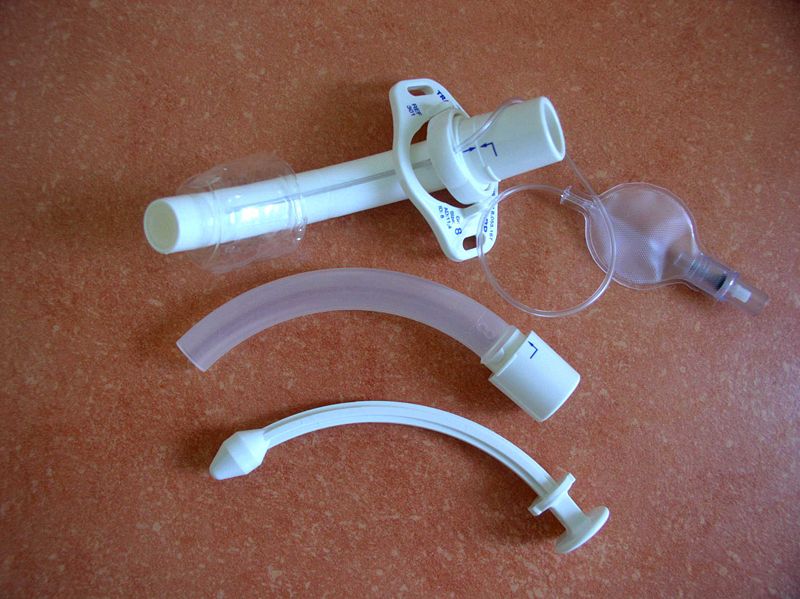
See Figure 22.3[5] for an image of the parts of a tracheostomy tube. The outside end of the outer cannula has a flange that is placed against the patient’s neck. The flange is secured around the patient’s neck with tie straps, and a split 4″ x 4″ tracheostomy dressing is placed under the flange to absorb secretions. A cuff is typically present on the distal end of the outer cannula to make a tight seal in the airway. (See the top image in Figure 22.3.) The cuff is inflated and deflated with a syringe attached to the pilot balloon. Most tracheostomy tubes have a hollow inner cannula inside the outer cannula that is either disposable or removed for cleaning as part of the tracheostomy care procedure. (See the middle image of Figure 22.3.) A solid obturator is used during the initial tracheostomy insertion procedure to help guide the outer cannula through the tracheostomy and into the airway. (See the bottom image of Figure 22.3.) It is removed after insertion and the inner cannula is slid into place.
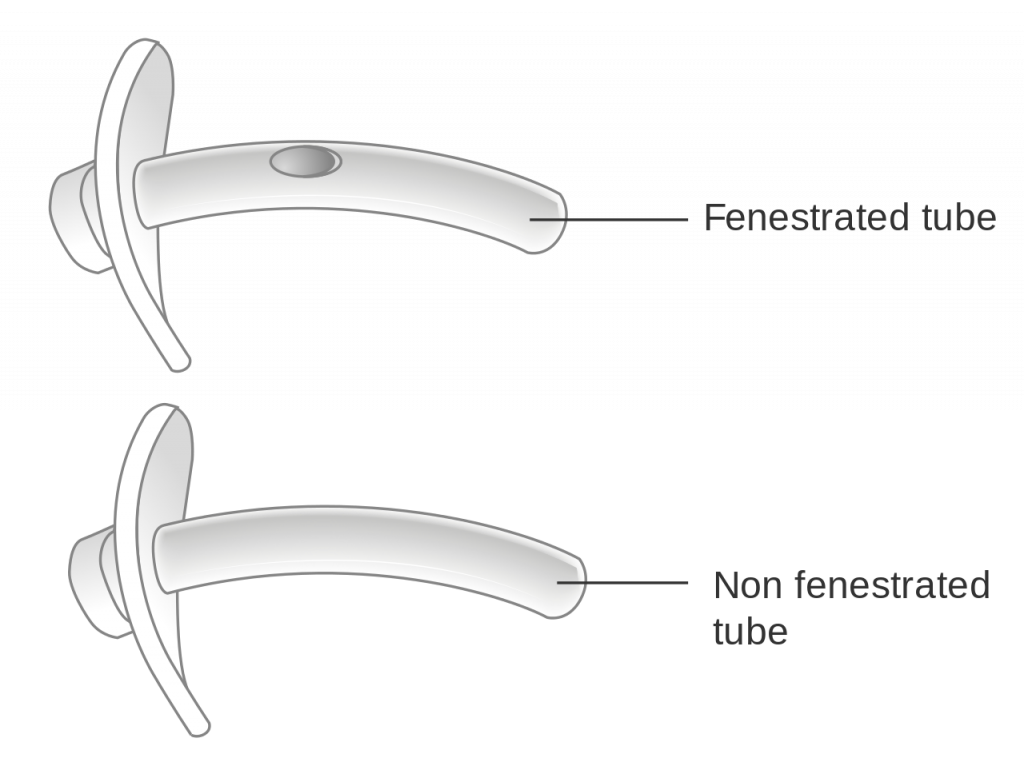
When a tracheostomy is placed, the provider determines if a fenestrated or unfenestrated outer cannula is needed based on the patient’s condition. A fenestrated tube is used for patients who can speak with their tracheostomy tube in place. Under the guidance of a speech pathologist and respiratory therapist, the inner cannula is eventually removed from a fenestrated tube and the cuff deflated so the patient is able to speak. Otherwise, a patient with a tracheostomy tube is unable to speak because there is no airflow over the vocal cords, and alternative communication measures, such as a whiteboard, pen and paper, or computer device with note-taking ability, must be put into place by the nurse. Suctioning should never be performed through a fenestrated tube without first inserting a nonfenestrated inner cannula, or severe tracheal damage can occur. See Figure 22.4[6] for images of a fenestrated and nonfenestrated outer cannula.
Caring for a patient with a tracheostomy tube includes providing routine tracheostomy care and suctioning. Tracheostomy care is a procedure performed routinely to keep the flange, tracheostomy dressing, ties or straps, and surrounding area clean to reduce the introduction of bacteria into the trachea and lungs. The inner cannula becomes occluded with secretions and must be cleaned or replaced frequently according to agency policy to maintain an open airway. Suctioning through the tracheostomy tube is also performed to remove mucus and to maintain a patent airway.
- “2301 Major Respiratory Organs.jpg” by OpenStax is licensed under CC BY 3.0 ↵
- National Heart, Lung, and Blood Institute. (n.d.). Respiratory failure. https://www.nhlbi.nih.gov/health-topics/respiratory-failure ↵
- “Tracheostomy NIH.jpg” by National Heart Lung and Blood Institute is in the Public Domain ↵
- A.D.A.M. Medical Encyclopedia [Internet]. Atlanta (GA): A.D.A.M., Inc.; c1997-2020. Nail abnormalities; [updated 2020, June 2] https://medlineplus.gov/ency/article/002955.htm ↵
- “Tracheostomy tube.jpg” by Kaluse D Peter, Wiehl, Germany is licensed under CC BY 2.0 DE ↵
- “Diagram showing a fenestrated and a non fenestrated tracheostomy tube CRUK 066.svg” by Cancer Research UK is licensed under CC BY-SA 4.0. ↵
Drain management systems are commonly used during post-operative surgical management to remove drainage, prevent infection, and enhance wound healing. A drain may be superficial in the skin or deep in an organ, duct, or cavity, such as a hematoma. A patient may have several drains depending on the extent and type of surgery. A closed system uses a vacuum system to withdraw fluids and collect them in a reservoir. Closed systems must be emptied and drainage measured routinely according to agency policy.
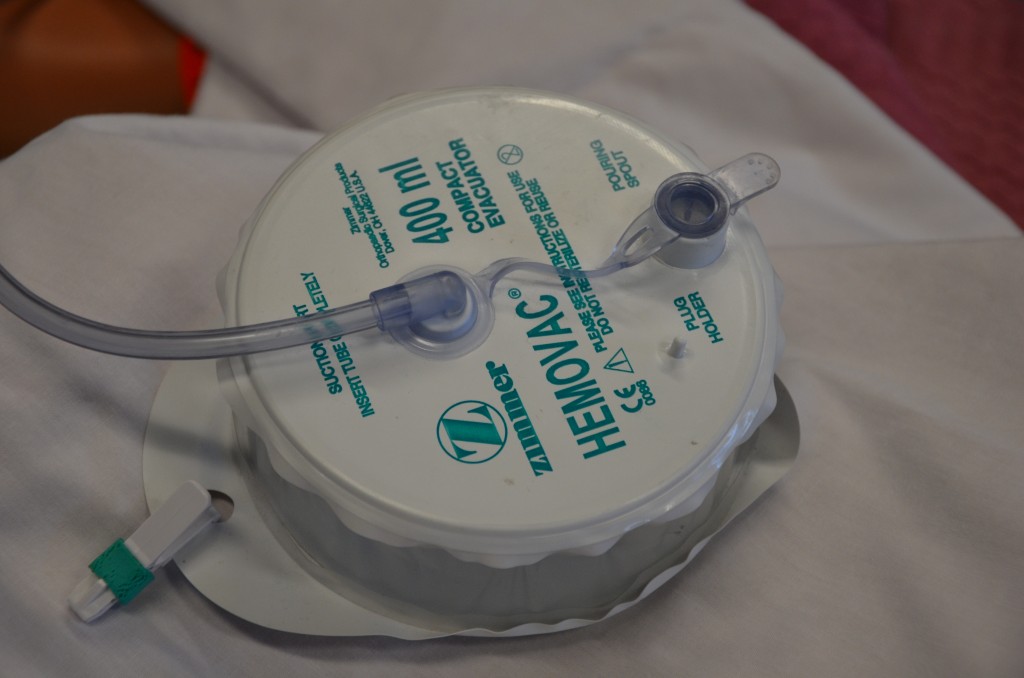
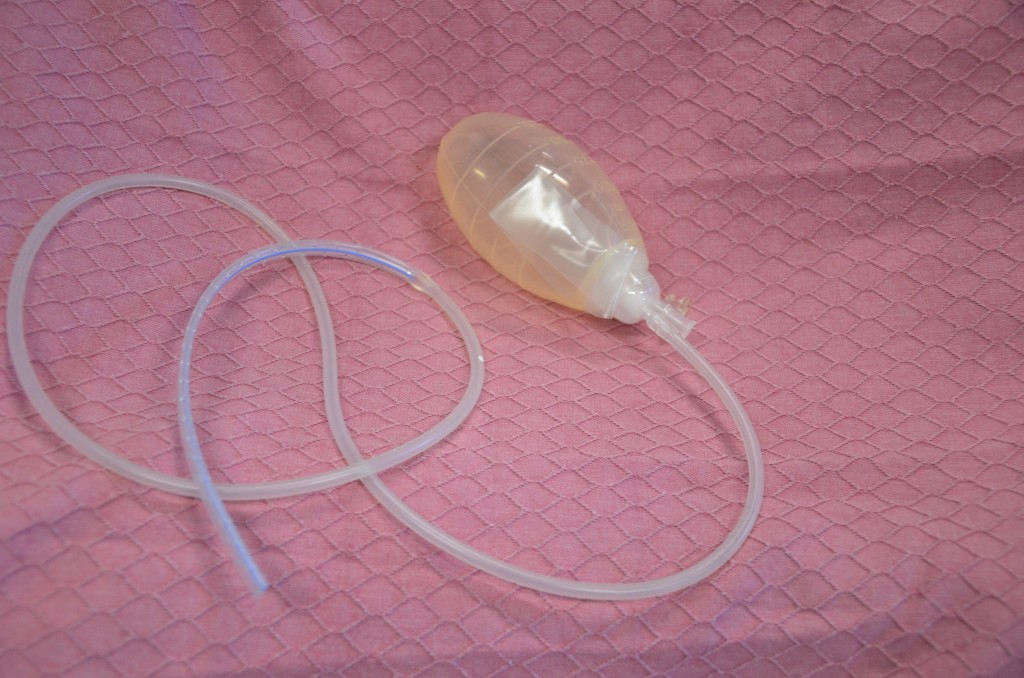
Drainage tubes contain perforations to allow fluid to drain from the surgical wound site. The drainage is collected in a closed sterile collection system/reservoir, such as a Hemovac or Jackson-Pratt. The amount of drainage varies depending on location and type of surgery. A Hemovac drain (see Figure 20.38[1]) can hold up to 500 mL of drainage. A Jackson-Pratt (JP) drain (see Figure 20.39[2]) is used for smaller amounts of drainage, usually ranging from 25 to 50 mL. Drains are usually sutured to the skin to prevent accidental removal, and the drainage site is covered with a sterile dressing. The site and drain should be checked periodically throughout the shift to ensure the drain is functioning effectively and that no leaking is occurring.
Checklist for Drain Management
Use the checklist below to review the steps for completion of “Drain Management."
Steps
Disclaimer: Always review and follow agency policy regarding this specific skill.
- Gather supplies: drainage measurement container, nonsterile gloves, waterproof pad, and alcohol swab.
- Perform safety steps:
- Perform hand hygiene.
- Check the room for transmission-based precautions.
- Introduce yourself, your role, the purpose of your visit, and an estimate of the time it will take.
- Confirm patient ID using two patient identifiers (e.g., name and date of birth).
- Explain the process to the patient and ask if they have any questions.
- Be organized and systematic.
- Use appropriate listening and questioning skills.
- Listen and attend to patient cues.
- Ensure the patient’s privacy and dignity.
- Assess ABCs.
- Apply nonsterile gloves and goggles or face shield according to agency policy to reduce the transmission of microorganisms and protect against an accidental body fluid exposure.
- Maintaining a sterile technique, remove the plug from the pouring spout as indicated on the drain:
- Open the plug pointing away from your face to avoid an accidental splash of contaminated fluid.
- Maintain the plug’s sterility.
- Notice that the vacuum will be broken and the reservoir (drainage collection system) will expand.
- Gently tilt the opening of the reservoir toward the measuring container and pour out the drainage away from you to prevent exposure to body fluids. Do not touch the measuring container with the reservoir opening.
- Place the drainage container on the bed or hard surface, tilt it away from your face, and compress the drain to flatten it with one hand to remove all the air before closing the spout to establish the vacuum system.
- Cleanse the plug with the alcohol swab per agency policy. Maintaining sterility, place the plug back into the pour spout of the drainage system to establish the vacuum system of the drainage system.
- Secure the device onto the patient's gown using a safety pin; check patency and placement of tube. Ensure that enough slack is present in tubing and that the reservoir hangs lower than the wound. Proper placement of the reservoir allows gravity to facilitate wound drainage. Providing enough slack to accommodate patient movement prevents tension of the drainage system and pulling on the tubing and insertion site.
- Note the characteristics of the drainage: color, consistency, odor, and amount. Drainage counts as patient fluid output and must be documented on the patient chart per agency policy.
- Monitor and empty drains frequently in the post-operative period to reduce the weight of the reservoir and to assess drainage.
- Remove gloves and perform hand hygiene.
- Assist the patient to a comfortable position, ask if they have any questions, and thank them for their time.
- Ensure safety measures when leaving the room:
- CALL LIGHT: Within reach
- BED: Low and locked (in lowest position and brakes on)
- SIDE RAILS: Secured
- TABLE: Within reach
- ROOM: Risk-free for falls (scan room and clear any obstacles)
- Document the procedure and assessment findings according to agency policy. Report any unusual findings or concerns to the health care provider. If the amount of drainage increases or changes, notify the appropriate health care provider according to agency policy.
- If the amount of drainage significantly decreases, the drain may be ready to be assessed and removed.
- Notify required health care provider if the wound appears infected.
- Record the number of drains if there is more than one, and record each one separately.
Before discussing specific procedures related to facilitating bowel and bladder function, let’s review basic concepts related to urinary and bowel elimination. When facilitating alternative methods of elimination, it is important to understand the anatomy and physiology of the gastrointestinal and urinary systems, as well as the adverse effects of various conditions and medications on elimination. Use the hyperlinks below to review information about these topics.
For more information about the anatomy and physiology of the gastrointestinal system and medications used to treat diarrhea and constipation, visit the "Gastrointestinal" chapter of the Open RN Nursing Pharmacology textbook.
For more information about the anatomy and physiology of the kidneys and diuretic medications used to treat fluid overload, visit the "Cardiovascular and Renal System" chapter in Open RN Nursing Pharmacology textbook.
For more information about applying the nursing process to facilitate elimination, visit the "Elimination" chapter in Open RN Nursing Fundamentals.
Urinary Elimination Devices
This section will focus on the devices used to facilitate urinary elimination. Urinary catheterization is the insertion of a catheter tube into the urethral opening and placing it in the neck of the urinary bladder to drain urine. There are several types of urinary elimination devices, such as indwelling catheters, intermittent catheters, suprapubic catheters, and external devices. Each of these types of devices is described in the following subsections.
Indwelling Catheter
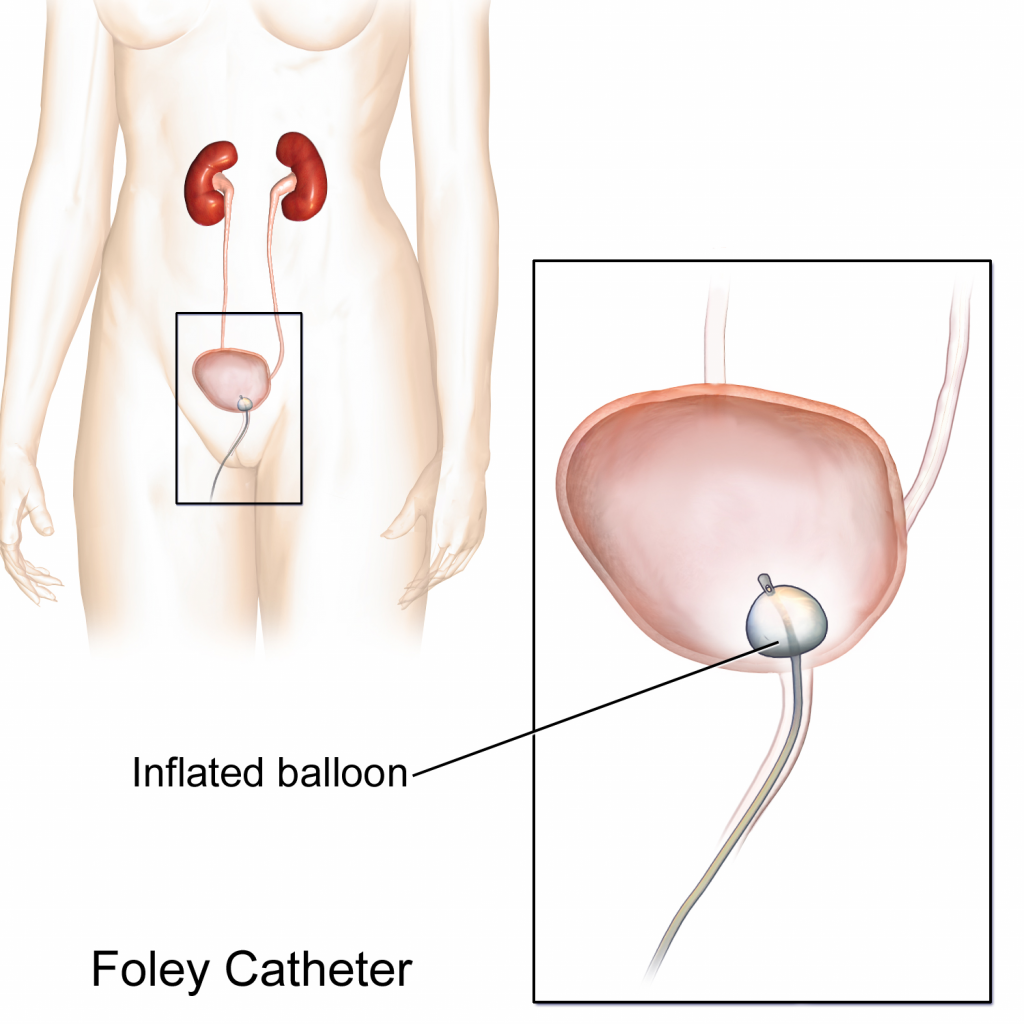
An indwelling catheter, often referred to as a “Foley catheter,” refers to a urinary catheter that remains in place after insertion into the bladder for the continual collection of urine. It has a balloon on the insertion tip to maintain placement in the neck of the bladder. The other end of the catheter is attached to a drainage bag for the collection of urine. See Figure 21.1[3] for an illustration of the anatomical placement of an indwelling catheter in the bladder neck.
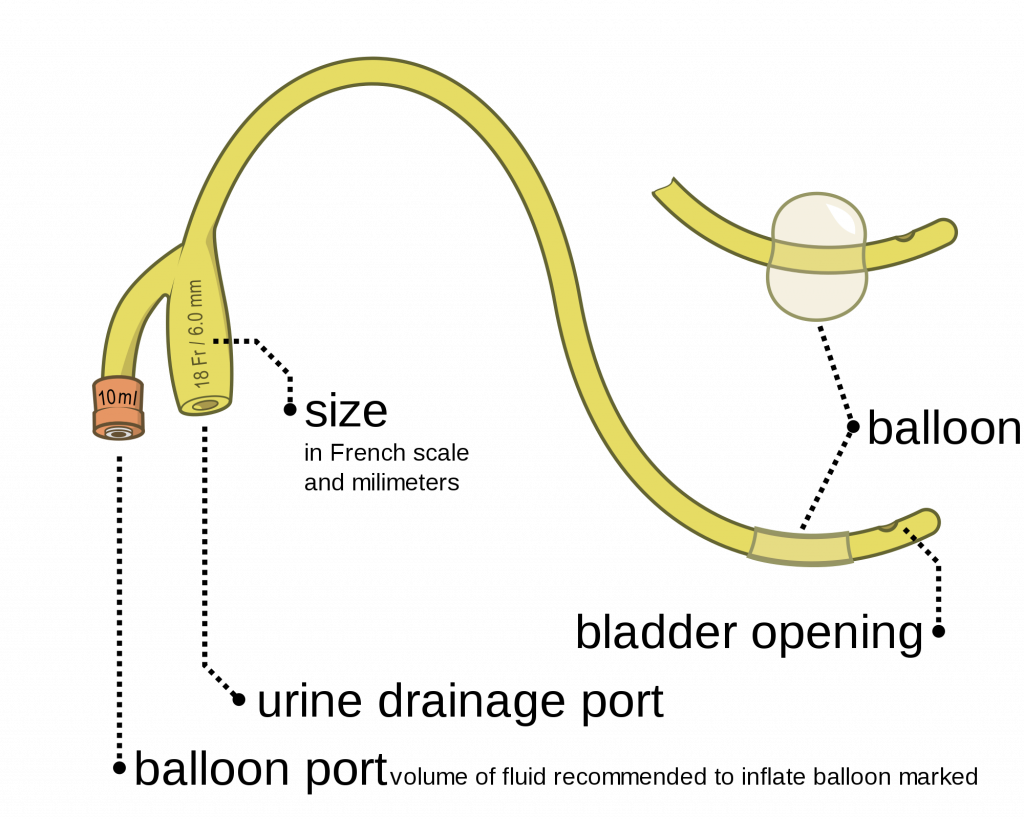
The distal end of an indwelling catheter has a urine drainage port that is connected to a drainage bag. The size of the catheter is marked at this end using the French catheter scale. A balloon port is also located at this end, where a syringe is inserted to inflate the balloon after it is inserted into the bladder. The balloon port is marked with the amount of fluid required to fill the balloon. See Figure 21.2[4] for an image of the parts of an indwelling catheter.
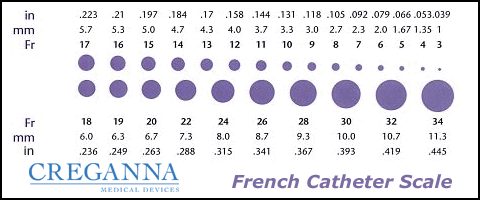
Catheters have different sizes, with the larger the number indicating a larger diameter of the catheter. See Figure 21.3[5] for an image of the French Catheter Scale.
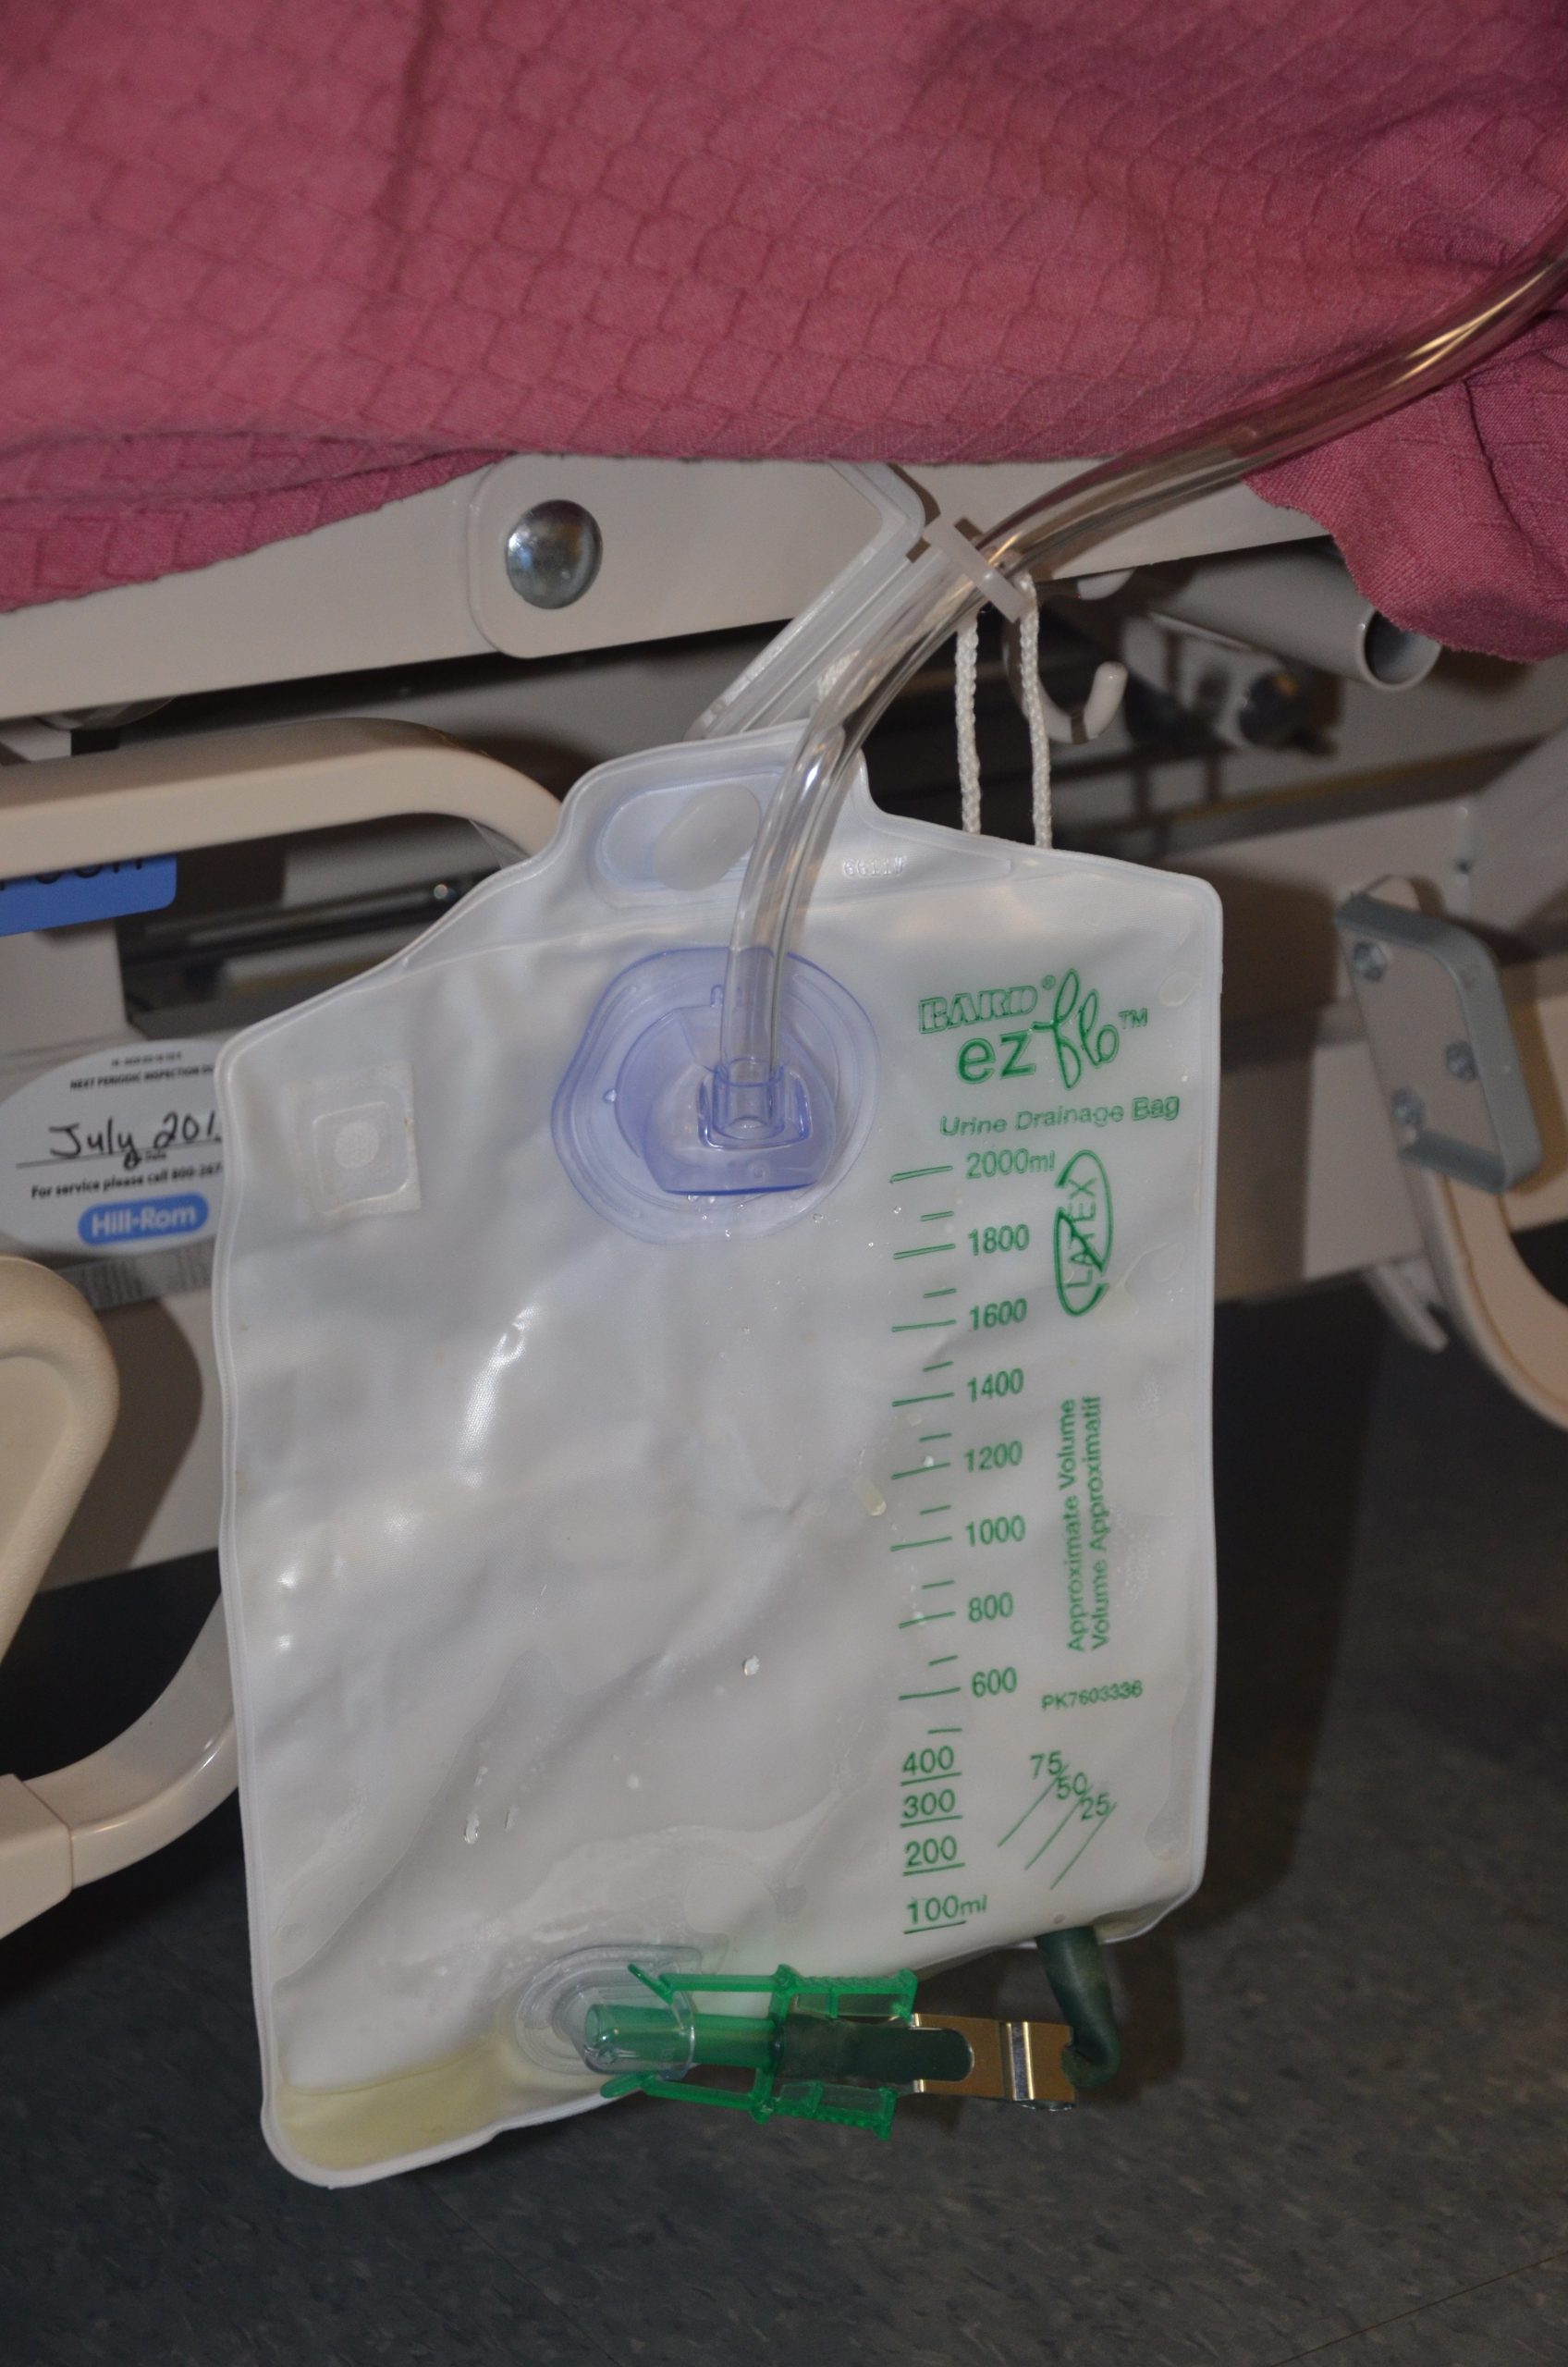
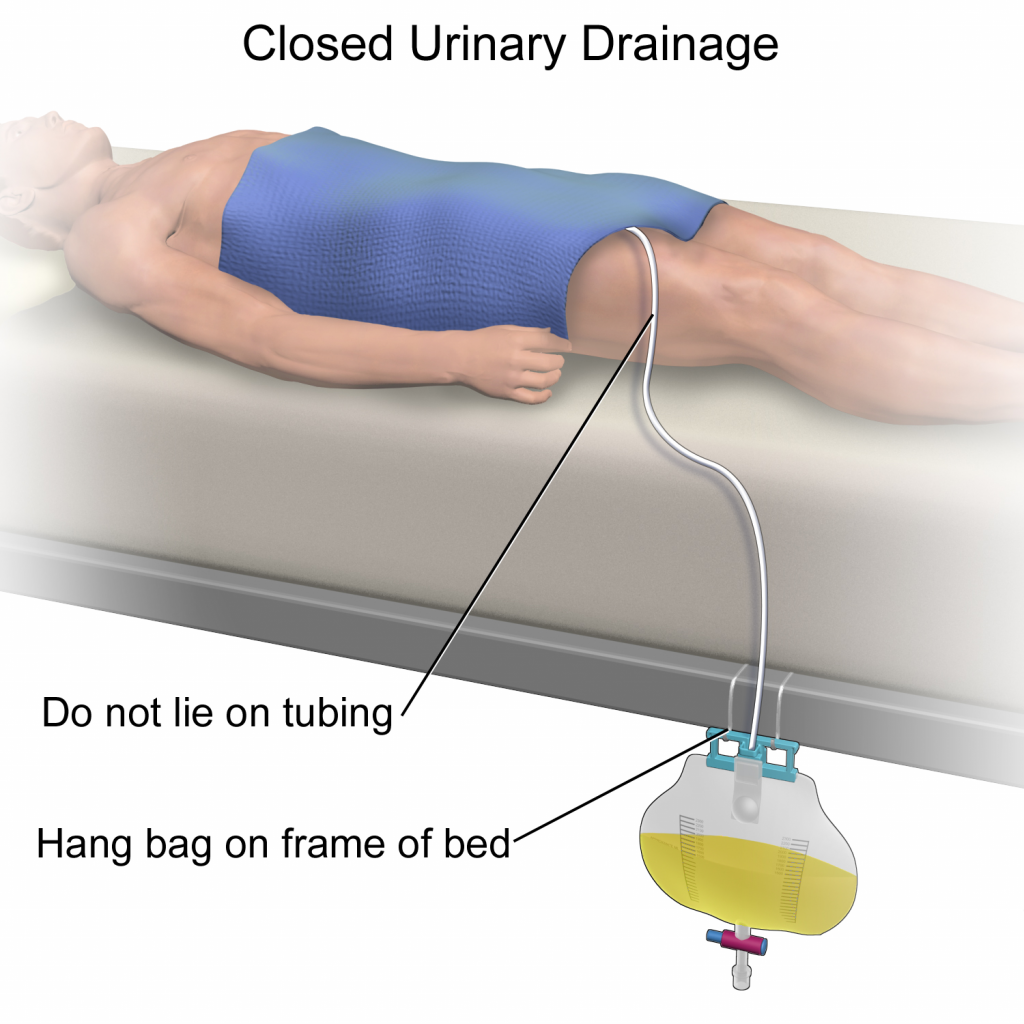
There are two common types of bags that may be attached to an indwelling catheter. During inpatient or long-term care, larger collection bags that can hold up to 2 liters of fluid are used. See Figure 21.4[6] for an image of a typical collection bag attached to an indwelling catheter. These bags should be emptied when they are half to two-thirds full to prevent traction on the urethra from the bag. Additionally, the collection bag should always be placed below the level of the patient’s bladder so that urine flows out of the bladder and urine does not inadvertently flow back into the bladder. Ensure the tubing is not coiled, kinked, or compressed so that urine can flow unobstructed into the bag. Slack should be maintained in the tubing to prevent injury to the patient's urethra. To prevent the development of a urinary tract infection, the bag should not be permitted to touch the floor.
See Figure 21.5[7] for an illustration of the placement of the urine collection bag when the patient is lying in bed.
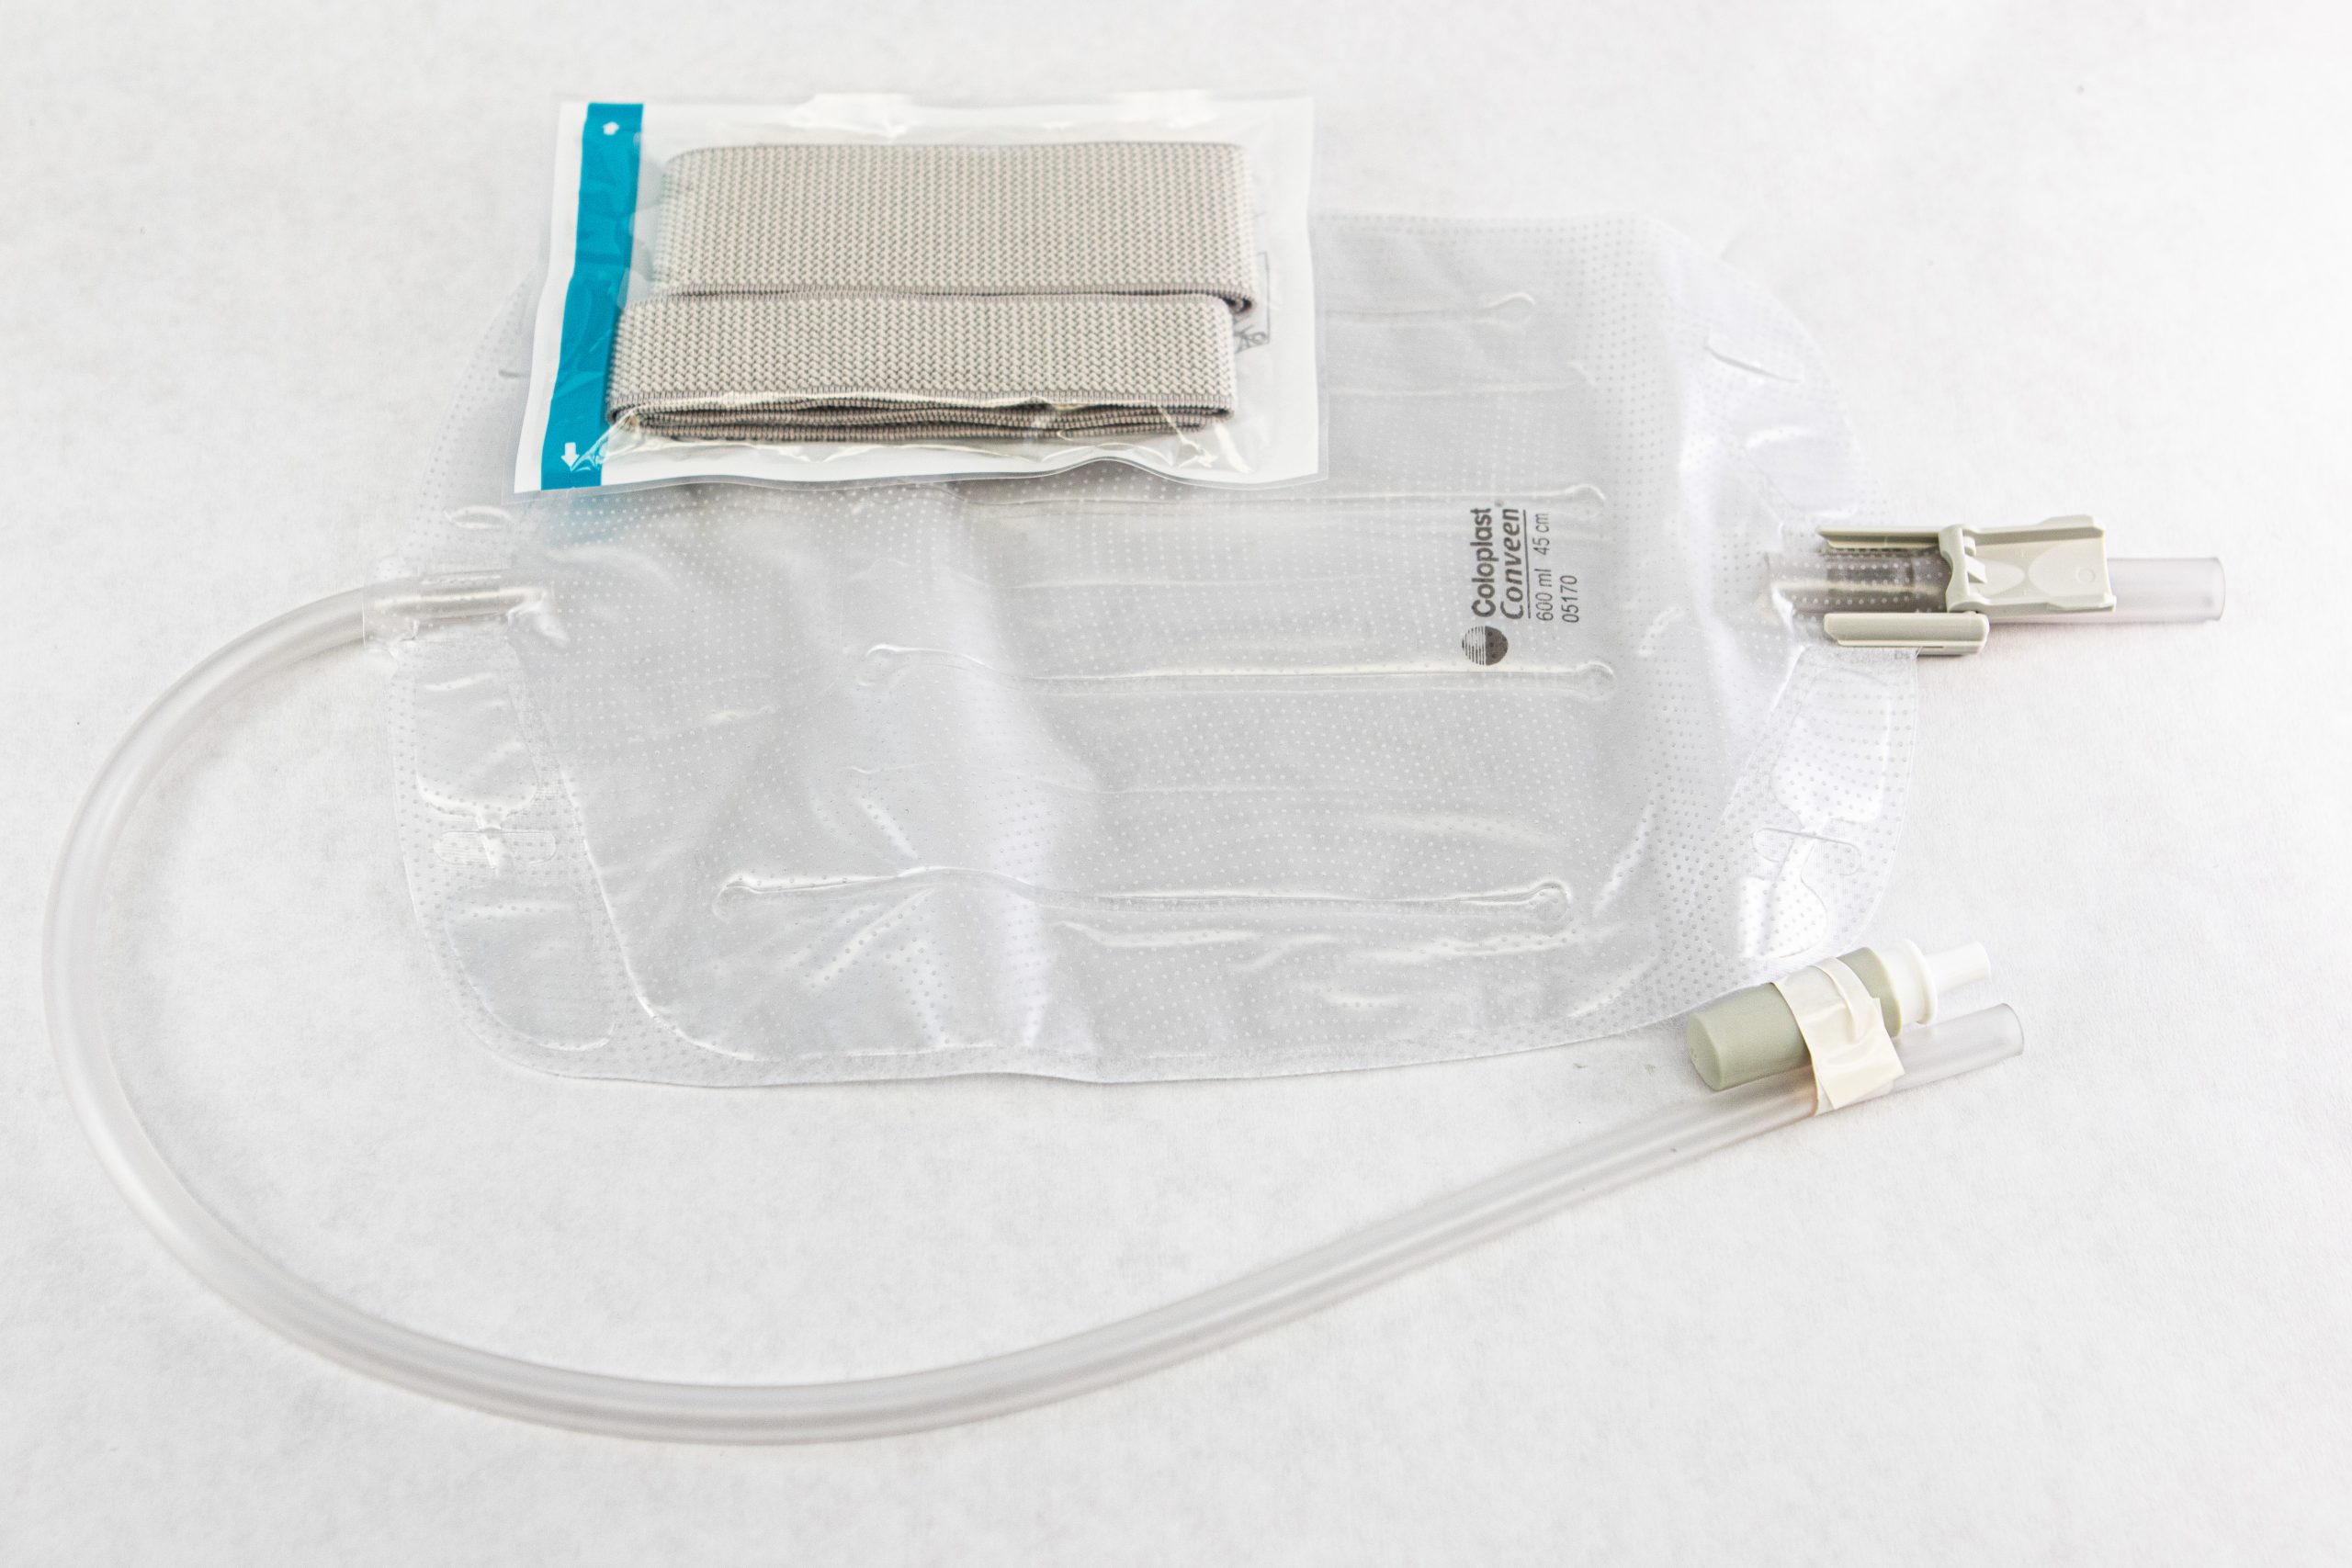
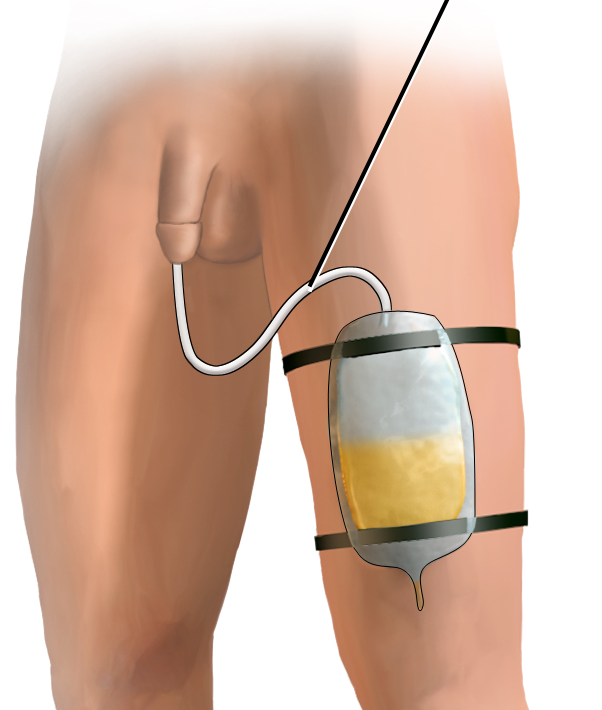
A second type of urine collection bag is a leg bag. Leg bags provide discretion when the patient is in public because they can be worn under clothing. However, leg bags are small and must be emptied more frequently than those used during inpatient care. Figure 21.6[8] for an image of leg bag and Figure 21.7[9] for an illustration of an indwelling catheter attached to a leg bag.
Straight Catheter
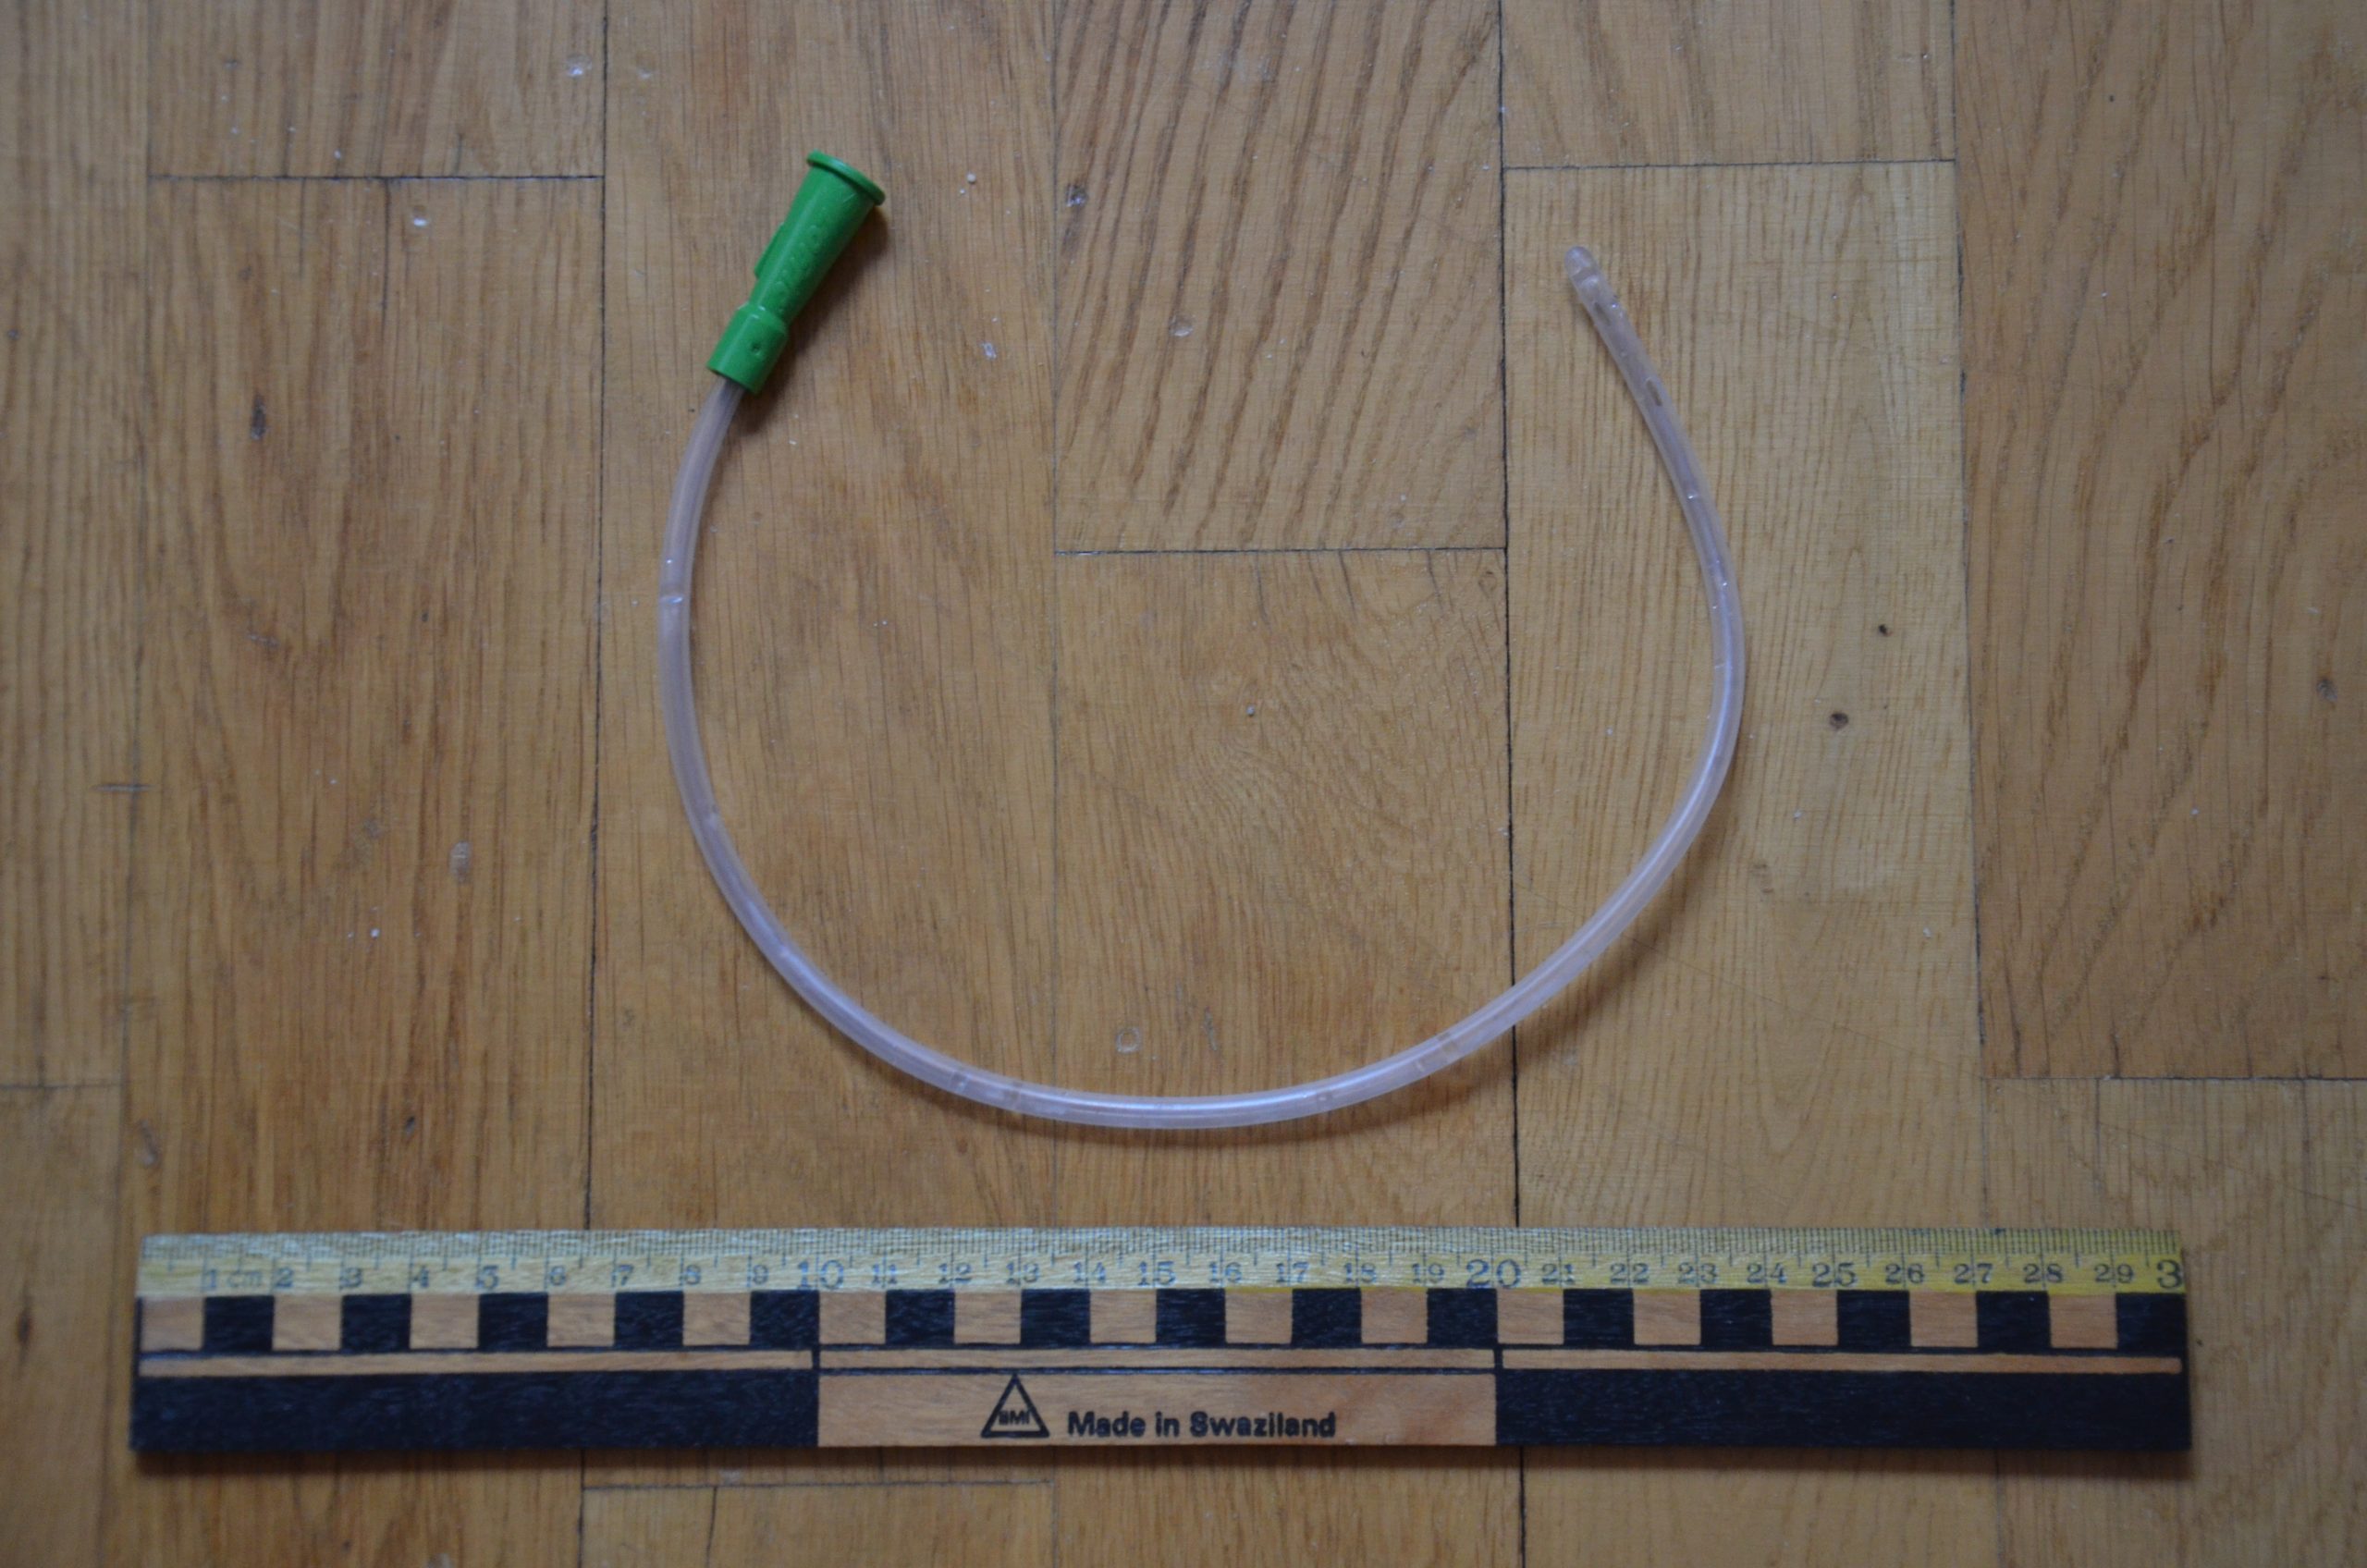
A straight catheter is used for intermittent urinary catheterization. The catheter is inserted to allow for the flow of urine and then immediately removed, so a balloon is not required at the insertion tip. See Figure 21.8[10] for an image of a straight catheter. Intermittent catheterization is used for the relief of urinary retention. It may be performed once, such as after surgery when a patient is experiencing urinary retention due to the effects of anesthesia, or performed several times a day to manage chronic urinary retention. Some patients may also independently perform self-catheterization at home to manage chronic urinary retention caused by various medical conditions. In some situations, a straight catheter is also used to obtain a sterile urine specimen for culture when a patient is unable to void into a sterile specimen cup. According to the Centers for Disease Control and Prevention (CDC), intermittent catheterization is preferred to indwelling urethral catheters whenever feasible because of decreased risk of developing a urinary tract infection.[11]
Other Types of Urinary Catheters
Coude Catheter Tip
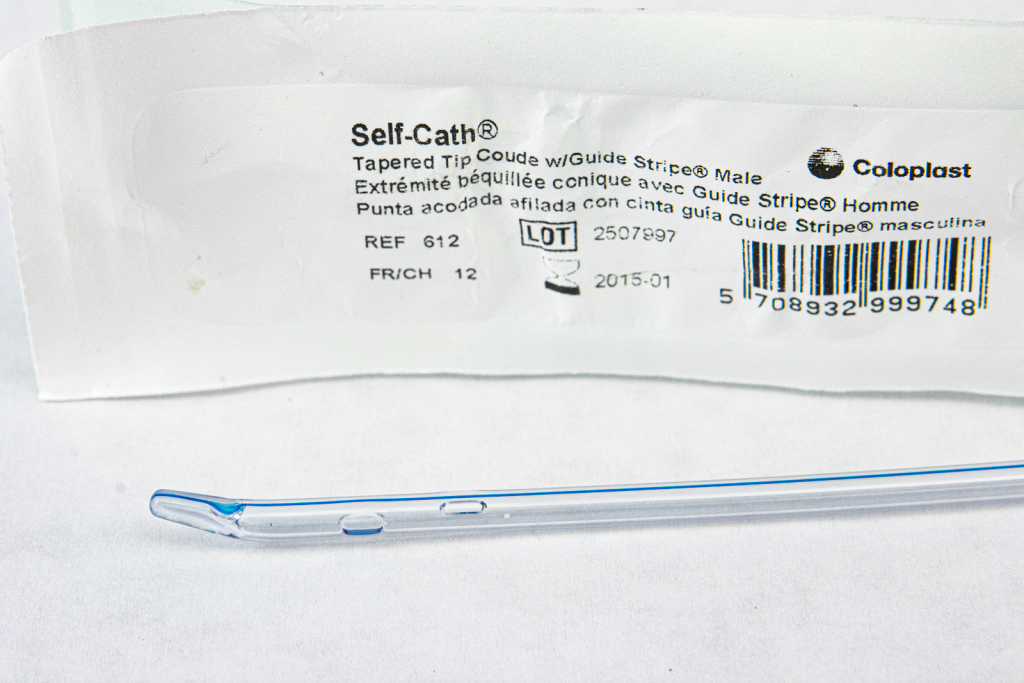
Coude catheter tips are curved to follow the natural curve of the urethra during catheterization. They are often used when catheterizing male patients with enlarged prostate glands. See Figure 21.9[12] for an example of a urinary catheter with a coude tip. During insertion, the tip of the Coude catheter must be pointed anteriorly or it can cause damage the urethra. A thin line embedded in the catheter provides information regarding orientation during the procedure; maintain the line upwards to keep it pointed anteriorly.
Irrigation Catheter
Irrigation catheters are typically used after prostate surgery to flush the surgical area. These catheters are larger in size to allow for larger amounts of fluid to flush. See Figure 21.10[13] for an image comparing a larger 20 French catheter (typically used for irrigation) to a 14 French catheter (typically used for indwelling catheters).

Suprapubic Catheters
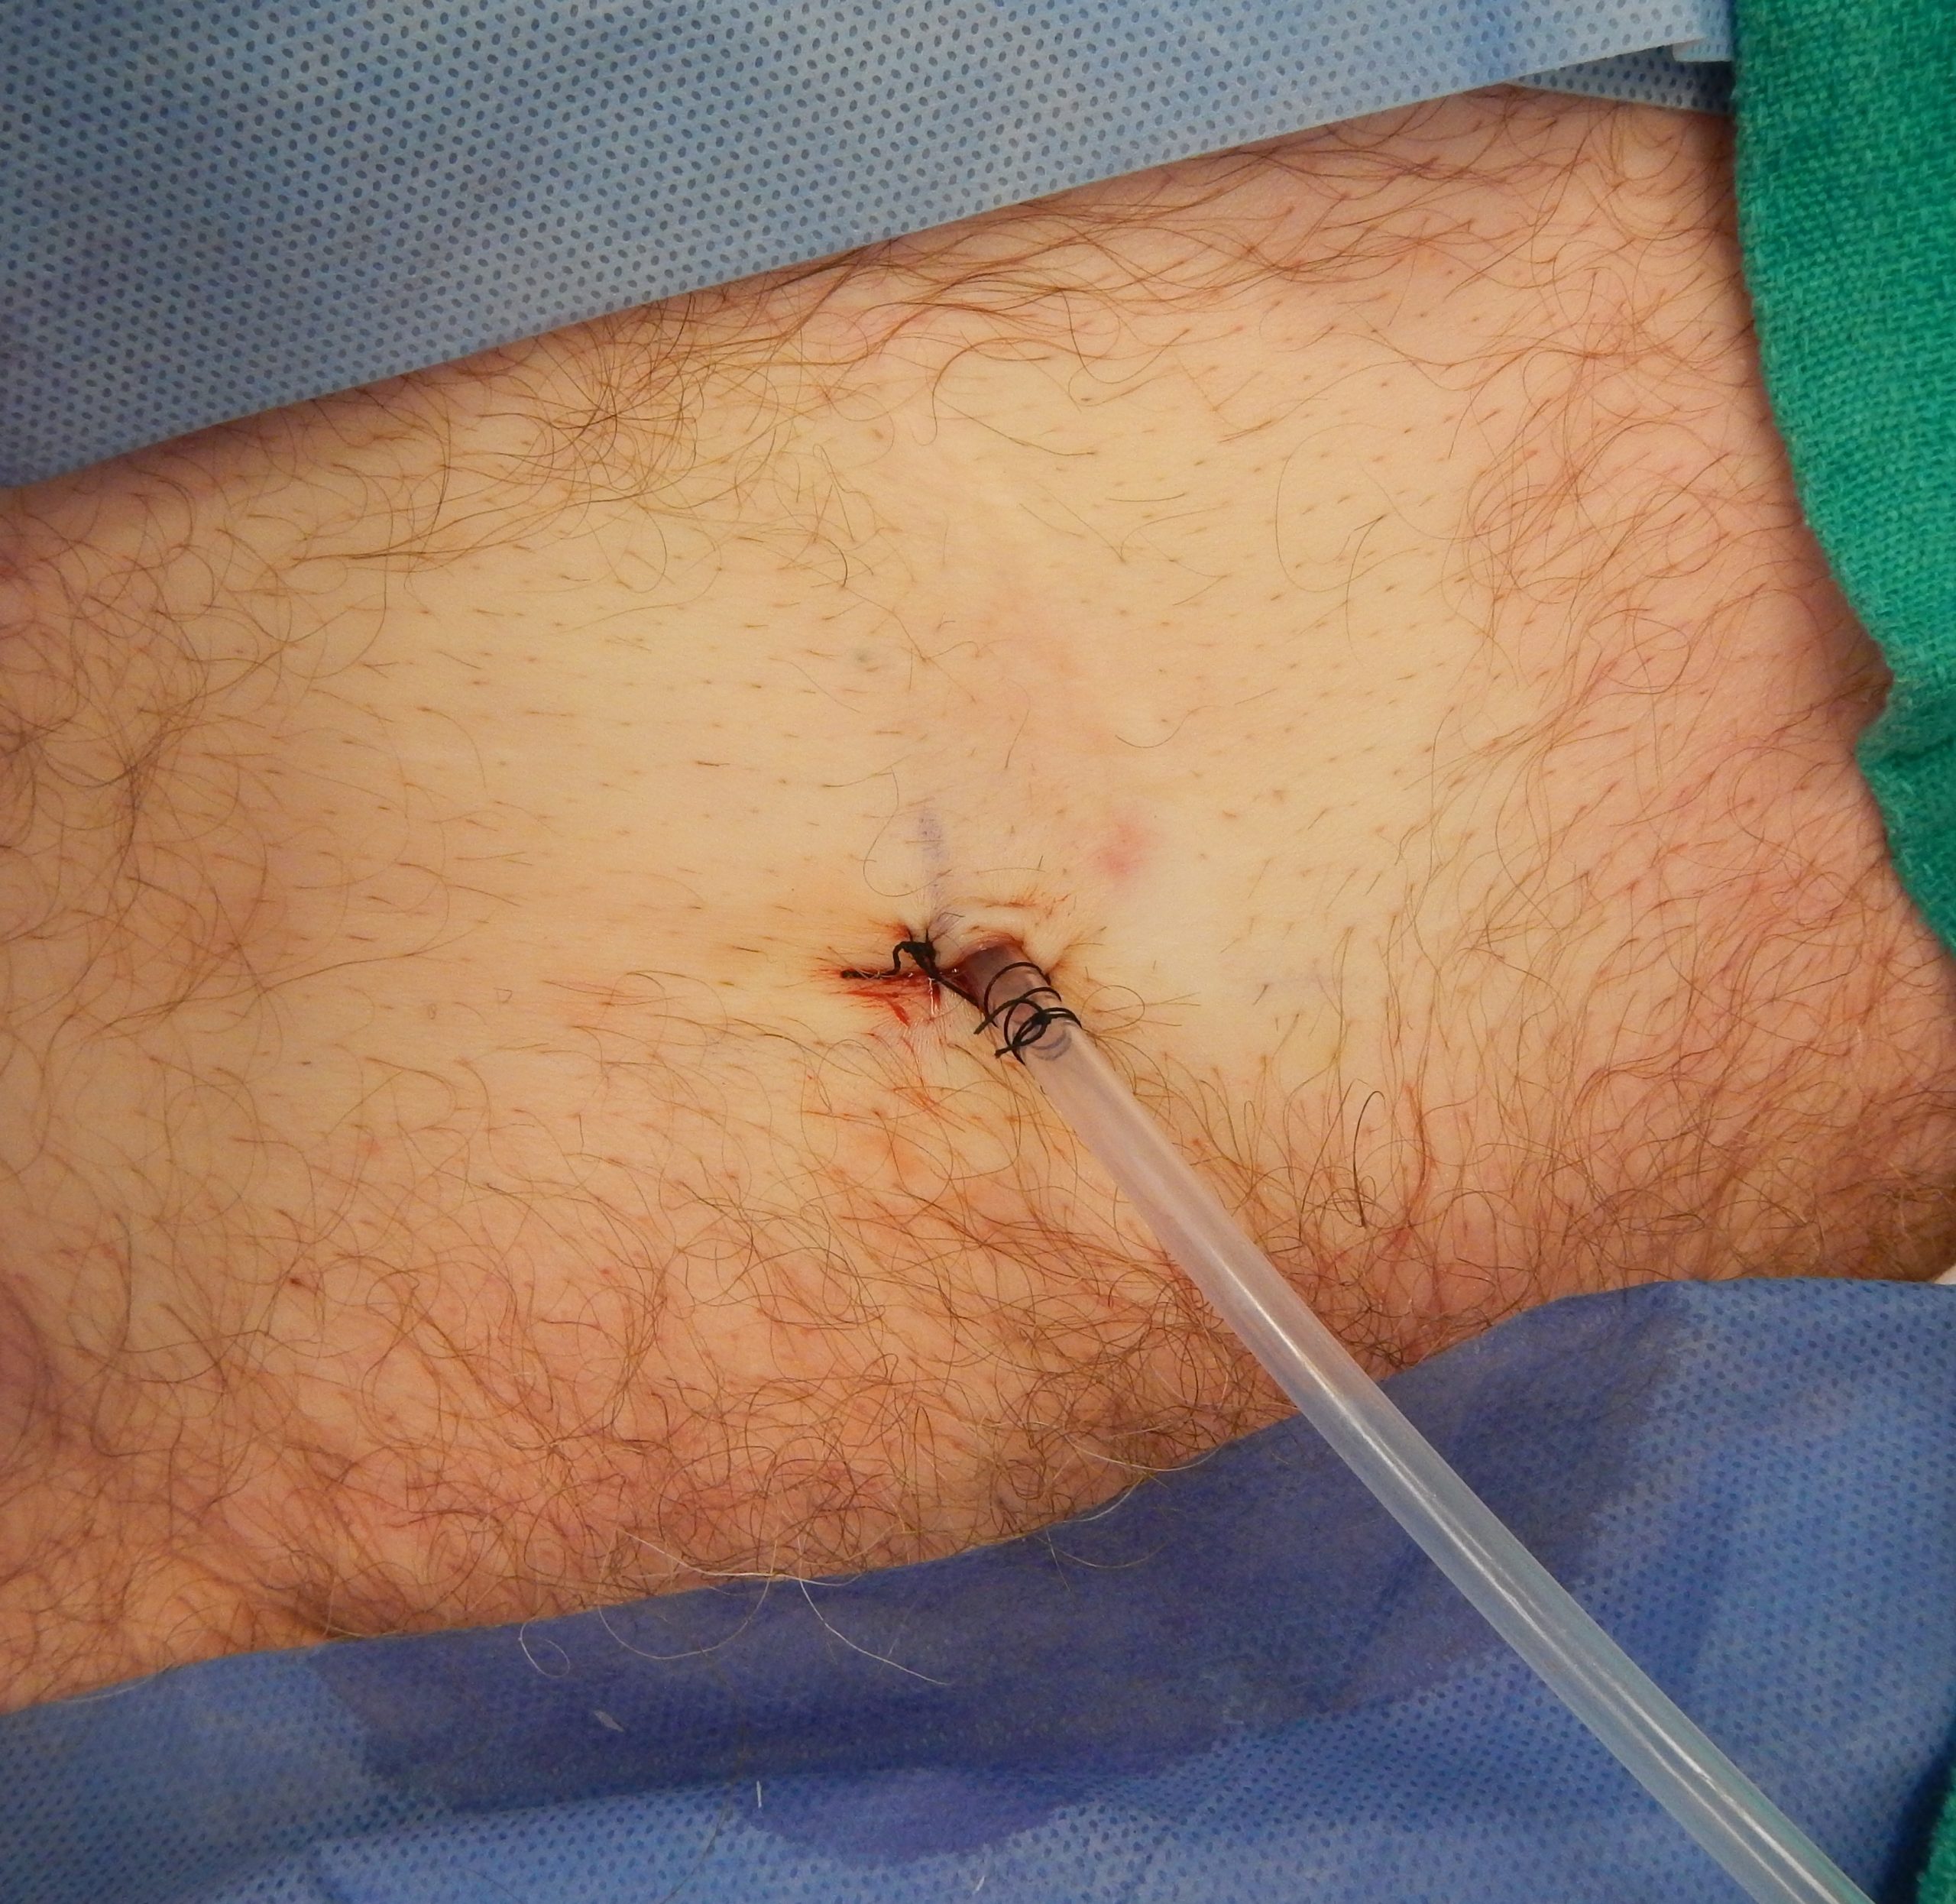
Suprapubic catheters are surgically inserted through the abdominal wall into the bladder. This type of catheter is typically inserted when there is a blockage within the urethra that does not allow the use of a straight or indwelling catheter. Suprapubic catheters may be used for a short period of time for acute medical conditions or may be used permanently for chronic conditions. See Figure 21.11[14] for an image of a suprapubic catheter. The insertion site of a suprapubic catheter must be cleaned regularly according to agency policy with appropriate steps to prevent skin breakdown.
Male Condom Catheter
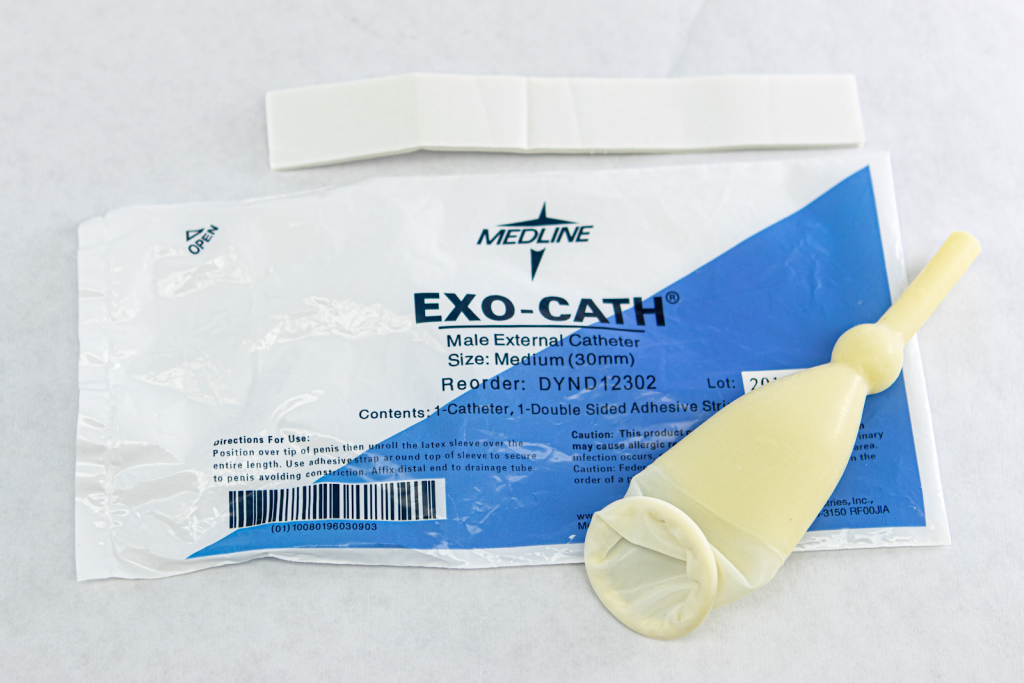
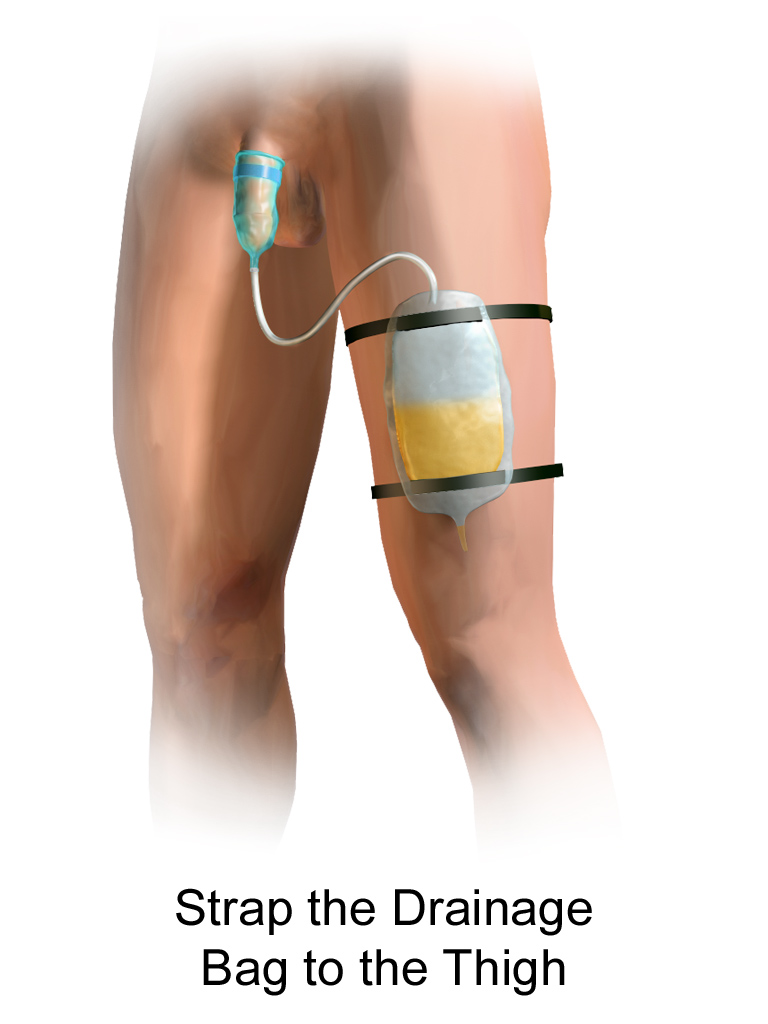
A condom catheter is a noninvasive device used for males with incontinence. It is placed over the penis and connected to a drainage bag. This device protects and promotes healing of the skin around the perineal area and inner legs and is used as an alternative to an indwelling urinary catheter. See Figure 21.12[15] for an image of a condom catheter and Figure 21.13[16] for an illustration of a condom catheter attached to a leg bag.
Female External Urinary Catheter
Female external urinary catheters (FEUC) have been recently introduced into practice to reduce the incidence of catheter-associated urinary tract infection (CAUTI) in women.[17] The external female catheter device is made of a purewick material that is placed externally over the female’s urinary meatus. The wicking material is attached to a tube that is hooked to a low-suction device. When the wick becomes saturated with urine, it is suctioned into a drainage canister. Preliminary studies have found that utilizing the FEUC device reduced the risk for CAUTI.[18],[19]
View these supplementary videos on female external urinary catheters:
Students demonstrate use of Purewick Female External Catheter[20]
How to use the use the PureWick - a female external catheter[21]
A catheter-associated urinary tract infection (CAUTI) is a common, life-threatening complication caused by indwelling urinary catheters. The development of a CAUTI is associated with patients’ increased length of stay in the hospital, resulting in additional hospital costs and a higher risk of death. It is estimated that 17% to 69% of CAUTI cases are preventable, meaning that up to 380,000 infections and 9,000 patient deaths per year related to CAUTI can be prevented with appropriate nursing measures.[22]
Nurses can save lives, prevent harm, and lower health care costs by following interventions outlined in the document created by the American Nurses Association titled Streamlined Evidence-Based RN Tool: Catheter Associated Urinary Tract Infection (CAUTI) Prevention. Review the entire tool in the hyperlink provided below. Key interventions include the following:
- Ensure the patient meets CDC-approved indications prior to inserting an indwelling catheter. If the patient does not meet the approved indications, contact the provider and advocate for an alternative method to facilitate elimination.
- According to the Centers for Disease Control and Prevention (CDC), appropriate indications for inserting an indwelling urinary catheter include the following[23]:
- Urinary retention or bladder outlet obstruction
- Hourly monitoring of urinary output in critically ill patients
- Perioperative use for selected surgeries
- Healing of open sacral and perineal wounds in patients with urinary incontinence
- Prolonged immobilization
- End-of-life care[24]
- Inappropriate reasons for inserting an indwelling urinary catheter include the following:
- Substitution of nursing care for a patient or resident with incontinence
- A means for obtaining a urine culture when a patient can voluntarily void
- Prolonged postoperative care without appropriate indications[25]
- According to the Centers for Disease Control and Prevention (CDC), appropriate indications for inserting an indwelling urinary catheter include the following[23]:
- After an indwelling urinary catheter is inserted, assess the patient daily to determine if the patient still meets the CDC criteria for an indwelling catheter and document the findings. If the patient no longer meets the approved criteria, follow agency policy for removal.
- When an indwelling catheter is in place, prevent CAUTI by following the maintenance steps outlined by the CDC.
- Continually monitor for signs of a CAUTI and report concerns to the health care provider.[26]
- Signs and symptoms of CAUTI to urgently report to the health care provider include fever greater than 38 degrees Celsius, change in mental status such as confusion or lethargy, chills, malodorous urine, and suprapubic or flank pain. Flank pain can be assessed by assisting the patient to a sitting or side-lying position and percussing the costovertebral areas.[27]
Streamlined Evidence-Based RN Tool: Catheter Associated Urinary Tract Infection (CAUTI) Prevention
A catheter-associated urinary tract infection (CAUTI) is a common, life-threatening complication caused by indwelling urinary catheters. The development of a CAUTI is associated with patients’ increased length of stay in the hospital, resulting in additional hospital costs and a higher risk of death. It is estimated that 17% to 69% of CAUTI cases are preventable, meaning that up to 380,000 infections and 9,000 patient deaths per year related to CAUTI can be prevented with appropriate nursing measures.[29]
Nurses can save lives, prevent harm, and lower health care costs by following interventions outlined in the document created by the American Nurses Association titled Streamlined Evidence-Based RN Tool: Catheter Associated Urinary Tract Infection (CAUTI) Prevention. Review the entire tool in the hyperlink provided below. Key interventions include the following:
- Ensure the patient meets CDC-approved indications prior to inserting an indwelling catheter. If the patient does not meet the approved indications, contact the provider and advocate for an alternative method to facilitate elimination.
- According to the Centers for Disease Control and Prevention (CDC), appropriate indications for inserting an indwelling urinary catheter include the following[30]:
- Urinary retention or bladder outlet obstruction
- Hourly monitoring of urinary output in critically ill patients
- Perioperative use for selected surgeries
- Healing of open sacral and perineal wounds in patients with urinary incontinence
- Prolonged immobilization
- End-of-life care[31]
- Inappropriate reasons for inserting an indwelling urinary catheter include the following:
- Substitution of nursing care for a patient or resident with incontinence
- A means for obtaining a urine culture when a patient can voluntarily void
- Prolonged postoperative care without appropriate indications[32]
- According to the Centers for Disease Control and Prevention (CDC), appropriate indications for inserting an indwelling urinary catheter include the following[30]:
- After an indwelling urinary catheter is inserted, assess the patient daily to determine if the patient still meets the CDC criteria for an indwelling catheter and document the findings. If the patient no longer meets the approved criteria, follow agency policy for removal.
- When an indwelling catheter is in place, prevent CAUTI by following the maintenance steps outlined by the CDC.
- Continually monitor for signs of a CAUTI and report concerns to the health care provider.[33]
- Signs and symptoms of CAUTI to urgently report to the health care provider include fever greater than 38 degrees Celsius, change in mental status such as confusion or lethargy, chills, malodorous urine, and suprapubic or flank pain. Flank pain can be assessed by assisting the patient to a sitting or side-lying position and percussing the costovertebral areas.[34]
Streamlined Evidence-Based RN Tool: Catheter Associated Urinary Tract Infection (CAUTI) Prevention

