12.4 Gastrointestinal and Genitourinary Assessment
Open Resources for Nursing (Open RN)
The gastrointestinal (GI) system is responsible for the ingestion of food and the absorption of nutrients. Additionally, the GI and genitourinary (GU) systems are responsible for the elimination of waste products.[1] Therefore, during assessment of these systems, the nurse collects subjective and objective data regarding the underlying structures of the abdomen, as well as the normal functioning of the GI and GU systems.
Subjective Assessment
A focused gastrointestinal and genitourinary subjective assessment collects data about the signs and symptoms of GI and GU diseases, including any digestive or nutritional issues, relevant medical or family history of GI and GU disease, and any current treatment for related issues.[2] Table 12.3a outlines interview questions used to explore medical and surgical history, symptoms related to the gastrointestinal and genitourinary systems, and associated medications. Information gained from the interview process is used to tailor the subsequent physical assessment and create a plan for patient care and education.[3]
Table 12.3a Interview Questions for Subjective Assessment of GI and GU Systems
| Interview Questions | Follow-up |
|---|---|
| Have you ever been diagnosed with a gastrointestinal (GI), kidney, or bladder condition? |
Please describe the conditions and treatments. |
| Have you ever had abdominal surgery? | Please describe the surgery and if you experienced any complications. |
| Are you currently taking any medications, herbs, or supplements? | Please describe. |
| Do you have any abdominal pain? | Are there any associated symptoms with the pain such as fever, nausea, vomiting, or change in bowel pattern?
Are you having bloody stools (hematochezia); dark, tarry stools (melena); abdominal distention; or vomiting of blood (hematemesis)? When did the pain start to occur? (Onset) Where is the pain? (Location) When it occurs, how long does the pain last? (Duration) Can you describe what the pain feels like? (Characteristics) What brings on the pain? (Aggravating factors) What relieves the pain? (Alleviating factors) Does the pain radiate anywhere? (Radiation) What have you used to treat the pain? (Treatment) What effect has the pain had on you? (Effects) How severe is the pain from 0-10 when it occurs? (Severity) |
| Have you had any issues with nausea, vomiting, food intolerance, heartburn, ulcers, change in appetite, or weight? | Please describe.
What treatment did you use for these symptoms? What is your typical diet in a 24-hour period? |
| Do you have any difficulty swallowing food or liquids (dysphagia)? | Please describe.
Have you ever been diagnosed with a stroke or transient ischemic attack (TIA)? |
| When was your last bowel movement? | Have there been any changes in pattern or consistency of your stool?
Are you passing any gas? |
| Have you had any issues with constipation or diarrhea? | Please describe.
How long have you had these issues? What treatment did you use for these symptoms? If constipation:
If diarrhea:
|
| Do you experience any pain or discomfort with urination (dysuria)? | Please describe.
If you have discomfort while urinating, is the discomfort internal or external? Do you use any treatment for these symptoms? |
| Do you experience frequent urination (urinary frequency)? | Please describe.
Does the frequency occur during daytime or nighttime hours? |
| Do you ever experience a strong urge to urinate that makes it difficult to reach the bathroom in time (urinary urgency)? | Does this strong urge ever result in a leakage of urine? Does the urge come and go or is it continuous? |
| Do you have any leakage of urine when you cough, sneeze, or jump (urinary incontinence)?
Do you have difficulty starting the flow of urine? |
Have you tried any treatment for this issue? |
Gastrointestinal
Pain is the most common complaint related to abdominal problems and can be attributed to multiple underlying etiologies. Because of the potential variability of contributing factors, a careful and thorough assessment of this chief complaint should occur. Additional associated questions include asking if bloody stools (hematochezia); dark, tarry stools ( melena); bloating (abdominal distention); or vomiting of blood (hematemesis) are occurring.
Nausea, vomiting, diarrhea, and constipation are common issues experienced by hospitalized patients due to adverse effects of medications or medical procedures. Read more details about commonly occurring gastrointestinal conditions in the “Elimination” chapter in Open RN Nursing Fundamentals. It is important to ask a hospitalized patient daily about the date of their last bowel movement and flatus so that a bowel management program can be initiated if necessary. If a patient is experiencing diarrhea, it is important to assess and monitor for signs of dehydration or electrolyte imbalances. Dehydration can be indicated by dry skin, dry mucous membranes, or sunken eyes. These symptoms may require contacting the health care provider for further treatment. Read additional information about fluid and electrolyte imbalances in the “Fluids and Electrolytes” chapter in Open RN Nursing Fundamentals.
Additional specialized assessments of GI system function can include examination of the oropharynx and esophagus. For example, patients who have experienced a cerebrovascular accident (CVA), also called a “stroke,” may experience difficulty swallowing (dysphagia). The nurse is often the first to notice these difficulties when swallowing pills, liquid, or food and can advocate for treatment to prevent complications, such as unintended weight loss or aspiration pneumonia.[4]
Genitourinary
The nursing assessment of the genitourinary system generally focuses on bladder function. Ask about urinary symptoms, including dysuria, urinary frequency, or urinary urgency. Dysuria is any discomfort associated with urination and often signifies a urinary tract infection. Patients with dysuria commonly experience burning, stinging, or itching sensation. In elderly patients, changes in mental status may be the presenting symptom of a urinary tract infection. In women with dysuria, asking whether the discomfort is internal or external is important because vaginal inflammation can also cause dysuria as urine passes by the inflamed labia.
Abnormally frequent urination (e.g., every hour or two) is termed urinary frequency. In older adults, urinary frequency often occurs at night and is termed nocturia. Frequency of normal urination varies considerably from individual to individual depending on personality traits, bladder capacity, or drinking habits. It can also be a symptom of a urinary tract infection, pregnancy in females, or prostate enlargement in males.
Urinary urgency is an abrupt, strong, and often overwhelming need to urinate. Urgency often causes urinary incontinence, a leakage of urine. When patients experience urinary urgency, the desire to urinate may be constant with only a few milliliters of urine eliminated with each voiding.[5] Read additional information about commonly occurring genitourinary system alterations in the “Elimination” chapter in Open RN Nursing Fundamentals.
Life Span Considerations
Infants
Eating and elimination patterns of infants require special consideration based on the stage of development.
- Ask parents about feeding habits. Is the baby being breastfed or formula fed? If formula fed, how does the child tolerate the formula?
- Note that the expected abdominal contour of an infant is called protuberant, which means bulging.
- Assess the umbilical cord; it should dry and fall off on its own within two weeks of life.
- Observe for respiratory movement in the abdomen of the infant.
Children
The expected abdominal contour of a child is protuberant until about the age of 4. Children often cannot provide more information than “my stomach hurts”; they may have symptoms of decreased school attendance due to abdominal discomfort.
Older Adults
Constipation may be more common in older adults due to decreased physical mobility and oral intake. Urinary urgency, urinary frequency, urinary retention, nocturia, and urinary incontinence are also common concerns for older adults.
Objective Assessment
Physical examination of the abdomen includes inspection, auscultation, palpation, and percussion. Note that the order of physical assessment differs for the abdominal system compared to other systems. Palpation should occur after the auscultation of bowel sounds so that accurate, undisturbed bowel sounds can be assessed. The abdomen is roughly divided into four quadrants: right upper, right lower, left upper, and left lower (see Figure 12.3[6]). When assessing the abdomen, consider the organs located in the quadrant you are examining.
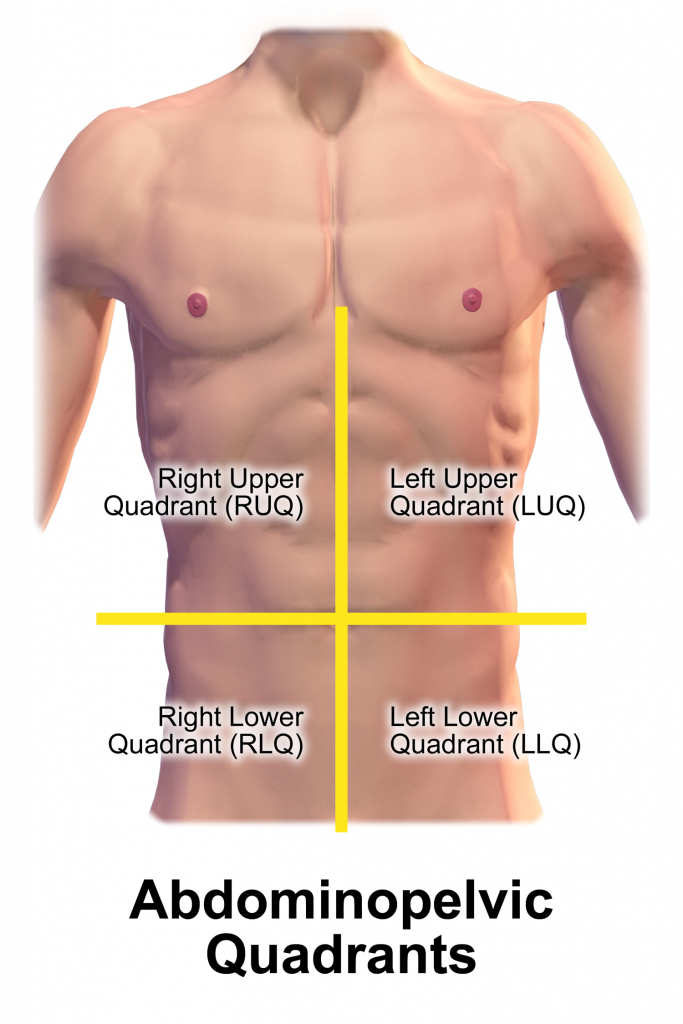
In preparation for the physical assessment, the nurse should create an environment in which the patient will be comfortable. Encourage the patient to empty their bladder prior to the assessment. Warm the room and stethoscope to decrease tensing during assessment.
Inspection
The abdomen is inspected by positioning the patient supine on an examining table or bed. The head and knees should be supported with small pillows or folded sheets for comfort and to relax the abdominal wall musculature. The patient’s arms should be at their side and not folded behind the head, as this tenses the abdominal wall. Ensure the patient is covered adequately to maintain privacy, while still exposing the abdomen as needed for a thorough assessment. Visually examine the abdomen for overall shape, masses, skin abnormalities, and any abnormal movements.
- Observe the general contour and symmetry of the entire abdominal wall. The contour of the abdomen is often described as flat, rounded, scaphoid (sunken), or protuberant (convex or bulging).
- Assess for distention. Generalized distention of the abdomen can be caused by obesity, bowel distention from gas or liquid, or fluid buildup.
- Assess for masses or bulges, which may indicate structural deformities like hernias or related to disorders in abdominal organs.
- Assess the patient’s skin for uniformity of color, integrity, scarring, or striae. Striae are white or silvery elongated marks that occur when the skin stretches, especially during pregnancy or excessive weight gain.
- Note the shape of the umbilicus; it should be inverted and midline.
- Carefully note any scars, and correlate these scars with the patient’s recollection of previous surgeries or injury.
- Document any abnormal movement or pulsations. Visible intestinal peristalsis can be caused by intestinal obstruction. Pulsations may be seen in the epigastric area in patients who are especially thin, but otherwise should not be observed.[7],[8]
Auscultation
Auscultation, or the listening, of the abdomen, follows inspection for more accurate assessment of bowel sounds. Use a warmed stethoscope to assess the frequency and characteristics of the patient’s bowel sounds, which are also referred to as peristaltic murmurs.
Begin your assessment by gently placing the diaphragm of your stethoscope on the skin in the right lower quadrant (RLQ), as bowel sounds are consistently heard in that area. Bowel sounds are generally high-pitched, gurgling sounds that are heard irregularly. Move your stethoscope to the next quadrant in a clockwise motion around the abdominal wall.
It is not recommended to count abdominal sounds because the activity of normal bowel sounds may cycle with peak-to-peak periods as long as 50 to 60 minutes.[9] The majority of peristaltic murmurs are produced by the stomach, with the remainder from the large intestine and a small contribution from the small intestine. Because the conduction of peristaltic murmur is heard throughout all parts of the abdomen, the source of peristaltic murmur is not always at the site where it is heard. If the conduction of peristaltic sounds is good, auscultation at a single location is considered adequate. [10]
Hyperactive bowel sounds may indicate bowel obstruction or gastroenteritis. Sometimes you may be able to hear a patient’s bowel sounds without a stethoscope, often described as “stomach growling” or borborygmus. This is a common example of hyperactive sounds. Hypoactive bowel sounds may be present with constipation, after abdominal surgery, peritonitis, or paralytic ileus. As you auscultate the abdomen, you should not hear vascular sounds. If heard, this finding should be reported to the health care provider.[11],[12]
Palpation
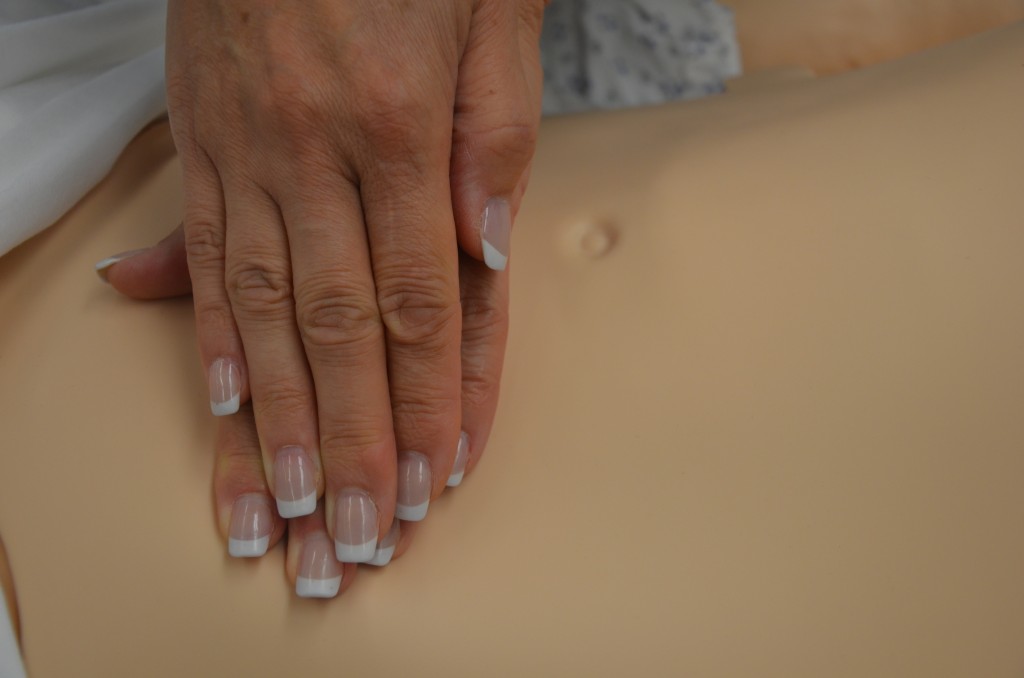
Palpation, or touching, of the abdomen involves using the flat of the hand and fingers (not the fingertips) to detect palpable organs, abnormal masses, or tenderness[13] (see Figure 12.4 [14]). When palpating the abdomen of a patient reporting abdominal pain, the nurse should palpate that area last. Light palpation is primarily used by bedside nurses to assess for musculature, abnormal masses, and tenderness. Deep palpation is a technique used by advanced practice clinicians to assess for enlarged organs. Lightly palpate the abdomen by pressing into the skin about 1 centimeter beginning in the RLQ. Continue to move around the abdomen in a clockwise manner.
Palpate the bladder for distention. Note the patient response to palpation, such as pain, guarding, rigidity, or rebound tenderness. Guarding refers to voluntary contraction of the abdominal wall musculature, usually the result of fear, anxiety, or the touch of cold hands. Rigidity refers to involuntary contraction of the abdominal musculature in response to peritoneal inflammation, a reflex the patient cannot control.[15] Rebound tenderness is another sign of peritoneal inflammation or peritonitis. To elicit rebound tenderness, the clinician maintains pressure over an area of tenderness and then withdraws the hand abruptly. If the patient winces with pain upon withdrawal of the hand, the test is positive.[16],[17], [18]
Note: If the patient has a Foley catheter in place, additional assessments are included in the “Facilitation of Elimination” chapter.
Percussion
You may observe advanced practice nurses and other health care providers percussing the abdomen to obtain additional data. Percussing can be used to assess the liver and spleen or to determine if costovertebral angle (CVA) tenderness is present, which is related to inflammation of the kidney.
![]()
- Encourage the patient to empty their bladder prior to palpation.
- When palpating the abdomen, ask the patient to bend their knees when lying in a supine position to enhance relaxation of abdominal muscles.
See Table 12.3b for a comparison of expected versus unexpected findings when assessing the abdomen.
Table 12.3b Expected Versus Unexpected Gastrointestinal and Genitourinary Assessment Findings
| Assessment | Expected Findings |
Unexpected Findings (Document and notify the provider of any new findings*) |
|---|---|---|
| Inspection | Symmetry of shape and color
Flat or rounded contour (protuberant in children until age 4) No visible lesions Intact skin Colostomy |
Asymmetry
Distension Scars Wounds Skin breakdown Pulsations Visible peristalsis |
| Auscultation | Presence of normoactive bowel sounds | Hypoactive bowel sounds
Hyperactive bowel sounds Absent bowel sounds |
| Palpation | Absence of pain or tenderness
Absence of masses |
Pain on palpation
Guarding Rigidity Rebound tenderness Masses noted that are not previously documented |
| Genitourinary | Clear, pale yellow urine
Absence of pain, urgency, frequency, or retention |
Dark or bloody urine, foul odor, or sediment present
Dysuria Urinary frequency Urinary urgency Urinary retention |
| *CRITICAL CONDITIONS to report immediately</strong | New or worsening melena
Bloody stools Hematemesis Signs of dehydration associated with diarrhea and vomiting, such as <30mL urine/hour |
- This work is a derivative of Clinical Procedures for Safer Patient Care by British Columbia Institute of Technology and is licensed under CC BY 4.0. ↵
- This work is a derivative of Clinical Procedures for Safer Patient Care by British Columbia Institute of Technology and is licensed under CC BY 4.0 ↵
- This work is a derivative of Clinical Procedures for Safer Patient Care by British Columbia Institute of Technology and is licensed under CC BY 4.0 ↵
- Ferguson, C. M. (1990). An overview of the gastrointestinal system. In Walker, H. K., Hall, W. D., Hurst, J. W. (Eds.), Clinical methods: The history, physical, and laboratory examinations (3rd ed.). Butterworths. https://www.ncbi.nlm.nih.gov/books/NBK405/ ↵
- Wrenn, K. (1990). Dysuria, frequency, and urgency. In Walker, H. K., Hall, W. D., Hurst, J. W. (Eds.), Clinical methods: The history, physical, and laboratory examinations (3rd ed.). Butterworths. https://www.ncbi.nlm.nih.gov/books/NBK291/ ↵
- “Blausen 0005 AbdominopelvicQuadrants.png” by BruceBlaus is licensed under CC BY 3.0 ↵
- This work is a derivative of Clinical Procedures for Safer Patient Care by British Columbia Institute of Technology and is licensed under CC BY 4.0 ↵
- Ferguson, C. M. (1990). Inspection, auscultation, palpation, and percussion of the abdomen. In Walker, H. K., Hall, W. D., Hurst, J. W. (Eds.), Clinical methods: The history, physical, and laboratory examinations (3rd ed.). Butterworths. https://www.ncbi.nlm.nih.gov/books/NBK420/ ↵
- McGee, S. R. (2012). Evidence-based physical diagnosis (3rd ed.). Elsevier Saunders. ↵
- Mayumi, T., Yoshida, M., Tazuma, S., Furukawa, A., Nishii, O., Shigematsu, K., Azuhata, T., Itakura, A., Kamei, S., Kondo, H., Maeda, S., Mihara, H., Mizooka, M., Nishidate, T., Obara, H., Sato, N., Takayama, Y., Tsujikawa, T., Fujii, T., Miyata, T., Maruyama, I., Honda, H., & Hirata, K. (2015). Practice guidelines for primary care of acute abdomen. J Hepatobiliary Pancreat Sci, 23, 3–36. https://doi.org/10.1002/jhbp.303 ↵
- This work is a derivative of Clinical Procedures for Safer Patient Care by British Columbia Institute of Technology and is licensed under CC BY 4.0. ↵
- Ferguson, C. M. (1990). Inspection, auscultation, palpation, and percussion of the abdomen. In Walker, H. K., Hall W. D., Hurst J. W. (Eds.), Clinical methods: The history, physical, and laboratory examinations (3rd ed.). Butterworths. https://www.ncbi.nlm.nih.gov/books/NBK420/ ↵
- Ferguson, C. M. (1990). An overview of the gastrointestinal system. In Walker, H. K., Hall W. D., Hurst J. W. (Eds.), Clinical methods: The history, physical, and laboratory examinations (3rd ed.). Butterworths. https://www.ncbi.nlm.nih.gov/books/NBK405/ ↵
- “DSC_2286-1024x678.jpg” by British Columbia Institute of Technology is licensed under CC BY 4.0. Access for free at https://opentextbc.ca/clinicalskills/chapter/2-5-focussed-respiratory-assessment/ ↵
- McGee, S. R. (2012). Evidence-based physical diagnosis (3rd ed.). Elsevier Saunders. https://kimhournet.files.wordpress.com/2018/12/mcgee-evidence-based-physical-diagnosis-3rd-ed1.pdf ↵
- This work is a derivative of Clinical Procedures for Safer Patient Care by British Columbia Institute of Technology and is licensed under CC BY 4.0 ↵
- Ferguson, C. M. (1990). Inspection, auscultation, palpation, and percussion of the abdomen. In Walker, H. K., Hall, W. D., Hurst, J. W. (Eds.), Clinical methods: The history, physical, and laboratory examinations (3rd ed.). Butterworths. https://www.ncbi.nlm.nih.gov/books/NBK420/ ↵
- McGee, S. R. (2012). Evidence-based physical diagnosis (3rd ed.). Elsevier Saunders. https://kimhournet.files.wordpress.com/2018/12/mcgee-evidence-based-physical-diagnosis-3rd-ed1.pdf ↵
When assessing a patient’s oxygenation status, it is important for the nurse to have an understanding of the underlying structures of the respiratory system to best understand their assessment findings. Visit the “Respiratory Assessment" chapter for more information about the structures of the respiratory system.
Video Review for Oxygenation Basics
View the TED-Ed Oxygen's Journey video on YouTube[1]
Breathing Mechanics[2]
Gas Exchange[3]
Carbon Dioxide Transport[4]
Assessing Oxygenation Status
A patient’s oxygenation status is routinely assessed using pulse oximetry, referred to as SpO2. SpO2 is an estimated oxygenation level based on the saturation of hemoglobin measured by a pulse oximeter. Because the majority of oxygen carried in the blood is attached to hemoglobin within the red blood cell, SpO2 estimates how much hemoglobin is “saturated” with oxygen. The target range of SpO2 for an adult is 94-98%.[5] For patients with chronic respiratory conditions, such as COPD, the target range for SpO2 is often lower at 88% to 92%. Although SpO2 is an efficient, noninvasive method to assess a patient’s oxygenation status, it is an estimate and not always accurate. For example, if a patient is severely anemic and has a decreased level of hemoglobin in the blood, the SpO2 reading is affected. Decreased peripheral circulation can also cause a misleading low SpO2 level.
A more specific measurement of oxygen and carbon dioxide in the blood is obtained through an arterial blood gas (ABG). ABG results are often obtained for patients who have deteriorating or unstable respiratory status requiring urgent and emergency treatment. An ABG is a blood sample that is typically drawn from the radial artery by a respiratory therapist, emergency or critical care nurse, or health care provider. ABG results evaluate oxygen, carbon dioxide, pH, and bicarbonate levels. The partial pressure of oxygen in the blood is referred to as PaO2. The normal PaO2 level of a healthy adult is 80 to 100 mmHg. The PaO2 reading is more accurate than a SpO2 reading because it is not affected by hemoglobin levels. The PaCO2 level is the partial pressure of carbon dioxide in the blood. The normal PaCO2 level of a healthy adult is 35-45 mmHg. The normal range of pH level for arterial blood is 7.35-7.45, and the normal range for the bicarbonate (HCO3) level is 22-26. The SaO2 level is also obtained, which is the calculated arterial oxygen saturation level. See Table 11.2a for a summary of normal ranges of ABG values.[6]
Table 11.2a Normal Ranges of ABG Values
| Value | Description | Normal Range |
|---|---|---|
| pH | Acid-base balance of blood | 7.35-7.45 |
| PaO2 | Partial pressure of oxygen | 80-100 mmHg |
| PaCO2 | Partial pressure of carbon dioxide | 35-45 mmHg |
| HCO3 | Bicarbonate level | 22-26 mEq/L |
| SaO2 | Calculated oxygen saturation | 95-100% |
Hypoxia and Hypercapnia
Hypoxia is defined as a reduced level of tissue oxygenation. Hypoxia has many causes, ranging from respiratory and cardiac conditions to anemia. Hypoxemia is a specific type of hypoxia that is defined as decreased partial pressure of oxygen in the blood (PaO2), measured by an arterial blood gas (ABG).
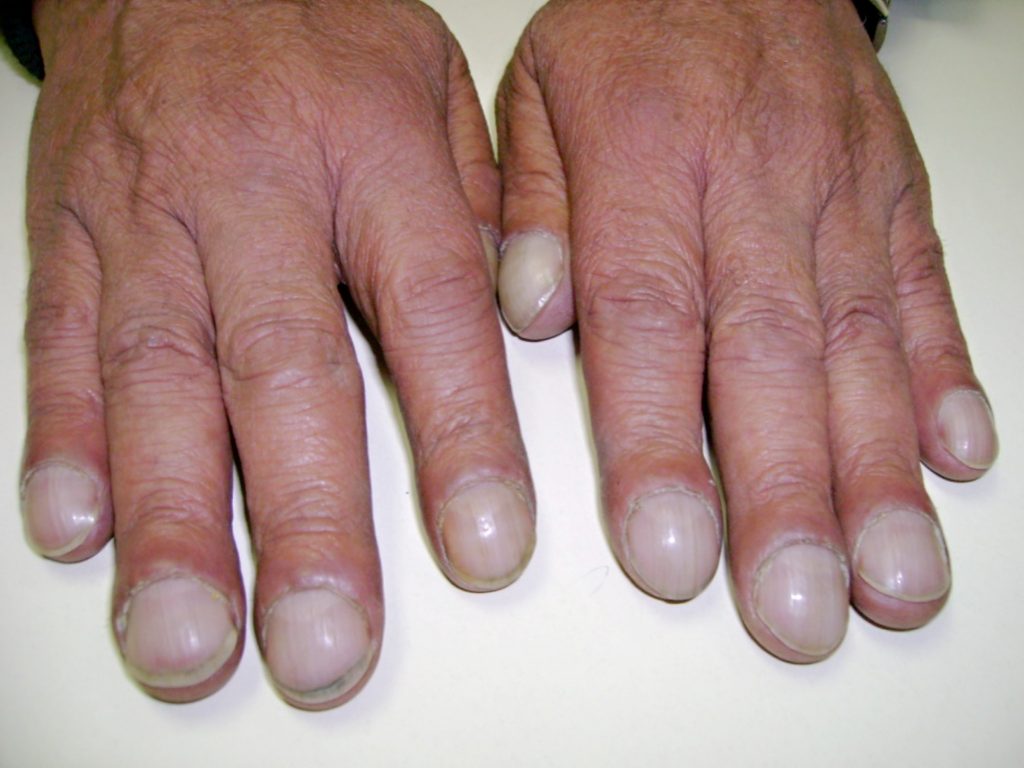
Early signs of hypoxia are anxiety, confusion, and restlessness. As hypoxia worsens, the patient’s level of consciousness and vital signs will worsen, with increased respiratory rate and heart rate and decreased pulse oximetry readings. Late signs of hypoxia include bluish discoloration of the skin and mucous membranes called cyanosis. Cyanosis is most easily seen around the lips and in the oral mucosa. A sign of chronic hypoxia is clubbing, a gradual enlargement of the fingertips (see Figure 11.1[7]). See Table 11.2b for symptoms and signs of hypoxia.[8]
Hypercapnia is an elevated level of carbon dioxide in the blood. This level is measured by the PaCO2 level in an ABG test and is indicated when the PaCO2 level is higher than 45. Hypercapnia is typically caused by hypoventilation or areas of the alveoli that are ventilated but not perfused. In a state of hypercapnia or hypoventilation, there is an accumulation of carbon dioxide in the blood. The increased carbon dioxide causes the pH of the blood to drop, leading to a state of respiratory acidosis. You can read more about respiratory acidosis in the “Fluids and Electrolytes” chapter of the Open RN Nursing Fundamentals book. Patients with hypercapnia can present with tachycardia, dyspnea, flushed skin, confusion, headaches, and dizziness. If the hypercapnia develops gradually over time, such as in a patient with chronic obstructive pulmonary disease (COPD), symptoms may be mild or may not be present at all. Hypercapnia is managed by addressing its underlying cause. A noninvasive positive pressure device such as a BiPAP may provide support to patients who are having trouble breathing normally, but if this is not sufficient, intubation may be required.[9]
Table 11.2b Symptoms and Signs of Hypoxia
| Signs & Symptoms | Description |
|---|---|
| Restlessness | Patient may become increasingly fidgety, move about the bed, demonstrate signs of anxiety and agitation. Restlessness is an early sign of hypoxia. |
| Tachycardia | An elevated heart rate (above 100 beats per minute in adults) can be an early sign of hypoxia. |
| Tachypnea | An increased respiration rate (above 20 breaths per minute in adults) is an indication of respiratory distress. |
| Shortness of breath (Dyspnea) | Shortness of breath is a subjective symptom of not getting enough air. Depending on severity, dyspnea causes increased levels of anxiety. |
| Oxygen saturation level (SpO2) | Oxygen saturation levels should be above 94% for an adult without an underlying respiratory condition. |
| Use of accessory muscles | Use of neck or intercostal muscles when breathing is an indication of respiratory distress. |
| Noisy breathing | Audible noises with breathing are an indication of respiratory conditions. Assess lung sounds with a stethoscope for adventitious sounds such as wheezing, rales, or crackles. Secretions can plug the airway, thereby decreasing the amount of oxygen available for gas exchange in the lungs. |
| Flaring of nostrils or pursed lip breathing | Flaring is a sign of hypoxia, especially in infants. Pursed-lip breathing is a technique often used in patients with COPD. This breathing technique increases the amount of carbon dioxide exhaled so that more oxygen can be inhaled. |
| Position of patient | Patients in respiratory distress may sit up or lean over by resting arms on their legs to enhance lung expansion. Patients who are hypoxic may not be able to lie flat in bed. |
| Ability of patient to speak in full sentences | Patients in respiratory distress may be unable to speak in full sentences or may need to catch their breath between sentences. |
| Skin color (Cyanosis) | Changes in skin color to bluish or gray are a late sign of hypoxia. |
| Confusion or loss of consciousness (LOC) | This is a worsening sign of hypoxia. |
| Clubbing | Clubbing, a gradual enlargement of the fingertips, is a sign of chronic hypoxia. |
Treating Hypoxia
Acute hypoxia is a medical emergency and should be treated promptly with oxygen therapy. Failure to initiate oxygen therapy when needed can result in serious harm or death of the patient. Although oxygen is considered a medication that requires a prescription, oxygen therapy may be initiated without a physician’s order in emergency situations as part of the nurse’s response to the “ABCs,” a common abbreviation for airway, breathing, and circulation. Most agencies have a protocol in place that allows nurses to apply oxygen in emergency situations. After applying oxygen as needed, the nurse then contacts the provider, respiratory therapist, or rapid response team, depending on the severity of hypoxia. Devices such high flow oxymasks, CPAP, BiPAP, or mechanical ventilation may be initiated by the respiratory therapist or provider to deliver higher amounts of inspired oxygen. Various types of oxygenation devices are further explained in the “Oxygenation Equipment” section.
Prescription orders for oxygen therapy will include two measurements of oxygen to be delivered - the oxygen flow rate and the fraction of inspired oxygen (FiO2). The oxygen flow rate is the number dialed up on the oxygen flow meter between 1 L/minute and 15 L/minute. Fio2 is the concentration of oxygen the patient inhales. Room air contains 21% oxygen concentration, so the FiO2 for supplementary oxygen therapy will range from 21% to 100% concentration.
In addition to administering oxygen therapy, there are several other interventions the nurse should consider implementing to a hypoxic patient. Additional interventions used to treat hypoxia in conjunction with oxygen therapy are outlined in Table 11.2c.[10]
Table 11.2c Interventions to Manage Hypoxia
| Interventions | Additional Information |
|---|---|
| Raise the Head of the Bed | Raising the head of the bed to high Fowler’s position promotes effective chest expansion and diaphragmatic descent, maximizes inhalation, and decreases the work of breathing. Patients with COPD who are short of breath may gain relief by sitting upright or leaning over a bedside table while in bed. |
| Encourage Enhanced Breathing and Coughing Techniques | Enhanced breathing and coughing techniques such as using pursed-lip breathing, coughing and deep breathing, huffing technique, incentive spirometry, and flutter valves may assist patients to clear their airway while maintaining their oxygen levels. See the following “Enhanced Breathing and Coughing Techniques” section for additional information regarding these techniques. |
| Manage Oxygen Therapy and Equipment | If the patient is already on supplemental oxygen, ensure the equipment is turned on, set at the required flow rate, correctly positioned on the patient, and properly connected to an oxygen supply source. If a portable tank is being used, check the oxygen level in the tank. Ensure the connecting oxygen tubing is not kinked, which could obstruct the flow of oxygen. Feel for the flow of oxygen from the exit ports on the oxygen equipment. In hospitals where medical air and oxygen are used, ensure the patient is connected to the oxygen flow port. Hospitals in America follow the national standard that oxygen flow ports are green and air outlets are yellow. |
| Assess the Need for Respiratory Medications | Pharmacological management is essential for patients with respiratory disease such as asthma, COPD, or severe allergic response. Bronchodilators effectively relax smooth muscles and open airways. Glucocorticoids relieve inflammation and also assist in opening air passages. Mucolytics decrease the thickness of pulmonary secretions so that they can be expectorated more easily. |
| Provide Oral Suctioning if Needed | Some patients may have a weakened cough that inhibits their ability to clear secretions from the mouth and throat. Patients with muscle disorders or those who have experienced a cerebral vascular accident (CVA) are at risk for aspiration pneumonia, which is caused by the accidental inhalation of material from the mouth or stomach. Provide oral suction if the patient is unable to clear secretions from the mouth and pharynx. See the chapter on “Tracheostomy Care and Suctioning” for additional details on suctioning. |
| Provide Pain Relief If Needed | Provide adequate pain relief if the patient is reporting pain. Pain increases anxiety and may inhibit the patient’s ability to take in full breaths. |
| Consider the Side Effects of Pain Medications | A common side effect of pain medication is sedation and respiratory depression. For more information about interventions to manage respiratory depression, see the “Oxygenation” chapter in the Open RN Nursing Fundamentals textbook. |
| Consider Other Devices to Enhance Clearance of Secretions | Chest physiotherapy and specialized devices assist with secretion clearance, such as handheld flutter valves or vests that inflate and vibrate the chest wall. Consider requesting a consultation with a respiratory therapist based on the patient’s situation. |
| Plan Frequent Rest Periods Between Activities | Patients experiencing hypoxia often feel short of breath and fatigue easily. Allow the patient to rest frequently, and space out interventions to decrease oxygen demand in patients whose reserves are likely limited. |
| Consider Other Potential Causes of Dyspnea | If a patient’s level of dyspnea is worsening, assess for other underlying causes in addition to the primary diagnosis. Are there other respiratory, cardiovascular, or hematological conditions such as anemia occurring? Start by reviewing the patient’s most recent hemoglobin and hematocrit lab results. Completing a thorough assessment may reveal abnormalities in these systems to report to the health care provider. |
| Consider Obstructive Sleep Apnea | Patients with obstructive sleep apnea (OSA) are often not previously diagnosed prior to hospitalization. The nurse may notice the patient snores, has pauses in breathing while snoring, or awakens not feeling rested. These signs may indicate the patient is unable to maintain an open airway while sleeping, resulting in periods of apnea and hypoxia. If these apneic periods are noticed but have not been previously documented, the nurse should report these findings to the health care provider for further testing and follow-up. Testing consists of using continuous pulse oximetry while the patient is sleeping to determine if the patient is hypoxic during these episodes and if a CPAP device should be prescribed. See the box below for additional information regarding OSA. |
| Anxiety | Anxiety often accompanies the feeling of dyspnea and can worsen it. Anxiety in patients with COPD is chronically undertreated. It is important for the nurse to address the feelings of anxiety and dyspnea. Anxiety can be relieved by teaching enhanced breathing and coughing techniques, encouraging relaxation techniques, or administering antianxiety medications. |
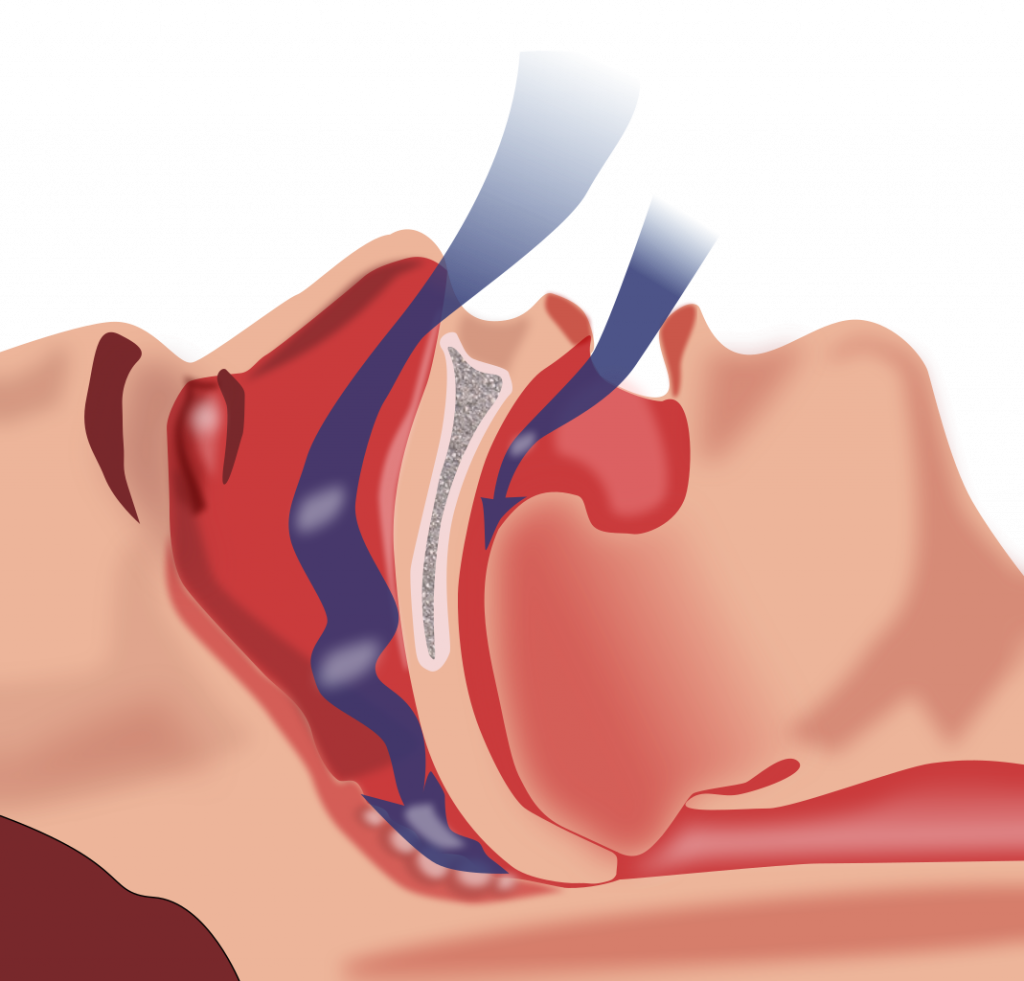
Obstructive Sleep Apnea (OSA) is the most common type of sleep apnea. See Figure 11.2[11] for an illustration of OSA. As soft tissue falls to the back of the throat, it impedes the passage of air (blue arrows) through the trachea and is characterized by repeated episodes of complete or partial obstructions of the upper airway during sleep. The episodes of breathing cessations are called “apneas,” meaning “without breath.” Despite the effort to breathe, apneas are associated with a reduction in blood oxygen saturation due to the obstruction of the airway. Treatment for OSA often includes the use of a CPAP device.
Enhanced Breathing and Coughing Techniques
In addition to oxygen therapy and the interventions listed in Table 11.2c to implement for a patient experiencing dyspnea and hypoxia, there are several techniques a nurse can teach a patient to use to enhance their breathing and coughing. These techniques include pursed-lip breathing, incentive spirometry, coughing and deep breathing, and the huffing technique.
Pursed-Lip Breathing
Pursed-lip breathing is a technique that allows people to control their oxygenation and ventilation. The technique requires a person to inspire through the nose and exhale through the mouth at a slow controlled flow. See Figure 11.3[12] for an illustration of pursed-lip breathing. This type of exhalation gives the person a puckered or pursed appearance. By prolonging the expiratory phase of respiration, a small amount of positive end-expiratory pressure (PEEP) is created in the airways that helps to keep them open so that more air can be exhaled, thus reducing air trapping that occurs in some conditions such as COPD. Pursed-lip breathing often relieves the feeling of shortness of breath, decreases the work of breathing, and improves gas exchange. People also regain a sense of control over their breathing while simultaneously increasing their relaxation.[13]

View the COPD Foundation's YouTube video to learn more about pursed-lip breathing:
Breathing Techniques[14]
Incentive Spirometry
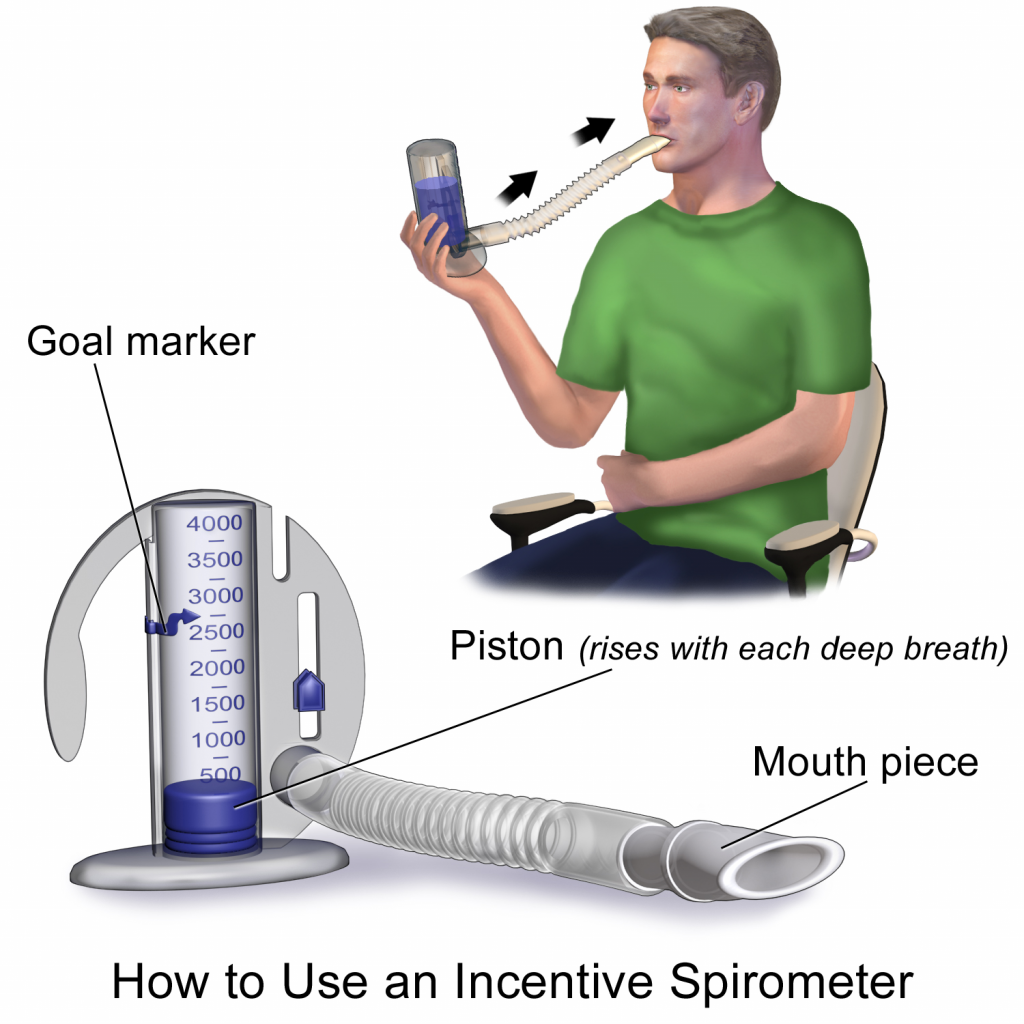
An incentive spirometer is a medical device often prescribed after surgery to prevent and treat atelectasis. Atelectasis occurs when alveoli become deflated or filled with fluid and can lead to pneumonia. See Figure 11.4[15] for an image of a patient using an incentive spirometer. While sitting upright, the patient should breathe in slowly and deeply through the tubing with the goal of raising the piston to a specified level. The patient should attempt to hold their breath for 5 seconds, or as long as tolerated, and then rest for a few seconds. This technique should be repeated by the patient 10 times every hour while awake.[16] The nurse may delegate this intervention to unlicensed assistive personnel, but the frequency in which it is completed and the volume achieved should be documented and monitored by the nurse.
Coughing and Deep Breathing
Teaching the coughing and deep breathing technique is similar to incentive spirometry but no device is required. The patient is encouraged to take deep, slow breaths and then exhale slowly. After each set of breaths, the patient should cough. This technique is repeated 3 to 5 times every hour.
Huffing Technique
The huffing technique is helpful for patients who have difficulty coughing. Teach the patient to inhale with a medium-sized breath and then make a sound like “Ha” to push the air out quickly with the mouth slightly open.
Vibratory PEP Therapy
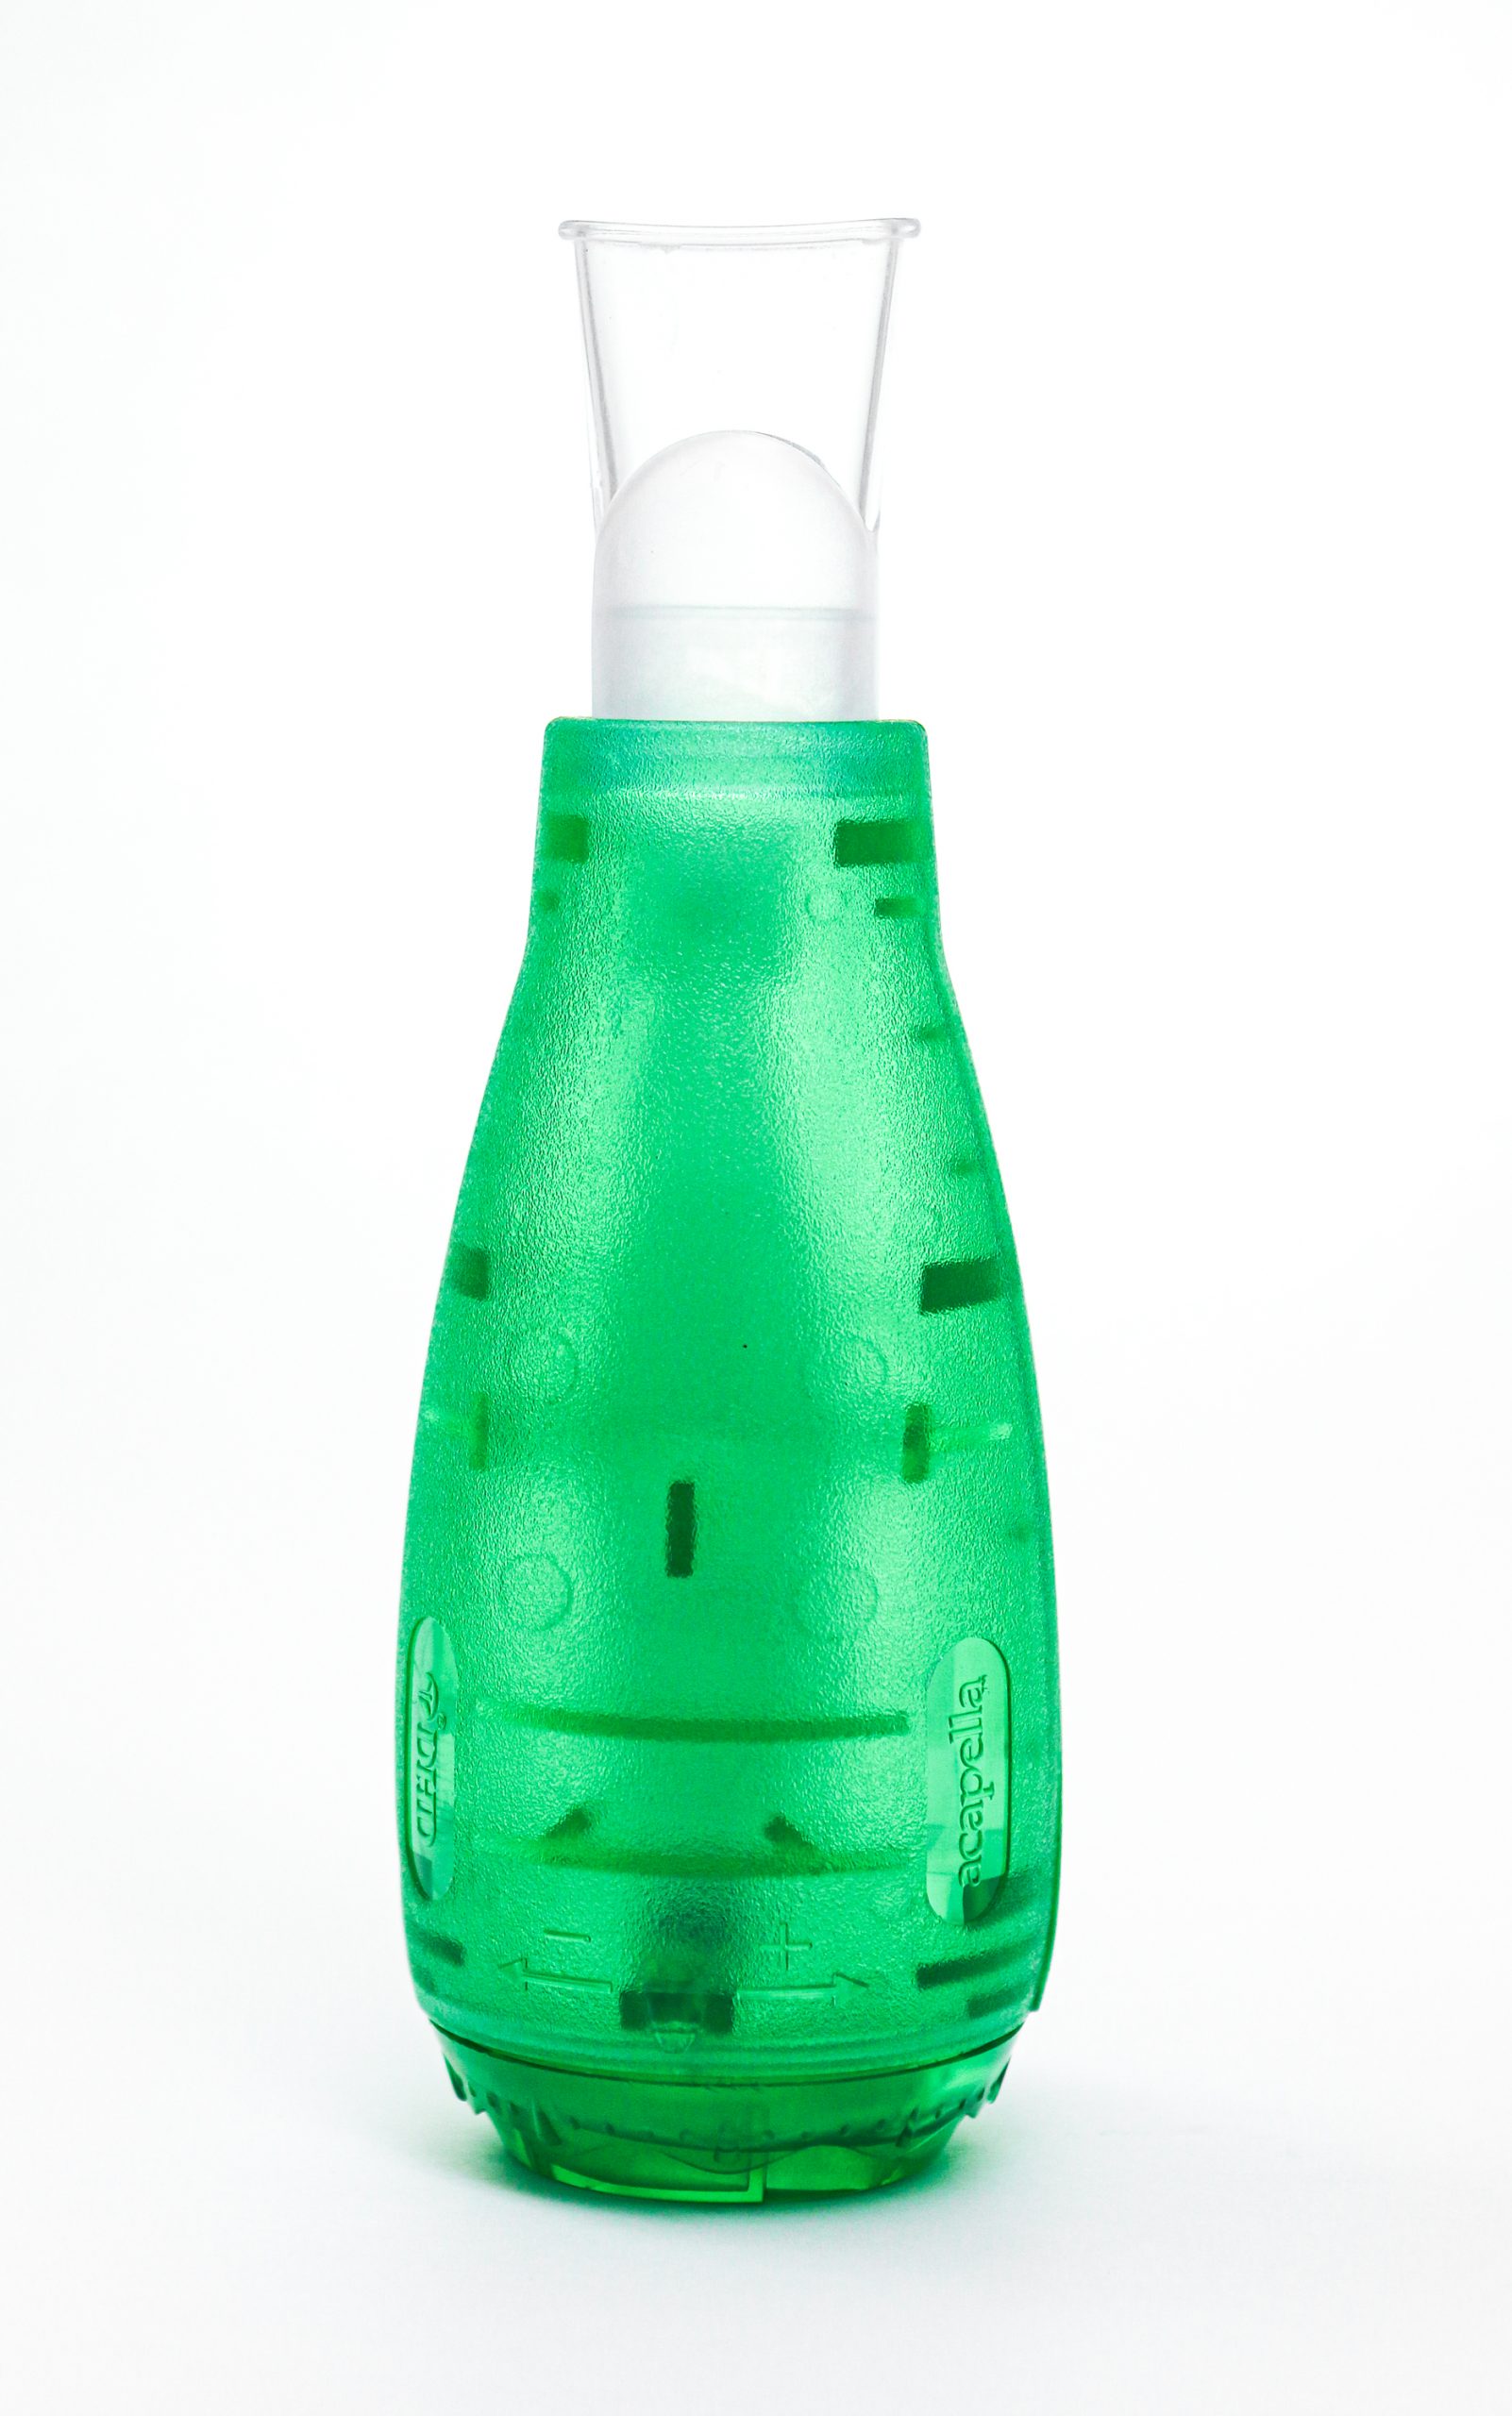
Vibratory Positive Expiratory Pressure (PEP) therapy uses handheld devices such as “flutter valves” or “Acapella” devices for patients who need assistance in clearing mucus from their airways. These devices (see Figure 11.5[17]) require a prescription and are used in collaboration with a respiratory therapist or advanced health care provider. To use Vibratory PEP therapy, the patient should sit up, take a deep breath, and blow into the device. A flutter valve within the device creates vibrations that help break up the mucus so the patient can cough it up and spit it out. Additionally, a small amount of positive end-expiratory pressure (PEEP) is created in the airways that helps to keep them open so that more air can be exhaled.
Visit NHS University Hospitals Plymouth Physiotherapy's "Acapella" video on YouTube to review using a flutter valve device[18]
Clubbing: A gradual enlargement of the fingertips in patients with respiratory conditions that cause chronic hypoxia.
Cyanosis: A bluish discoloration of the skin and mucous membranes caused by lack of oxygenation to the tissues.
Dyspnea: A subjective feeling of not being able to get enough air; also called shortness of breath.
FiO2: Fraction of inspired oxygen (i.e., the concentration of oxygen inhaled). Room air contains 21% oxygen levels, and oxygenation devices can increase the inhaled concentration of oxygen up to 100%. However, FiO2 levels should be decreased as soon as feasible to do so to prevent lung injury.
Hypercapnia: Elevated carbon dioxide levels in the blood, indicated by PaCO2 level greater than 45 in an ABG test.
Hypoxemia: Decreased dissolved oxygen in the arterial blood, indicated by a PaO2 level less than 80 mmHg in an ABG test.
Hypoxia: A reduced level of tissue oxygenation.
Obstructive Sleep Apnea (OSA): Characterized by repeated occurrences of complete or partial obstructions of the upper airway during sleep, resulting in apneic episodes.
PaO2: The partial pressure of dissolved oxygen in the blood measured by arterial blood gas samples.
SpO2: An estimated oxygenation level based on the saturation level of hemoglobin measured by a pulse oximeter.
Ventilation: The mechanical movement of air into and out of the lungs.
There are several types of equipment a nurse may use when providing oxygen therapy to a patient. Each device is described in detail below.
Pulse Oximeter
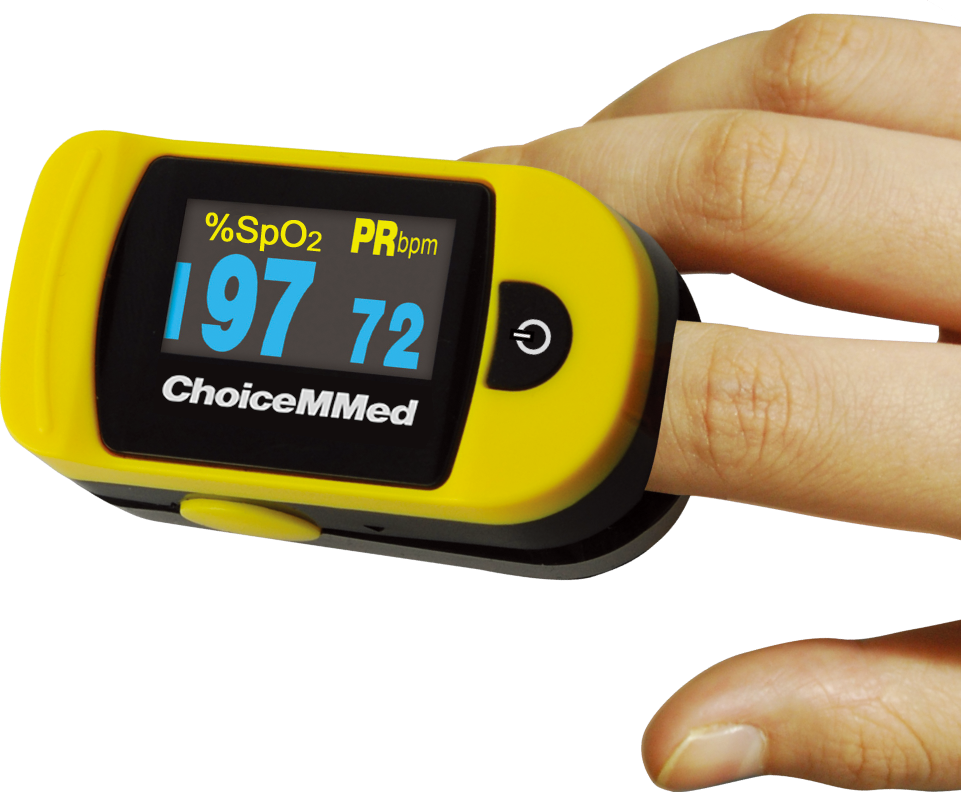
A pulse oximeter is a commonly used portable device used to obtain a patient’s oxygen saturation level at the bedside or in a clinic. See Figure 11.6[19] for an image of a portable pulse oximeter. The pulse oximeter, commonly referred to as a “Pulse Ox,” is an electronic device that measures the oxygen saturation of hemoglobin in a patient’s red blood cells, referred to as SpO2. The normal range for SpO2 for an adult without an underlying respiratory condition is above 92%. The pulse oximeter analyzes light produced by the probe as it passes through the finger to determine the saturation level of the hemoglobin molecule. Pulse oximeter probes can be attached to a patient’s finger, forehead, nose, foot, ear, or toe. However, pulse oximetry readings can be inaccurate if the patient is wearing nail polish, has reduced perfusion of the extremities due to a cardiovascular condition, or has other molecules attached to hemoglobin such as in the case of carbon monoxide poisoning.[20]
Oxygen Flow Meter
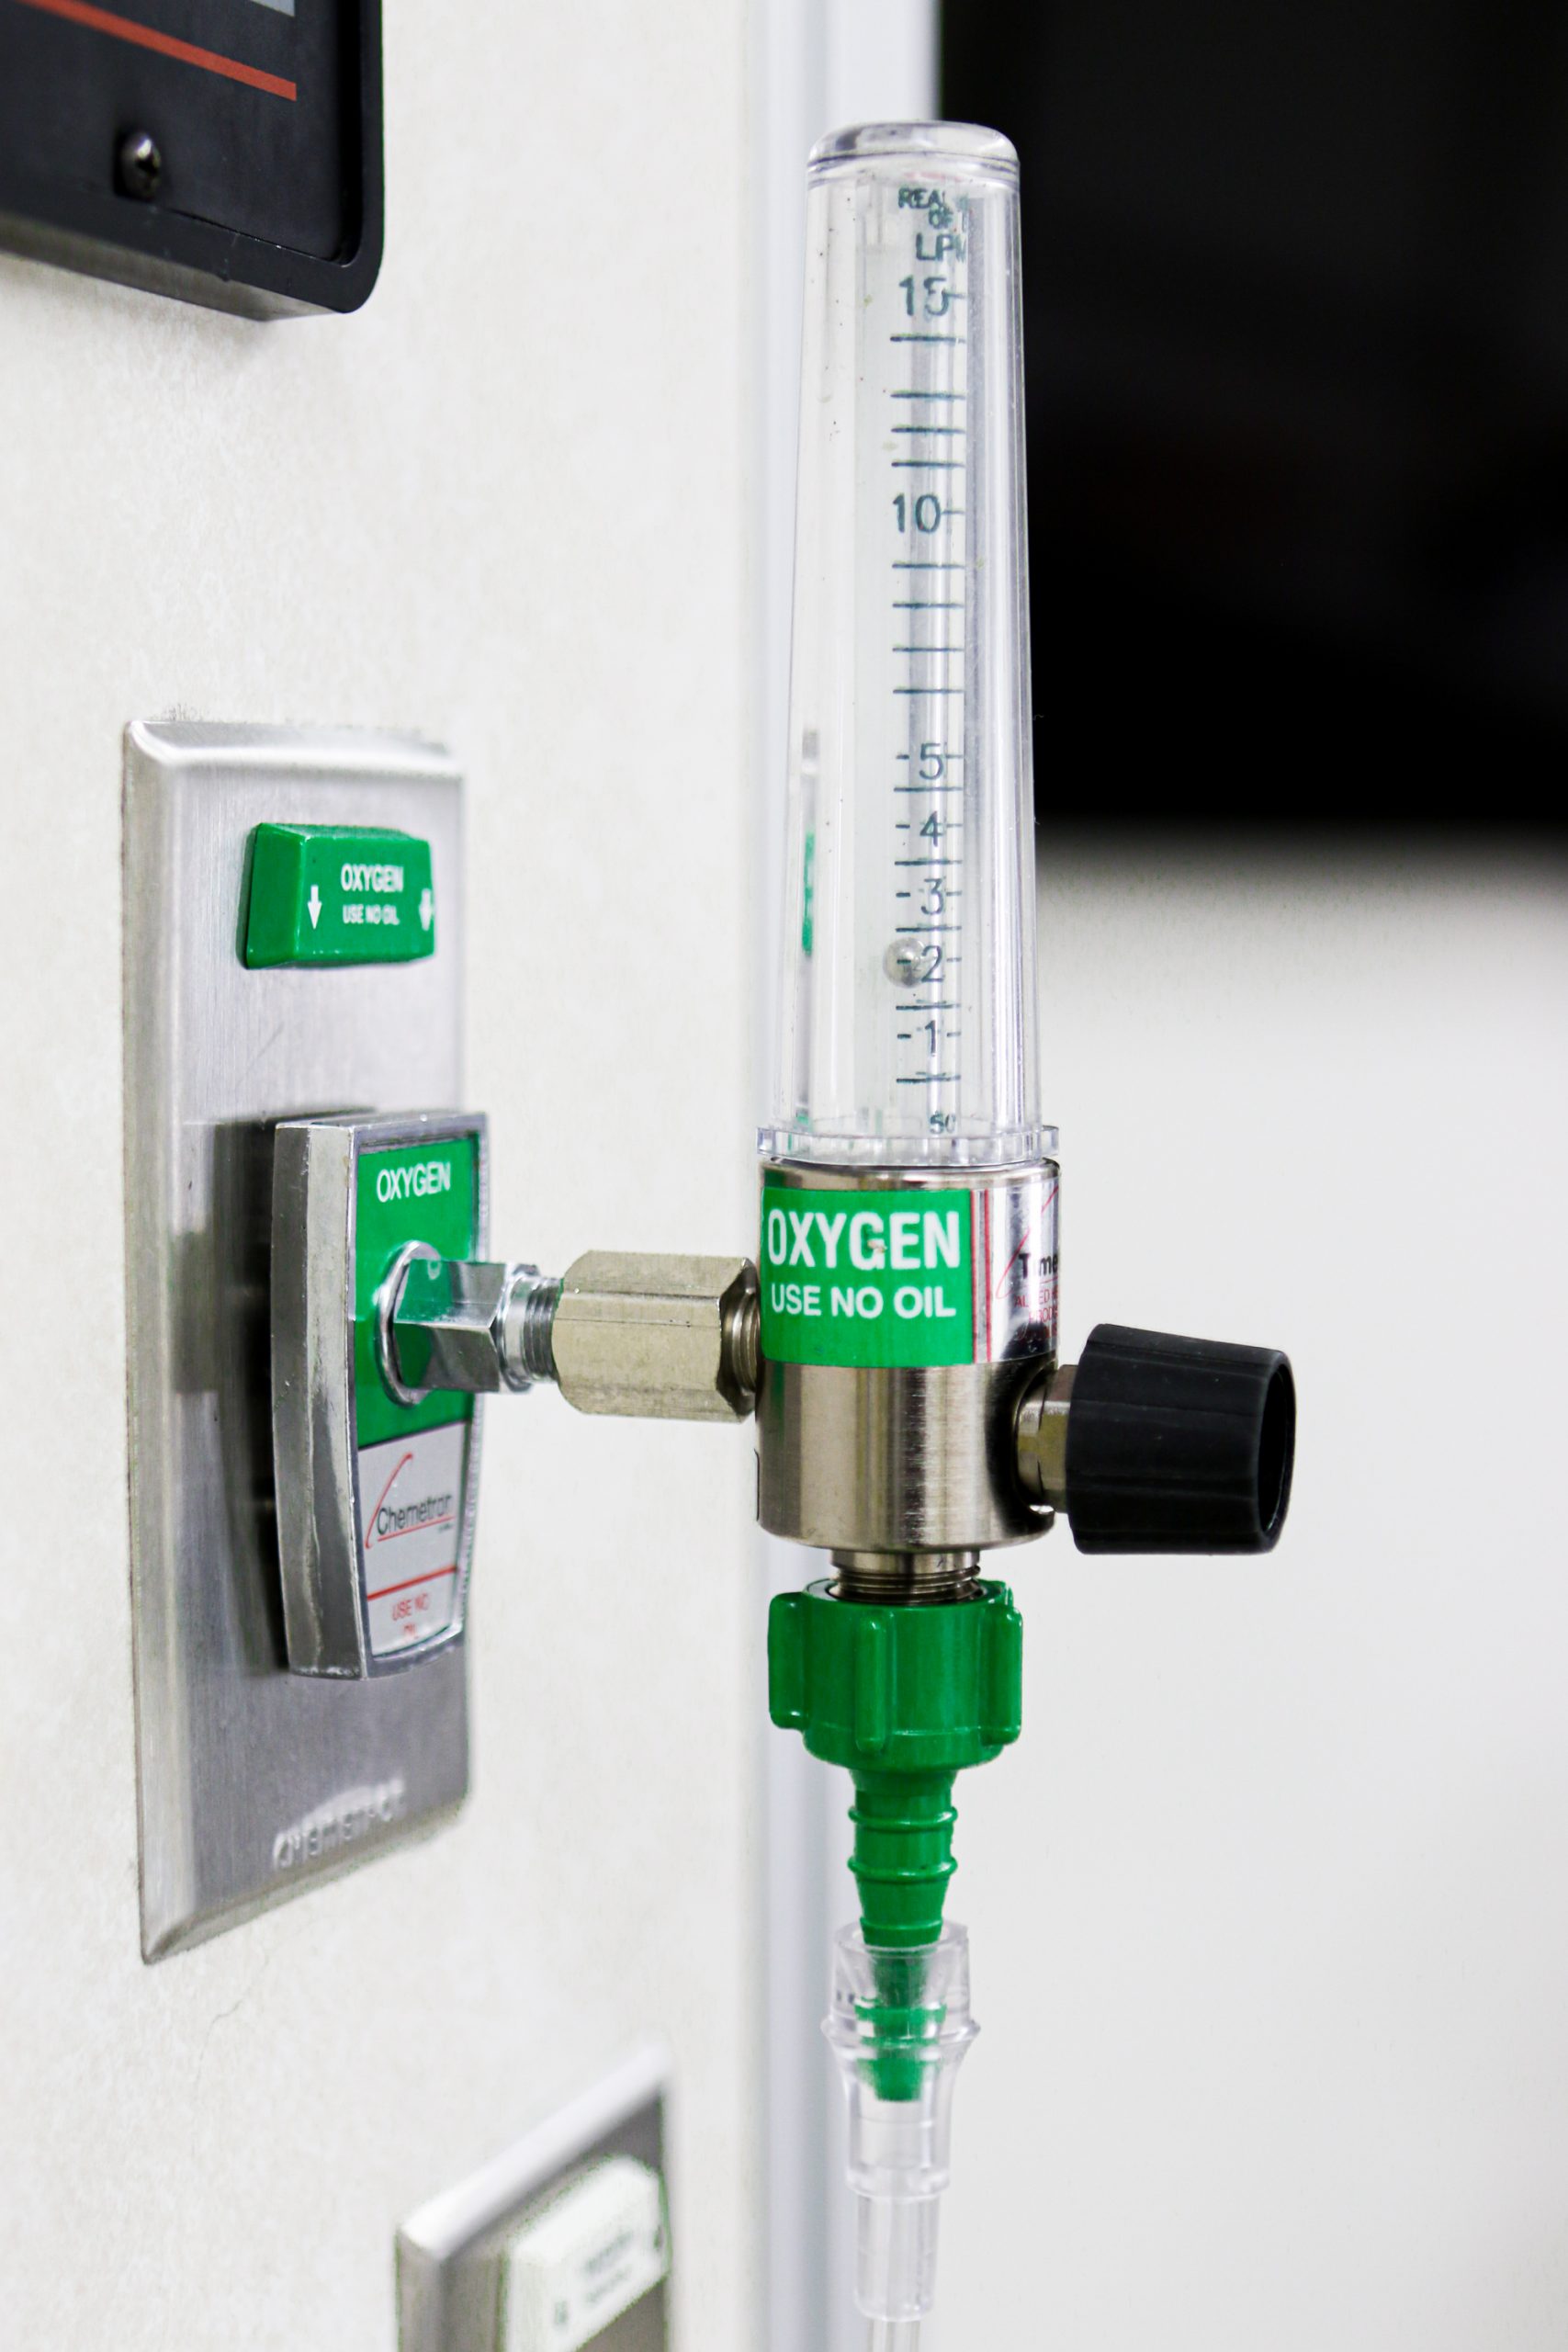
In inpatient settings, rooms are equipped with wall-mounted oxygen supply outlets that are nationally standardized in a green color, whereas air outlets are standardized with a yellow color. Oxygen flow meters are attached to the green oxygen outlets, and then the oxygenation device is attached to the flow meter. See Figure 11.7[21] for an image of an oxygen flow meter. An oxygen flow meter consists of a glass cylinder containing a steel ball with an opening through which oxygen from the supply source is injected through an adapter. This adapter is commonly referred to as a “tree” because of its appearance. Oxygen is turned on, and the flow rate of oxygen is controlled by turning the green valve on the side of the glass cylinder. The flow rate is set according to the location of a steel ball inside the cylinder and the numbered lines on the glass cylinder. For example, in Figure 11.7, the flow rate is currently set at 2 liter per minute (L/min). It is essential to implement safety precautions whenever oxygen is used. Read more about "Safety with Oxygen Therapy" later in this section.
Portable Oxygen Supply Devices
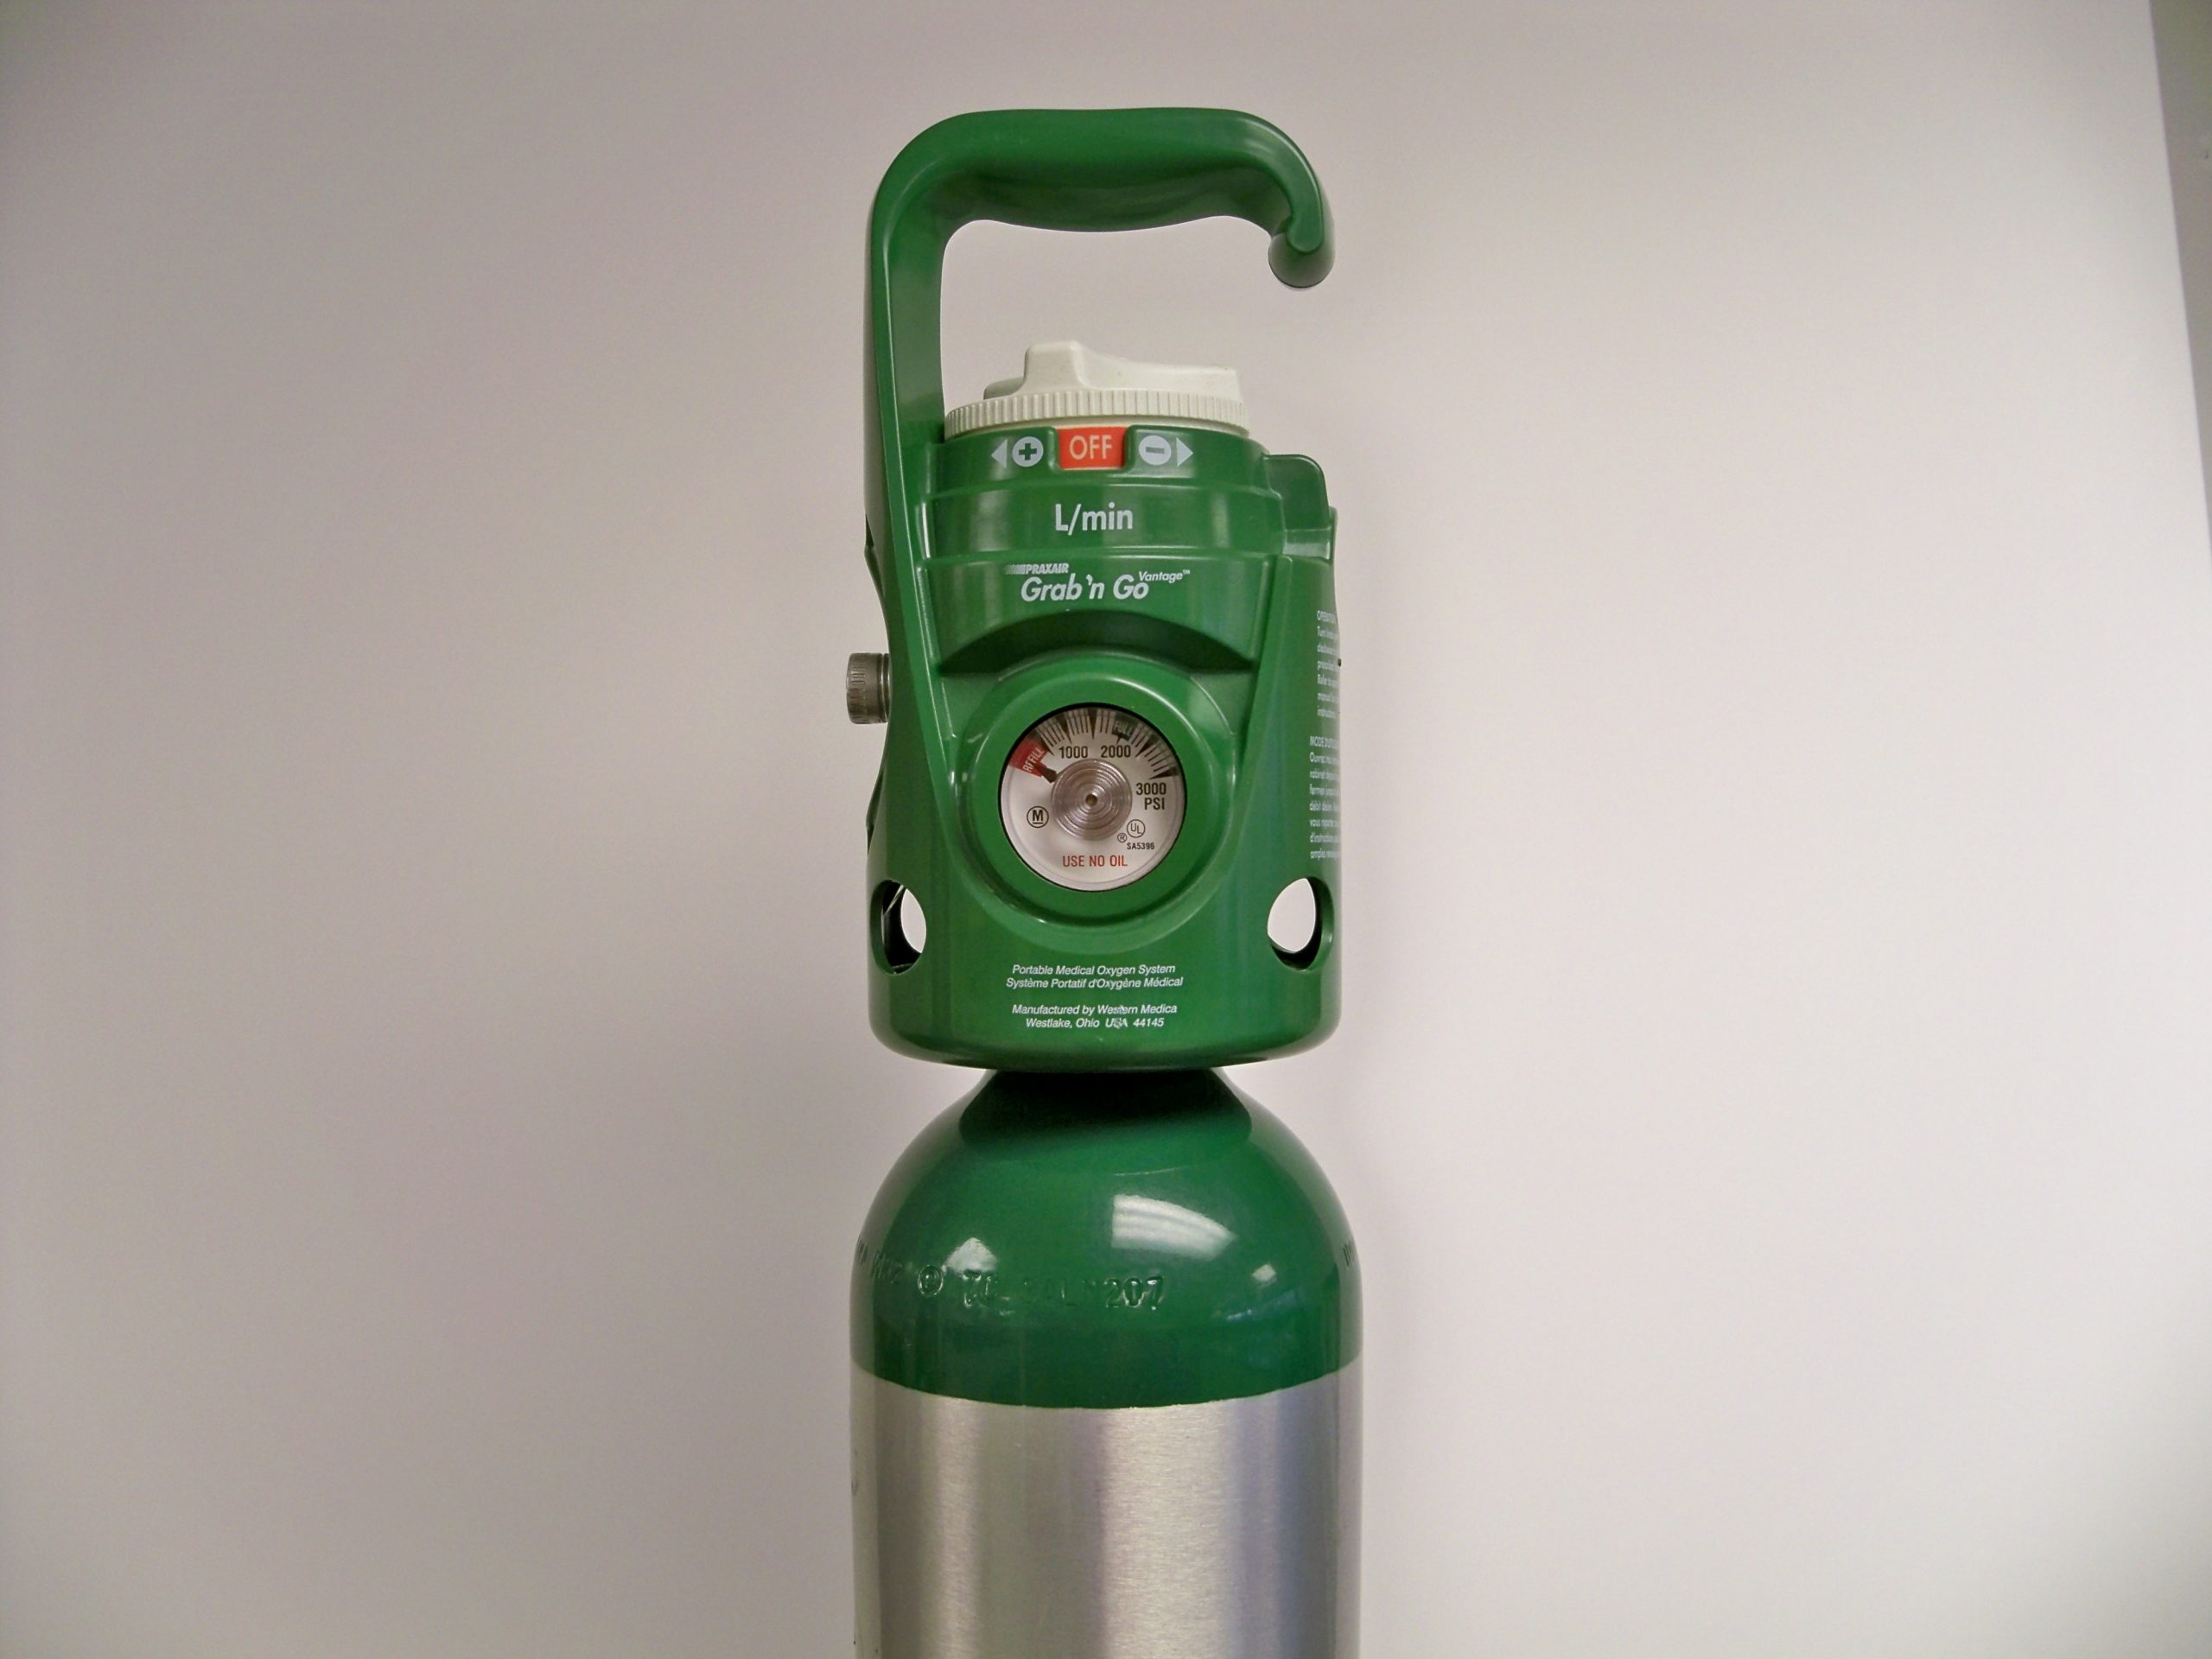
Portable oxygen tanks are commonly used when transporting a patient to procedures within the hospital or to other agencies. See Figure 11.8[22] for an image of a portable oxygen tank. Oxygenation devices are connected to the tank in a similar manner as the wall-mounted oxygen flow meter. It is crucial for nurses and transporters to ensure the tank has an adequate amount of oxygen for use during transport, is turned on, and the appropriate flow rate is set.
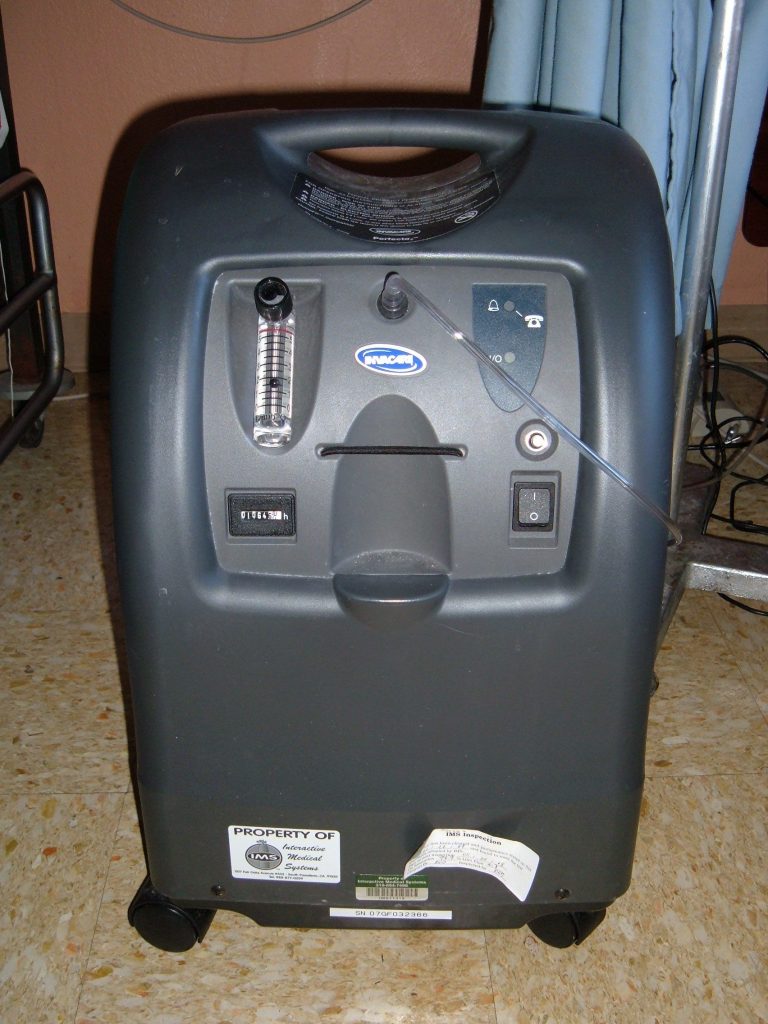
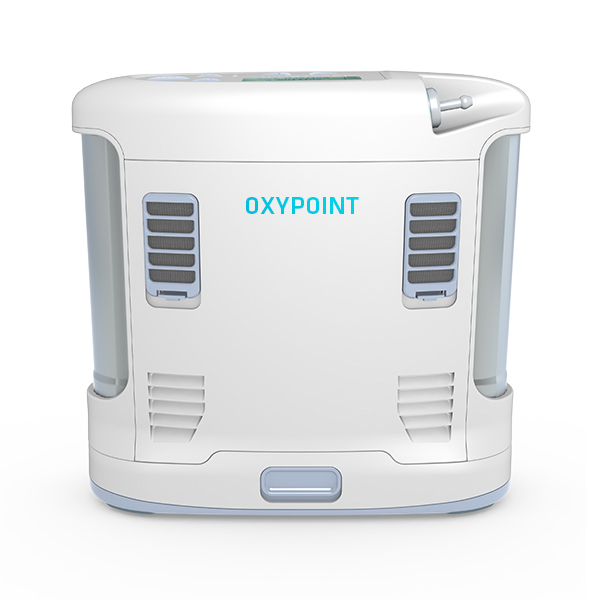
Instead of oxygen tanks, oxygen concentrators are commonly used by patients in their home environment. See Figure 11.9[23] for an image of a home oxygen concentrator. Oxygen concentrators are also produced in portable sizes that are lightweight and easy for patient use while travelling and mobile in the community. See Figure 11.10[24] for an image of a portable oxygen concentrator. Oxygen concentrators work by taking the 21% concentration of oxygen in the air, running it through a molecular sleeve to remove the nitrogen and concentrating the oxygen to a 96% level, thus producing between 1 and 6 liters per minute of oxygen. Oxygen concentrators may provide pulse flow or continuous flow. Pulse flow only occurs on inhalation, whereas continuous flow delivers oxygen throughout the entire breath cycle. Pulse versions are the most lightweight because oxygen is provided only as needed by the patient.[25]
Nasal Cannula
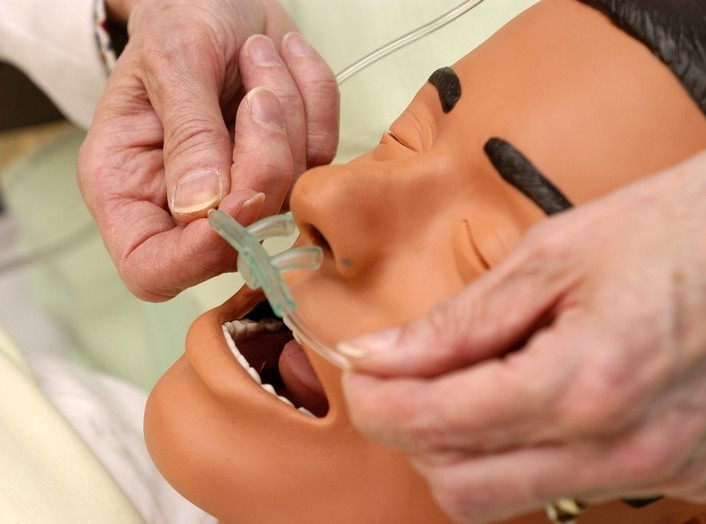
A nasal cannula is the simplest oxygenation device and consists of oxygen tubing connected to two short prongs that are inserted into the patient’s nares. See Figure 11.11[26] for an image of a nasal cannula. The tubing is connected to the flow meter of the oxygen supply source. To prevent drying out the patient's mucus membranes, humidification may be added for hospitalized patients receiving oxygen flow rates greater than 4 L/minute or for those receiving oxygen therapy for longer periods of time.[27]
Nasal cannulas are the most common type of oxygen equipment. They are used for short- and long-term therapy (i.e., COPD patients) and are best used with stable patients who require low amounts of oxygen.
Flow rate: Nasal cannulas can have a flow rate ranging from 1 to 5 liters per minute (L/min), with a 4% increase in FiO2 for every liter of oxygen, resulting in range of fraction of inspired oxygen (FiO2) levels of 24-44%.
Advantages: Nasal cannulas are easy to use, inexpensive, and disposable. They are convenient because the patient can talk and eat while receiving oxygen.
Limitations: The nasal prongs of nasal cannula are easily dislodged, especially when the patient is sleeping. The tubing placed on the face can cause skin breakdown in the nose and above the ears, so the nurse must vigilantly monitor these areas. Based on agency policy, the nurse should add padding to the oxygen tubing as needed to avoid skin breakdown and may apply a water-based lubricant to prevent drying. However, petroleum-based lubricant should not be used due to the risk of flammability. Nasal cannulas are not as effective if the patient is a mouth breather or has blocked nostrils, a deviated septum, or nasal polyps.[28]
High-Flow Nasal Cannula
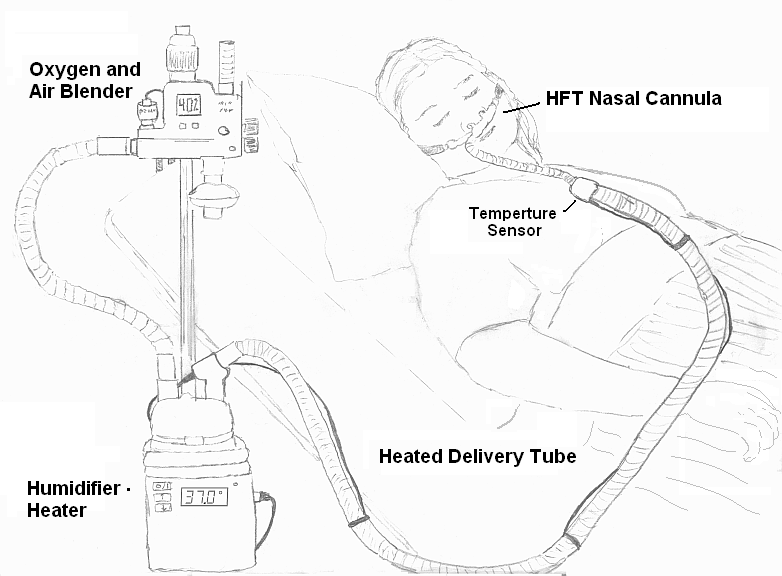
High-flow nasal cannula therapy is an oxygen supply system capable of delivering up to 100% humidified and heated oxygen at a flow rate of up to 60 liters per minute.[29] Patients with high-flow nasal cannulas are generally in critical condition and require advanced monitoring. See Figure 11.12[30] for an illustration of a high-flow nasal cannula system that is initially set up by a respiratory therapist and then maintained by a nurse.
Simple Mask
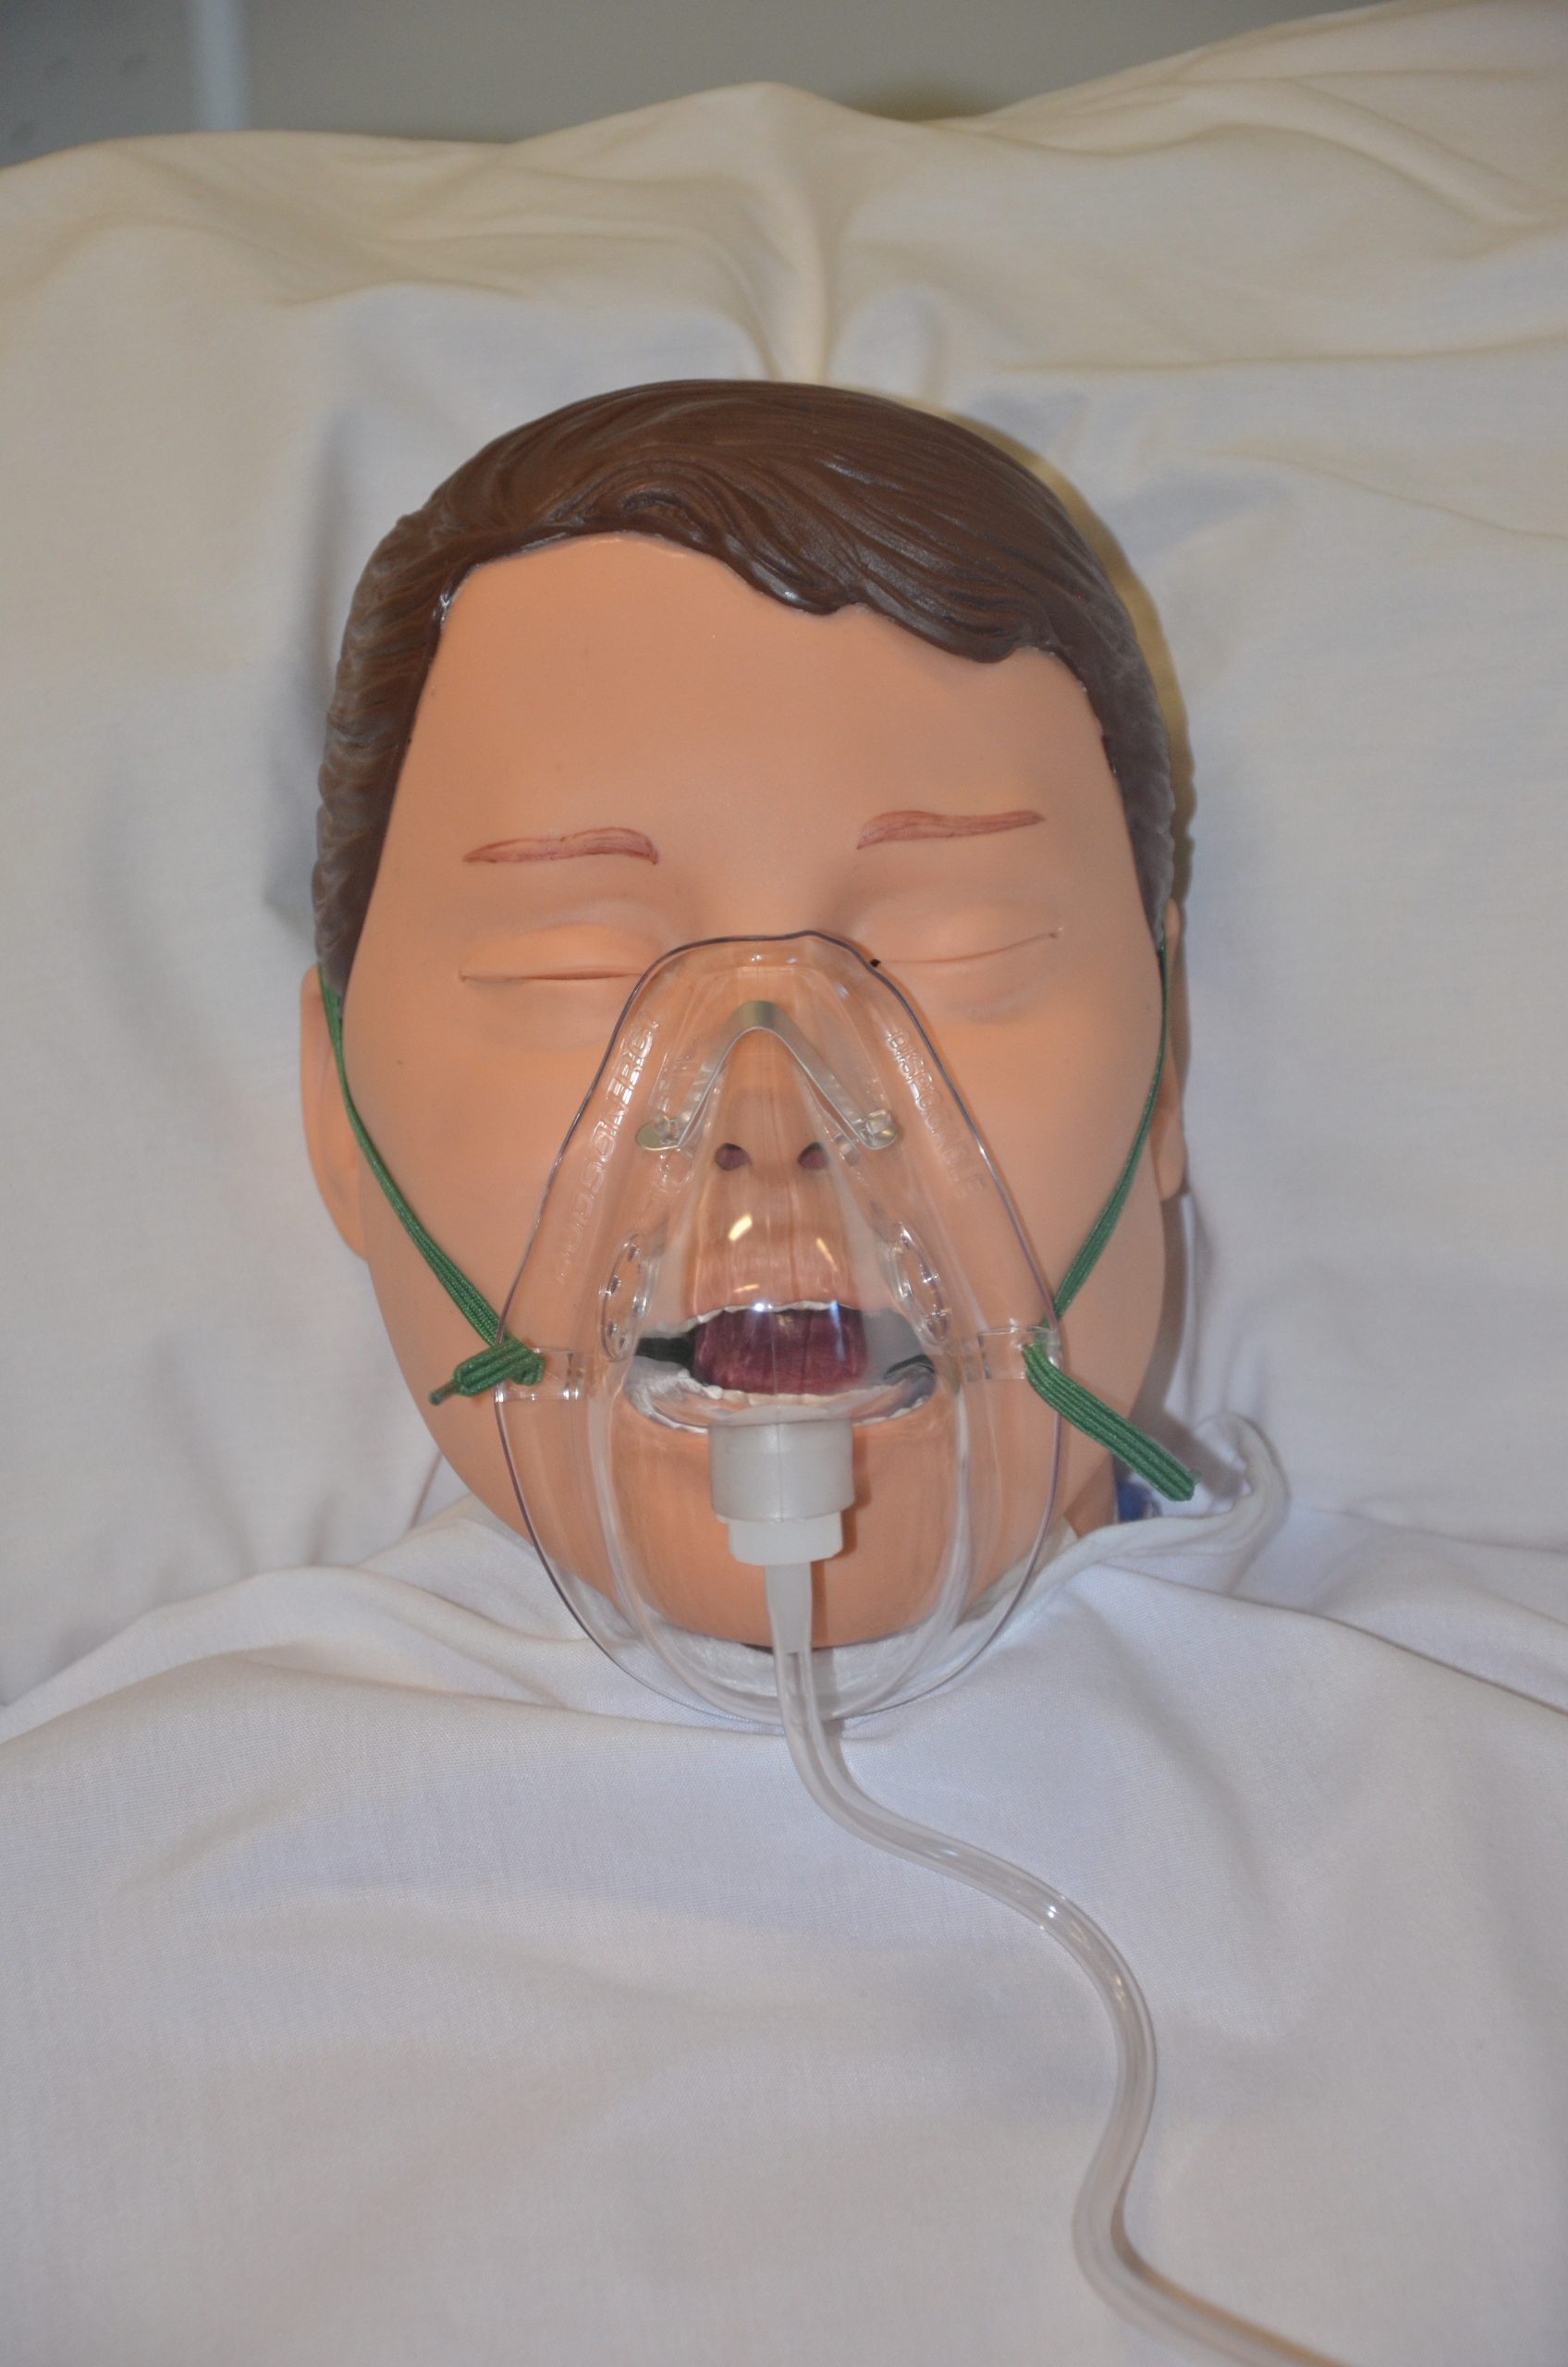
A simple mask fits over the mouth and nose of the patient and contains exhalation ports (i.e., holes on the side of the mask) through which the patient exhales carbon dioxide. These holes should always remain open. The mask is held in place by an elastic band placed around the back of the head. It also has a metal piece near the top that can be pinched and shaped over the patient's nose to create a better fit. Humidified air may be attached if the oxygen concentrations are drying for the patient. See Figure 11.13[31] for an image of a simple face mask.
Flow Rate: Simple masks should be set to a flow rate of 6 to 10 L/min, resulting in oxygen concentration (FiO2) levels of 35%-50%. The flow rate should never be set below 6 L/min because this can result in the patient rebreathing their exhaled carbon dioxide.
Advantages: Face masks are used to provide moderate oxygen concentrations. Their efficiency in oxygen delivery depends on how well the mask fits and the patient’s respiratory demands.
Disadvantages: Face masks must be removed when eating, and they may feel confining for some patients who feel claustrophobic with the mask on.[32]
Non-Rebreather Mask
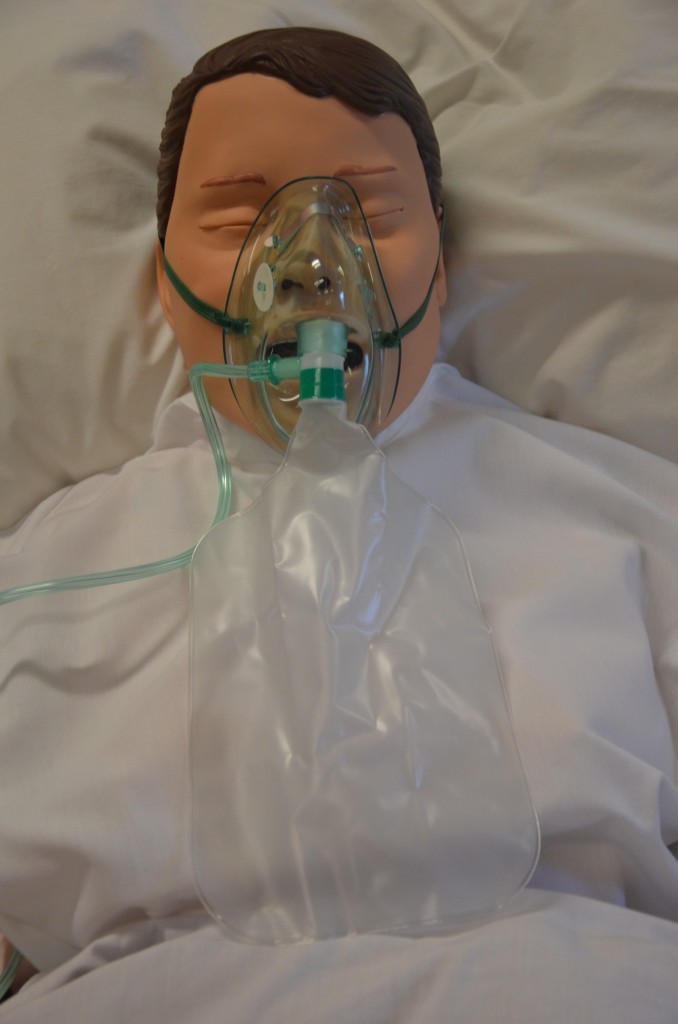
A non-rebreather mask consists of a mask attached to a reservoir bag that is attached with tubing to a flow meter. See Figure 11.14[33] for an image of a non-rebreather mask. It has a series of one-way valves between the mask and the bag and also on the covers on the exhalation ports. The reservoir bag should never totally deflate; if the bag deflates, there is a problem and immediate intervention is required. The one-way valves function so that on inspiration, the patient only breathes in from the reservoir bag; on exhalation, carbon dioxide is directed out through the exhalation ports. Non-rebreather masks are used for patients who can breathe on their own but require higher concentrations of oxygen to maintain satisfactory blood oxygenation levels.
Flow rate: The flow rate for a non-rebreather mask should be set to deliver a minimum of 10 to 15 L/minute. The reservoir bag should be inflated prior to placing the mask on the patient. With a good fit, the non-rebreather mask can deliver between 60% and 80% FiO2.
Advantages: Non-rebreather masks deliver high levels of oxygen noninvasively to patients who can otherwise breathe unassisted.
Disadvantages: Due to the one-way valves in non-rebreather masks, there is a high risk of suffocation if the gas flow is interrupted. The mask requires a tight seal and may feel hot and confining to the patient. It will interfere with talking, and the patient cannot eat with the mask on.
Partial Rebreather Mask
The partial rebreather mask looks very similar to the non-rebreather mask. The difference between the masks is a partial rebreather mask does not contain one-way valves, so the patient’s exhaled air mixes with their inhaled air. A partial rebreather mask requires 10-15 L/min of oxygen, but only delivers 35-50% FiO2.
Venturi Mask
Venturi masks are indicated for patients who require a specific amount of supplemental oxygen to avoid complications, such as those with chronic obstructive pulmonary disease (COPD). Different types of adaptors are attached to a face mask that set the flow rate to achieve a specific FiO2 ranging from 24% to 60%. Venturi adapters are typically set up by a respiratory therapist, but in some facilities they may be set up by a nurse according to agency policy.
Flow rate: The flow rate depends on the adaptor and does not correspond to the flow meter. Consult with a respiratory therapist before changing the flow rate.
Advantages: A specific amount of FiO2 is delivered to patients whose breathing status may be affected by high levels of oxygen.
Continuous Positive Airway Pressure (CPAP)
A continuous positive airway pressure (CPAP) device is used for people who are able to breathe spontaneously on their own but need help in keeping their airway unobstructed, such as those with obstructive sleep apnea. (See Table 11.2c in the “Basic Concepts of Oxygenation” section for more information about obstructive sleep apnea.) The CPAP device consists of a special mask that covers the patient’s nose, or nose and mouth, and is attached to a machine that continuously applies mild air pressure to keep the patient’s airways from collapsing.
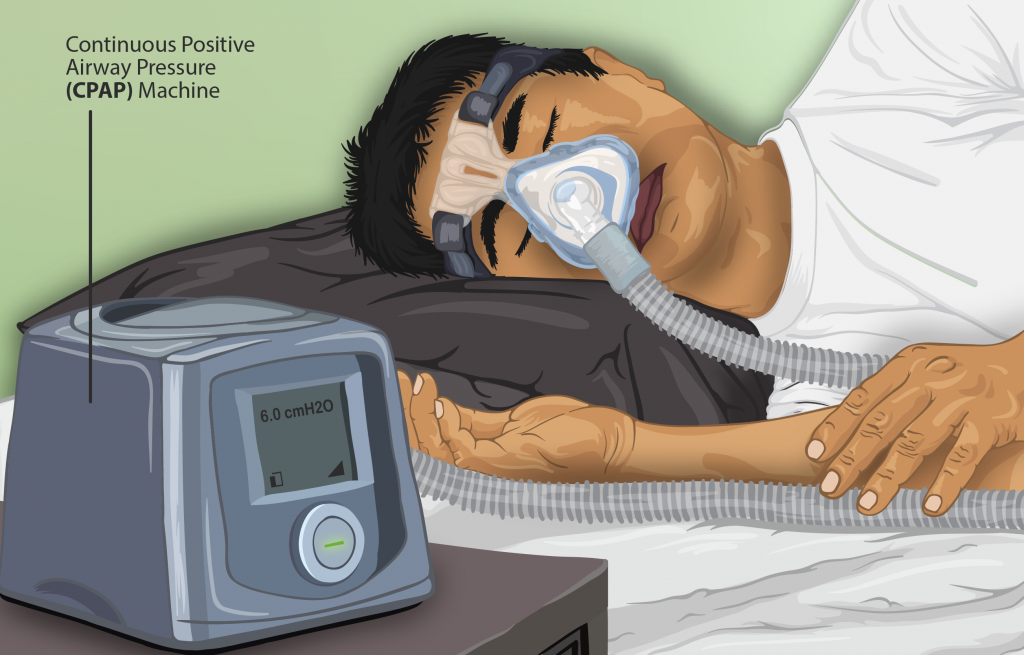
A prescription is required for a CPAP device in the hospital or patient’s home environment. In the hospital, the FiO2 is set up with the CPAP mask by the respiratory therapist. In a home setting, an adapter is added so that oxygen is attached using a flowmeter with preprogrammed settings so the patient and/or nurse are only required to turn the machine on before sleeping and off upon awakening. It is important to keep the mask and tubing clean to prevent infection, so be sure to follow agency policy for cleaning the equipment regularly. If a humidifier is attached, distilled water or sterile water should be used to fill it, but never tap water. See Figure 11.15[34] for an illustration of a patient wearing a CPAP device while sleeping.
Video Review of FDA Recommendations on How to Use a CPAP Mask[35]
BiPAP
A Bilevel Positive Airway Pressure (BiPAP) device is similar to a CPAP device in that it is used to prevent airways from collapsing, but BiPAP devices have two pressure settings. One setting occurs during inhalation and a lower pressure setting is used during exhalation. Patients using BiPAP devices in their home environment for obstructive sleep apnea often find these two pressures more tolerable because they don’t have to exhale against continuous pressure. In acute-care settings, BiPAP devices are also used for patients in acute respiratory distress as a noninvasive alternative to intubation and mechanical ventilation and are managed by respiratory therapists. BiPAP devices in home settings are set up in a similar manner as CPAP machines for ease of use. See Figure 11.16[36] for an image of a simulated patient wearing a BiPAP mask in a hospital setting with continuous pulse oximetry monitoring.

Bag Valve Mask (Ambu Bag)
A bag valve mask, commonly known as an “Ambu bag,” is a handheld device used in emergency situations for patients who are not breathing (respiratory arrest) or who are not breathing adequately (respiratory failure). In this manner, this device is different from the other devices because it assists with ventilation, the movement of air into and out of the lungs, as well as oxygenation. See Figure 11.17[37] for an image of a bag valve mask. Bag valve masks are produced in different sizes for infants, children, and adults to prevent lung injury, so it is important to use the correct size for the patient.
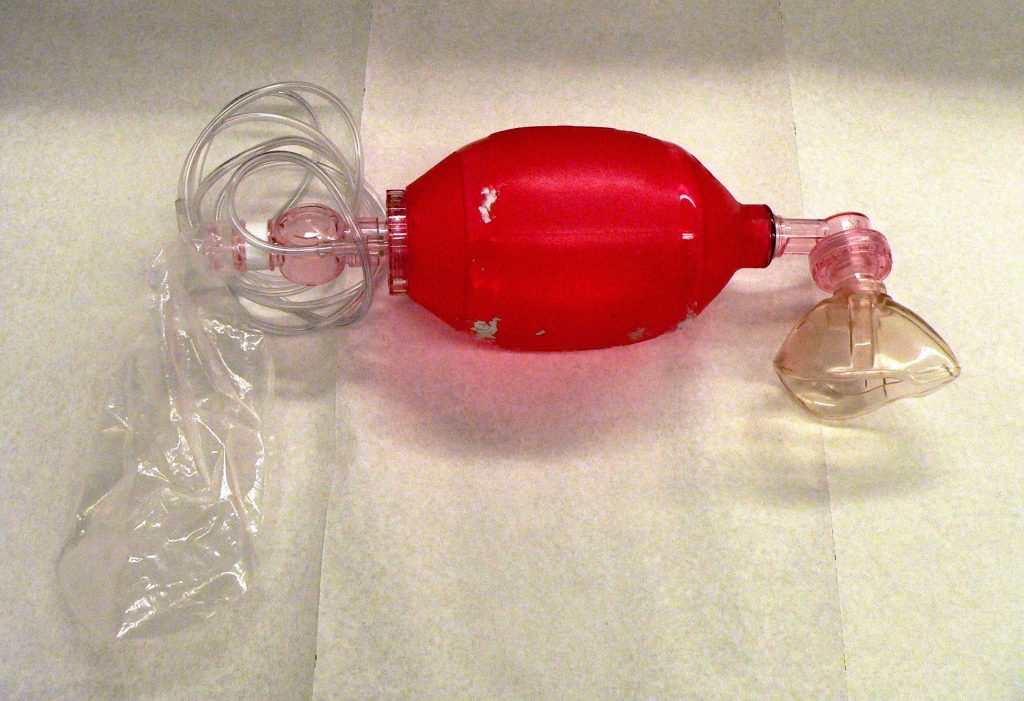
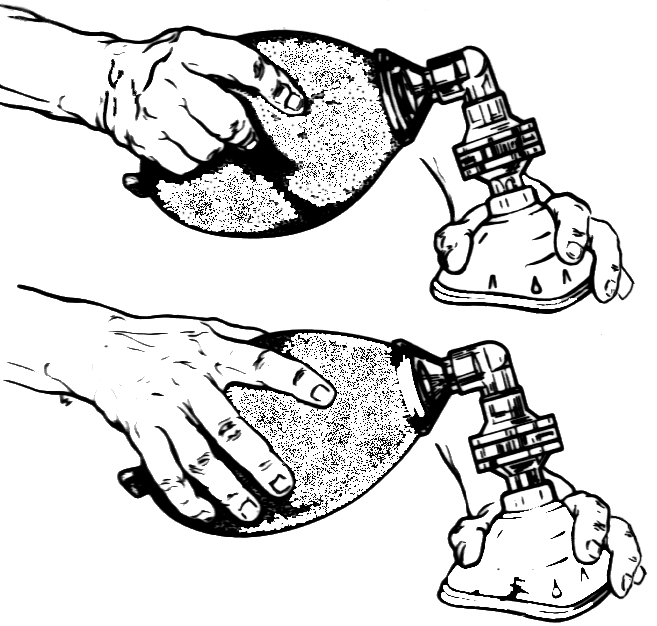
When using a bag mask valve, the rescuer manually compresses the bag to force air into the lungs. Squeezing the bag once every 5 to 6 seconds for an adult or once every 3 seconds for an infant or child provides an adequate respiratory rate. In inpatient settings, the bag mask valve is attached to an oxygen supply to increase the concentration of oxygenation provided with each breath. See Figure 11.18[38] for an illustration of operating a bag valve mask.
It is vital to obtain a tight seal of the mask to the patient’s face, but this is difficult for a single rescuer to achieve. Therefore, two rescuers are recommended; one rescuer performs a jaw thrust maneuver, secures the mask to the patient's face with both hands, and focuses on maintaining a leak-proof mask seal, while the other rescuer squeezes the bag and focuses on the amount and the timing.
Flow rate: The flow rate for a bag valve mask attached to an oxygen source should be set to 15 L/minute, resulting in FiO2 of 100%.
Advantages: A bag valve mask is portable and provides immediate assistance to patients in respiratory failure or respiratory arrest. It also can be used to hyperoxygenate patients before procedures that can cause hypoxia, such as tracheal suctioning.
Disadvantages: The rate and depth of compression of the bag must be closely monitored to prevent injury to the patient. In the event of respiratory failure when the patient is still breathing, the bag compressions must be coordinated with the patient’s inhalations to ensure that oxygen is delivered and asynchrony of breaths is prevented. Complications may also result from overinflating or overpressurizing the patient. Complications include lung injury or the inflation of the stomach that can lead to aspiration of stomach contents. Additionally, rescuers may tire after a few minutes of manually compressing the bag, resulting in less than optimal ventilation. Alternatively, an endotracheal tube (ET) can be inserted by an advanced practitioner to substitute for the mask portion of this device. See more information about endotracheal tubes below.
Endotracheal Intubation
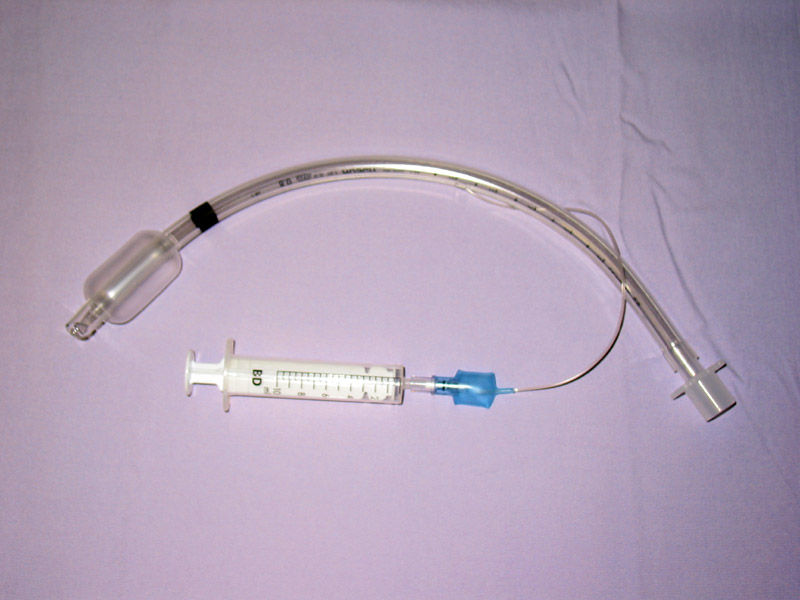
When a patient is receiving general anesthesia prior to a procedure or surgery or is experiencing respiratory failure or respiratory arrest, an endotracheal tube (ET) is inserted by an advanced practitioner, such as a respiratory therapist, paramedic, or anesthesiologist, to maintain a secure airway. The ET tube is sealed within the trachea with an inflatable cuff, and oxygen is supplied via a bag valve mask or via mechanical ventilation. See Figure 11.19[39] for an image of a cuffed endotracheal tube.
Mechanical Ventilator
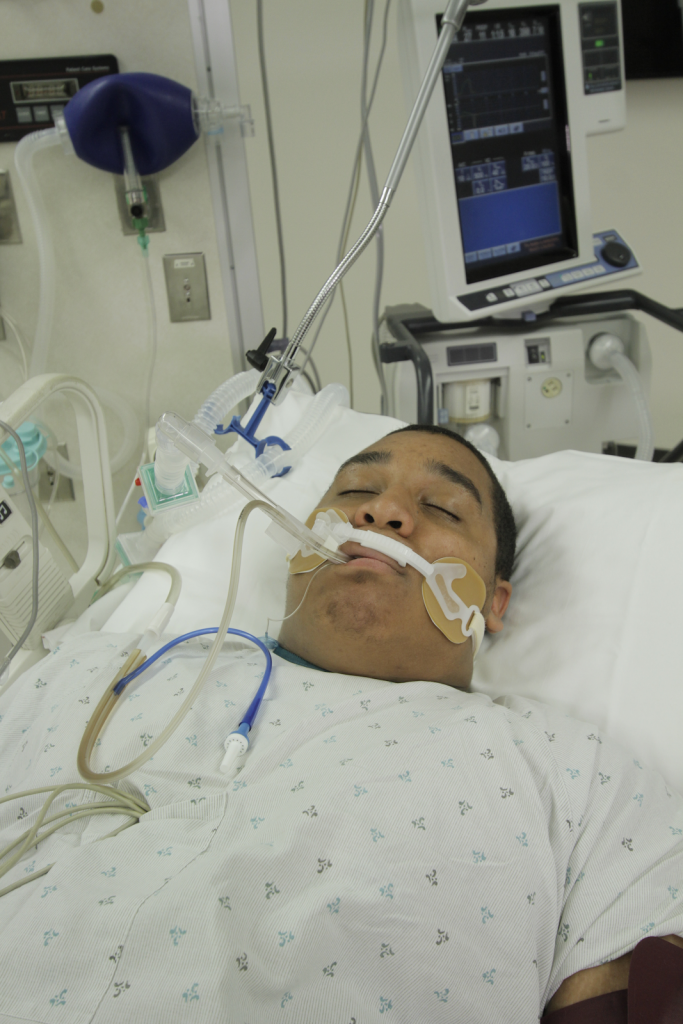
A mechanical ventilator is a machine attached to an endotracheal tube to assist or replace spontaneous breathing. Mechanical ventilation is termed invasive because it requires placement of a device inside the trachea through the mouth, such as an endotracheal tube. Mechanical ventilators are managed by respiratory therapists via protocol or provider order. FiO2 can be set from 21-100%. Nurses collaborate with respiratory therapists and the health care providers regarding the overall care of the patient on a mechanical ventilator. See Figure 11.20[40] for an image of a simulated patient who is intubated with an endotracheal tube and attached to a mechanical ventilator.
Tracheostomy
A tracheostomy is a surgically-made hole called a stoma that goes from the front of the patient’s neck into the trachea. A tracheostomy tube is placed through the stoma and directly into the trachea to maintain an open (patent) airway and to administer oxygen. A tracheostomy may be performed emergently or as a planned procedure. Read more about tracheostomies in the "Tracheostomy Care and Suctioning" chapter.
Flow Rates and Oxygen Percentages
When administering oxygen to a patient, it is important to ensure that oxygen flow rates are appropriately set according to the type of administration device. Review Table 11.3a to review appropriate settings for various types of oxygenation devices.
Table 11.3a Settings of Oxygenation Devices
| Device | Flow Rates and Oxygen Percentage |
|---|---|
| Nasal Cannula | Flow rate: 1-6 L/min
FiO2: 24% to 44% |
| High-Flow Nasal Cannula | Flow rate: up to 60 L/min
FiO2: Up to 100% |
| Simple Mask | Flow rate: 6-10 L/min
FiO2: 28% to 50% |
| Non-Rebreather Mask | Flow rate: 10 to 15 L/min
FiO2: 60-80% Safety Note: The reservoir bag should always be partially inflated. |
| CPAP, BiPAP, Venturi Mask, Mechanical Ventilator | Use the settings provided by the respiratory therapist and/or provider order.
|
| Bag Valve Mask | Flow rate: 15 L/min
FiO2: 100% Squeeze the bag once every 5 to 6 seconds for an adult or once every 3 seconds for an infant or child. |
Safety with Oxygen Therapy
Oxygen therapy supports life, but it also supports fire. While there are many benefits to oxygen therapy, there are also many hazards. Oxygen must be administered cautiously and according to the safety guidelines in Table 11.3b.[41]
Table 11.3b Oxygen Therapy Safety Guidelines
| Guideline | Additional Information |
|---|---|
| Remember that oxygen is a medication. | Oxygen is a medication and should not be adjusted without consultation with a physician or respiratory therapist. |
| Store oxygen cylinders correctly. | When using oxygen cylinders, store them upright, chained, or in appropriate holders so that they will not fall. Full oxygen tanks should be stored separately from partially-full or empty oxygen tanks. |
| Use tank holders appropriately. | When transporting a patient, proper tank holders must be used per Joint Commission guidelines. Tanks should never be placed on the patient’s bed. |
| Do not allow smoking near the oxygen devices. | Oxygen supports combustion. No smoking is permitted around any oxygen delivery devices in the hospital or home environment. |
| Keep oxygen cylinders away from heat sources. | Keep oxygen delivery systems at least 5 feet from any heat source. |
| Check for electrical hazards in the home or hospital prior to use. | Determine that electrical equipment in the room or home is in safe working condition. A small electrical spark in the presence of oxygen will result in a serious fire. The use of a gas stove, kerosene space heater, or smoker is unsafe in the presence of oxygen. Avoid items that may create a spark (e.g., electrical razor, hair dryer, synthetic fabrics that cause static electricity, or mechanical toys) with nasal cannula in use. Petroleum-based lubricants should not be used on the lips or around the nasal cannula. |
| Check levels of oxygen in portable tanks. | Check oxygen levels of portable tanks before transporting a patient to ensure that there is enough oxygen in the tank. |
There are several types of equipment a nurse may use when providing oxygen therapy to a patient. Each device is described in detail below.
Pulse Oximeter
A pulse oximeter is a commonly used portable device used to obtain a patient’s oxygen saturation level at the bedside or in a clinic. See Figure 11.6[42] for an image of a portable pulse oximeter. The pulse oximeter, commonly referred to as a “Pulse Ox,” is an electronic device that measures the oxygen saturation of hemoglobin in a patient’s red blood cells, referred to as SpO2. The normal range for SpO2 for an adult without an underlying respiratory condition is above 92%. The pulse oximeter analyzes light produced by the probe as it passes through the finger to determine the saturation level of the hemoglobin molecule. Pulse oximeter probes can be attached to a patient’s finger, forehead, nose, foot, ear, or toe. However, pulse oximetry readings can be inaccurate if the patient is wearing nail polish, has reduced perfusion of the extremities due to a cardiovascular condition, or has other molecules attached to hemoglobin such as in the case of carbon monoxide poisoning.[43]

Oxygen Flow Meter
In inpatient settings, rooms are equipped with wall-mounted oxygen supply outlets that are nationally standardized in a green color, whereas air outlets are standardized with a yellow color. Oxygen flow meters are attached to the green oxygen outlets, and then the oxygenation device is attached to the flow meter. See Figure 11.7[44] for an image of an oxygen flow meter. An oxygen flow meter consists of a glass cylinder containing a steel ball with an opening through which oxygen from the supply source is injected through an adapter. This adapter is commonly referred to as a “tree” because of its appearance. Oxygen is turned on, and the flow rate of oxygen is controlled by turning the green valve on the side of the glass cylinder. The flow rate is set according to the location of a steel ball inside the cylinder and the numbered lines on the glass cylinder. For example, in Figure 11.7, the flow rate is currently set at 2 liter per minute (L/min). It is essential to implement safety precautions whenever oxygen is used. Read more about "Safety with Oxygen Therapy" later in this section.

Portable Oxygen Supply Devices
Portable oxygen tanks are commonly used when transporting a patient to procedures within the hospital or to other agencies. See Figure 11.8[45] for an image of a portable oxygen tank. Oxygenation devices are connected to the tank in a similar manner as the wall-mounted oxygen flow meter. It is crucial for nurses and transporters to ensure the tank has an adequate amount of oxygen for use during transport, is turned on, and the appropriate flow rate is set.

Instead of oxygen tanks, oxygen concentrators are commonly used by patients in their home environment. See Figure 11.9[46] for an image of a home oxygen concentrator. Oxygen concentrators are also produced in portable sizes that are lightweight and easy for patient use while travelling and mobile in the community. See Figure 11.10[47] for an image of a portable oxygen concentrator. Oxygen concentrators work by taking the 21% concentration of oxygen in the air, running it through a molecular sleeve to remove the nitrogen and concentrating the oxygen to a 96% level, thus producing between 1 and 6 liters per minute of oxygen. Oxygen concentrators may provide pulse flow or continuous flow. Pulse flow only occurs on inhalation, whereas continuous flow delivers oxygen throughout the entire breath cycle. Pulse versions are the most lightweight because oxygen is provided only as needed by the patient.[48]


Nasal Cannula
A nasal cannula is the simplest oxygenation device and consists of oxygen tubing connected to two short prongs that are inserted into the patient’s nares. See Figure 11.11[49] for an image of a nasal cannula. The tubing is connected to the flow meter of the oxygen supply source. To prevent drying out the patient's mucus membranes, humidification may be added for hospitalized patients receiving oxygen flow rates greater than 4 L/minute or for those receiving oxygen therapy for longer periods of time.[50]
Nasal cannulas are the most common type of oxygen equipment. They are used for short- and long-term therapy (i.e., COPD patients) and are best used with stable patients who require low amounts of oxygen.
Flow rate: Nasal cannulas can have a flow rate ranging from 1 to 5 liters per minute (L/min), with a 4% increase in FiO2 for every liter of oxygen, resulting in range of fraction of inspired oxygen (FiO2) levels of 24-44%.
Advantages: Nasal cannulas are easy to use, inexpensive, and disposable. They are convenient because the patient can talk and eat while receiving oxygen.
Limitations: The nasal prongs of nasal cannula are easily dislodged, especially when the patient is sleeping. The tubing placed on the face can cause skin breakdown in the nose and above the ears, so the nurse must vigilantly monitor these areas. Based on agency policy, the nurse should add padding to the oxygen tubing as needed to avoid skin breakdown and may apply a water-based lubricant to prevent drying. However, petroleum-based lubricant should not be used due to the risk of flammability. Nasal cannulas are not as effective if the patient is a mouth breather or has blocked nostrils, a deviated septum, or nasal polyps.[51]

High-Flow Nasal Cannula
High-flow nasal cannula therapy is an oxygen supply system capable of delivering up to 100% humidified and heated oxygen at a flow rate of up to 60 liters per minute.[52] Patients with high-flow nasal cannulas are generally in critical condition and require advanced monitoring. See Figure 11.12[53] for an illustration of a high-flow nasal cannula system that is initially set up by a respiratory therapist and then maintained by a nurse.

Simple Mask
A simple mask fits over the mouth and nose of the patient and contains exhalation ports (i.e., holes on the side of the mask) through which the patient exhales carbon dioxide. These holes should always remain open. The mask is held in place by an elastic band placed around the back of the head. It also has a metal piece near the top that can be pinched and shaped over the patient's nose to create a better fit. Humidified air may be attached if the oxygen concentrations are drying for the patient. See Figure 11.13[54] for an image of a simple face mask.
Flow Rate: Simple masks should be set to a flow rate of 6 to 10 L/min, resulting in oxygen concentration (FiO2) levels of 35%-50%. The flow rate should never be set below 6 L/min because this can result in the patient rebreathing their exhaled carbon dioxide.
Advantages: Face masks are used to provide moderate oxygen concentrations. Their efficiency in oxygen delivery depends on how well the mask fits and the patient’s respiratory demands.
Disadvantages: Face masks must be removed when eating, and they may feel confining for some patients who feel claustrophobic with the mask on.[55]

Non-Rebreather Mask
A non-rebreather mask consists of a mask attached to a reservoir bag that is attached with tubing to a flow meter. See Figure 11.14[56] for an image of a non-rebreather mask. It has a series of one-way valves between the mask and the bag and also on the covers on the exhalation ports. The reservoir bag should never totally deflate; if the bag deflates, there is a problem and immediate intervention is required. The one-way valves function so that on inspiration, the patient only breathes in from the reservoir bag; on exhalation, carbon dioxide is directed out through the exhalation ports. Non-rebreather masks are used for patients who can breathe on their own but require higher concentrations of oxygen to maintain satisfactory blood oxygenation levels.
Flow rate: The flow rate for a non-rebreather mask should be set to deliver a minimum of 10 to 15 L/minute. The reservoir bag should be inflated prior to placing the mask on the patient. With a good fit, the non-rebreather mask can deliver between 60% and 80% FiO2.
Advantages: Non-rebreather masks deliver high levels of oxygen noninvasively to patients who can otherwise breathe unassisted.
Disadvantages: Due to the one-way valves in non-rebreather masks, there is a high risk of suffocation if the gas flow is interrupted. The mask requires a tight seal and may feel hot and confining to the patient. It will interfere with talking, and the patient cannot eat with the mask on.

Partial Rebreather Mask
The partial rebreather mask looks very similar to the non-rebreather mask. The difference between the masks is a partial rebreather mask does not contain one-way valves, so the patient’s exhaled air mixes with their inhaled air. A partial rebreather mask requires 10-15 L/min of oxygen, but only delivers 35-50% FiO2.
Venturi Mask
Venturi masks are indicated for patients who require a specific amount of supplemental oxygen to avoid complications, such as those with chronic obstructive pulmonary disease (COPD). Different types of adaptors are attached to a face mask that set the flow rate to achieve a specific FiO2 ranging from 24% to 60%. Venturi adapters are typically set up by a respiratory therapist, but in some facilities they may be set up by a nurse according to agency policy.
Flow rate: The flow rate depends on the adaptor and does not correspond to the flow meter. Consult with a respiratory therapist before changing the flow rate.
Advantages: A specific amount of FiO2 is delivered to patients whose breathing status may be affected by high levels of oxygen.
Continuous Positive Airway Pressure (CPAP)
A continuous positive airway pressure (CPAP) device is used for people who are able to breathe spontaneously on their own but need help in keeping their airway unobstructed, such as those with obstructive sleep apnea. (See Table 11.2c in the “Basic Concepts of Oxygenation” section for more information about obstructive sleep apnea.) The CPAP device consists of a special mask that covers the patient’s nose, or nose and mouth, and is attached to a machine that continuously applies mild air pressure to keep the patient’s airways from collapsing.
A prescription is required for a CPAP device in the hospital or patient’s home environment. In the hospital, the FiO2 is set up with the CPAP mask by the respiratory therapist. In a home setting, an adapter is added so that oxygen is attached using a flowmeter with preprogrammed settings so the patient and/or nurse are only required to turn the machine on before sleeping and off upon awakening. It is important to keep the mask and tubing clean to prevent infection, so be sure to follow agency policy for cleaning the equipment regularly. If a humidifier is attached, distilled water or sterile water should be used to fill it, but never tap water. See Figure 11.15[57] for an illustration of a patient wearing a CPAP device while sleeping.

Video Review of FDA Recommendations on How to Use a CPAP Mask[58]
BiPAP
A Bilevel Positive Airway Pressure (BiPAP) device is similar to a CPAP device in that it is used to prevent airways from collapsing, but BiPAP devices have two pressure settings. One setting occurs during inhalation and a lower pressure setting is used during exhalation. Patients using BiPAP devices in their home environment for obstructive sleep apnea often find these two pressures more tolerable because they don’t have to exhale against continuous pressure. In acute-care settings, BiPAP devices are also used for patients in acute respiratory distress as a noninvasive alternative to intubation and mechanical ventilation and are managed by respiratory therapists. BiPAP devices in home settings are set up in a similar manner as CPAP machines for ease of use. See Figure 11.16[59] for an image of a simulated patient wearing a BiPAP mask in a hospital setting with continuous pulse oximetry monitoring.

Bag Valve Mask (Ambu Bag)
A bag valve mask, commonly known as an “Ambu bag,” is a handheld device used in emergency situations for patients who are not breathing (respiratory arrest) or who are not breathing adequately (respiratory failure). In this manner, this device is different from the other devices because it assists with ventilation, the movement of air into and out of the lungs, as well as oxygenation. See Figure 11.17[60] for an image of a bag valve mask. Bag valve masks are produced in different sizes for infants, children, and adults to prevent lung injury, so it is important to use the correct size for the patient.

When using a bag mask valve, the rescuer manually compresses the bag to force air into the lungs. Squeezing the bag once every 5 to 6 seconds for an adult or once every 3 seconds for an infant or child provides an adequate respiratory rate. In inpatient settings, the bag mask valve is attached to an oxygen supply to increase the concentration of oxygenation provided with each breath. See Figure 11.18[61] for an illustration of operating a bag valve mask.
It is vital to obtain a tight seal of the mask to the patient’s face, but this is difficult for a single rescuer to achieve. Therefore, two rescuers are recommended; one rescuer performs a jaw thrust maneuver, secures the mask to the patient's face with both hands, and focuses on maintaining a leak-proof mask seal, while the other rescuer squeezes the bag and focuses on the amount and the timing.

Flow rate: The flow rate for a bag valve mask attached to an oxygen source should be set to 15 L/minute, resulting in FiO2 of 100%.
Advantages: A bag valve mask is portable and provides immediate assistance to patients in respiratory failure or respiratory arrest. It also can be used to hyperoxygenate patients before procedures that can cause hypoxia, such as tracheal suctioning.
Disadvantages: The rate and depth of compression of the bag must be closely monitored to prevent injury to the patient. In the event of respiratory failure when the patient is still breathing, the bag compressions must be coordinated with the patient’s inhalations to ensure that oxygen is delivered and asynchrony of breaths is prevented. Complications may also result from overinflating or overpressurizing the patient. Complications include lung injury or the inflation of the stomach that can lead to aspiration of stomach contents. Additionally, rescuers may tire after a few minutes of manually compressing the bag, resulting in less than optimal ventilation. Alternatively, an endotracheal tube (ET) can be inserted by an advanced practitioner to substitute for the mask portion of this device. See more information about endotracheal tubes below.
Endotracheal Intubation
When a patient is receiving general anesthesia prior to a procedure or surgery or is experiencing respiratory failure or respiratory arrest, an endotracheal tube (ET) is inserted by an advanced practitioner, such as a respiratory therapist, paramedic, or anesthesiologist, to maintain a secure airway. The ET tube is sealed within the trachea with an inflatable cuff, and oxygen is supplied via a bag valve mask or via mechanical ventilation. See Figure 11.19[62] for an image of a cuffed endotracheal tube.

Mechanical Ventilator
A mechanical ventilator is a machine attached to an endotracheal tube to assist or replace spontaneous breathing. Mechanical ventilation is termed invasive because it requires placement of a device inside the trachea through the mouth, such as an endotracheal tube. Mechanical ventilators are managed by respiratory therapists via protocol or provider order. FiO2 can be set from 21-100%. Nurses collaborate with respiratory therapists and the health care providers regarding the overall care of the patient on a mechanical ventilator. See Figure 11.20[63] for an image of a simulated patient who is intubated with an endotracheal tube and attached to a mechanical ventilator.

Tracheostomy
A tracheostomy is a surgically-made hole called a stoma that goes from the front of the patient’s neck into the trachea. A tracheostomy tube is placed through the stoma and directly into the trachea to maintain an open (patent) airway and to administer oxygen. A tracheostomy may be performed emergently or as a planned procedure. Read more about tracheostomies in the "Tracheostomy Care and Suctioning" chapter.
Flow Rates and Oxygen Percentages
When administering oxygen to a patient, it is important to ensure that oxygen flow rates are appropriately set according to the type of administration device. Review Table 11.3a to review appropriate settings for various types of oxygenation devices.
Table 11.3a Settings of Oxygenation Devices
| Device | Flow Rates and Oxygen Percentage |
|---|---|
| Nasal Cannula | Flow rate: 1-6 L/min
FiO2: 24% to 44% |
| High-Flow Nasal Cannula | Flow rate: up to 60 L/min
FiO2: Up to 100% |
| Simple Mask | Flow rate: 6-10 L/min
FiO2: 28% to 50% |
| Non-Rebreather Mask | Flow rate: 10 to 15 L/min
FiO2: 60-80% Safety Note: The reservoir bag should always be partially inflated. |
| CPAP, BiPAP, Venturi Mask, Mechanical Ventilator | Use the settings provided by the respiratory therapist and/or provider order.
|
| Bag Valve Mask | Flow rate: 15 L/min
FiO2: 100% Squeeze the bag once every 5 to 6 seconds for an adult or once every 3 seconds for an infant or child. |
Safety with Oxygen Therapy
Oxygen therapy supports life, but it also supports fire. While there are many benefits to oxygen therapy, there are also many hazards. Oxygen must be administered cautiously and according to the safety guidelines in Table 11.3b.[64]
Table 11.3b Oxygen Therapy Safety Guidelines
| Guideline | Additional Information |
|---|---|
| Remember that oxygen is a medication. | Oxygen is a medication and should not be adjusted without consultation with a physician or respiratory therapist. |
| Store oxygen cylinders correctly. | When using oxygen cylinders, store them upright, chained, or in appropriate holders so that they will not fall. Full oxygen tanks should be stored separately from partially-full or empty oxygen tanks. |
| Use tank holders appropriately. | When transporting a patient, proper tank holders must be used per Joint Commission guidelines. Tanks should never be placed on the patient’s bed. |
| Do not allow smoking near the oxygen devices. | Oxygen supports combustion. No smoking is permitted around any oxygen delivery devices in the hospital or home environment. |
| Keep oxygen cylinders away from heat sources. | Keep oxygen delivery systems at least 5 feet from any heat source. |
| Check for electrical hazards in the home or hospital prior to use. | Determine that electrical equipment in the room or home is in safe working condition. A small electrical spark in the presence of oxygen will result in a serious fire. The use of a gas stove, kerosene space heater, or smoker is unsafe in the presence of oxygen. Avoid items that may create a spark (e.g., electrical razor, hair dryer, synthetic fabrics that cause static electricity, or mechanical toys) with nasal cannula in use. Petroleum-based lubricants should not be used on the lips or around the nasal cannula. |
| Check levels of oxygen in portable tanks. | Check oxygen levels of portable tanks before transporting a patient to ensure that there is enough oxygen in the tank. |
When administering oxygen therapy, it is important for the nurse to assess the patient before, during, and after the procedure and document the findings.
Subjective Assessment
Prior to initiating oxygen therapy, if conditions warrant, the nurse should briefly obtain a history of respiratory conditions and collect data regarding current symptoms associated with the patient’s feeling of shortness of breath. The duration of this focused assessment should be modified based on the severity of the patient’s dyspnea. See Table 11.4 for focused interview questions related to oxygen therapy. This information is used to customize the oxygen delivery device and flow rate for the patient. For example, supplemental oxygen is typically initiated in nonemergency situations with a nasal cannula at 1-2 liters per minute (L/min), but a patient with a history of chronic obstructive pulmonary disease (COPD) may require a different device such as a Venturi mask.
Table 11.4 Focused Interview Questions for Subjective Assessment of Dyspnea
| Interview Questions | Follow-up |
|---|---|
| Please rate your current feeling of shortness of breath from 0-10, "0" being no shortness of breath and "10" being the worst shortness of breath you have ever experienced. | Note: If the shortness of breath is severe, associated with chest pain, or if there are imminent signs of respiratory failure, discontinue the subjective assessment and obtain emergency assistance. |
| Are you experiencing any additional symptoms such as chest pain, cough, or a feeling of swelling in your throat or tongue? | Please describe.
Note: If the patient describes severe symptoms that could indicate imminent blockage of the airway, obtain emergency assistance. When did it start? Is the cough productive of phlegm? If yes, what color and what is the amount? Does the chest pain radiate elsewhere? |
| Have you ever been diagnosed with respiratory conditions such as asthma or COPD? | Please describe. |
| Are you currently taking any medications, herbs, or supplements to help you breathe? | Please identify what you are taking and the dosage.
If you are using inhalers on an as-needed basis, how often are you using them and has the frequency increased lately? |
| Have you received oxygen therapy previously?
|
Please describe.
Do you use oxygen therapy at home? What is your normal flow rate? Do you use CPAP or BiPAP devices at home? |
| Do you smoke? | Have you considered quitting? |
Objective Assessment
Prior to applying supplemental oxygen, objective data regarding patient status should quickly be obtained such as airway clearance, respiratory rate, pulse oximetry, and lung sounds. Signs of cyanosis in the skin or nail bed assessment should also be noted. Within a few minutes after initiating oxygen administration, the nurse should evaluate for improvement of these indicators, and if no improvement is noted, then additional actions should be taken. At any point, if the nurse feels that the patient’s condition is deteriorating, emergency action should be taken such as calling the rapid response team or 911.
Depending upon the severity of patient condition, serial ABG results may also be monitored to determine effectiveness of oxygenation interventions.
After oxygen therapy is initiated, it is important to closely monitor for skin breakdown at pressure points. For example, nasal cannula tubing often causes skin breakdown in the nares or over the ears, so protective foam dressings may need to be applied.
Life Span Considerations
Children
Different sized oxygen equipment is used for infants and children. Additionally, oxygen tubing may need to be secured to a child’s face with tape to prevent them from pulling it off. For infants, the pulse oximeter probe is usually attached to the palm or foot.
Older Adults
If a patient is oxygen-dependent, ensure that extension tubing is applied so the patient is able to reach the bathroom with the oxygen device in place. However, be aware of the increased risk for falls due to the excess tubing. Keeping the oxygen tubing coiled up at the head of the bed or on the bedside table closest to the bathroom will decrease the patient’s risk of falling. Advise the patient to ask for assistance when getting up to use the restroom.
- Safety Tip: When oxygen is in use, teach the patient about safety considerations with oxygen use because it is very flammable. See the “Safety with Oxygen Therapy” section in "Oxygenation Equipment" for more details.
- After administering oxygen, instruct the patient to inhale through their nose with slow, deep breaths and to breathe out through their mouth.
- If a patient is experiencing worsening dyspnea with decreased oxygen saturation levels compared to their baseline levels, apply oxygen and stay with the patient until their oxygen saturation level increases and they report feeling less short of breath. Providing a physical presence is an important intervention for the associated anxiety that accompanies dyspnea. Consider asking a team member for assistance.
- Based on the patient’s condition, it may be helpful to institute additional interventions to improve oxygenation. See Table 11.2c in the “Basic Concepts of Oxygenation” section for interventions to improve hypoxia.
Sample Documentation of Expected Findings
Patient has a history of COPD and reported feeling short of breath after getting up to use the bathroom this morning. Respirations were 24/minute, pulse oximetry 88% on room air, and lungs sounds were diminished. Oxygen applied via nasal cannula at 2 Lpm, and the patient was encouraged to take slow deep breaths in through their nose and out of their mouth. After five minutes, the pulse oximetry was 94%, the respiratory rate decreased to 16/minute, and the patient reported the feeling of shortness of breath had subsided.
Sample Documentation of Unexpected Findings
Patient has a history of COPD and heart failure and reported feeling short of breath after getting up to use the bathroom this morning. Respirations were 30/minute, pulse oximetry was 88% on room air, and lungs had crackles in the lower posterior lobes. Oxygen was applied via nasal cannula at 2 Lpm and the patient was encouraged to cough and deep breathe. After five minutes, the respiratory rate and pulse oximetry readings did not improve. Dr. Smith was notified at 0715 and an order for a STAT chest X-ray was received, followed by an order for furosemide 40 mg IV STAT. Furosemide was administered, and 30 minutes later the pulse oximetry increased to 92%, respiratory rate decreased to 18/minute, and there was urine output of 500 mL with reduced crackles in the lower posterior lobes. Patient reported feeling less short of breath.
Use the checklist below to review the steps for “Managing Oxygen Therapy."
Video Review of Administering Oxygen:[65]
Steps
Disclaimer: Always review and follow agency policy regarding this specific skill.
- Verify provider order or protocol.
- Gather supplies: pulse oximeter, oxygen delivery device, and tubing.
- Perform safety steps:
- Perform hand hygiene.
- Check the room for transmission-based precautions.
- Introduce yourself, your role, the purpose of your visit, and an estimate of the time it will take.
- Confirm patient ID using two patient identifiers (e.g., name and date of birth).
- Explain the process to the patient and ask if they have any questions.
- Be organized and systematic.
- Use appropriate listening and questioning skills.
- Listen and attend to patient cues.
- Ensure the patient’s privacy and dignity.
- Assess ABCs.
- Perform a focused respiratory assessment including airway, respiratory rate, pulse oximetry rate, and lung sounds.
- Employ safety measures for oxygen therapy.
- Connect flow meter to oxygen supply source.
- Apply adapter for tubing.
- Connect nasal cannula tubing to flow meter.
- Set oxygen flow at prescribed rate.
- When using a nasal cannula, place the prongs into the patient's nares and fit the tubing around their ears. When using a mask, place the mask over the patient's mouth and nose, secure a firm seal, and tighten the straps around the head. If using a non-rebreather mask, partially inflate the reservoir bag before applying the mask. Place the patient in an upright position as clinically appropriate.
- Evaluate patient’s response to oxygen therapy including airway, respiratory rate, pulse oximetry reading, and reported dyspnea.
- Institute additional interventions to improve oxygenation as needed.
- Adapt this procedure to reflect variations across the life span.
- Assist the patient to a comfortable position, ask if they have any questions, and thank them for their time.
- Ensure safety measures when leaving the room:
- CALL LIGHT: Within reach
- BED: Low and locked (in lowest position and brakes on)
- SIDE RAILS: Secured
- TABLE: Within reach
- ROOM: Risk-free for falls (scan room and clear any obstacles)
- Perform hand hygiene.
- Document the assessment findings. Report any concerns according to agency policy.
Use the checklist below to review the steps for “Managing Oxygen Therapy."
Video Review of Administering Oxygen:[66]
Steps
Disclaimer: Always review and follow agency policy regarding this specific skill.
- Verify provider order or protocol.
- Gather supplies: pulse oximeter, oxygen delivery device, and tubing.
- Perform safety steps:
- Perform hand hygiene.
- Check the room for transmission-based precautions.
- Introduce yourself, your role, the purpose of your visit, and an estimate of the time it will take.
- Confirm patient ID using two patient identifiers (e.g., name and date of birth).
- Explain the process to the patient and ask if they have any questions.
- Be organized and systematic.
- Use appropriate listening and questioning skills.
- Listen and attend to patient cues.
- Ensure the patient’s privacy and dignity.
- Assess ABCs.
- Perform a focused respiratory assessment including airway, respiratory rate, pulse oximetry rate, and lung sounds.
- Employ safety measures for oxygen therapy.
- Connect flow meter to oxygen supply source.
- Apply adapter for tubing.
- Connect nasal cannula tubing to flow meter.
- Set oxygen flow at prescribed rate.
- When using a nasal cannula, place the prongs into the patient's nares and fit the tubing around their ears. When using a mask, place the mask over the patient's mouth and nose, secure a firm seal, and tighten the straps around the head. If using a non-rebreather mask, partially inflate the reservoir bag before applying the mask. Place the patient in an upright position as clinically appropriate.
- Evaluate patient’s response to oxygen therapy including airway, respiratory rate, pulse oximetry reading, and reported dyspnea.
- Institute additional interventions to improve oxygenation as needed.
- Adapt this procedure to reflect variations across the life span.
- Assist the patient to a comfortable position, ask if they have any questions, and thank them for their time.
- Ensure safety measures when leaving the room:
- CALL LIGHT: Within reach
- BED: Low and locked (in lowest position and brakes on)
- SIDE RAILS: Secured
- TABLE: Within reach
- ROOM: Risk-free for falls (scan room and clear any obstacles)
- Perform hand hygiene.
- Document the assessment findings. Report any concerns according to agency policy.

