1.2 Initiating Patient Interaction
Open Resources for Nursing (Open RN)
Before every patient interaction, the nurse must perform hand hygiene and consider the use of additional personal protective equipment, introduce themselves, and identify the patient using two different identifiers. It is also important to provide a culturally safe space for interaction and to consider the developmental stage of the patient.
Hand Hygiene and Infection Prevention
Before initiating care with a patient, hand hygiene is required and a risk assessment should be performed to determine the need for personal protective equipment (PPE). This is important for protection of both patient and nurse.
Hand Hygiene
Using hand hygiene is a simple but effective way to prevent infection when performed correctly and at the appropriate times when providing patient care. See Figure 1.3.[1] for an image about hand hygiene from the Centers for Disease Control (CDC).[2] Use the hyperlinks provided below to read more information and watch a video about effective handwashing.
Key points from the CDC about hand hygiene include the following:[3]
- In general, hand sanitizers are as effective as washing with soap and water and are less drying to the skin. When using hand sanitizer, use enough gel to cover both hands and rub for approximately 20 seconds, coating all surfaces of both hands until your hands feel dry. Go directly to the patient without putting your hands into pockets or touching anything else.[4]
- Be sure to wash with soap and water if your hands are visibly soiled or the patient has diarrhea from suspected or confirmed C. Difficile (C-diff).
- Clean all areas of the hands including the front and back, the fingertips, the thumbs, and between fingers.
- Gloves are not a substitute for cleaning your hands. Wash your hands after removing gloves.
- Hand hygiene should be performed at these times:
- Immediately before touching a patient
- Before performing an aseptic task (e.g., placing an indwelling device) or handling invasive medical devices
- Before moving from working on a soiled body site to a clean body site on the same patient
- After contact with blood, body fluids, or contaminated surfaces
- Immediately after glove removal
- When leaving the area after touching a patient or their immediate environment

Checklists for performing handwashing and using hand sanitizer are located in Appendix A.
Visit the Center for Disease Control and Prevention’s website to read more about Hand Hygiene in Healthcare Settings
Download a factsheet from the Center for Disease Control and Prevention called Clean Hands Count
Video Reviews of Hand Hygiene:
Clean Hands Count[5]
Hand Washing Technique[6]
Hand Sanitizing Technique[7]
Personal Protective Equipment (PPE)
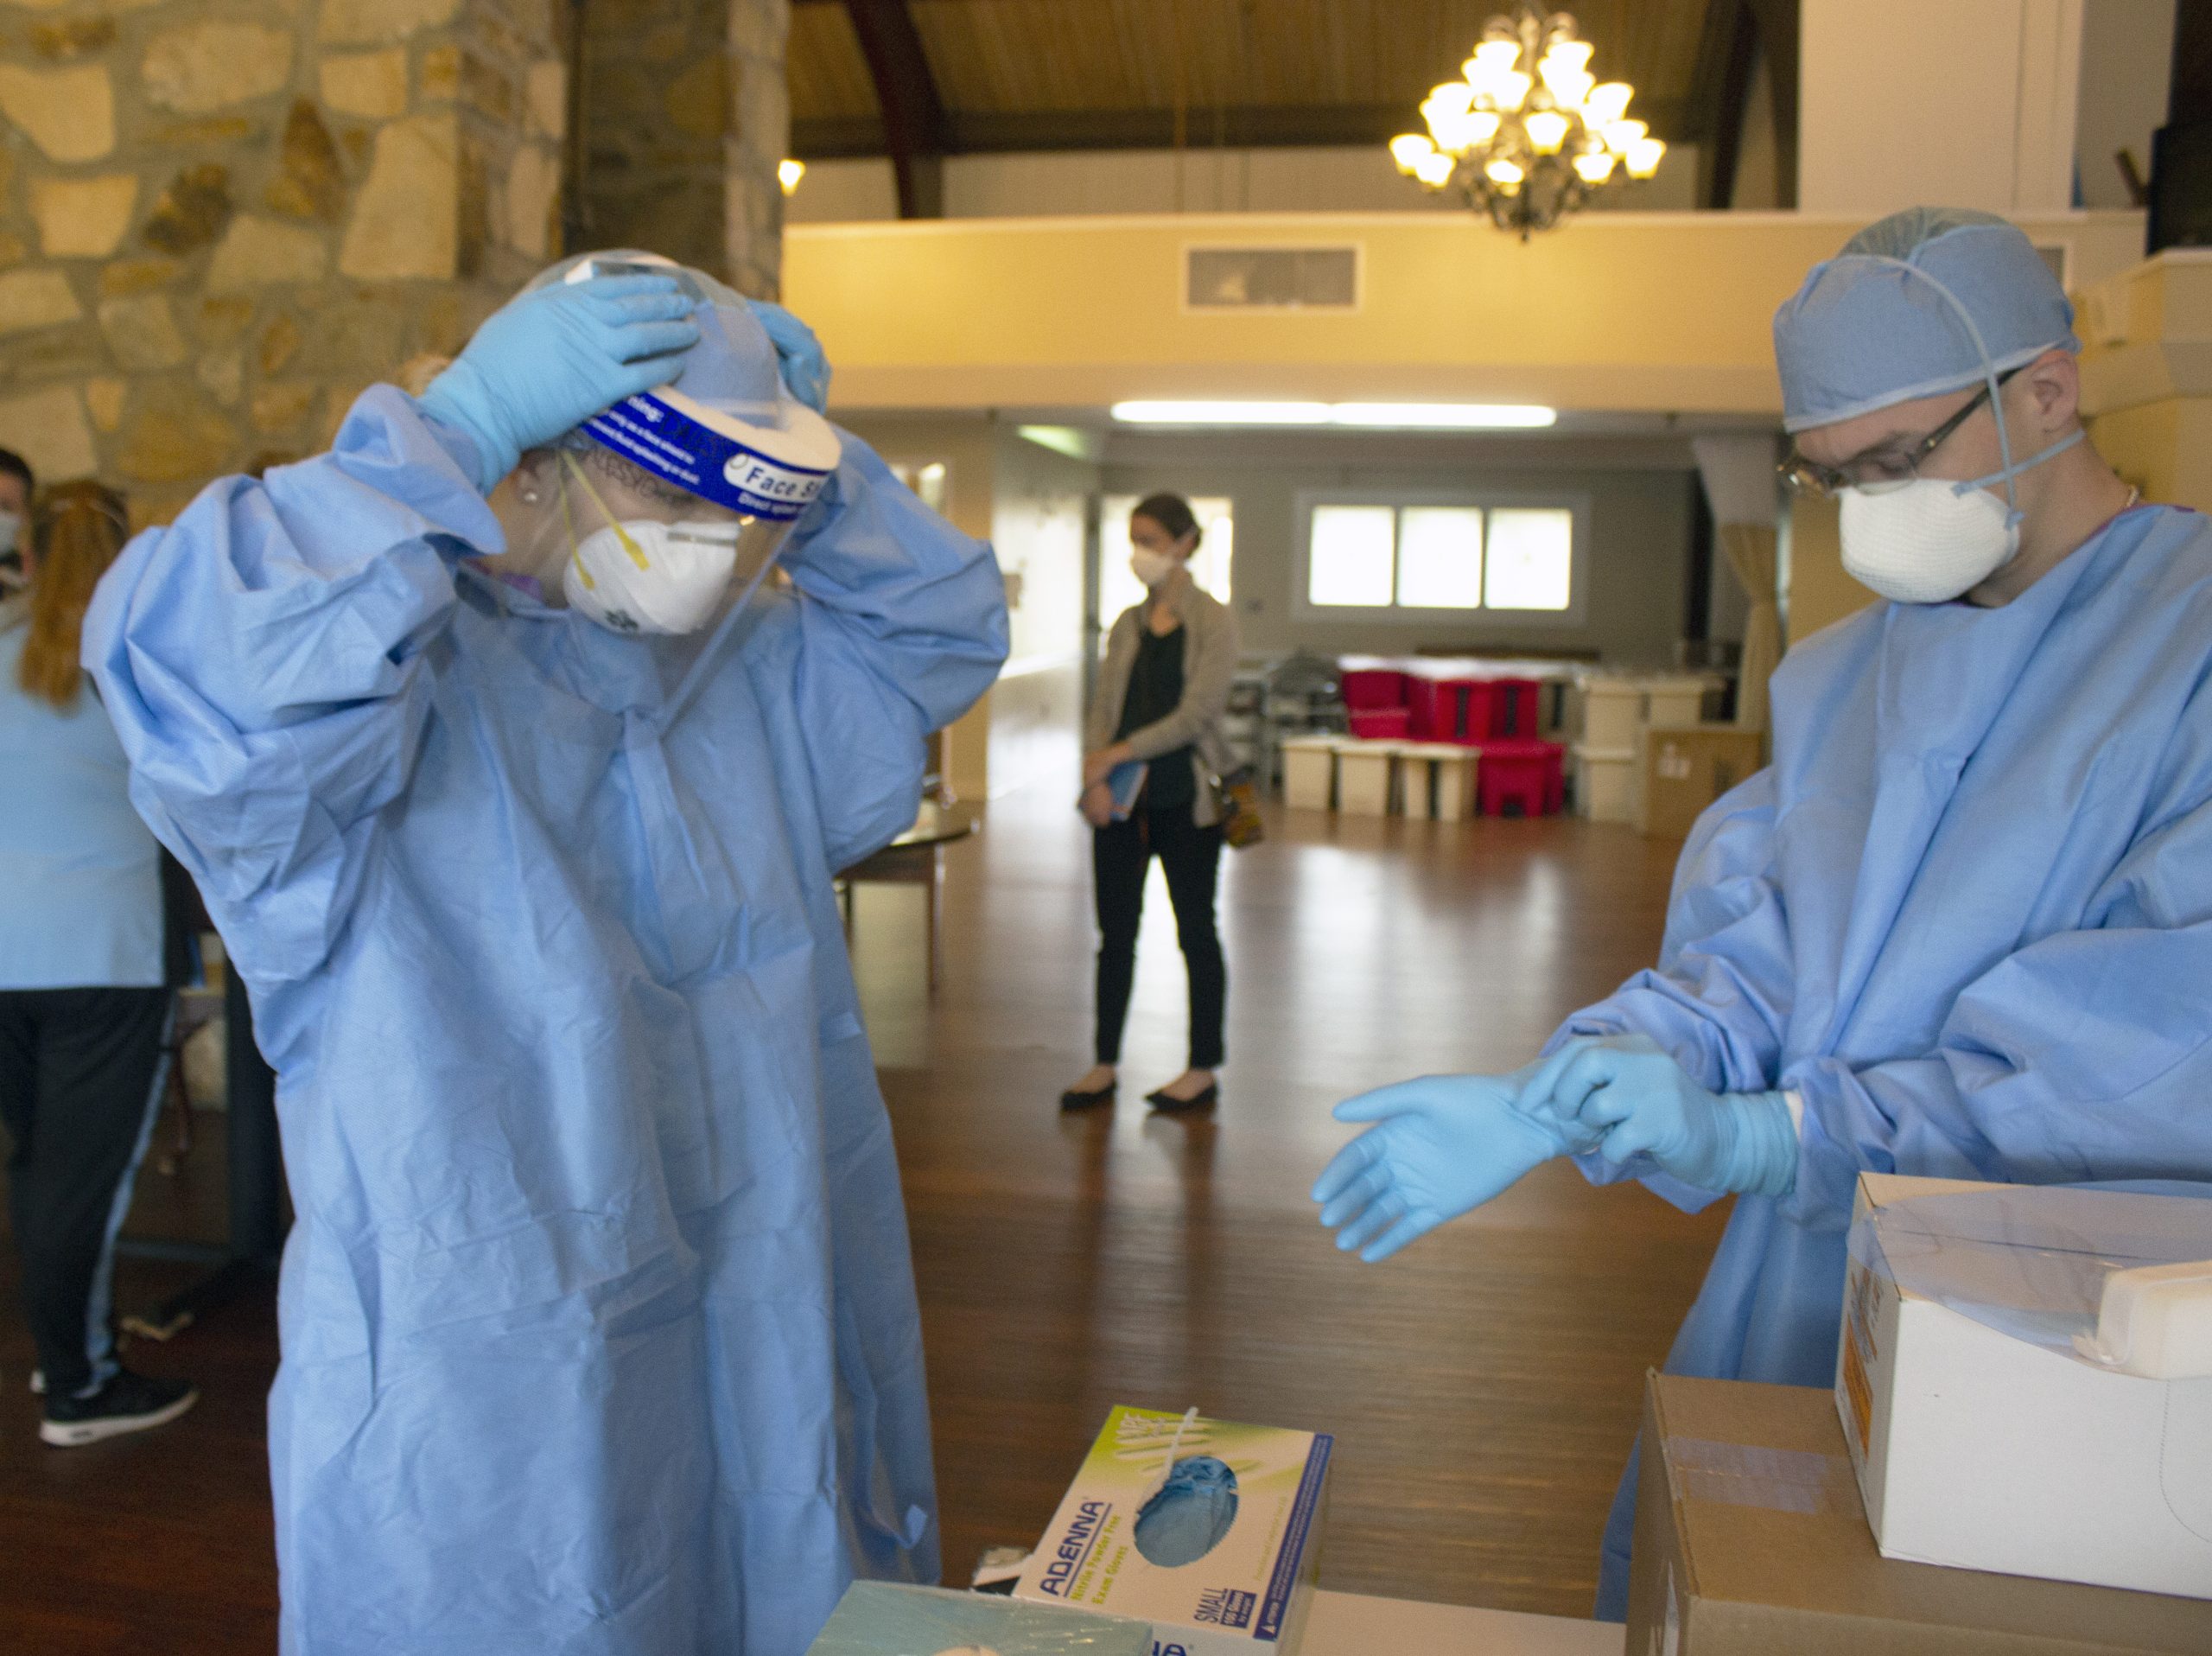
Medical asepsis is a term used to describe measures to prevent the spread of infection in health care agencies. Performing hand hygiene at appropriate times during patient care and applying gloves when there is potential risk to body fluids are examples of using medical asepsis. Additional precautions are implemented by health care team members when a patient has, or is suspected of having, an infectious disease. These additional precautions are called personal protective equipment (PPE) and are based on how an infection is transmitted, such as by contact, droplet, or airborne routes. Personal protective equipment (PPE) includes gowns, eyewear, face shields, and masks. PPE is used along with environmental controls, such as surface cleaning and disinfecting to prevent the transmission of infection.[8] See Figure 1.4[9] for an image of health care team members applying PPE. These precautions are further discussed in the “Aseptic Technique” chapter. For the purpose of this chapter, be sure to perform a general risk assessment before entering a patient’s room and apply the appropriate PPE as needed. This risk assessment include:
- Is there signage posted on the patient’s door that contact, droplet, or airborne precautions are in place? If so, follow the instructions provided.
- Does this patient have a confirmed or suspected infection or communicable disease?
- Will your face, hands, skin, mucous membranes, or clothing be potentially exposed to blood or body fluids by spray, coughing, or sneezing?
Introducing Oneself
When initiating care with patients, it is essential to first provide privacy, and then introduce yourself and explain what will be occurring. Providing privacy means taking actions such as talking with the patient privately in a room with the door shut. A common framework used for introductions during patient care is AIDET, a mnemonic for Acknowledge, Introduce, Duration, Explanation, and Thank You.[10]
- Acknowledge: Greet the patient by the name documented in their medical record. Make eye contact, smile, and acknowledge any family or friends in the room. Ask the patient their preferred way of being addressed (for example, “Mr. Doe,” “Jonathon,” or “Johnny”) and their preferred pronouns (i.e., he/him, she/her or they/them), as appropriate.
- Introduce: Introduce yourself by your name and role. For example, “I’m John Doe and I am a nursing student working with your nurse to take care of you today.”
- Duration: Estimate a time line for how long it will take to complete the task you are doing. For example, “I am here to obtain your blood pressure, heart rate, and oxygen saturation levels. This should take about 5 minutes.”
- Explanation: Explain step by step what to expect next and answer questions. For example, “I will be putting this blood pressure cuff on your arm and inflating it. It will feel as if it is squeezing your arm for a few moments.”
- Thank You: At the end of the encounter, thank the patient and ask if anything is needed before you leave. In an acute or long-term care setting, ensure the call light is within reach and the patient knows how to use it. If family members are present, thank them for being there to support the patient as appropriate. For example, “Thank you for taking time to talk with me today. Is there anything I can get for you before I leave the room? Here is the call light (Place within reach). Press the red button if you would like to call the nurse.”
Patient Identification
Before performing assessments, obtaining vital signs, or providing care, patients must be properly identified using two identifiers.
First identifier:
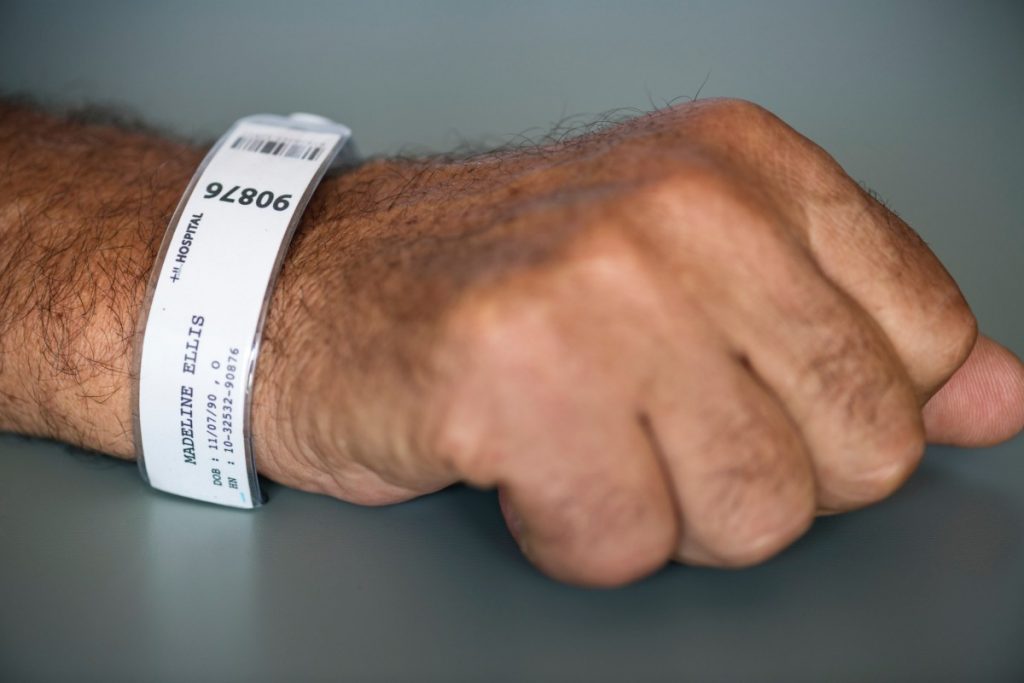
- Ask the patient to state their name and date of birth. If they have an armband, compare the information they are stating to the information on the armband and verify they match. See Figure 1.5[11] for an image of an armband.
- If the patient doesn’t have an armband confirm the information they are stating to information provided in the chart.
- If the patient is unable to state their name and date of birth, scan their armband or ask another staff member or family member to identify them.
Confirm first identifier with a different second identifier:
- Scan the wristband.
- Compare the name and date of birth to the patient’s chart.
- Ask staff to verify the patient in a long-term care setting.
- Compare the picture on the medication administration record (MAR) to the patient.
- If present, ask a family member to confirm the patient’s name.
Cultural Safety
When initiating patient interaction, it is important to establish cultural safety. Cultural safety refers to the creation of safe spaces for patients to interact with health professionals without judgment or discrimination. See Figure 1.6[12] for an image representing cultural safety. Recognizing that you and all patients bring a cultural context to interactions in a health care setting is helpful when creating cultural safe spaces. If you discover you need more information about a patient’s cultural beliefs to tailor your care, use an open-ended question that allows the patient to share what they believe to be important. For example, you may ask, “I am interested in your cultural background as it relates to your health. Can you share with me what is important about your cultural background that will help me care for you?”[13]

Adapting to Variations Across the Life Span
It is important to adapt your interactions with patients in accordance their developmental stage. Developmentalists break the life span into nine stages[14]:
- Prenatal Development
- Infancy and Toddlerhood
- Early Childhood
- Middle Childhood
- Adolescence
- Early Adulthood
- Middle Adulthood
- Late Adulthood
- Death and Dying
A brief overview of the characteristics of each stage of human development is provided in Table 1.2 When caring for infants, toddlers, children, and adolescents, parents or guardians are an important source of information, and family dynamics should be included as part of the general survey assessment. When caring for older adults or those who are dying, other family members may be important to include in the general survey assessment. See Figure 1.7[15] for an image representing patients in various developmental stages of life.

Table 1.2 Variations Across the Life Span
| Stage of Development | Common Characteristics |
|---|---|
| Prenatal Development | Conception occurs and development begins. All major structures of the body are forming and the health of the mother is of primary concern. Understanding nutrition, teratogens (environmental factors that can lead to birth defects), and labor and delivery are primary concerns for the mother. |
| Infancy and Toddlerhood | The first year and a half to two years of life are ones of dramatic growth and change. A newborn with a keen sense of hearing but very poor vision is transformed into a walking, talking toddler within a relatively short period of time. Caregivers are also transformed from someone who manages feeding and sleep schedules to a constantly moving guide and safety inspector for a mobile, energetic child. |
| Early Childhood | Early childhood is also referred to as the preschool years, consisting of the years that follow toddlerhood and precede formal schooling. As a three- to five-year-old, the child is busy learning language, gaining a sense of self and greater independence, and beginning to learn the workings of the physical world. This knowledge does not come quickly however, and preschoolers may have initially interesting conceptions of size, time, space, and distance, such as fearing that they may go down the drain if they sit at the front of the bathtub. A toddler’s fierce determination to do something may give way to a four-year-old’s sense of guilt for doing something that brings the disapproval of others. |
| Middle Childhood | The ages of six through eleven comprise middle childhood, and much of what children experience at this age is connected to their involvement in the early grades of school. Their world becomes filled with learning and testing new academic skills, assessing one’s abilities and accomplishments, and making comparisons between self and others. Schools compare students and make these comparisons public through team sports, test scores, and other forms of recognition. Growth rates slow down and children are able to refine their motor skills at this point in life. Children begin to learn about social relationships beyond the family through interaction with friends and fellow students. |
| Adolescence | The World Health Organization defines adolescence as a person between the age of 10 and 19. Adolescence is a period of dramatic physical change marked by an overall physical growth spurt and sexual maturation, known as puberty. It is also a time of cognitive change as the adolescent begins to think of new possibilities and to consider abstract concepts such as love, fear, and freedom. Adolescents have a sense of invincibility that puts them at greater risk of injury from high-risk behaviors such as car accidents, drug and alcohol abuse, or contracting sexually transmitted infections that can have lifelong consequences or result in death. |
| Early Adulthood | The twenties and thirties are often thought of as early adulthood. It is a time of physiological peak but also highest risk for involvement in violent crimes and substance abuse. It is a time of focusing on the future and putting a lot of energy into making choices that will help one earn the status of a full adult in the eyes of others. Love and work are primary concerns at this stage of life. |
| Middle Adulthood | The late thirties through the mid-sixties is referred to as middle adulthood. This is a period in which aging processes that began earlier become more noticeable but also a time when many people are at their peak of productivity in love and work. It can also be a time of becoming more realistic about possibilities in life previously considered and of recognizing the difference between what is possible and what is likely to be achieved in their lifetime. |
| Late Adulthood | This period of the life span has increased over the last 100 years. For nurses, patients in this period are referred to as “older adults.” The term “young old” is used to describe people between 65 and 79, and the term “old old” is used for those who are 80 and older. One of the primary differences between these groups is that the young old are very similar to midlife adults because they are still working, still relatively healthy, and still interested in being productive and active. The “old old” may remain productive, active, and independent, but risks of the heart disease, lung disease, cancer, and cerebral vascular disease (i.e., strokes) increase substantially for this age group. Issues of housing, health care, and extending active life expectancy are only a few of the topics of concern for this age group. A better way to appreciate the diversity of people in late adulthood is to go beyond chronological age and examine whether a person is experiencing optimal aging (when they are in very good health for their age and continue to have an active, stimulating life), normal aging (when the changes in health are similar to most of those of the same age), or impaired aging (when more physical challenges and diseases occur compared to others of the same age). |
| Death and Dying | Death is the final stage of life. Dying with dignity allows an individual to make choices about treatment, say goodbyes, and take care of final arrangements. When caring for patients who are actively dying, nurses can advocate for care that allows that person to die with dignity according to their wishes. |
- "Animated-Logo-Clean-Hands-Count” by Centers for Disease Control and Prevention is licensed under CC0. Access for free at https://www.cdc.gov/handhygiene/campaign/index.html ↵
- Centers for Disease Control and Prevention. (2019, April 29). Hand hygiene. https://www.cdc.gov/handhygiene/index.html ↵
- Centers for Disease Control and Prevention. (2019, April 29). Hand hygiene. https://www.cdc.gov/handhygiene/index.html ↵
- Centers for Disease Control and Prevention. (2019, April 29). Hand hygiene. https://www.cdc.gov/handhygiene/index.html ↵
- Centers for Disease Control and Prevention. (2017, May 5). Clean hands count. [Video]. YouTube. All rights reserved. https://youtu.be/MzkNSzqmUSY ↵
- Johns Hopkins Medicine. (2019, March 26). Hand-washing steps using the WHO technique. [Video]. YouTube. All rights reserved. https://youtu.be/IisgnbMfKvI ↵
- Johns Hopkins Medicine. (2019, May 8). Hand rubbing steps using the WHO technique. [Video]. YouTube. All rights reserved. https://youtu.be/B3eq5fLzAOo ↵
- This work is a derivative of Clinical Procedures for Safer Patient Care by British Columbia Institute of Technology licensed under CC BY 4.0 ↵
- “Pennsylvania_National_Guard_(49923831732).jpg” by The National Guard is in the Public Domain. ↵
- Huron. (n.d.). AIDET patient communication. https://www.studergroup.com/aidet ↵
- “barcode_clinic_fist_hand_healthcare_hospital_identification_identity-1517387.jpg” by rawpixel.com is licensed under CC0 ↵
- “MODEL OF MULTINATIONAL UNITY” by Margherita Marchetti is licensed under CC0 ↵
- This work is a derivative of The Complete Subjective Health Assessment by Lapum, St-Amant, Hughes, Petrie, Morrell, & Mistry and is licensed under CC BY 4.0 ↵
- This work is a derivative of Human Development Life Span by Laura Overstreet and is licensed under CC BY 4.0 ↵
- “pexels-photo-1556706.jpeg” by Daniel Reche is licensed under CC0; “kids-1675964_960_720.jpg” by auntmasako is licensed under CC0; “100312-F-6448T-001.JPG” by U.S. Air Force photo/Senior Airman Timothy Taylor is licensed under CC0; “smart-3479338_1280.jpg” by malcolmbeldon4 is licensed under CC0; "Business man” by Tim Engle is licensed under CC BY-NC 2.0; “Portrait of an old woman in front of her home” by Nithi Anand is licensed under CC BY 2.0 ↵
Use the checklist below to review the steps for completion of an “Ostomy Appliance Change."
Steps
Disclaimer: Always review and follow agency policy regarding this specific skill.
- Gather supplies: washcloth and warm water, stoma products/appliances per order/patient preference (wafer, bag, clip), sizing measures, scissors, pen, nonsterile gloves, skin prep or other skin products per patient preference, and wastebasket.
- Perform safety steps:
- Perform hand hygiene.
- Check the room for transmission-based precautions.
- Introduce yourself, your role, the purpose of your visit, and an estimate of the time it will take.
- Confirm patient ID using two patient identifiers (e.g., name and date of birth).
- Explain the process to the patient.
- Be organized and systematic.
- Use appropriate listening and questioning skills.
- Listen and attend to patient cues.
- Ensure the patient’s privacy and dignity.
- Assess ABCs.
- Set the bed to a comfortable height; raise the opposite side rail.
- Ask the patient about preferences, usual practices, care, and maintenance at home.
- Apply nonsterile gloves.
- Position the patient according to patient status:
- Assist the patient to the bathroom and have him/her sit on the toilet to be near the sink for ease of process.
- If in bed, uncover the patient, exposing only the abdomen. Apply drape/chux under the patient or ostomy pouch. Place the wastebasket near the bed.
- Empty the pouch depending on the type of the appliance and the location type of procedure:
- Remove the pouch and empty it into the toilet.
- Set pouch aside in the basin or receptacle if at bedside.
- Assess ostomy bag contents, and remove current ostomy appliance (keep clamp if present).
- Remove adhesive residue from the skin with adhesive remover wipes.
- Cleanse the stoma and surrounding skin with gauze and room temperature tap water; pat dry the skin.
- Assess the condition of the stoma and peristomal skin.
- Place the gauze pad over the stoma while you are preparing the new wafer and pouch.
- Trace the pattern onto the paper backing of the wafer and cut the wafer. No more than 1/8 inch of skin around the stoma should be exposed for correct fit.
- Apply skin prep and wait until tacky (optional).
- Remove the gauze pad from the orifice of the stoma.
- Remove the paper backing from the wafer and place it on the skin with the stoma centered in the cutout opening of the wafer; press gently on the wafer to remove air/seal to the skin.
- Apply pouch to wafer with clamp on pouch and opening in downward position.
- Attach and close the pouch clamp.
- Dispose of old supplies and wrappings.
- Remove your gloves and perform hand hygiene.
- Assist the patient to a comfortable position, ask if they have any questions, and thank them for their time.
- Ensure safety measures when leaving the room:
- CALL LIGHT: Within reach
- BED: Low and locked (in lowest position and brakes on)
- SIDE RAILS: Secured
- TABLE: Within reach
- ROOM: Risk-free for falls (scan room and clear any obstacles)
- Document the procedure and related assessment findings. Report any concerns according to agency policy.
Learning Activities
(Answers to “Learning Activities” can be found in the “Answer Key” at the end of the book. Answers to interactive activity elements will be provided within the element as immediate feedback.)
1. Your patient complains of pain while you are inflating the balloon during a urinary catheter insertion. Describe your next steps.
2. Your patient is admitted with a fractured head of the right femur and is scheduled for surgery in the next six hours. You have a prescription to insert a Foley catheter. After you assess the patient’s ability for the recommended position to insert the catheter, you note that the patient is unable to move the right leg and should not move the leg. Describe how you will proceed with the procedure.
3. A patient with a new colostomy refuses to look at the stoma or participate in changing the pouching system. What are some suggestions to help your patient adjust to the stoma?
4. The nurse is caring for a female patient who is experiencing inadequate bladder emptying. The nurse obtains an order to determine post-void residual. Which catheter type would the nurse use to evaluate post-void residual?
- Coude catheter
- Indwelling catheter
- Straight catheter
- Foley catheter
5. The nurse is caring for a patient who had a colostomy placed two days earlier. The nurse notes that the stoma is moist and beefy red. Which action should the nurse be expected to take based on these findings?
- Notify the physician of the findings immediately.
- Remove the bag and apply pressure to the stoma.
- Document the assessment findings of the stoma.
- Change the appliance pouch and clean the skin.
6. The nurse is providing patient education on the care of an ostomy. Which of the following statements by the patient would indicate that further education is necessary?
- “I should plan to replace the pouch system every 8-10 days.”
- “Wafer should be cut 1/16 to 1/8 an inch larger than the stoma.”
- “It is important to chew all foods completely and slowly.”
- “I will keep a diary of the foods I eat and my stool pattern.”
Respiratory System Anatomy
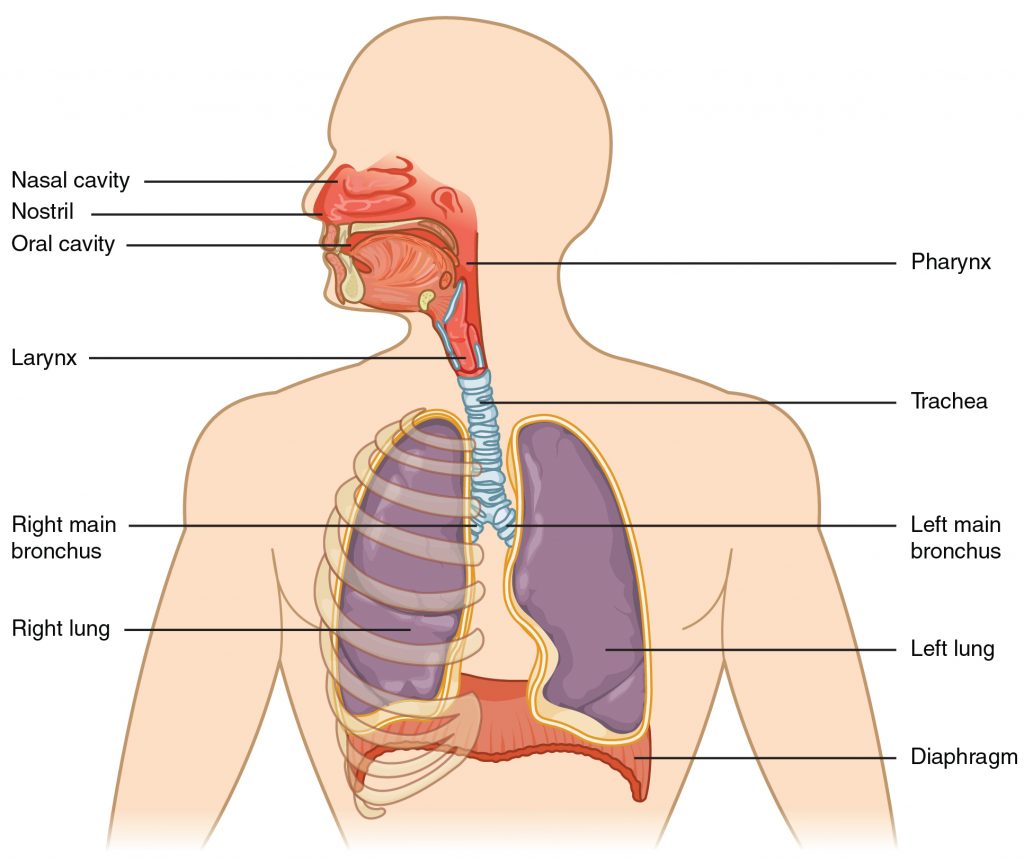
It is important for the nurse to have an understanding of the underlying structures of the respiratory system before performing suctioning to ensure that care is given to protect sensitive tissues and that airways are appropriately assessed during the suctioning procedure. See Figure 22.1[1] for an illustration of the anatomy of the respiratory system.
Maintaining a patent airway is a top priority and one of the “ABCs” of patient care (i.e., Airway, Breathing, and Circulation). Suctioning is often required in acute-care settings for patients who cannot maintain their own airway due to a variety of medical conditions such as respiratory failure, stroke, unconsciousness, or postoperative care. The suctioning procedure is useful for removing mucus that may obstruct the airway and compromise the patient’s breathing ability.
To read more details about the respiratory system, see the “Respiratory Assessment” chapter.
Respiratory Failure and Respiratory Arrest
Respiratory failure and respiratory arrest often require emergency suctioning. Respiratory failure is a life-threatening condition that is caused when the respiratory system cannot get enough oxygen from the lungs into the blood to oxygenate the tissues, or there are high levels of carbon dioxide in the blood that the body cannot effectively eliminate via the lungs. Acute respiratory failure can happen quickly without much warning. It is often caused by a disease or injury that affects breathing, such as pneumonia, opioid overdose, stroke, or a lung or spinal cord injury. Acute respiratory failure requires emergency treatment. Untreated respiratory failure can lead to respiratory arrest.
Signs and symptoms of respiratory failure include shortness of breath (dyspnea), rapid breathing (tachypnea), rapid heart rate (tachycardia), unusual sweating (diaphoresis), decreasing pulse oximetry readings below 90%, and air hunger (a feeling as if you can't breathe in enough air). In severe cases, signs and symptoms may include cyanosis (a bluish color of the skin, lips, and fingernails), confusion, and sleepiness.
The main goal of treating respiratory failure is to ensure that sufficient oxygen reaches the lungs and is transported to the other organs while carbon dioxide is cleared from the body.[2] Treatment measures may include suctioning to clear the airway while also providing supplemental oxygen using various oxygenation devices. Severe respiratory distress may require intubation and mechanical ventilation, or the emergency placement of a tracheostomy may be performed if the airway is obstructed. For additional details about oxygenation and various oxygenation devices, go to the “Oxygen Therapy" chapter.
Tracheostomy
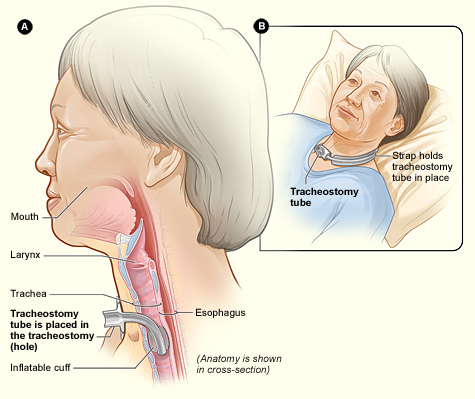
A tracheostomy is a surgically-created opening called a stoma that goes from the front of the patient’s neck into the trachea. A tracheostomy tube is placed through the stoma and directly into the trachea to maintain an open (patent) airway. See Figure 22.2[3]for an illustration of a patient with a tracheostomy tube in place.
Placement of a tracheostomy tube may be performed emergently or as a planned procedure due to the following:
- A large object blocking the airway
- Respiratory failure or arrest
- Severe neck or mouth injuries
- A swollen or blocked airway due to inhalation of harmful material such as smoke, steam, or other toxic gases
- Cancer of the throat or neck, which can affect breathing by pressing on the airway
- Paralysis of the muscles that affect swallowing
- Surgery around the larynx that prevents normal breathing and swallowing
- Long-term oxygen therapy via a mechanical ventilator[4]
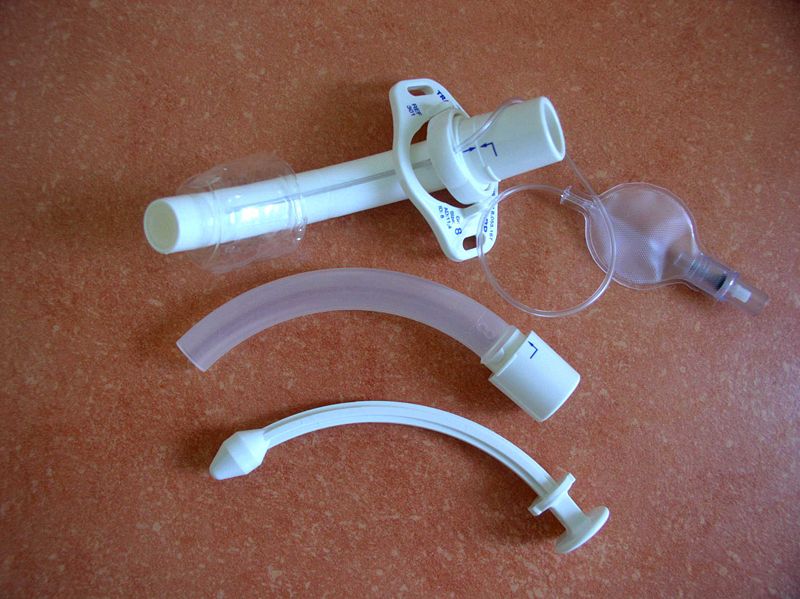
See Figure 22.3[5] for an image of the parts of a tracheostomy tube. The outside end of the outer cannula has a flange that is placed against the patient’s neck. The flange is secured around the patient’s neck with tie straps, and a split 4" x 4" tracheostomy dressing is placed under the flange to absorb secretions. A cuff is typically present on the distal end of the outer cannula to make a tight seal in the airway. (See the top image in Figure 22.3.) The cuff is inflated and deflated with a syringe attached to the pilot balloon. Most tracheostomy tubes have a hollow inner cannula inside the outer cannula that is either disposable or removed for cleaning as part of the tracheostomy care procedure. (See the middle image of Figure 22.3.) A solid obturator is used during the initial tracheostomy insertion procedure to help guide the outer cannula through the tracheostomy and into the airway. (See the bottom image of Figure 22.3.) It is removed after insertion and the inner cannula is slid into place.
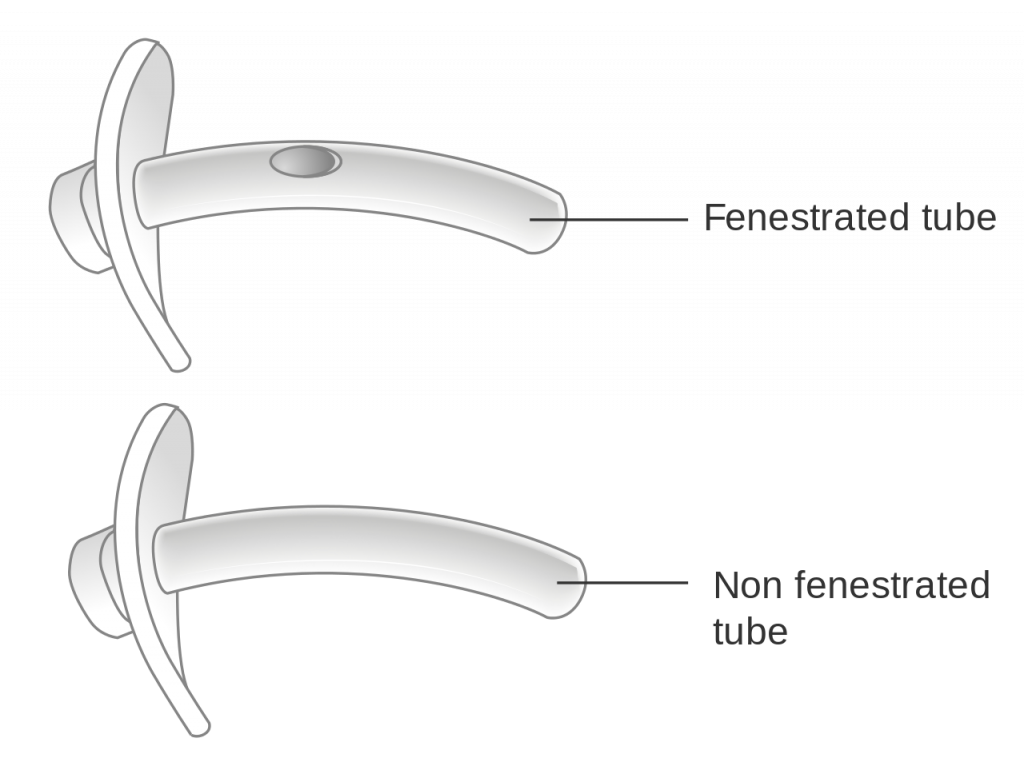
When a tracheostomy is placed, the provider determines if a fenestrated or unfenestrated outer cannula is needed based on the patient's condition. A fenestrated tube is used for patients who can speak with their tracheostomy tube in place. Under the guidance of a speech pathologist and respiratory therapist, the inner cannula is eventually removed from a fenestrated tube and the cuff deflated so the patient is able to speak. Otherwise, a patient with a tracheostomy tube is unable to speak because there is no airflow over the vocal cords, and alternative communication measures, such as a whiteboard, pen and paper, or computer device with note-taking ability, must be put into place by the nurse. Suctioning should never be performed through a fenestrated tube without first inserting a nonfenestrated inner cannula, or severe tracheal damage can occur. See Figure 22.4[6] for images of a fenestrated and nonfenestrated outer cannula.
Caring for a patient with a tracheostomy tube includes providing routine tracheostomy care and suctioning. Tracheostomy care is a procedure performed routinely to keep the flange, tracheostomy dressing, ties or straps, and surrounding area clean to reduce the introduction of bacteria into the trachea and lungs. The inner cannula becomes occluded with secretions and must be cleaned or replaced frequently according to agency policy to maintain an open airway. Suctioning through the tracheostomy tube is also performed to remove mucus and to maintain a patent airway.
Bladder scan: A bedside test using a noninvasive tool used to measure the volume of urine in the bladder.
CAUTI: Catheter-associated urinary tract infection.
Colostomy: The colon is attached to a stoma to bypass the rectum and the anus.
Coude catheter: A catheter specifically designed to maneuver around obstructions or blockages in the urethra such as with enlarged prostate glands in males. Coude originates from the French word that means “bend.”
Ileostomy: The lower end of the small intestine (ileum) is attached to a stoma to bypass the colon, rectum, and anus.
Indwelling catheter: A device often referred to as a “Foley catheter” that is inserted into the neck of the bladder and remains in place for continual collection of urine into a collection bag.
Intermittent catheterization: The insertion and removal of a straight catheter for relief of urinary retention.
Ostomy: The surgical procedure that creates the opening from the stoma outside the body to an organ such as the small intestine, colon, rectum, or bladder. A stoma can be permanent, such as when an organ is removed, or temporary, such as when an organ requires time to heal.
Prostate hypertrophy: A common medical condition of the enlargement of the prostate gland in males as they age, causing uncomfortable urinary symptoms such as urgency and frequency.
Stoma: An opening on the abdomen that is connected to the gastrointestinal or urinary systems to allow waste (urine or feces) to be collected in a pouch.
Straight catheter: A catheter used for intermittent urinary catheterization; it does not have a balloon at the insertion end.
Urinary catheterization: The insertion of a catheter tube into the urethral opening and placing it in the neck of the urinary bladder to drain urine.
Urinary Tract Infection (UTI): An infection in the urinary system causing symptoms such as burning on urination (dysuria), frequent urination, malodorous urine, fever, and change in level of consciousness.
Urostomy: The ureters (tubes that carry urine from the kidney to the bladder) are attached to a stoma to bypass the bladder.
Access the Nursing Fundamentals for content on what interventions you could use when planning care for a client to protect skin integrity and tissue integrity. Based on the factors that the client triggers on the Braden scale, you will use different interventions based on the etiology of the skin issue.
see the link here: https://nicoletcollege.pressbooks.pub/nursingfundamentalsnicolet/chapter/10-5-braden-scale/
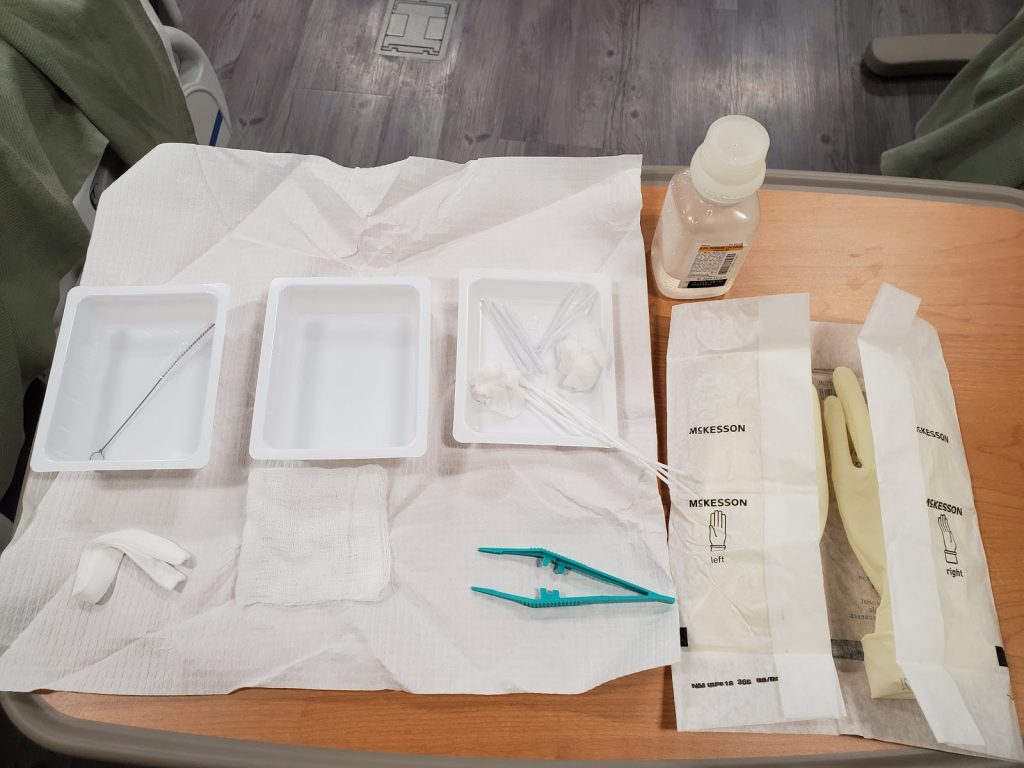
Tracheostomy care is provided on a routine basis to keep the tracheostomy tube’s flange, inner cannula, and surrounding area clean to reduce the amount of bacteria entering the artificial airway and lungs. See Figure 22.9[7] for an image of a sterile tracheostomy care kit.
Replacing and Cleaning an Inner Cannula
The primary purpose of the inner cannula is to prevent tracheostomy tube obstruction. Many sources of obstruction can be prevented if the inner cannula is regularly cleaned and replaced. Some inner cannulas are designed to be disposable, while others are reusable for a number of days. Follow agency policy for inner cannula replacement or cleaning, but as a rule of thumb, inner cannula cleaning should be performed every 12-24 hours at a minimum. Cleaning may be needed more frequently depending on the type of equipment, the amount and thickness of secretions, and the patient’s ability to cough up the secretions.
Changing the inner cannula may encourage the patient to cough and bring mucus out of the tracheostomy. For this reason, the inner cannula should be replaced prior to changing the tracheostomy dressing to prevent secretions from soiling the new dressing. If the inner cannula is disposable, no cleaning is required.[8]
Checklist for Tracheostomy Care With a Reusable Inner Cannula
Use the checklist below to review the steps for completion of “Tracheostomy Care.”
Stoma site should be assessed and a clean dressing applied at least once per shift. Wet or soiled dressings should be changed immediately.[9] Follow agency policy regarding clearing the inner cannula; it should be inspected at least twice daily and cleaned as needed.
Steps
Disclaimer: Always review and follow agency policy regarding this specific skill.
- Gather supplies: bedside table, towel, sterile gloves, pulse oximeter, PPE (i.e., mask, goggles, or face shield), tracheostomy suctioning equipment, bag valve mask (should be located in the room), and a sterile tracheostomy care kit (or sterile cotton-tipped applicators, sterile manufactured tracheostomy split sponge dressing, sterile basin, normal saline, and a disposable inner cannula or a small, sterile brush to clean the reusable inner cannula).
- Perform safety steps:
- Perform hand hygiene.
- Check the room for transmission-based precautions.
- Introduce yourself, your role, the purpose of your visit, and an estimate of the time it will take.
- Confirm patient ID using two patient identifiers (e.g., name and date of birth).
- Explain the process to the patient and ask if they have any questions.
- Be organized and systematic.
- Use appropriate listening and questioning skills.
- Listen and attend to patient cues.
- Ensure the patient’s privacy and dignity.
- Assess ABCs.
- Raise the bed to waist level and place the patient in a semi-Fowler’s position.
- Verify that there is a backup tracheostomy kit available.
- Don appropriate PPE.
- Perform tracheal suctioning if indicated.
- Remove and discard the trach dressing. Inspect drainage on the dressing for color and amount and note any odor.
- Inspect stoma site for redness, drainage, and signs and symptoms of infection.
- Remove the gloves and perform proper hand hygiene.
- Open the sterile package and loosen the bottle cap of sterile saline.
- Don one sterile glove on the dominant hand.
- Open the sterile drape and place it on the patient’s chest.
- Set up the equipment on the sterile field.
- Remove the cap and pour saline in both basins with ungloved hand (4"-6” above basin).
- Don the second sterile glove.
- Prepare and arrange supplies. Place pipe cleaners, trach ties, trach dressing, and forceps on the field. Moisten cotton applicators and place them in the third (empty) basin. Moisten two 4" x 4" pads in saline, wring out, open, and separately place each one in the third basin. Leave one 4" x 4" dry.
- With nondominant “contaminated” hand, remove the trach collar (if applicable) and remove (unlock and twist) the inner cannula. If the patient requires continuous supplemental oxygen, place the oxygenation device near the outer cannula or ask a staff member to assist in maintaining the oxygen supply to the patient.
- Place the inner cannula in the saline basin.
- Pick up the inner cannula with your nondominant hand, holding it only by the end usually exposed to air.
- With your dominant hand, use a brush to clean the inner cannula. Place the brush back into the saline basin.
- After cleaning, place the inner cannula in the second saline basin with your nondominant hand and agitate for approximately 10 seconds to rinse off debris. Repeat cleansing with brush as needed.
- Dry the inner cannula with the pipe cleaners and place the inner cannula back into the outer cannula. Lock it into place and pull gently to ensure it is locked appropriately. Reattach the preexisting oxygenation device.
- Clean the stoma with cotton applicators using one on the superior aspect and one on the inferior aspect.
- With your dominant, noncontaminated hand, moisten sterile gauze with sterile saline and wring out excess. Assess the stoma for infection and skin breakdown caused by flange pressure. Clean the stoma with the moistened gauze starting at the 12 o’clock position of the stoma and wipe toward the 3 o’clock position. Begin again with a new gauze square at 12 o’clock and clean toward 9 o’clock. To clean the lower half of the site, start at the 3 o’clock position and clean toward 6 o’clock; then wipe from 9 o’clock to 6 o’clock, using a clean moistened gauze square for each wipe. Continue this pattern on the surrounding skin and tube flange. Avoid using a hydrogen peroxide mixture because it can impair healing.[10]
- Use sterile gauze to dry the area.
- Apply the sterile tracheostomy split sponge dressing by only touching the outer edges.
- Replace trach ties as needed. (The literature overwhelmingly recommends a two-person technique when changing the securing device to prevent tube dislodgement. In the two-person technique, one person holds the trach tube in place while the other changes the securing device). Thread the clean tie through the opening on one side of the trach tube. Bring the tie around the back of the neck, keeping one end longer than the other. Secure the tie on the opposite side of the trach. Make sure that only one finger can be inserted under the tie.
- Remove the old tracheostomy ties.
- Remove gloves and perform proper hand hygiene.
- Provide oral care. Oral care keeps the mouth and teeth not only clean, but also has been shown to prevent hospital-acquired pneumonia.
- Lower the bed to lowest the position. If the patient is on a mechanical ventilator, the head of the bed should be maintained at 30-45 degrees to prevent ventilator-associated pneumonia.
- Assist the patient to a comfortable position, ask if they have any questions, and thank them for their time.
- Ensure safety measures when leaving the room:
- CALL LIGHT: Within reach
- BED: Low and locked (in lowest position and brakes on)
- SIDE RAILS: Secured
- TABLE: Within reach
- ROOM: Risk-free for falls (scan room and clear any obstacles)
- Perform hand hygiene.
- Document the procedure and related assessment findings. Report any concerns according to agency policy.
Sample Documentation
Sample Documentation of Expected Findings
Tracheostomy care provided with sterile technique. Stoma site free of redness or drainage. Inner cannula cleaned and stoma dressing changed. Patient tolerated the procedure without difficulties.
Sample Documentation of Unexpected Findings
Tracheostomy care provided with sterile technique. Stoma site is erythematous, warm, and tender to palpation. Inner cannula cleaned and stoma dressing changed. Patient tolerated the procedure without difficulties. Dr. Smith notified of change in condition of stoma at 1315 and stated would assess the patient this afternoon.

