14.2 Basic Integumentary Concepts
Open Resources for Nursing (Open RN)
The integumentary system includes the skin, hair, and nails. The skin is an organ that performs a variety of essential functions, such as protecting the body from invasion by microorganisms, chemicals, and other environmental factors; preventing dehydration; acting as a sensory organ; modulating body temperature and electrolyte balance; and synthesizing vitamin D.[1]
Skin
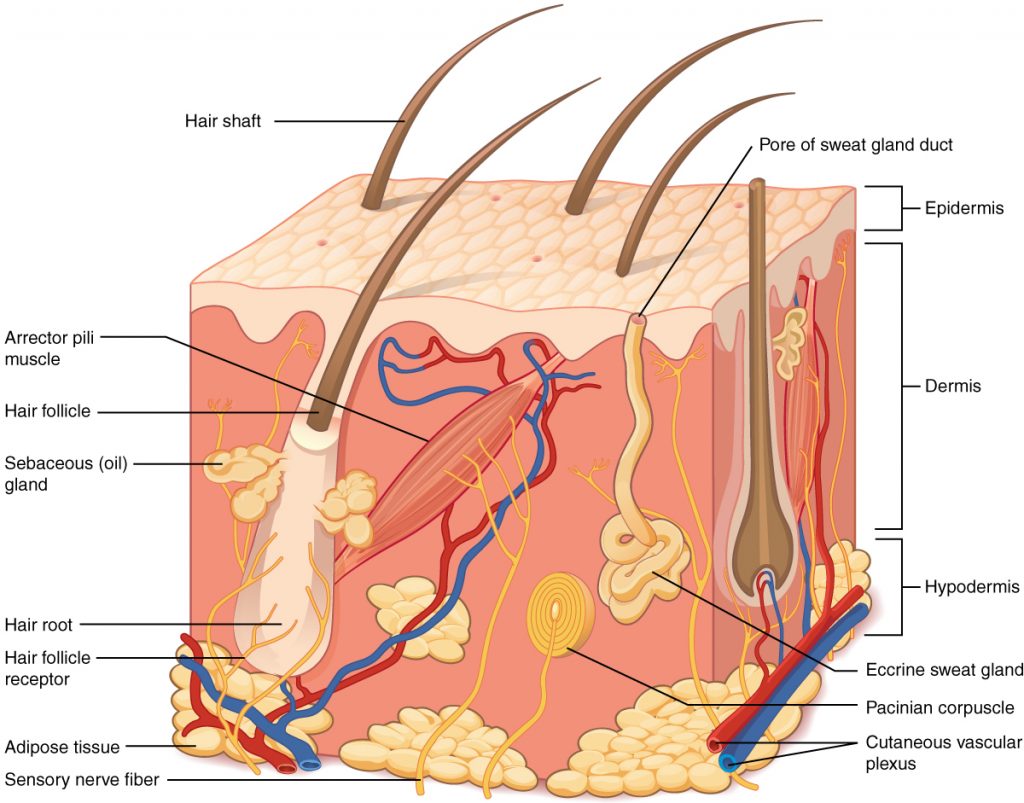
The skin is made of multiple layers of cells and tissues, which are held to underlying structures by connective tissue. See Figure 14.1[2] for an image of the layers of the skin. The skin is composed of two main layers: the uppermost thin layer called the epidermis made of closely packed epithelial cells, and the inner thick layer called the dermis that houses blood vessels, hair follicles, sweat glands, and nerve fibers. Beneath the dermis lies the hypodermis that contains connective tissue and adipose tissue (stored fat) to connect the skin to the underlying bones and muscles. The skin acts as a sense organ because the epidermis, dermis, and hypodermis contain specialized sensory nerve structures that detect touch, surface temperature, and pain.[3]
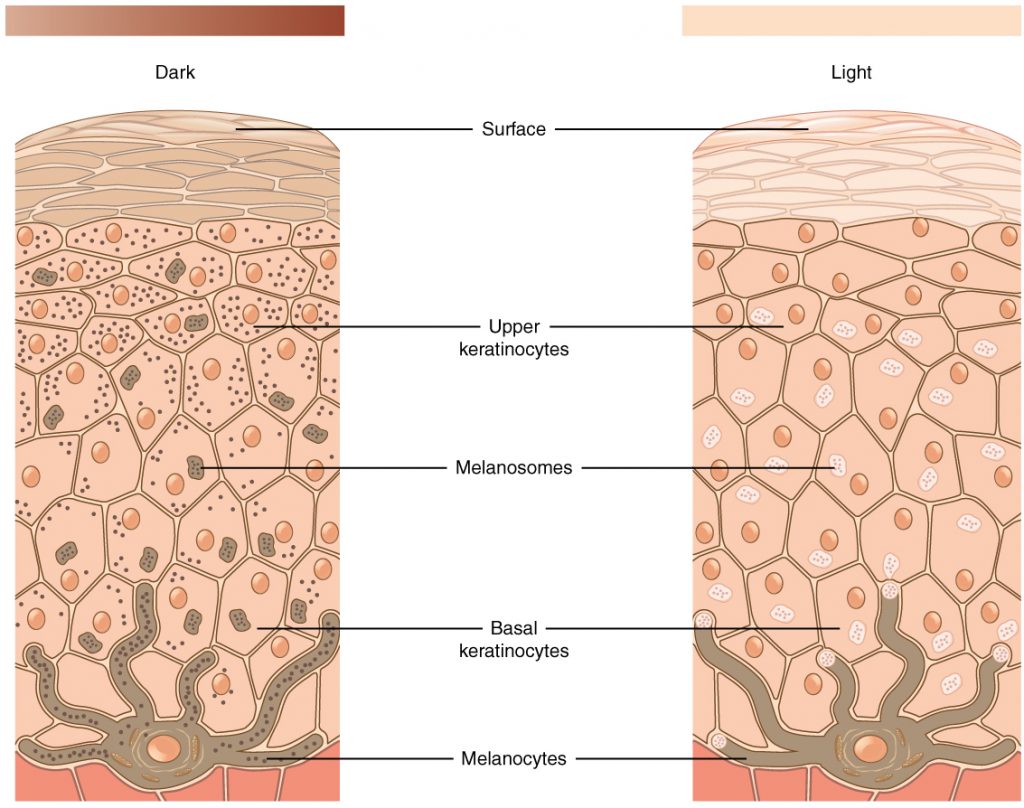
The color of skin is created by pigments, including melanin, carotene, and hemoglobin. Melanin is produced by cells called melanocytes that are scattered throughout the epidermis. See Figure 14.2[4] for an illustration of melanin and melanocytes. When there is an irregular accumulation of melanocytes in the skin, freckles appear. Dark-skinned individuals produce more melanin than those with pale skin. Exposure to the UV rays of the sun or a tanning bed causes additional melanin to be manufactured and built up, resulting in the darkening of the skin referred to as a tan. Increased melanin accumulation protects the DNA of epidermal cells from UV ray damage, but it requires about ten days after initial sun exposure for melanin synthesis to peak. This is why pale-skinned individuals often suffer sunburns during initial exposure to the sun. Darker-skinned individuals can also get sunburns, but they are more protected from their existing melanin than pale-skinned individuals.[5]
Too much sun exposure can eventually lead to wrinkling due to the destruction of the cellular structure of the skin, and in severe cases, can cause DNA damage resulting in skin cancer. Moles are larger masses of melanocytes, and although most are benign, they should be monitored for changes that indicate the presence of skin cancer. See Figure 14.3[6] for an image of moles.
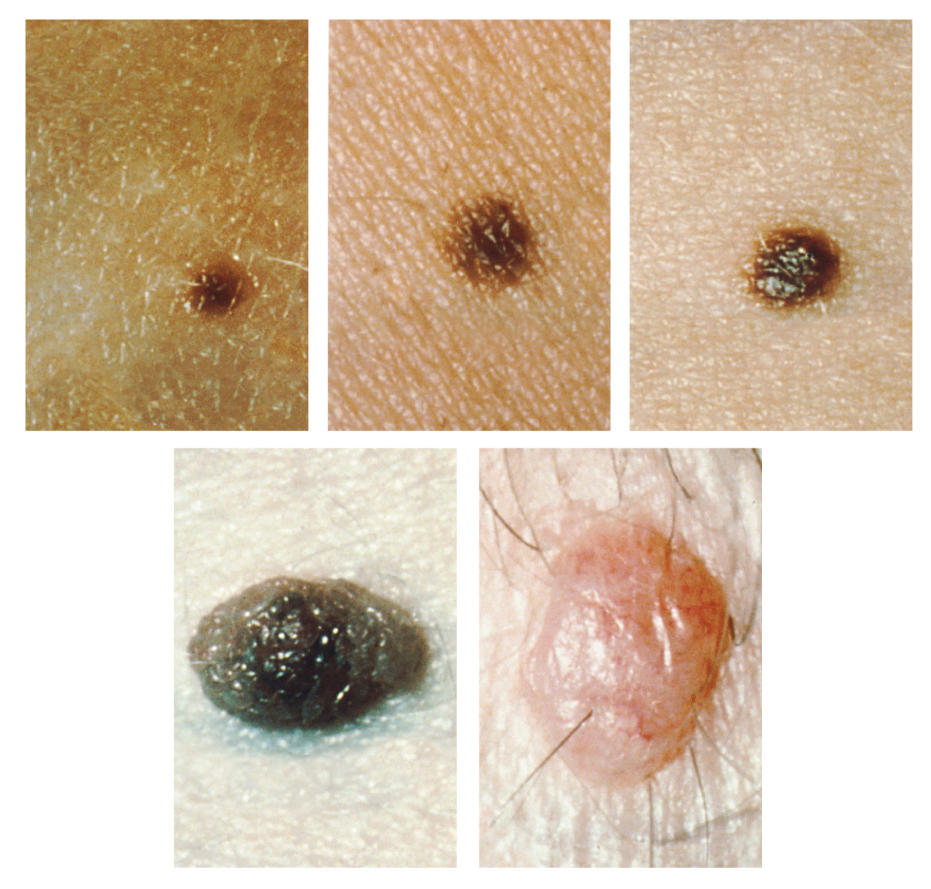
Patients are encouraged to use the ABCDE mnemonic to watch for signs of early-stage melanoma developing in moles. Consult a health care provider if you find these signs of melanoma when assessing a patient’s skin:
- Asymmetrical: The sides of the moles are not symmetrical
- Borders: The edges of the mole are irregular in shape
- Color: The color of the mole has various shades of brown or black
- Diameter: The mole is larger than 6 mm. (0.24 in.)
- Evolving: The shape of the mole has changed
Hair
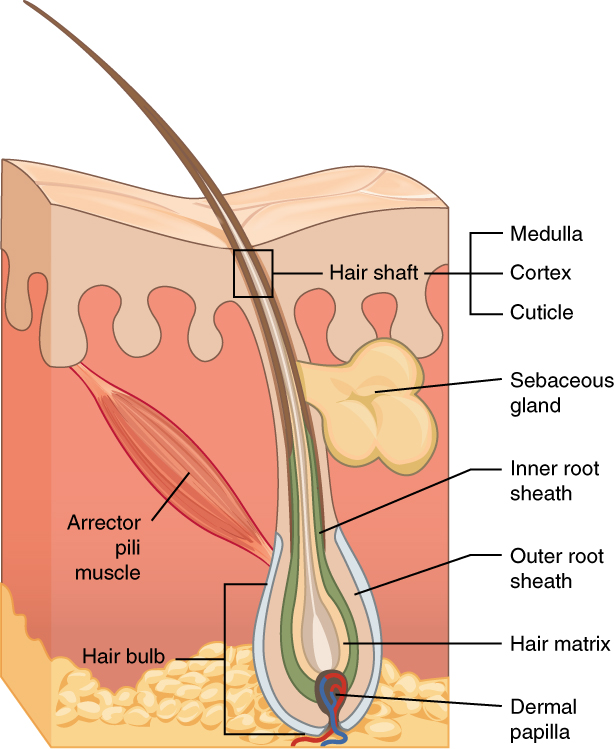
Hair is made of dead, keratinized cells that originate in the hair follicle in the dermis. For these reasons, there is no sensation in hair. See Figure 14.4[7] for an image of a hair follicle. Hair serves a variety of functions, including protection, sensory input, thermoregulation, and communication. For example, hair on the head protects the skull from the sun. Hair in the nose, ears, and around the eyes (eyelashes) defends the body by trapping any dust particles that may contain allergens and microbes. Hair of the eyebrows prevents sweat and other particles from dripping into the eyes.
Hair also has a sensory function due to sensory innervation by a hair root plexus surrounding the base of each hair follicle. Hair is extremely sensitive to air movement or other disturbances in the environment, even more so than the skin surface. This feature is also useful for the detection of the presence of insects or other potentially damaging substances on the skin surface. Each hair root is also connected to a smooth muscle called the arrector pili that contracts in response to nerve signals from the sympathetic nervous system, making the external hair shaft “stand up.” This movement is commonly referred to as goose bumps. The primary purpose for this movement is to trap a layer of air to add insulation.[8]
Nails
The nail bed is a specialized structure of the epidermis that is found at the tips of our fingers and toes. See Figure 14.5[9] for an illustration of a fingernail. The nail body is formed on the nail bed and protects the tips of our fingers and toes as they experience mechanical stress while being used. In addition, the nail body forms a back-support for picking up small objects with the fingers.[10]

Sweat Glands
When the body becomes warm, sweat glands produce sweat to cool the body. There are two types of sweat glands that secrete slightly different products. An eccrine sweat gland produces hypotonic sweat for thermoregulation. See Figure 14.6[11] for an illustration of an eccrine sweat gland. These glands are found all over the skin’s surface, but are especially abundant on the palms of the hand, the soles of the feet, and the forehead. They are coiled glands lying deep in the dermis, with the duct rising up to a pore on the skin surface where the sweat is released. This type of sweat is composed mostly of water and some salt, antibodies, traces of metabolic waste, and dermicidin, an antimicrobial peptide. Eccrine glands are a primary component of thermoregulation and help to maintain homeostasis.[12]
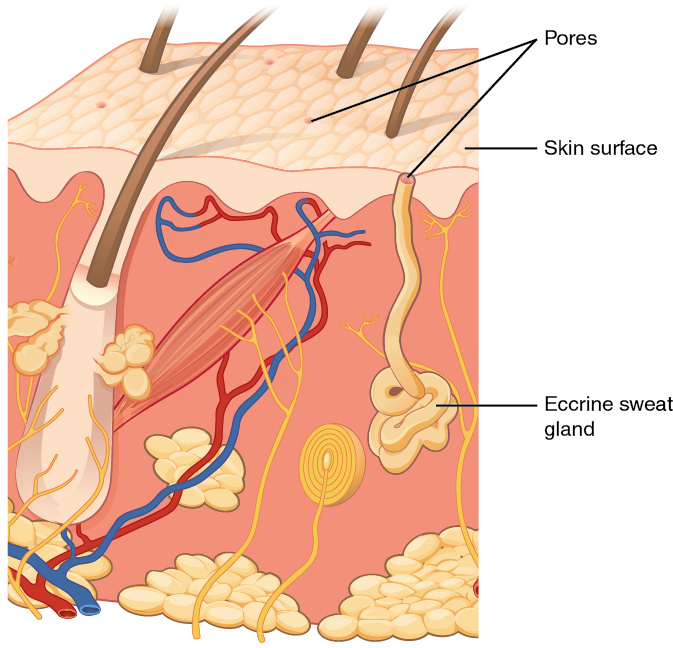
Apocrine sweat glands are mostly found in hair follicles in densely hairy areas, such as the armpits and genital regions. In addition to secreting water and salt, apocrine sweat includes organic compounds that make the sweat thicker and subject to bacterial decomposition and subsequent odor. The release of this sweat is controlled by the nervous system and hormones and plays a role in the human pheromone response. Most commercial antiperspirants use an aluminum-based compound as their primary active ingredient to stop sweat. When the antiperspirant enters the sweat gland duct, the aluminum-based compounds form a physical block in the duct, which prevents sweat from coming out of the pore.[13]
Skin Lesions
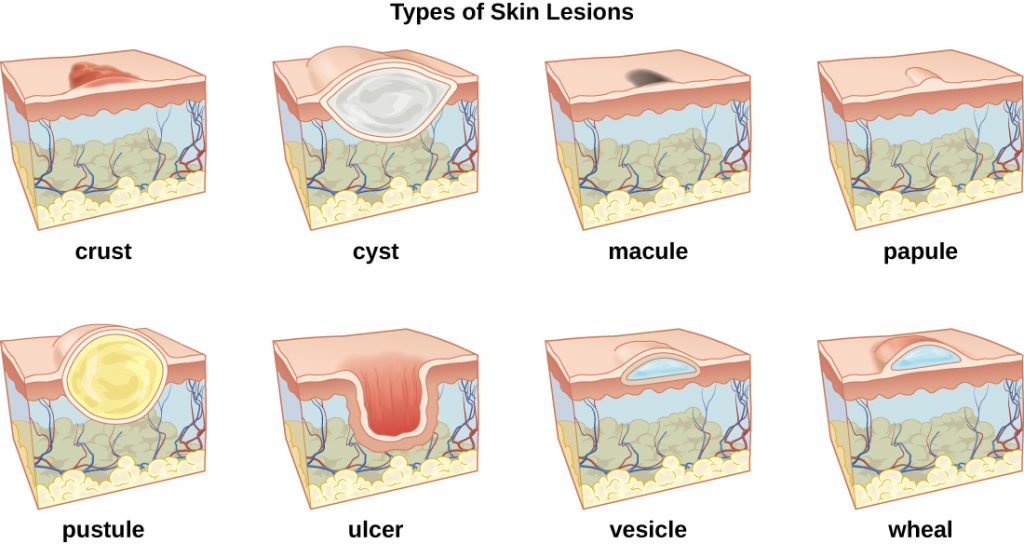
A lesion is an area of abnormal tissue. There are many terms for common skin lesions that may be described in a patient’s chart. These terms are defined in Table 14.2. See Figure 14.7[14] for illustrations of common skin lesions.
Table 14.2 Medical Terms Associated with Skin Lesions and Rashes[15]
| Medical Term | Definition |
|---|---|
| abscess | localized collection of pus |
| bulla (pl., bullae) | fluid-filled blister no more than 5 mm in diameter |
| carbuncle | deep, pus-filled abscess generally formed from multiple furuncles |
| crust | dried fluids from a lesion on the surface of the skin |
| cyst | encapsulated sac filled with fluid, semi-solid matter, or gas, typically located just below the upper layers of skin |
| folliculitis | a localized rash due to inflammation of hair follicles |
| furuncle (boil) | pus-filled abscess due to infection of a hair follicle |
| macules | smooth spots of discoloration on the skin |
| papules | small raised bumps on the skin, such as a mosquito bite |
| pseudocyst | lesion that resembles a cyst but with a less-defined boundary |
| purulent | pus-producing; also called suppurative |
| pustules | fluid- or pus-filled bumps on the skin, such as acne |
| pyoderma | any suppurative (pus-producing) infection of the skin |
| suppurative | producing pus; purulent |
| ulcer | break in the skin or open sore such as a venous ulcer |
| vesicle | small, fluid-filled lesion, such as a herpes blister |
| wheal | swollen, inflamed skin that itches or burns, often from an allergic reaction |
- This work is a derivative of Anatomy & Physiology by OpenStax and is licensed under CC BY 4.0. Access for free at https://openstax.org/books/anatomy-and-physiology/pages/1-introduction ↵
- “501 Structure of the skin.jpg” by OpenStax is licensed under CC BY 3.0. Access for free at https://openstax.org/books/anatomy-and-physiology/pages/5-1-layers-of-the-skin. ↵
- This work is a derivative of Anatomy & Physiology by OpenStax and is licensed under CC BY 4.0. Access for free at https://openstax.org/books/anatomy-and-physiology/pages/1-introduction ↵
- “504 Melanocytes.jpg” by OpenStax is licensed under CC BY 3.0. Access for free at https://openstax.org/books/anatomy-and-physiology/pages/5-1-layers-of-the-skin. ↵
- A.D.A.M. Medical Encyclopedia [Internet]. Atlanta (GA): A.D.A.M., Inc.; c1997-2020. Skin turgor; [updated 2020, Sep 16; cited 2020, Sep 18]. https://medlineplus.gov/ency/article/003281.htm#:~:text=To%20check%20for%20skin%20turgor,back%20to%20its%20normal%20position. ↵
- “508 Moles.jpg” by OpenStax is licensed under CC BY 3.0. Access for free at https://openstax.org/books/anatomy-and-physiology/pages/5-1-layers-of-the-skin. ↵
- “506 Hair.jpg” by OpenStax is licensed under CC BY 3.0. Access for free at https://openstax.org/books/anatomy-and-physiology/pages/5-2-accessory-structures-of-the-skin. ↵
- This work is a derivative of Anatomy & Physiology by OpenStax and is licensed under CC BY 4.0. Access for free at https://openstax.org/books/anatomy-and-physiology/pages/1-introduction ↵
- “507 Nails.jpg” by OpenStax is licensed under CC BY 3.0. Access for free at https://openstax.org/books/anatomy-and-physiology/pages/5-2-accessory-structures-of-the-skin. ↵
- This work is a derivative of Anatomy & Physiology by OpenStax and is licensed under CC BY 4.0. Access for free at https://openstax.org/books/anatomy-and-physiology/pages/1-introduction ↵
- “508 Eccrine gland.jpg” by OpenStax is licensed under CC BY 3.0. Access for free at https://openstax.org/books/anatomy-and-physiology/pages/5-2-accessory-structures-of-the-skin. ↵
- This work is a derivative of Anatomy & Physiology by OpenStax and is licensed under CC BY 4.0. Access for free at https://openstax.org/books/anatomy-and-physiology/pages/1-introduction ↵
- This work is a derivative of Anatomy & Physiology by OpenStax and is licensed under CC BY 4.0. Access for free at https://openstax.org/books/anatomy-and-physiology/pages/1-introduction ↵
- “OSC Microbio 21 01 LesionLine.jpg” by OpenStax is licensed under CC BY 4.0. Access for free at https://commons.wikimedia.org/wiki/File:OSC_Microbio_21_01_LesionLine.jpg. ↵
- This work is derivative of Microbiology by OpenStax and is licensed under CC BY 4.0. Access for free at https://openstax.org/books/microbiology/pages/1-introduction. ↵
Now that we have reviewed tests included in a neurological exam, let’s review components of a routine neurological assessment typically performed by registered nurses. The neurological assessment begins by collecting subjective data followed by a physical examination.
Subjective Assessment
Subjective data collection guides the focus of the physical examination. Collect data from the patient using effective communication and pay particular attention to what the patient is reporting, including current symptoms and any history of neurological illness. Ask follow-up questions related to symptoms such as confusion, headache, vertigo, seizures, recent injury or fall, weakness, numbness, tingling, difficulty swallowing (called dysphagia) or speaking (called dysphasia), or lack of coordination of body movements.[1]
See Table 6.10a for sample interview questions to use during the subjective assessment
Table 6.10a Interview Questions Related to Subjective Assessment of Neurological System
| Interview Questions | Follow-up |
|---|---|
| Are you experiencing any current neurological concerns such as headache, dizziness, weakness, numbness, tingling, tremors, loss of balance, or decreased coordination?
Have you experienced any difficulty swallowing or speaking? Have you experienced any recent falls? |
If the patient is seeking care for an acute neurological problem, use the PQRSTU method to further evaluate their chief complaint. The PQRSTU method is described in the “Health History” chapter.
Note: If critical findings of an acute neurological event are actively occurring, such as signs of a stroke, obtain emergency assistance according to agency policy. |
| Have you ever experienced a neurological condition such as a stroke, transient ischemic attack, seizures, or head injury? | Describe the condition(s), date(s), and treatment(s). |
| Are you currently taking any medications, herbs, or supplements for a neurological condition? | Please describe. |
Life Span Considerations
Newborn
At birth, the neurologic system is not fully developed. The brain is still developing, and the newborn’s anterior fontanelle doesn't close until approximately 18 months of age. The sensory and motor systems gradually develop in the first year of life. The newborn’s sensory system responds to stimuli by crying or moving body parts. Initial motor activity is primitive in the form of newborn reflexes. Additional information about newborn reflexes is provided in the “Assessing Reflexes” section. As the newborn develops, so do the motor and sensory integration. Specific questions to ask parents or caregivers of infants include the following:
- Have you noticed your infant sleeping excessively or having difficulty arousing?
- Has your infant had difficulty feeding, sucking, or swallowing?
Children
Depending on the child's age and developmental level, they may answer questions independently or the child's parent/guardian may provide information. Specific questions for children include the following:
- Have you ever had a head injury or a concussion?
- Do you experience headaches? If so, how often?
- Have you had a seizure or convulsion?
- Have you noticed if your child has any problems with walking or balance?
- Have you noticed if your child experiences episodes of not being aware of their environment?
Older Adults
The aging adult experiences a general slowing in nerve conduction, resulting in a slowed motor and sensory interaction. Fine coordination, balance, and reflex activity may be impaired. There may also be a gradual decrease in cerebral blood flow and oxygen use that can cause dizziness and loss of balance. Examples of specific subjective questions for the older adult include the following:
- Have you ever had a head injury or recent fall?
- Do you experience any shaking or tremors of your hands? If so, do they occur more with rest or activity?
- Have you had any weakness, numbness, or tingling in any of your extremities?
- Have you noticed a problem with balance or coordination?
- Do you ever feel lightheaded or dizzy? If so, does it occur with activity or change in position?
Objective Assessment
The physical examination of the neurological system includes assessment of both the central and peripheral nervous systems. A routine neurological exam usually starts by assessing the patient's mental status followed by evaluation of sensory function and motor function. Comprehensive neurological exams may further evaluate cranial nerve function and deep tendon reflexes. The nurse must be knowledgeable of what is normal or expected for the patient's age, development, and condition to analyze the meaning of the data that is being collected.
Inspection
Nurses begin assessing a patient’s overall neurological status by observing their general appearance, posture, ability to walk, and personal hygiene in the first few minutes of nurse-patient interaction. For additional information about obtaining an overall impression of a patient’s status while performing an assessment, see the "General Survey" chapter.
Level of orientation is assessed and other standardized tools to evaluate a patient’s mental status may be used, such as the Glasgow Coma Scale (GCS), NIH Stroke Scale, or Mini-Mental State Exam (MMSE). Read more information about these tools under the "Assessing Mental Status" section earlier in this chapter.
The nurse also assesses a patient’s cerebellar function by observing their gait and balance. See the "Assessing Cerebellar Function" section earlier in chapter for more information.
Auscultation
Auscultation refers to the action of listening to sounds from the heart, lungs, or other organs with a stethoscope as a part of physical examination. Auscultation is not typically performed by registered nurses during a routine neurological assessment. However, advanced practice nurses and other health care providers may auscultate the carotid arteries for the presence of a swishing sound called a bruit. Bruits suggest interference with cerebral blood flow that can cause neurological deficits.
Palpation
Palpation during a physical examination typically refers to the use of touch to evaluate organs for size, location, or tenderness, but palpation during the neurologic physical exam involves using touch to assess sensory function and motor function. Refer to sections on "Assessing Sensory Function," "Assessing Motor Function," "Assessing Cranial Nerves," and “Assessing Reflexes" earlier in this chapter for additional information on how to perform these tests.
See Table 6.10b for a summary of expected and unexpected findings when performing an adult neurological assessment.
Table 6.10b Expected Versus Unexpected Findings on Adult Neurological Assessment
| Assessment | Expected Findings | Unexpected Findings (Document and notify provider if new finding*) |
|---|---|---|
| Inspection | Alert and oriented to person, place, and time
Symmetrical facial expressions Clear and appropriate speech Ability to follow instructions PERRLA (Pupils are equal, round, and reactive to light and accommodation) Cranial nerves all intact Negative Romberg test Sensory function present Cortical functioning (indicated by stereognosis) intact Good balance Coordinated gait with equal arm swing Finger-to-nose, rapid alternating arm movements, and heel-to-shin performance intact Negative pronator drift test Motor strength in upper and lower extremities equal bilaterally Deep tendon reflexes intact |
Not alert and oriented to person, place, and/or time
Asymmetrical facial expressions Garbled speech Inability to follow directions Pupils unequal in size or reactivity Deficits in one or more cranial nerve assessments Positive Romberg test Sensory function impaired in one or more areas Stereognosis not intact Poor balance Shuffled or asymmetrical gait with unequal arm swing Unable to complete finger-to-nose, alternating arm movement, or heel-to-shin tests Positive pronator drift test Unequal strength of upper and/or lower extremities One or more deep tendon reflexes are not reactive
|
| Critical findings to report immediately and/or obtain emergency assistance: | Change in mental status, pupil responsiveness, facial drooping, slurred words or inability to speak, or sudden unilateral loss of motor strength |
When performing a comprehensive neurological exam, examiners may assess the functioning of the cranial nerves. When performing these tests, examiners compare responses of opposite sides of the face and neck. Instructions for assessing each cranial nerve are provided below.
Cranial Nerve I - Olfactory
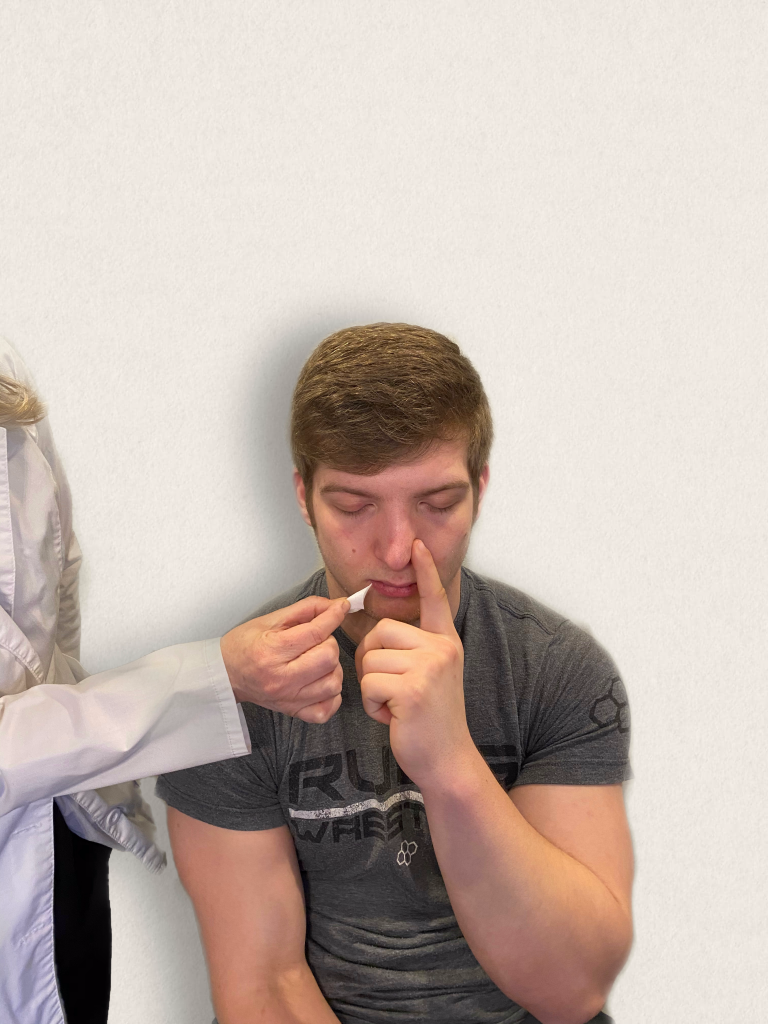
Ask the patient to identify a common odor, such as coffee or peppermint, with their eyes closed. See Figure 6.11[2] for an image of a nurse performing an olfactory assessment.
Cranial Nerve II - Optic
Be sure to provide adequate lighting when performing a vision assessment.
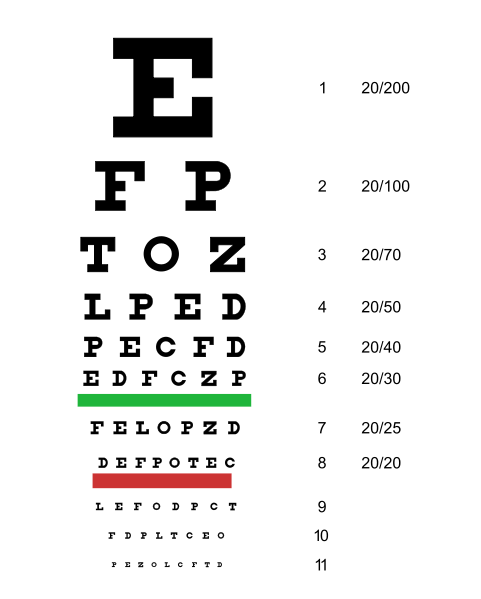
Far vision is tested using the Snellen chart. See Figure 6.12[3] for an image of a Snellen chart. The numerator of the fractions on the chart indicate what the individual can see at 20 feet, and the denominator indicates the distance at which someone with normal vision could see this line. For example, a result of 20/40 indicates this individual can see this line at 20 feet but someone with normal vision could see this line at 40 feet.
Test far vision by asking the patient to stand 20 feet away from a Snellen chart. Ask the patient to cover one eye and read the letters from the lowest line they can see.[4] Record the corresponding result in the furthermost right-hand column, such as 20/30. Repeat with the other eye. If the patient is wearing glasses or contact lens during this assessment, document the results as “corrected vision.” Repeat with each eye, having the patient cover the opposite eye. Alternative charts are available for children or adults who can’t read letters in English.
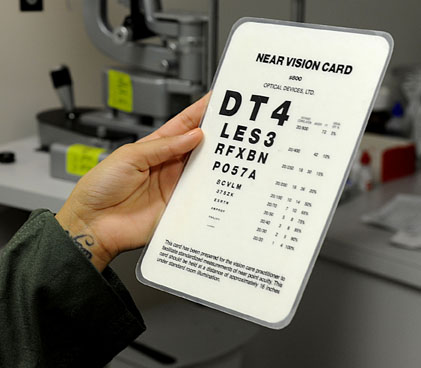
Near vision is assessed by having a patient read from a prepared card from 14 inches away. See Figure 6.13[5] for a card used to assess near vision.
Cranial Nerve III, IV, and VI - Oculomotor, Trochlear, Abducens
Cranial nerve III, IV, and VI (oculomotor, trochlear, abducens nerves) are tested together.
- Test eye movement by using a penlight. Stand 1 foot in front of the patient and ask them to follow the direction of the penlight with only their eyes. At eye level, move the penlight left to right, right to left, up and down, upper right to lower left, and upper left to lower right. Watch for smooth movement of the eyes in all fields. An unexpected finding is involuntary shaking of the eye as it moves, referred to as nystagmus.
- Test bilateral pupils to ensure they are equally round and reactive to light and accommodation. Dim the lights of the room before performing this test.
- Pupils should be round and bilaterally equal in size. The diameter of the pupils usually ranges from two to five millimeters. Emergency clinicians often encounter patients with the triad of pinpoint pupils, respiratory depression, and coma related to opioid overuse.
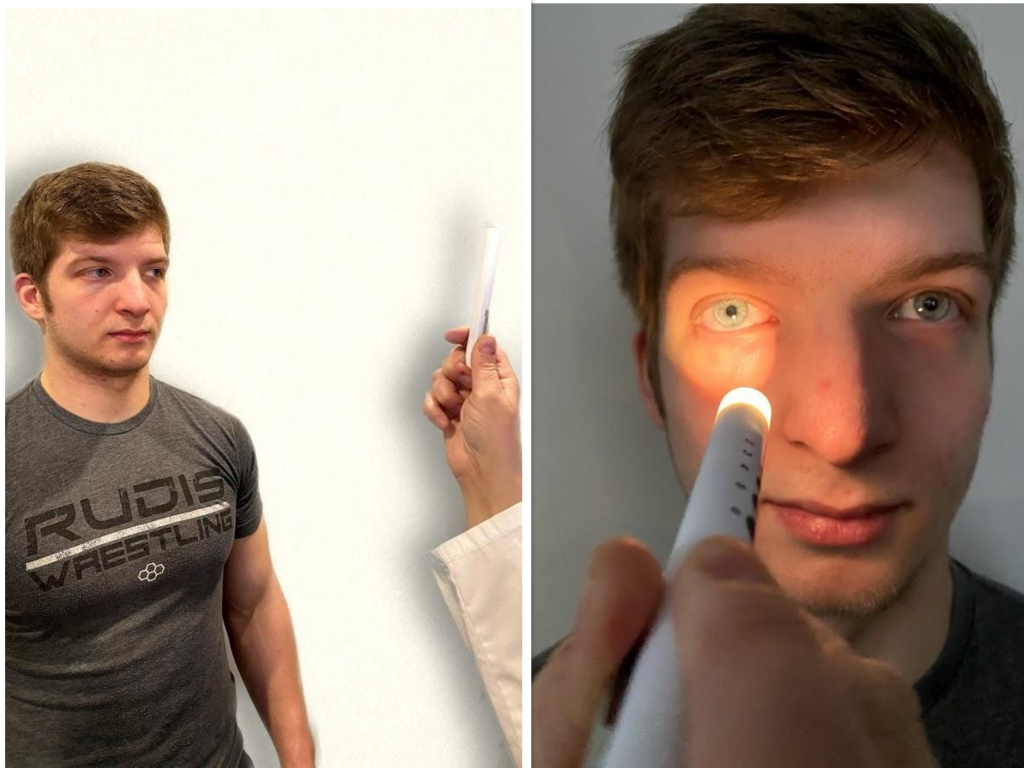
- Test pupillary reaction to light. Using a penlight, approach the patient from the side, and shine the penlight on one pupil. Observe the response of the lighted pupil, which is expected to quickly constrict. Repeat by shining the light on the other pupil. Both pupils should react in the same manner to light. See Figure 6.14[6] for an image of a nurse assessing a patient’s pupillary reaction to light. An unexpected finding is when one pupil is larger than the other or one pupil responds more slowly than the other to light, which is often referred to as a “sluggish response.”
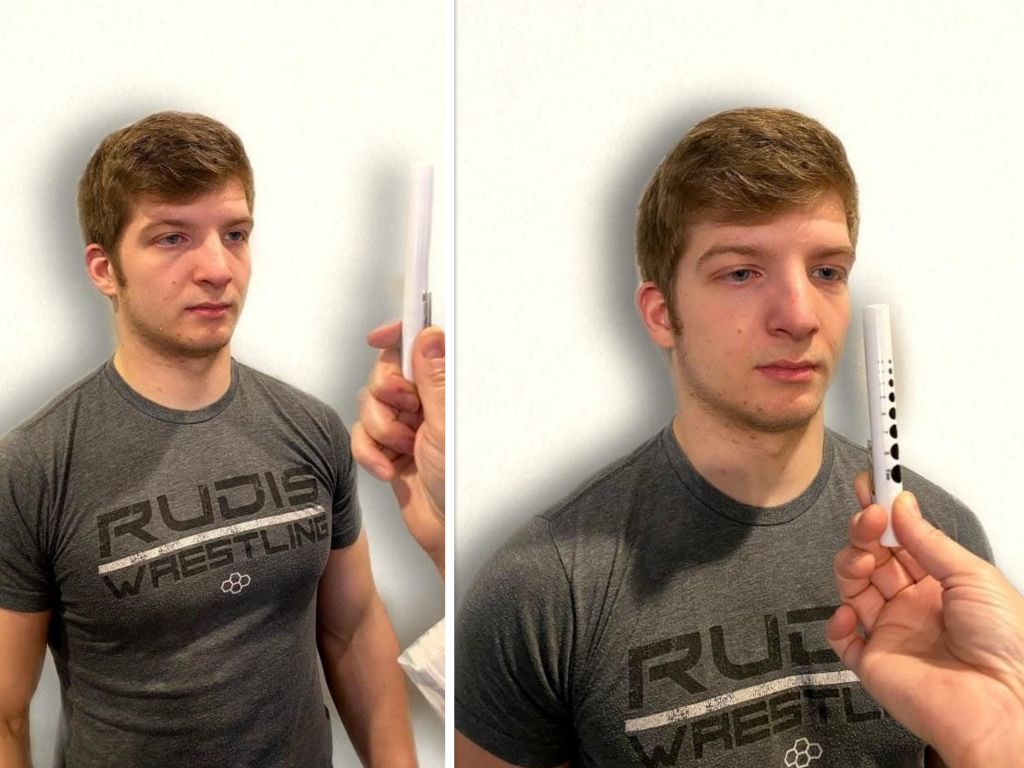
- Test eye convergence and accommodation. Recall that accommodation refers to the ability of the eye to adjust from near to far vision, with pupils constricting for near vision and dilating for far vision. Convergence refers to the action of both eyes moving inward as they focus on a close object using near vision. Ask the patient to look at a near object (4-6 inches away from the eyes), and then move the object out to a distance of 12 inches. Pupils should constrict while viewing a near object and then dilate while looking at a distant object, and both eyes should move together. See Figure 6.15[7] for an image of a nurse assessing convergence and accommodation.
- The acronym PERRLA is commonly used in medical documentation and refers to, "pupils are equal, round and reactive to light and accommodation."
Cranial Nerve V - Trigeminal
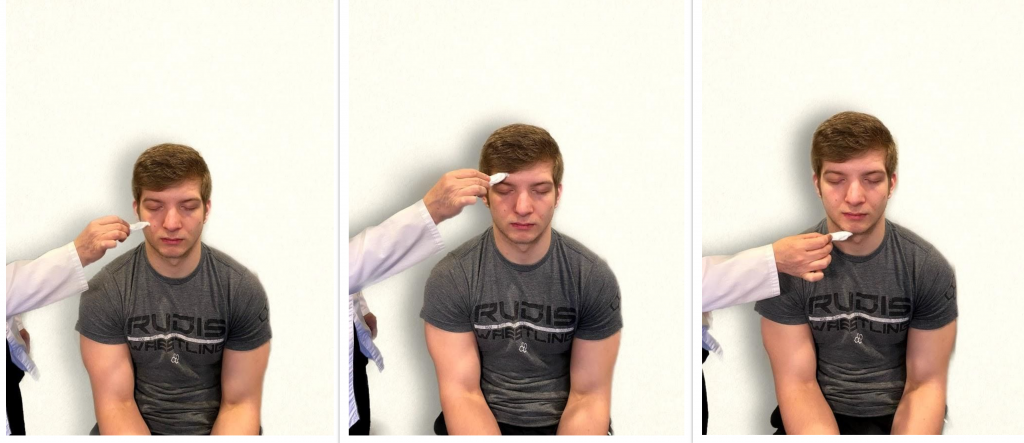
- Test sensory function. Ask the patient to close their eyes, and then use a wisp from a cotton ball to lightly touch their face, forehead, and chin. Instruct the patient to say ”Now” every time they feel the placement of the cotton wisp. See Figure 6.16[9] for an image of assessing trigeminal sensory function. The expected finding is that the patient will report every instance the cotton wisp is placed. An advanced technique is to assess the corneal reflex in comatose patients by touching the cotton wisp to the cornea of the eye to elicit a blinking response.
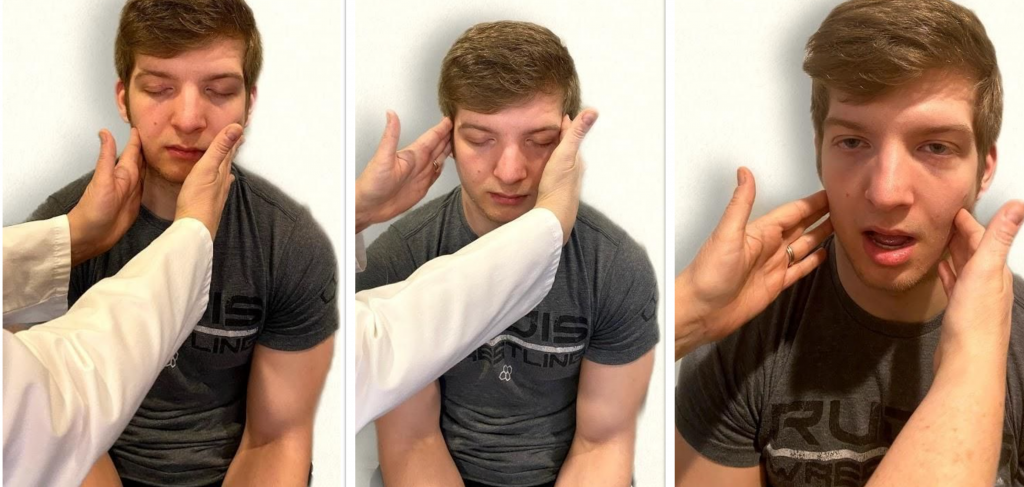
- Test motor function. Ask the patient to clench their teeth tightly while bilaterally palpating the temporalis and masseter muscles for strength. Ask the patient to open and close their mouth several times while observing muscle symmetry. See Figure 6.17[10] for an image of assessing trigeminal motor strength. The expected finding is the patient is able to clench their teeth and symmetrically open and close their mouth.
Cranial Nerve VII - Facial Nerve
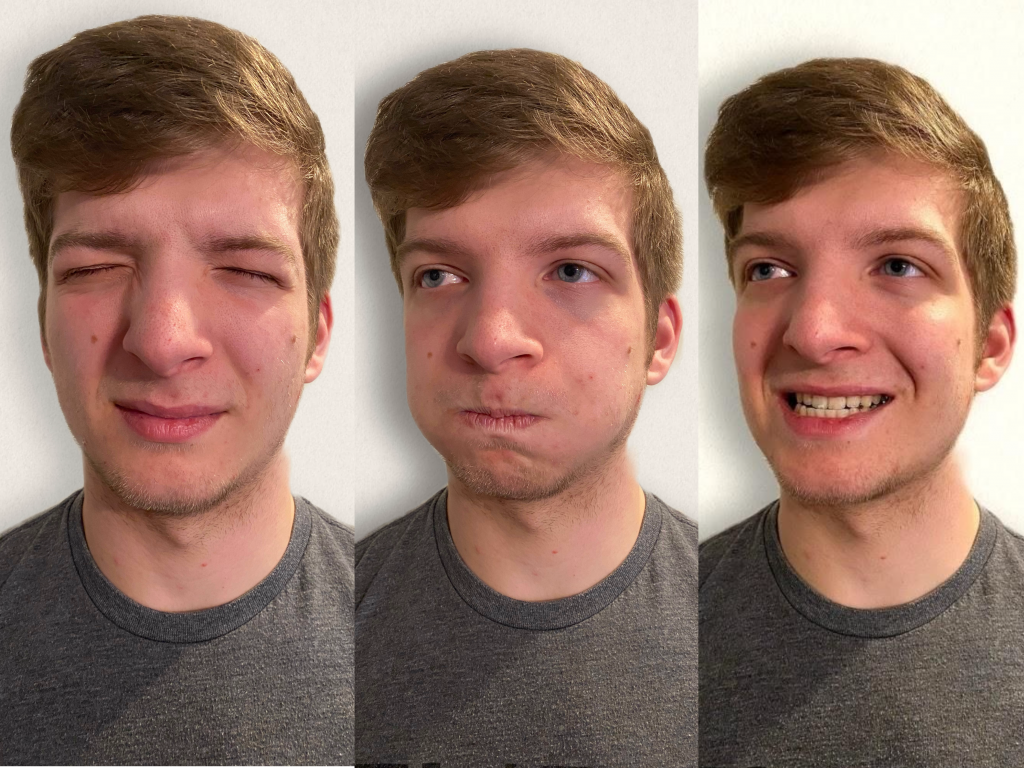
- Test motor function. Ask the patient to smile, show teeth, close both eyes, puff cheeks, frown, and raise eyebrows. Look for symmetry and strength of facial muscles. See Figure 6.18[11] for an image of assessing motor function of the facial nerve.
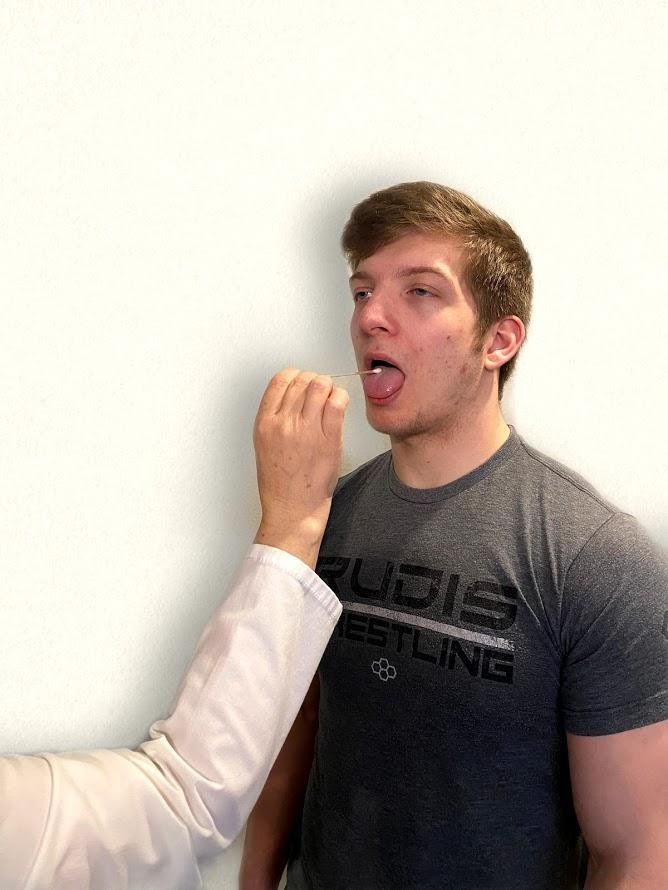
- Test sensory function. Test the sense of taste by moistening three different cotton applicators with salt, sugar, and lemon. Touch the patient's anterior tongue with each swab separately, and ask the patient to identify the taste. See Figure 6.19[12] for an image of assessing taste.
Cranial Nerve VIII - Vestibulocochlear
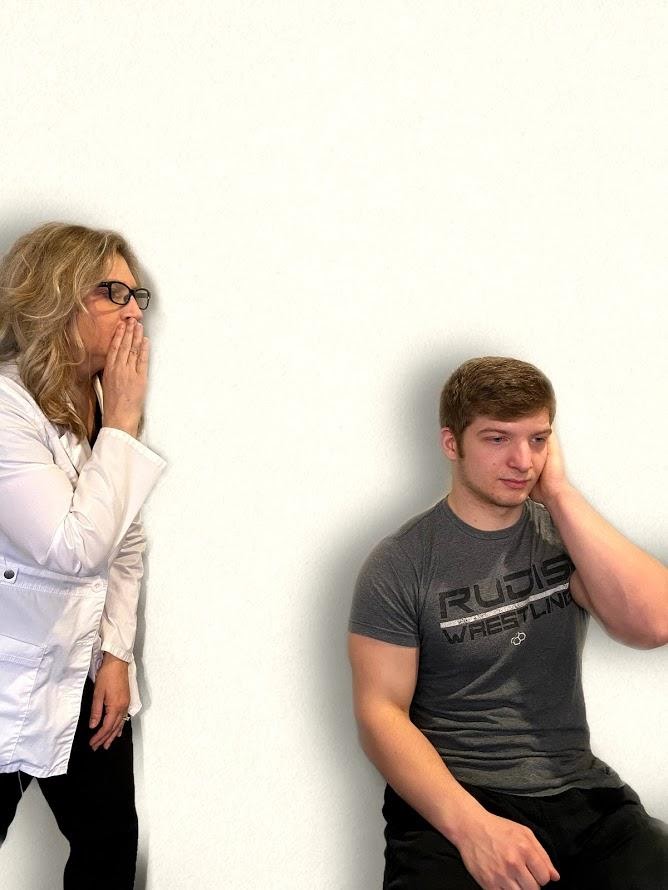
- Test auditory function. Perform the whispered voice test. The whispered voice test is a simple test for detecting hearing impairment if done accurately. See Figure 6.20[13] for an image assessing hearing using the whispered voice test. Complete the following steps to accurately perform this test:
- Stand at arm's length behind the seated patient to prevent lip reading.
- Each ear is tested individually. The patient should be instructed to occlude the non-test ear with their finger.
- Exhale before whispering and use as quiet a voice as possible.
- Whisper a combination of numbers and letters (for example, 4-K-2), and then ask the patient to repeat the sequence.
- If the patient responds correctly, hearing is considered normal; if the patient responds incorrectly, the test is repeated using a different number/letter combination.
- The patient is considered to have passed the screening test if they repeat at least three out of a possible six numbers or letters correctly.
- The other ear is assessed similarly with a different combination of numbers and letters.
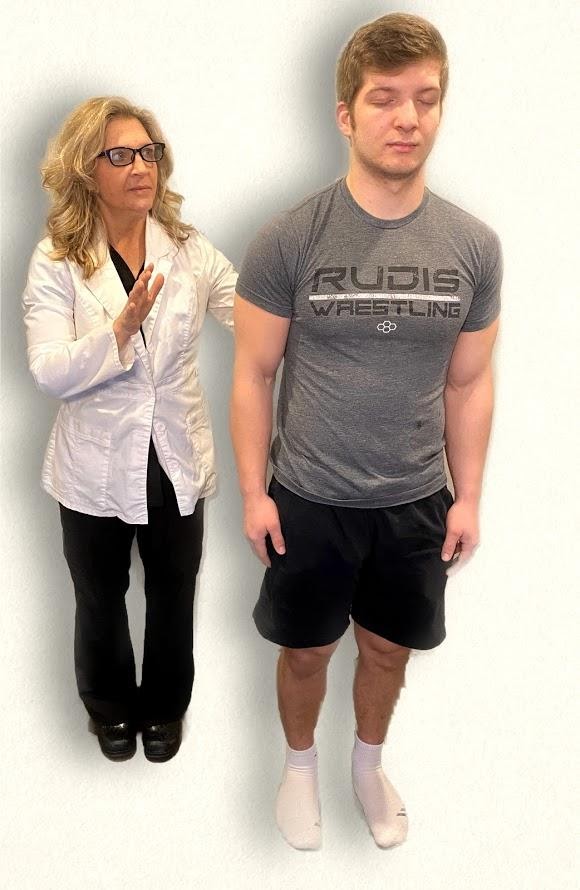
- Test balance. The Romberg test is used to test balance and is also used as a test for driving under the influence of an intoxicant. See Figure 6.21[14] for an image of the Romberg test. Ask the patient to stand with their feet together and eyes closed. Stand nearby and be prepared to assist if the patient begins to fall. It is expected that the patient will maintain balance and stand erect. A positive Romberg test occurs if the patient sways or is unable to maintain balance. The Romberg test is also a test of the body's sense of positioning (proprioception), which requires healthy functioning of the spinal cord.
Cranial Nerve IX - Glossopharyngeal
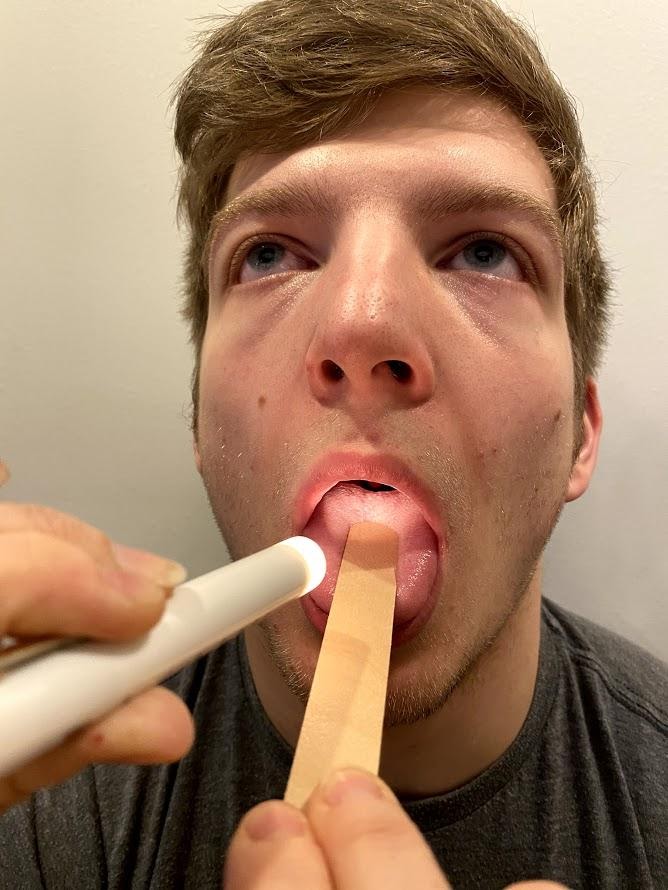
Ask the patient to open their mouth and say “Ah” and note symmetry of the upper palate. The uvula and tongue should be in a midline position and the uvula should rise symmetrically when the patient says "Ah." (see Figure 6.22[15]).
Cranial Nerve X - Vagus
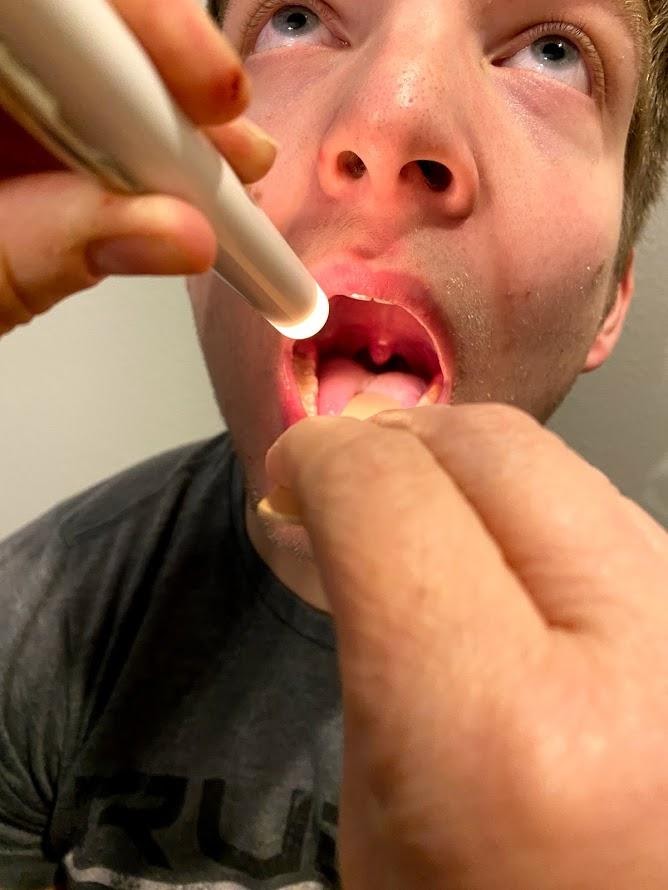
Use a cotton swab or tongue blade to touch the patient’s posterior pharynx and observe for a gag reflex followed by a swallow. The glossopharyngeal and vagus nerves work together for integration of gag and swallowing. See Figure 6.23[16] for an image of assessing the gag reflex.
Cranial Nerve XI - Spinal Accessory
Test the right sternocleidomastoid muscle. Face the patient and place your right palm laterally on the patient's left cheek. Ask the patient to turn their head to the left while resisting the pressure you are exerting in the opposite direction. At the same time, observe and palpate the right sternocleidomastoid with your left hand. Then reverse the procedure to test the left sternocleidomastoid.
Continue to test the sternocleidomastoid by placing your hand on the patient's forehead and pushing backward as the patient pushes forward. Observe and palpate the sternocleidomastoid muscles.
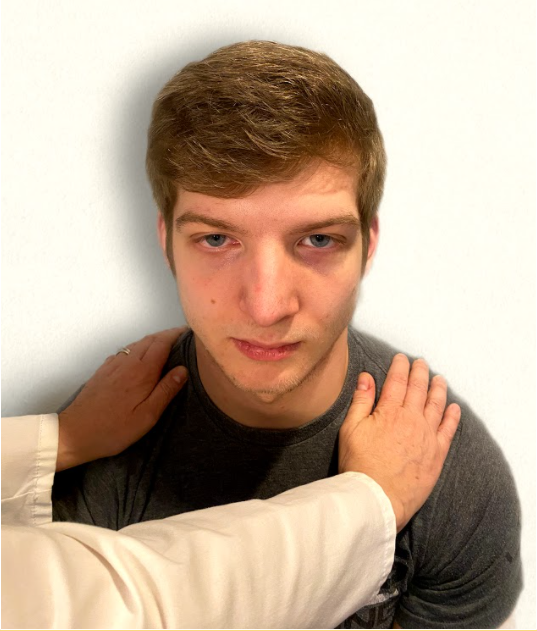
Test the trapezius muscle. Ask the patient to face away from you and observe the shoulder contour for hollowing, displacement, or winging of the scapula and observe for drooping of the shoulder. Place your hands on the patient's shoulders and press down as the patient elevates or shrugs the shoulders and then retracts the shoulders.[17] See Figure 6.24[18] for an image of assessing the trapezius muscle.
Cranial Nerve XII - Hypoglossal
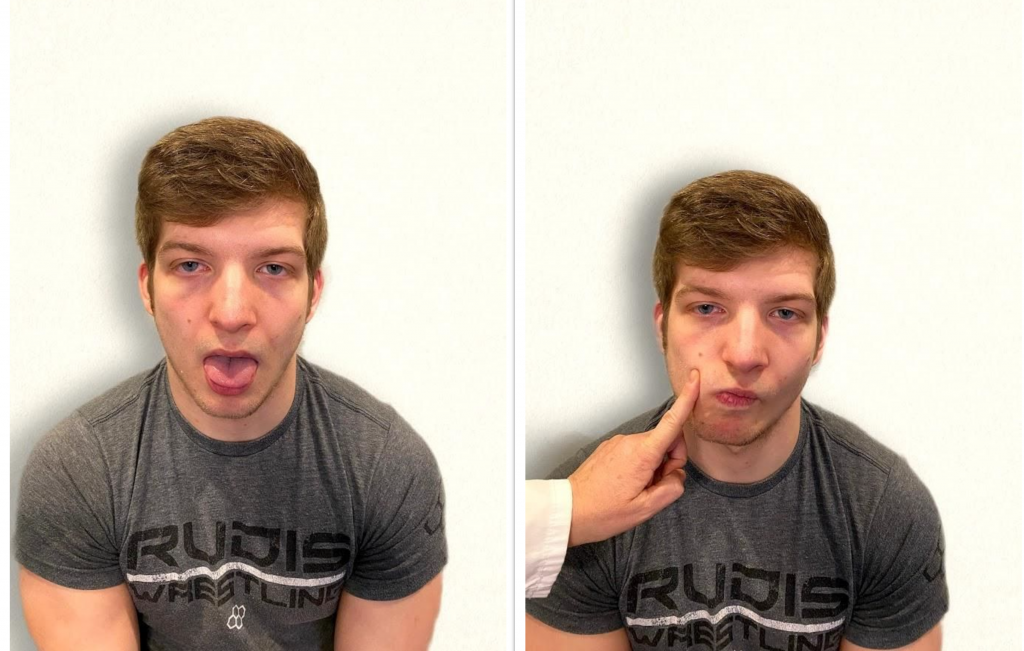
Ask the patient to protrude the tongue. If there is unilateral weakness present, the tongue will point to the affected side due to unopposed action of the normal muscle. An alternative technique is to ask the patient to press their tongue against their cheek while providing resistance with a finger placed on the outside of the cheek. See Figure 6.25[19] for an image of assessing the hypoglossal nerve.
Video Review of Cranial Nerve Assessment[20]
Expected Versus Unexpected Findings
See Table 6.5 for a comparison of expected versus unexpected findings when assessing the cranial nerves.
Table 6.5 Expected Versus Unexpected Findings of an Adult Cranial Nerve Assessment
| Cranial Nerve | Expected Finding | Unexpected Finding (Dysfunction) |
|---|---|---|
| I. Olfactory | Patient is able to describe odor. | Patient has inability to identify odors (anosmia). |
| II. Optic | Patient has 20/20 near and far vision. | Patient has decreased visual acuity and visual fields. |
| III. Oculomotor | Pupils are equal, round, and reactive to light and accommodation. | Patient has different sized or reactive pupils bilaterally. |
| IV. Trochlear | Both eyes move in the direction indicated as they follow the examiner’s penlight. | Patient has inability to look up, down, inward, outward, or diagonally. Ptosis refers to drooping of the eyelid and may be a sign of dysfunction. |
| V. Trigeminal | Patient feels touch on forehead, maxillary, and mandibular areas of face and chews without difficulty. | Patient has weakened muscles responsible for chewing; absent corneal reflex; and decreased sensation of forehead, maxillary, or mandibular area. |
| VI. Abducens | Both eyes move in coordination. | Patient has inability to look side to side (lateral); patient reports diplopia (double vision). |
| VII. Facial | Patient smiles, raises eyebrows, puffs out cheeks, and closes eyes without difficulty; patient can distinguish different tastes. | Patient has decreased ability to taste. Patient has facial paralysis or asymmetry of face such as facial droop. |
| VIII. Vestibulocochlear (Acoustic) | Patient hears whispered words or finger snaps in both ears; patient can walk upright and maintain balance. | Patient has decreased hearing in one or both ears and decreased ability to walk upright or maintain balance. |
| IX. Glossopharyngeal | Gag reflex is present. | Gag reflex is not present; patient has dysphagia. |
| X. Vagus | Patient swallows and speaks without difficulty. | Slurred speech or difficulty swallowing is present. |
| XI. Spinal Accessory | Patient shrugs shoulders and turns head side to side against resistance. | Patient has inability to shrug shoulders or turn head against resistance. |
| XII. Hypoglossal | Tongue is midline and can be moved without difficulty. | Tongue is not midline or is weak. |
Sample Documentation of Expected Findings
Patient denies any new onset of symptoms of headaches, dizziness, visual disturbances, numbness, tingling, or weakness. Patient is alert and oriented to person, place, and time. Dress is appropriate, well-groomed, and proper hygiene. Patient is cooperative and appropriately follows instructions during the exam. Speech is clear and facial expressions are symmetrical. Glasgow scores at 15. Gait is coordinated and erect with good balance. PERRLA, pupil size 4mm. Sensation intact in all extremities to light touch. Cranial nerves intact x 12. No deficits demonstrated on Mini-Mental Status Exam. Upper and lower extremity strength and hand grasps are 5/5 (equal with full resistance bilaterally). Follows commands appropriately. Cerebellar function intact as demonstrated through alternating hand movements and finger-to-nose test. Negative Romberg and Pronator drift. Balance is stable during heel-to-toe test. Tolerated exam without difficulty.
Sample Documentation of Unexpected Findings
Patient is alert and oriented to person, place, and time. Speech is clear; affect and facial expressions are appropriate to situation. Patient cooperative with exam and exhibits pleasant and calm behavior. Dress is appropriate, well-groomed, and proper hygiene. Posture remains erect in wheelchair, with intermittent drift to left side. History of CVA with left sided hemiplegia. Bilateral hearing aids in place with corrective lenses on. Pupils are 4mm equal and round. Reaction intact right and accommodation intact right eye. Left pupil 2mm, round nonreactive to light and accommodation. Upper extremity hand grips, nonsymmetrical due to left-sided weakness. Right hand grip and upper extremity strength strong at 4/5. Left lower extremity residual weakness, rated at 1/5, right lower extremity strength 4/5. Sensation intact to light touch bilaterally, R>L. Unable to assess Romberg and Pronator drift.
Use the checklist below to review the steps for completion of a “Head and Neck Assessment.”
Steps
Disclaimer: Always review and follow agency policy regarding this specific skill.
- Gather supplies: penlight, tongue blade, and nonsterile gloves.
- Perform safety steps:
- Perform hand hygiene.
- Check the room for transmission-based precautions.
- Introduce yourself, your role, the purpose of your visit, and an estimate of the time it will take.
- Confirm patient ID using two patient identifiers (e.g., name and date of birth).
- Explain the process to the patient and ask if they have any questions.
- Be organized and systematic.
- Use appropriate listening and questioning skills.
- Listen and attend to patient cues.
- Ensure the patient’s privacy and dignity.
- Assess ABCs.
- Inspect the head and facial expressions for symmetrical movement.
- Inspect the nose with a penlight for drainage and occlusion.
- Inspect the oral cavity for lesions, tongue position, movement of uvula, and oral health using a penlight.
- Inspect the throat and note any enlargement of the tonsils.
- Palpate the lymph nodes of the head and neck, including submaxillary, anterior cervical, posterior cervical, and preauricular.
- Ask the patient to swallow their own saliva and note any signs of difficulty swallowing.
- Assist the patient to a comfortable position, ask if they have any questions, and thank them for their time.
- Ensure five safety measures when leaving the room:
- CALL LIGHT: Within reach
- BED: Low and locked (in lowest position and brakes on)
- SIDE RAILS: Secured
- TABLE: Within reach
- ROOM: Risk-free for falls (scan room and clear any obstacles)
- Perform hand hygiene.
- Document the assessment findings and report any concerns according to agency policy.
Use the checklist below to review the steps for completion of a routine "Neurological Assessment.”
Steps
Disclaimer: Always review and follow agency policy regarding this specific skill.
- Gather supplies: penlight. For a comprehensive neurological exam, additional supplies may be needed: Snellen chart; tongue depressor; cotton wisp or applicator; and percussion hammer; objects to touch, such as coins or paper clips; substances to smell, such as vanilla, mint, or coffee; and substances to taste such as sugar, salt, or lemon.
- Perform safety steps:
- Perform hand hygiene.
- Check the room for transmission-based precautions.
- Introduce yourself, your role, the purpose of your visit, and an estimate of the time it will take.
- Confirm patient ID using two patient identifiers (e.g., name and date of birth).
- Explain the process to the patient and ask if they have any questions.
- Be organized and systematic.
- Use appropriate listening and questioning skills.
- Listen and attend to patient cues.
- Ensure the patient’s privacy and dignity.
- Assess ABCs.
- Obtain subjective assessment data related to history of neurological disease and any current neurological concerns using effective communication.
- Assess the patient's behavior, language, mood, hygiene, and choice of dress while performing the interview. Note any hearing or visual deficits and ensure glasses and hearing aids are in place, if needed.
- Assess level of consciousness and orientation; use Glasgow Coma Scale if appropriate.
- (Optional) Complete Mini-Mental State Examination (MMSE), if indicated.
- Assess for PERRLA.
- Assess motor strength and sensation.
- Hand grasps
- Upper body strength/resistance
- Lower body strength/resistance
- Sensation in extremities
- Assess coordination and balance.
- Ask the patient to walk, using an assistive device if needed, assessing gait for smoothness, coordination, and arm swing.
- As appropriate, assess the patient’s ability to tandem walk (heel to toe), walk on tiptoes, walk on heels.
- Assess cerebellar functioning using tests such as Romberg, pronator drift, rapid alternating hand movement, fingertip-to-nose, and heel-to-shin tests.
- (Optional) Perform a cranial nerve assessment and assess deep tendon reflexes as indicated.
- Assist the patient to a comfortable position, ask if they have any questions, and thank them for their time.
- Ensure five safety measures when leaving the room:
- CALL LIGHT: Within reach
- BED: Low and locked (in lowest position and brakes on)
- SIDE RAILS: Secured
- TABLE: Within reach
- ROOM: Risk-free for falls (scan room and clear any obstacles)
- Perform hand hygiene.
- Document the assessment findings and report any concerns according to agency policy.
Assessment of reflexes is not typically performed by registered nurses as part of a routine nursing neurological assessment of adult patients, but it is used in nursing specialty units and in advanced practice. Spinal cord injuries, neuromuscular diseases, or diseases of the lower motor neuron tract can cause weak or absent reflexes. To perform deep reflex tendon testing, place the patient in a seated position. Use a reflex hammer in a quick striking motion by the wrist on various tendons to produce an involuntary response. Before classifying a reflex as absent or weak, the test should be repeated after the patient is encouraged to relax because voluntary tensing of the muscles can prevent an involuntary reflexive action.
Reflexes are graded from 0 to 4+, with "2+" considered normal:
- 0: Absent
- 1+: Hypoactive
- 2+: Normal
- 3+: Hyperactive without clonus
- 4+: Hyperactive with clonus (involuntary muscle contraction)
To observe assessment of deep tendon reflexes, view the following video.
View Stanford Medicine's Assessment of Deep Tendon Reflexes Video.[21]
Brachioradialis Reflex
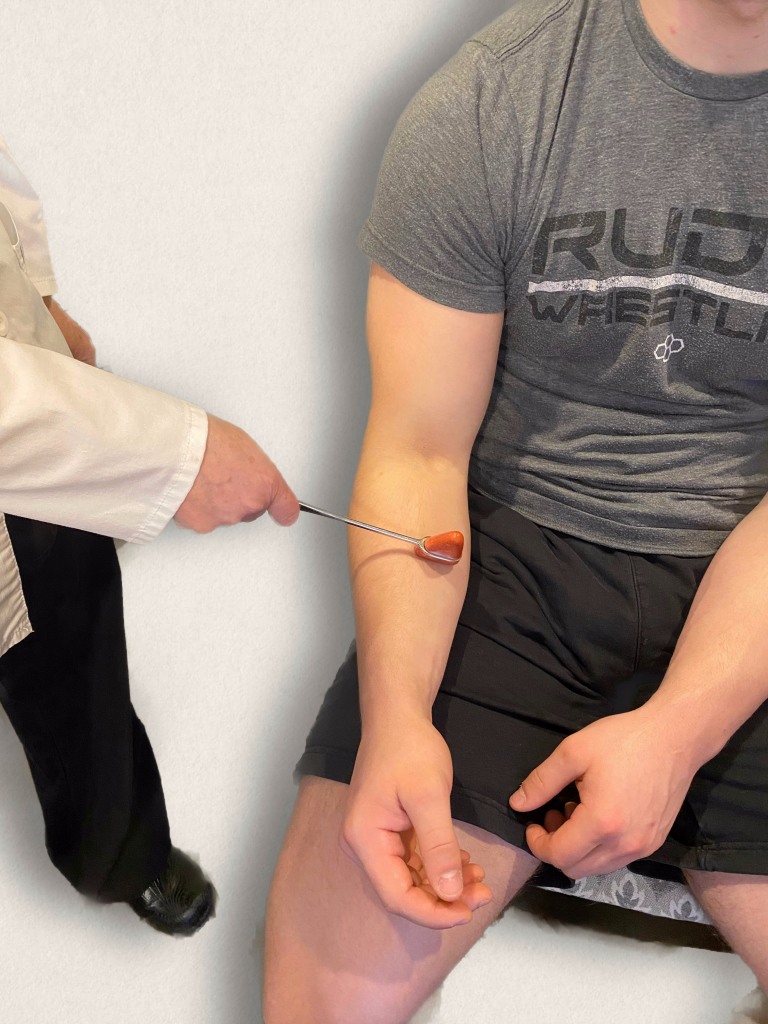
The brachioradialis reflex is used to assess the cervical spine nerves C5 and C6. Ask the patient to support their arm on their thigh or on your hand. Identify the insertion of the brachioradialis tendon on the radius and briskly tap it with the reflex hammer. The reflex consists of flexion and supination of the forearm. See Figure 6.37[22] for an image of obtaining the brachioradialis reflex.
Triceps Reflex
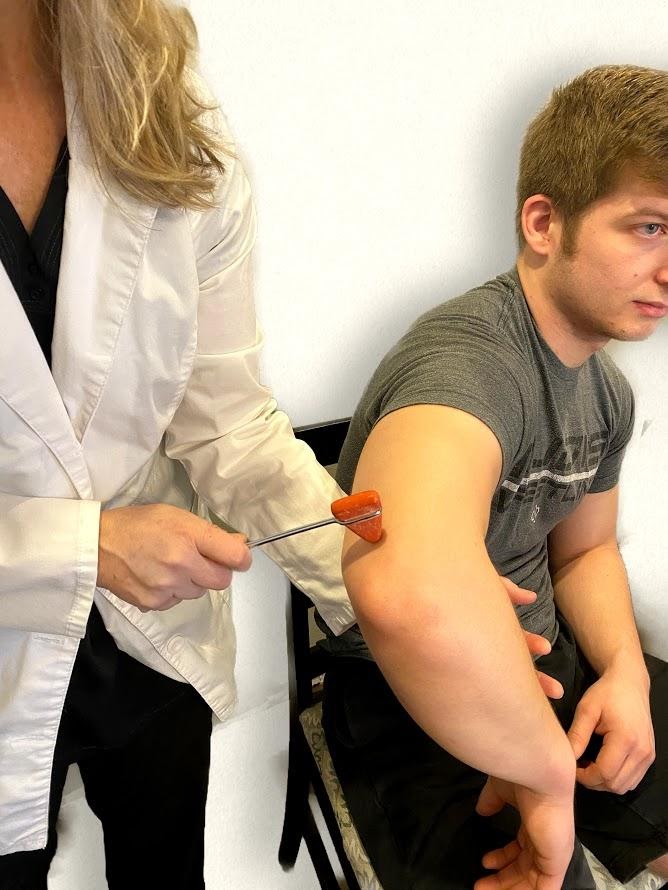
The triceps reflex assesses cervical spine nerves C6 and C7. Support the patient’s arm underneath their bicep to maintain a position midway between flexion and extension. Ask the patient to relax their arm and allow it to fully be supported by your hand. Identify the triceps tendon posteriorly just above its insertion on the olecranon. Tap briskly on the tendon with the reflex hammer. Note extension of the forearm. See Figure 6.38[23] for an image of the triceps reflex exam.
Patella (Knee Jerk) Reflex
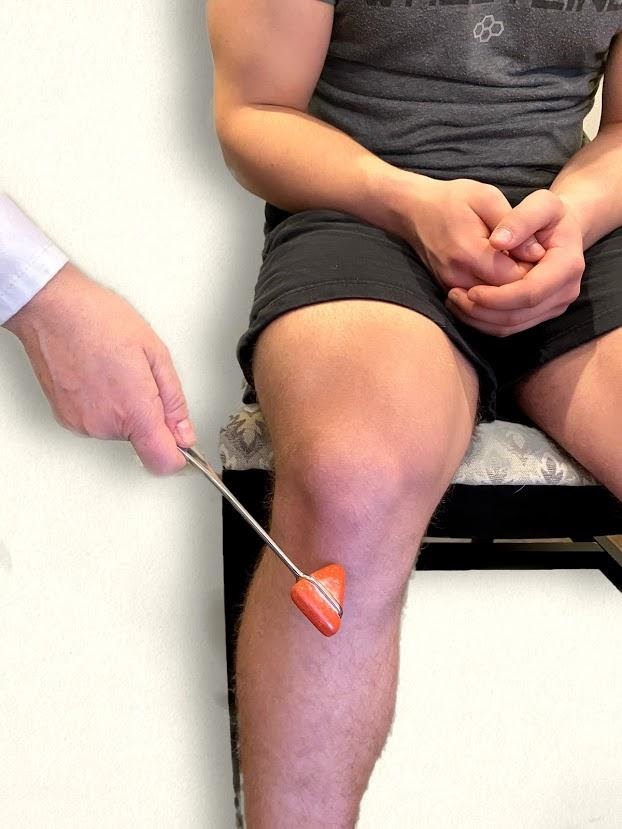
The patellar reflex, commonly referred to as the knee jerk test, assesses lumbar spine nerves L2, L3, and L4. Ask the patient to relax the leg and allow it to swing freely at the knee. Tap the patella tendon briskly, looking for extension of the lower leg. See Figure 6.39[24] for an image of assessing a patellar reflex.
Plantar Reflex
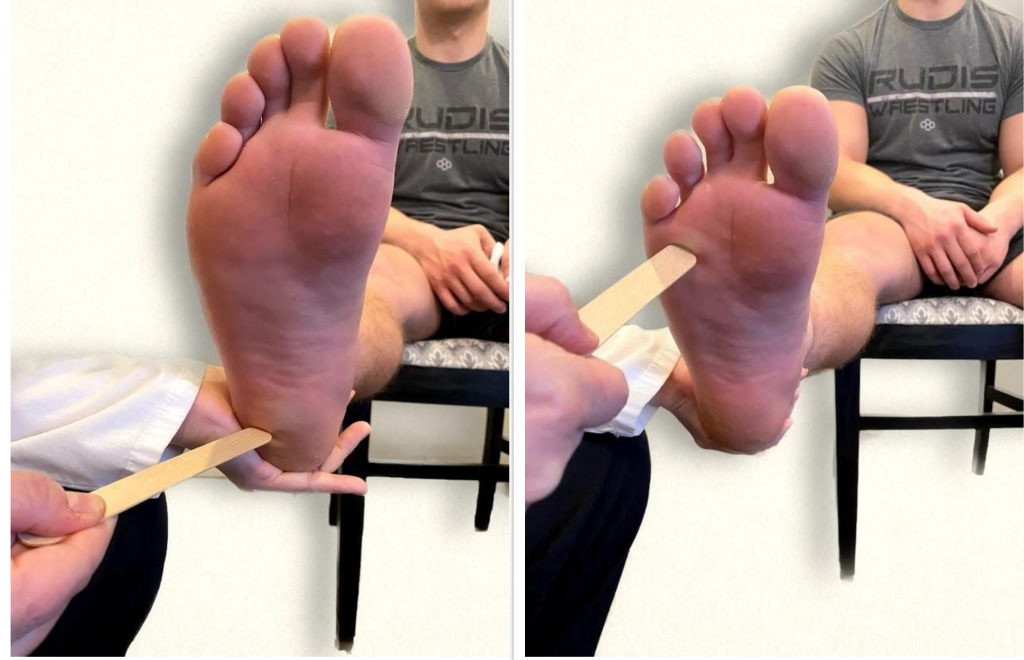
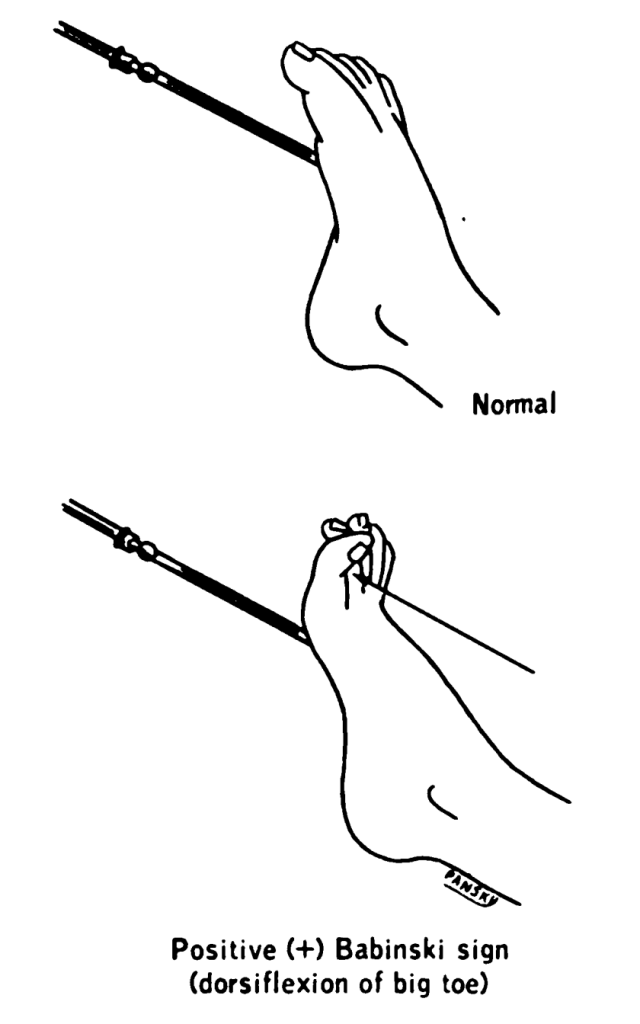
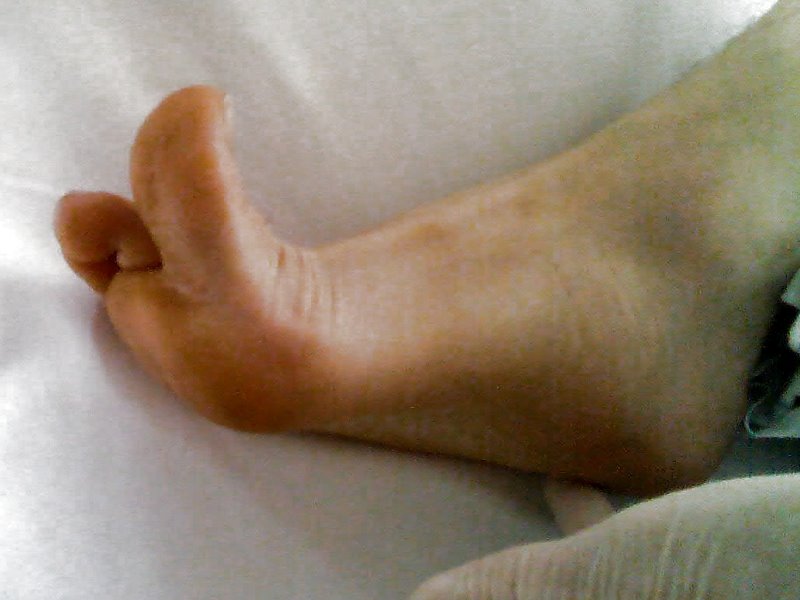
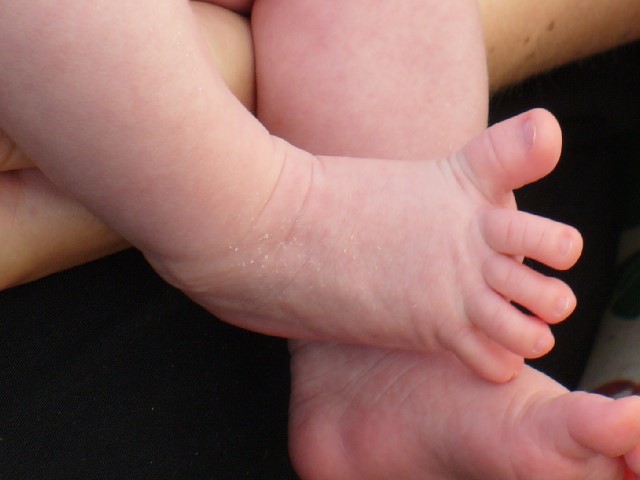
The plantar reflex assesses lumbar spine L5 and sacral spine S1. Ask the patient to extend their lower leg, and then stabilize their foot in the air with your hand. Stroke the lateral surface of the sole of the foot toward the toes. Many patients are ticklish and withdraw their foot, so it is sufficient to elicit the reflex by using your thumb to stroke lightly from the sole of the foot toward the toes. If there is no response, use a blunt object such as a key or pen. The expected reflex is flexion (i.e., bending) of the great toe. An abnormal response is toe extension (i.e., straightening), also known as the Babinski reflex, which is considered abnormal after 2 years of age. See Figures 6.40 - 6.43[25],[26],[27],[28] for images of assessing the plantar reflex.
Newborn Reflexes
Newborn reflexes originate in the central nervous system and are exhibited by infants at birth but disappear as part of child development. Neurological disease or delayed development is indicated if these reflexes are not present at birth, do not spontaneously resolve, or reappear in adulthood. Common newborn reflexes include sucking, rooting, palmar grasp, plantar grasp, Babinski, Moro, and tonic neck reflexes.
Sucking Reflex
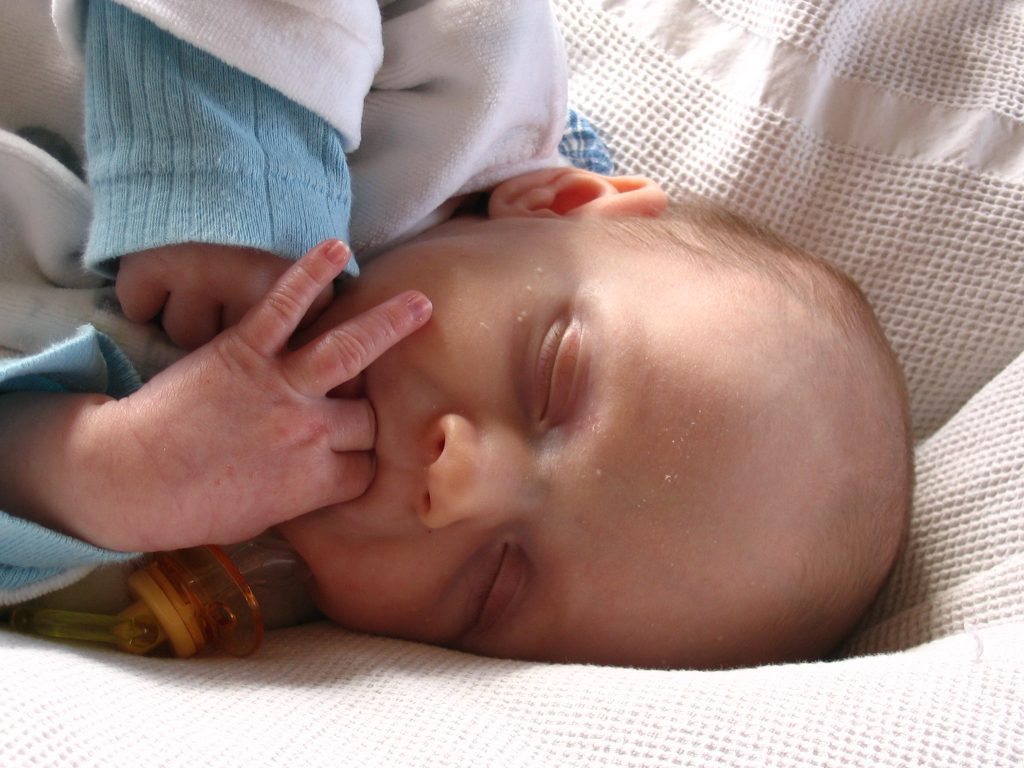
The sucking reflex is common to all mammals and is present at birth. It is linked with the rooting reflex and breastfeeding. It causes the child to instinctively suck anything that touches the roof of their mouth and simulates the way a child naturally eats. See Figure 6.44[31] for an image of the newborn sucking reflex.
Rooting Reflex
The rooting reflex assists in the act of breastfeeding. A newborn infant will turn its head toward anything that strokes its cheek or mouth, searching for the object by moving its head in steadily decreasing arcs until the object is found. See Figure 6.45[32] for an image of a newborn exhibiting the rooting reflex.

Palmar and Plantar Grasps
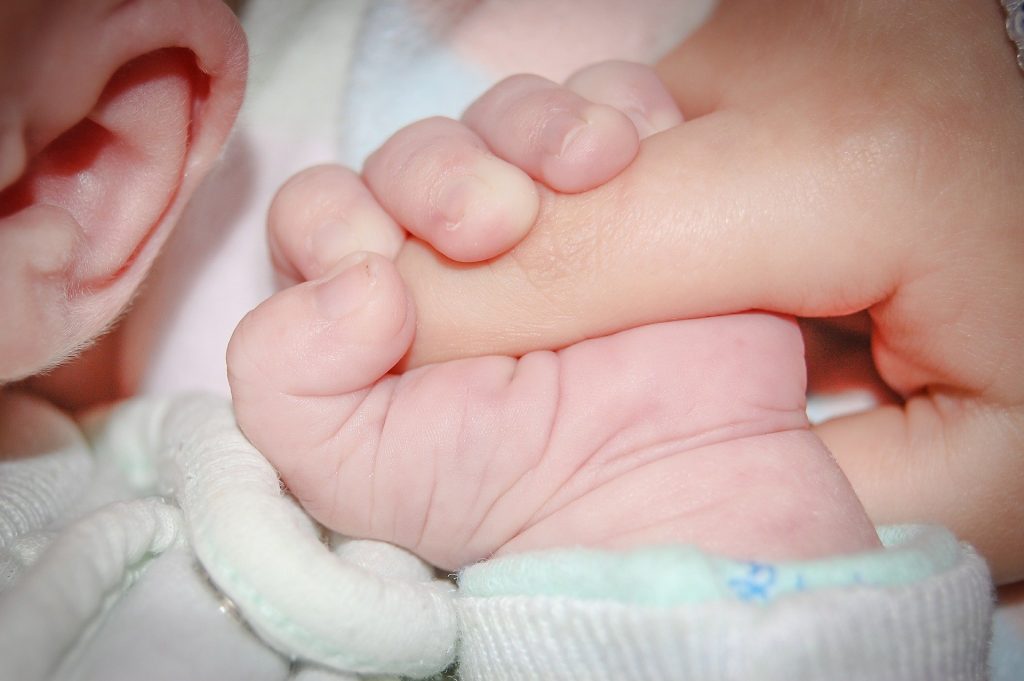
When an object is placed in an infant's hand and the palm of the child is stroked, the fingers will close reflexively, referred to as the palmar grasp reflex. A similar reflexive action occurs if an object is placed on the plantar surface of an infant’s foot, referred to as the plantar grasp reflex. See Figure 6.46[33] for an image of the palmar grasp reflex.
Moro Reflex
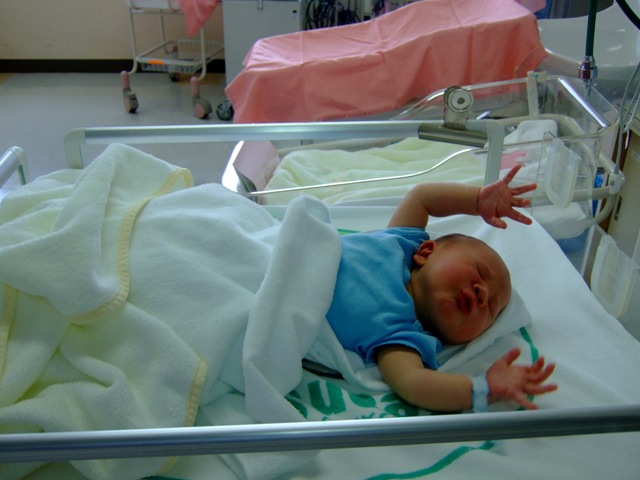
The Moro reflex is present at birth and is often stimulated by a loud noise. The Moro reflex occurs when the legs and head of the infant extend while the arms jerk up and out with the palms up. See Figure 6.47[34] for an image of an infant exhibiting the Moro reflex.
Tonic Neck Reflex
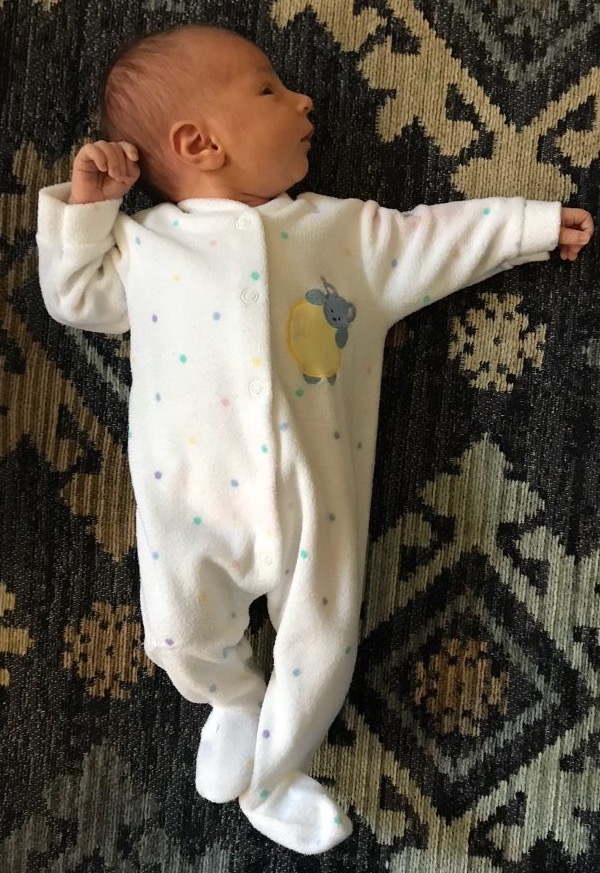
The asymmetrical tonic neck reflex, also known as the “fencing posture,” occurs when the child's head is turned to the side. The arm on the same side as the head is turned will straighten and the opposite arm will bend. See Figure 6.48[35] for an image of the tonic neck reflex.
Walking-Stepping Reflex
Although infants cannot support their own weight, when the soles of their feet touch a surface, it appears as if they are attempting to walk by placing one foot in front of the other foot.
Use the checklist below to review the steps for completion of “Obtaining a Nasal Swab.”
Steps
Disclaimer: Always review and follow agency policy regarding this specific skill.
- Gather supplies: N95 respirator (or face mask if respirators are not available), gloves, gown, eye protection (goggles or disposable face shields that cover the front and sides of the face), and physical barriers (e.g., plexiglass) if needed.
- Apply appropriate PPE: gown, N95 respirator (or face mask if a respirator is not available), gloves, and eye protection are needed for staff collecting specimens or working within 6 feet of the person being tested.
- Perform safety steps:
- Perform hand hygiene.
- Check the room for transmission-based precautions.
- Introduce yourself, your role, the purpose of your visit, and an estimate of the time it will take.
- Confirm patient ID using two patient identifiers (e.g., name and date of birth).
- Explain the process to the patient and ask if they have any questions.
- Be organized and systematic.
- Use appropriate listening and questioning skills.
- Listen and attend to patient cues.
- Ensure the patient’s privacy and dignity.
- Assess ABCs.
- Open the sampling kit using clean technique on a clean surface. The kit should contain a biohazard bag, specimen container, and a nasal swab.
- Remove the swab from the container being careful not to touch the soft end with your gloved hand or any other surface, which could contaminate the swab and either obscure the results or infect the patient.
- Insert the swab into the nostril:
- Anterior Nasal Swab: Have the patient tilt their head back at a 70-degree angle. Do not insert the swab more than a half an inch into the nostril.
- Nasopharyngeal Swab: Insert until resistance is encountered or the distance is equivalent to that from the ear to the nostril of the patient, indicating contact with the nasopharynx.
- Leave the swab in place as directed:
- Anterior Nasal Swab: Leave in place for 10 to 15 seconds.
- Nasopharyngeal Swab: Leave the swab in place for several seconds to absorb secretions.
- Gently remove the swab:
- Anterior Nasal Swab: Gently remove the swab after repeating Steps 6 & 7 in the other nostril.
- Nasopharyngeal Swab: Slowly remove the swab while rotating it.
- Place the swab in the sterile tube and snap the end off the swab at the break line. Place the cap on the tube.
- Label the tube with the patient's name, date of birth, medical record number, today’s date, your initials, time, and specimen type.
- Place the specimen into the biohazard bag.
- Remove the nonsterile gloves and place them in the appropriate receptacle.
- Perform hand hygiene.
- Assist the patient to a comfortable position, ask if they have any questions, and thank them for their time.
- Ensure safety measures when leaving the room:
- CALL LIGHT: Within reach
- BED: Low and locked (in lowest position and brakes on)
- SIDE RAILS: Secured
- TABLE: Within reach
- ROOM: Risk-free for falls (scan room and clear any obstacles)
- Follow agency policy regarding transportation of the specimen to the lab. Report results appropriately when they are received.
It is the nurse’s responsibility to assess for a patient’s continued need for an indwelling catheter daily and to advocate for removal when appropriate.[36] Prolonged use of indwelling catheters increases the risk of developing CAUTIs. For patients who require an indwelling catheter for operative purposes, the catheter is typically removed within 24 hours or less. Some agencies have a protocol for the removal of indwelling catheters, whereas others require a prescription from a provider. For additional instructions about how to remove an indwelling catheter, see the "Checklist for Foley Removal."
When removing an indwelling urinary catheter, it is considered a standard of practice to document the time and track the time of the first void. This information is also communicated during handoff reports. If the patient is unable to void within 4-6 hours and/or complains of bladder fullness, the nurse determines if incomplete bladder emptying is occurring according to agency policy. The ANA has made the following recommendations to assess for incomplete bladder emptying:
- The patient should be prompted to urinate.
- If urination volume is less than 180 mL, the nurse should perform a bladder scan to determine the post-void residual. A bladder scan is a bedside test performed by nurses that uses ultrasonic waves to determine the amount of fluid in the bladder.
- If a bladder scanner is not available, a straight urinary catheterization is performed.[37]
When a urinary catheter is removed, instruct the patient on the following guidelines:
- Increase or maintain fluid intake (unless contraindicated).
- Void when able with the goal to urinate within six hours after removal of the catheter. Inform the nurse of the void so that the amount can be measured and documented.
- Be aware that there may be a mild burning sensation during the first void.
- Report any burning, discomfort, frequency, or small amounts of urine when voiding.
- Report an inability to void, bladder tenderness, or distension.

