13.3 Common Musculoskeletal Conditions
Open Resources for Nursing (Open RN)
Now that we have reviewed the basic anatomy of the musculoskeletal system, let’s review common musculoskeletal conditions that a nurse may find on assessment.
Osteoporosis
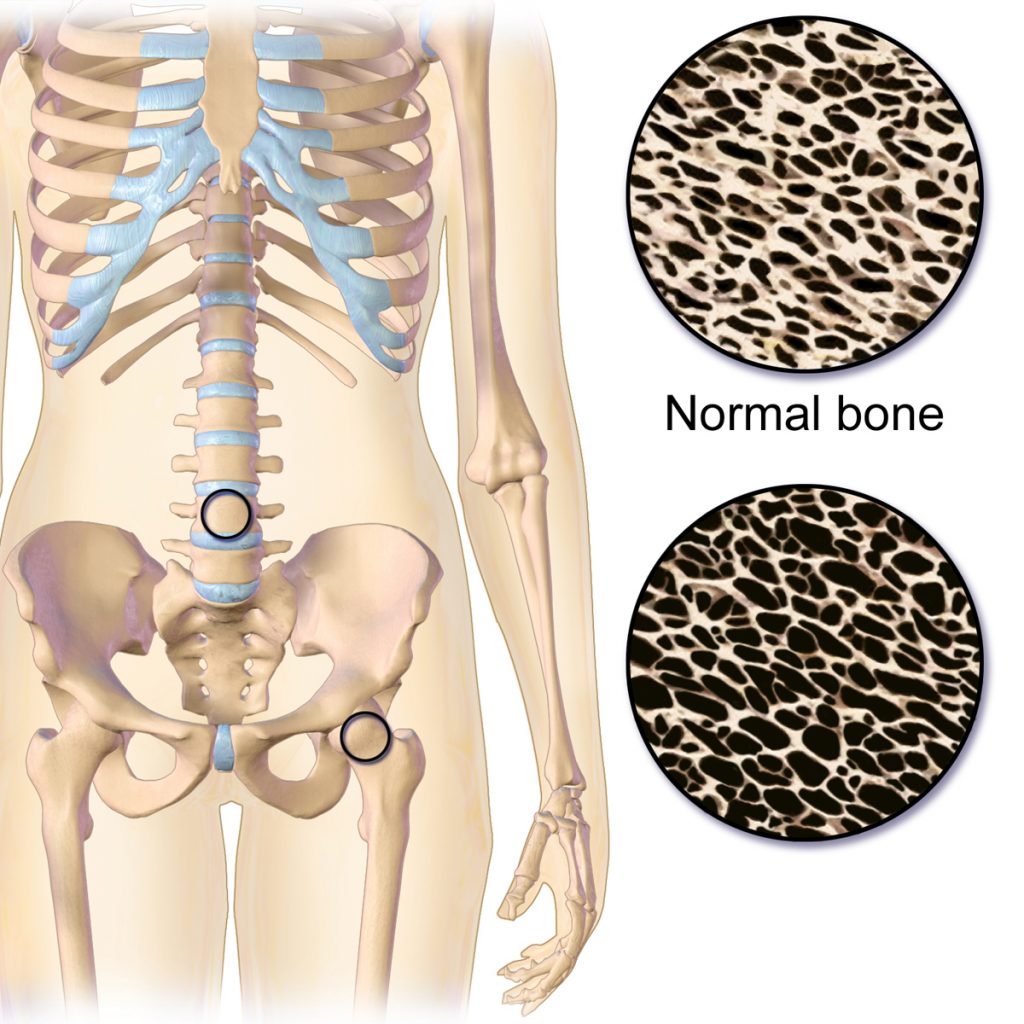
Osteoporosis is a disease that thins and weakens bones, causing them to become fragile and break easily. See Figure 13.11[1] for an illustration comparing the top right image of normal bone to the bottom right image of bone with osteoporosis. Osteoporosis is common in older women and often occurs in the hip, spine, and wrist. To keep bones strong, patients at risk are educated to eat a diet rich in calcium and vitamin D, participate in weight-bearing exercise, and avoid smoking. If needed, medications such as bisphosphonates and calcitonin are used to treat severe osteoporosis.[2]
Fracture
A fracture is the medical term for a broken bone. There are many different types of fractures commonly caused by sports injuries, falls, and car accidents. Additionally, people with osteoporosis are at higher risk for fractures from minor injuries due to weakening of the bones. See Figure 13.12[3] for an illustration of different types of fractures. For example, if the broken bone punctures the skin, it is called an open fracture. Symptoms of a fracture include the following:
- Intense pain
- Deformity (i.e., the limb looks out of place)
- Swelling, bruising, or tenderness around the injury
- Numbness and tingling of the extremity distal to the injury
- Difficulty moving a limb
A suspected fracture requires immediate medical attention and an X-ray to determine if the bone is broken. Treatment includes a cast or splint. In severe fractures, surgery is performed to place plates, pins, or screws in the bones to keep them in place as they heal.[4]

Hip Fracture
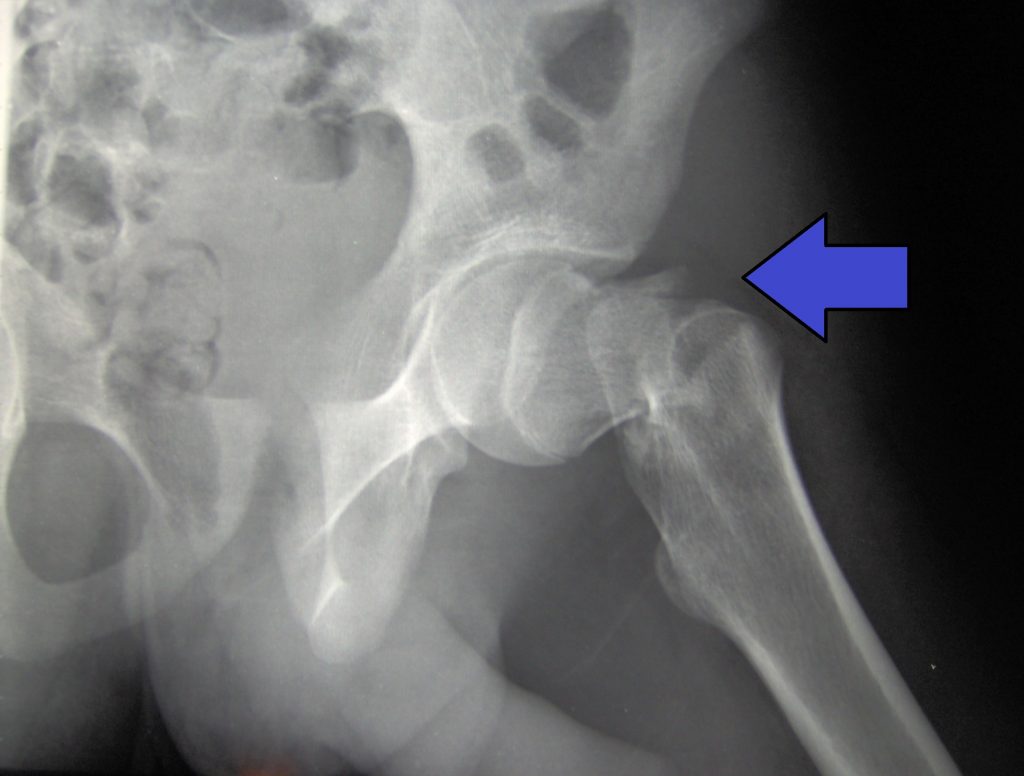
A hip fracture, commonly referred to as a “broken hip,” is actually a fracture of the femoral neck. See Figure 13.13[5] for an image of a hip fracture. Hip fractures are typically caused by a fall, especially in older adults with preexisting osteoporosis. Symptoms of a hip fracture after a fall include the following:
- Pain
- An inability to lift, move, or rotate the affected leg
- An inability to stand or put weight on the affected leg
- Bruising and swelling around the hip
- The injured leg appears shorter than the other leg
- The injured leg is rotated outwards[6]
Hip fractures typically require surgical repair within 48 hours of the injury. In approximately half of the cases of hip fractures, hip replacement is needed. See more information about hip replacement under the “Osteoarthritis” section below. In other cases, the fracture is fixed with surgery called Open Reduction Internal Fixation (ORIF) where the surgeon makes an incision to realign the bones, and then they are internally fixated (i.e., held together) with hardware like metal pins, plates, rods, or screws. After the bone heals, this hardware isn’t removed unless additional symptoms occur. After surgery, the patient will need mobility assistance for a prolonged period of time from family members or in a long-term care facility, and the reduced mobility can result in additional falls if protective measures are not put into place. Additionally, hip fractures are also associated with life-threatening complications, such as pneumonia, infected pressure injuries, and blood clots that can move to the lungs causing pulmonary embolism.[7]
Osteoarthritis
Osteoarthritis (OA) is the most common type of arthritis associated with aging and wear and tear of the articular cartilage that covers the surfaces of bones at a synovial joint. OA causes the cartilage to gradually become thinner, and as the cartilage layer wears down, more pressure is placed on the bones. The joint responds by increasing production of the synovial fluid for more lubrication, but this can cause swelling of the joint cavity. The bone tissue underlying the damaged articular cartilage also responds by thickening and causing the articulating surface of the bone to become rough or bumpy. As a result, joint movement results in pain and inflammation. In early stages of OA, symptoms may be resolved with mild activity that warms up the joint. However, in advanced OA, the affected joints become more painful and difficult to use, resulting in decreased mobility. There is no cure for osteoarthritis, but several treatments can help alleviate the pain. Treatments may include weight loss, low-impact exercise, and medications such as acetaminophen, nonsteroidal anti-inflammatory drugs (NSAIDs), and celecoxib. For severe cases of OA, joint replacement surgery may be required.[8]
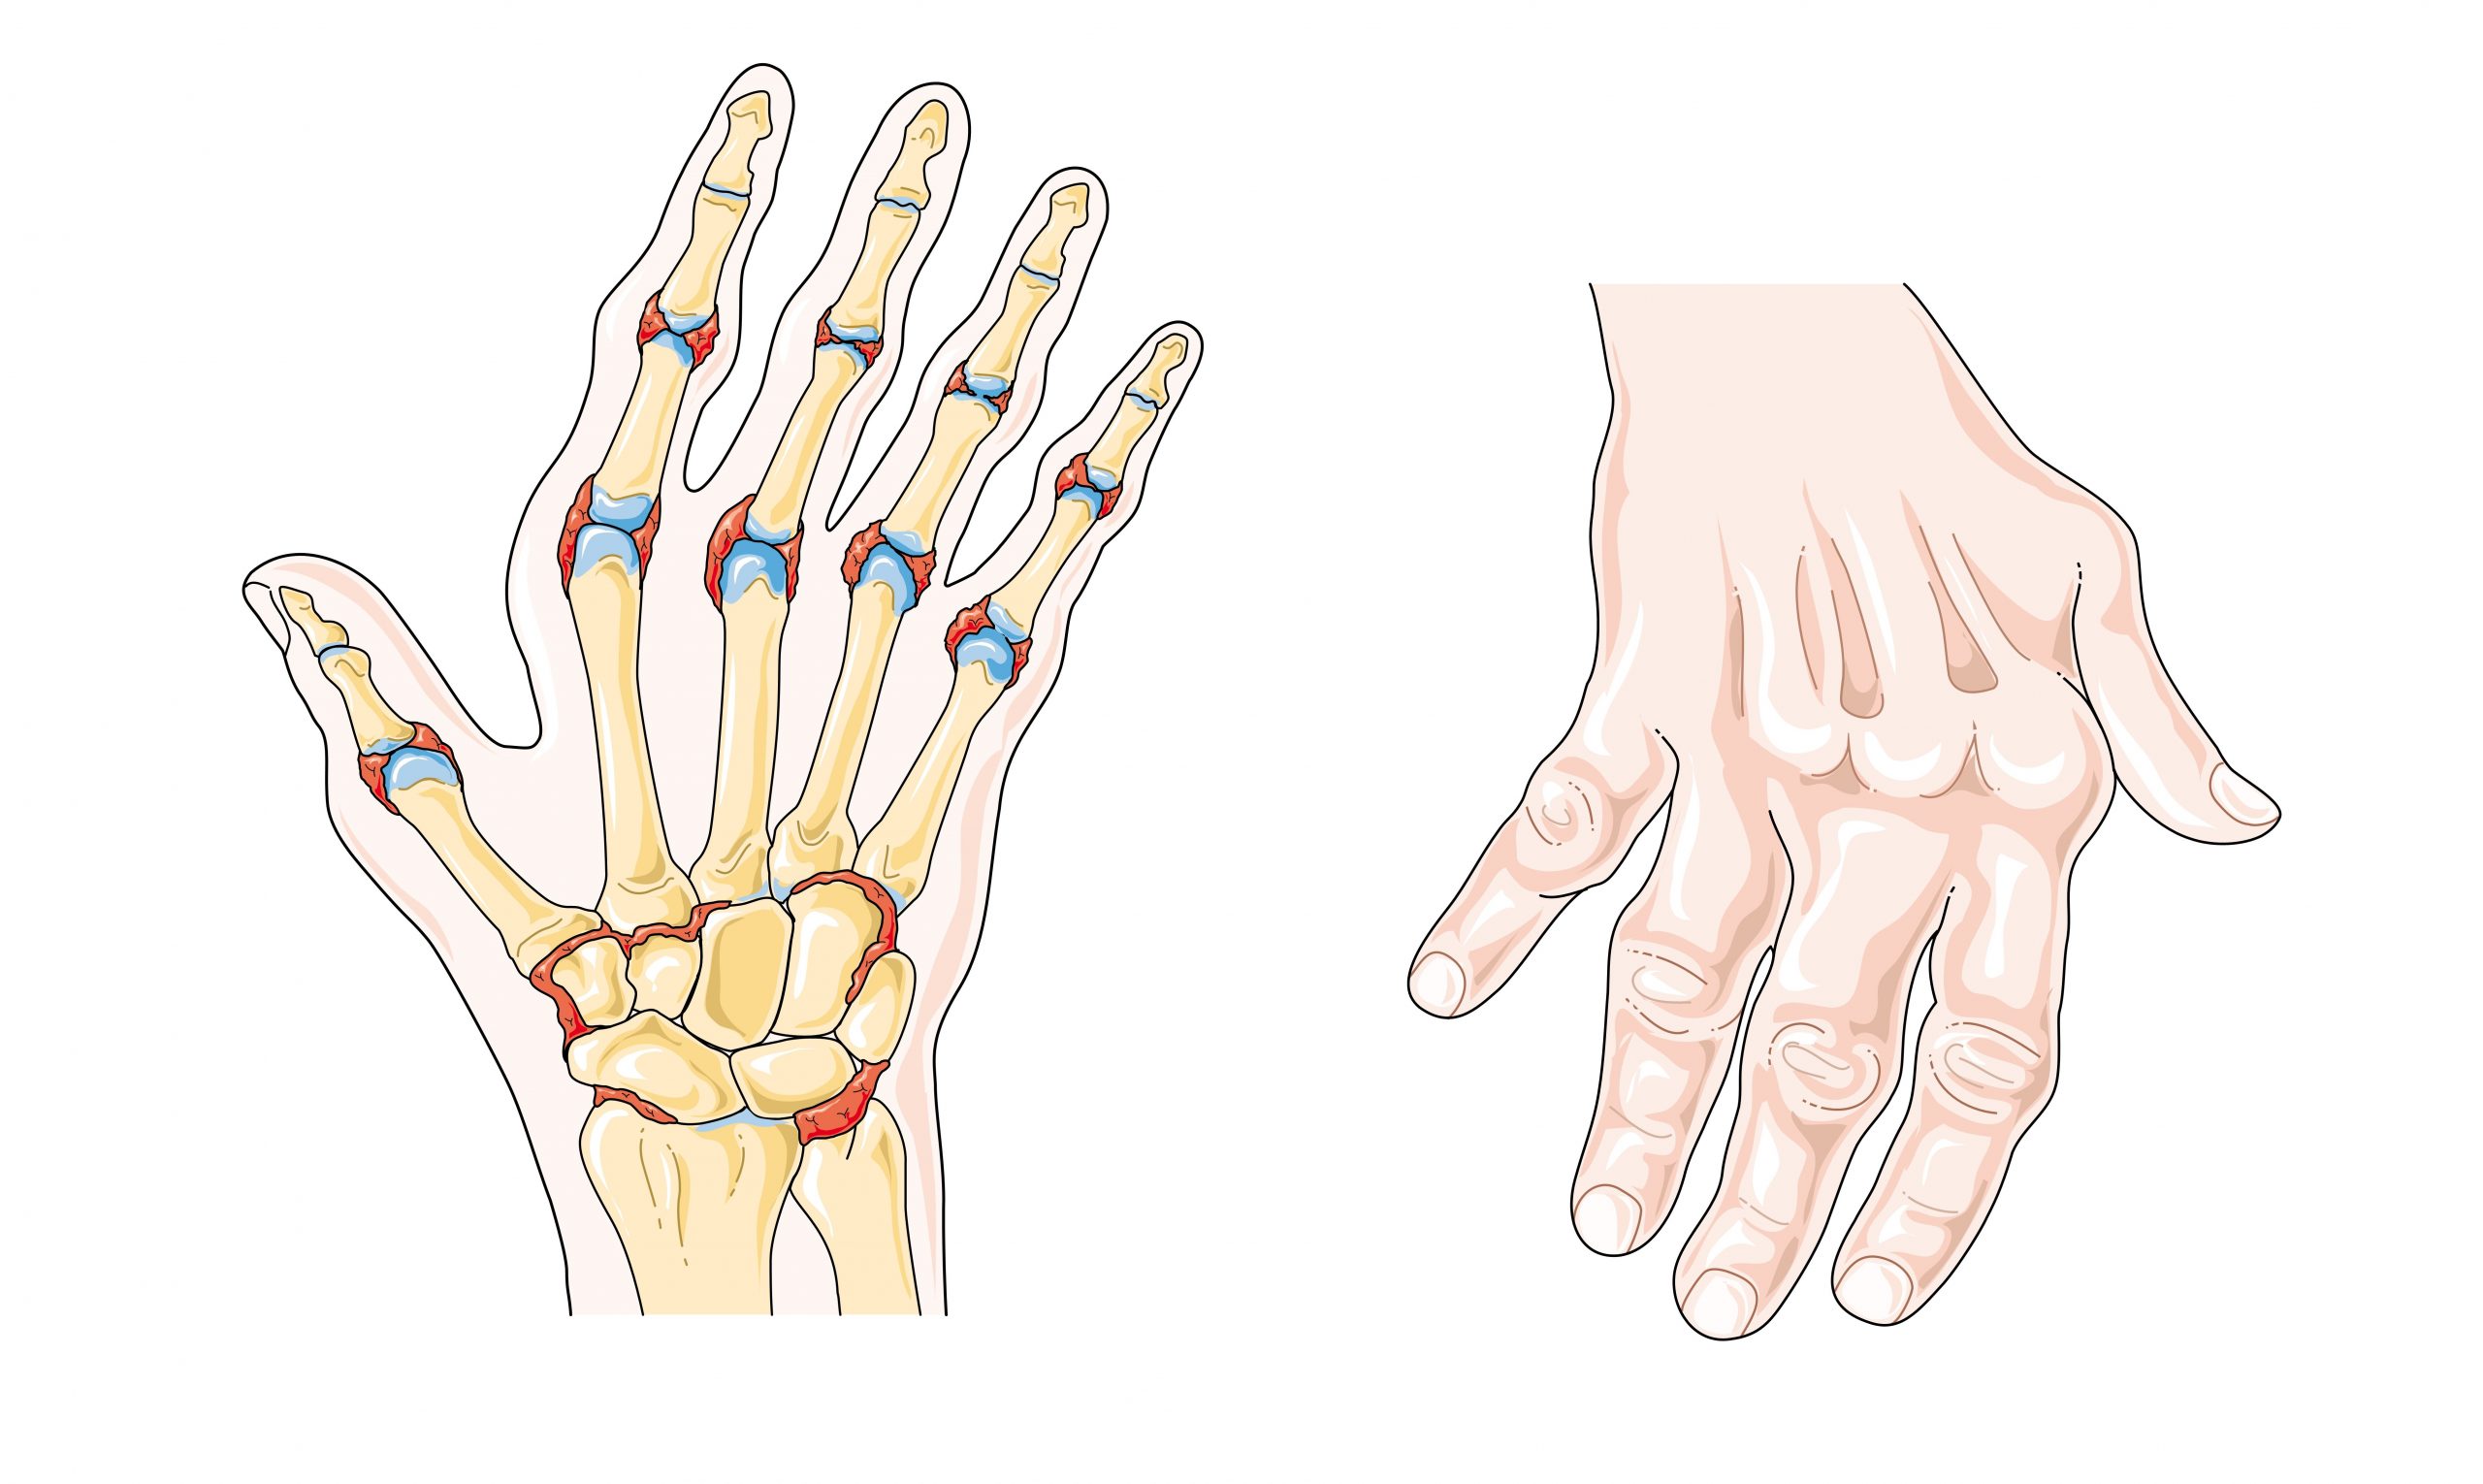
See Figure 13.14[9] for an image comparing a normal joint to one with osteoarthritis and another type of arthritis called rheumatoid arthritis. (Rheumatoid arthritis is further explained under the “Joint Replacement” subsection.)

Joint Replacement
Arthroplasty, the medical term for joint replacement surgery, is an invasive procedure requiring extended recovery time, so conservative treatments such as lifestyle changes and medications are attempted before surgery is performed. See Figure 13.15[10] for an illustration of joint replacement surgery. This type of surgery involves replacing the articular surfaces of the bones with prosthesis (artificial components). For example, in hip arthroplasty, the worn or damaged parts of the hip joint, including the head and neck of the femur and the acetabulum of the pelvis, are removed and replaced with artificial joint components. The replacement head for the femur consists of a rounded ball attached to the end of a shaft that is inserted inside the femur. The acetabulum of the pelvis is reshaped and a replacement socket is fitted into its place.[11]

Hip Replacement
Hip replacement is surgery for people with severe hip damage often caused by osteoarthritis or a hip fracture. During a hip replacement operation, the surgeon removes damaged cartilage and bone from the hip joint and replaces them with artificial parts.[12]
The most common complication after surgery is hip dislocation. Because a man-made hip is smaller than the original joint, the ball may easily come out of its socket. Some general rules of thumb when caring for patients during the recovery period are as follows:
- Patients should not cross their legs or ankles when they are sitting, standing, or lying down.
- Patients should not lean too far forward from their waist or pull their leg up past their waist. This bending is called hip flexion. Avoid hip flexion greater than 90 degrees.[13]
Rheumatoid Arthritis
Rheumatoid arthritis (RA) is a type of arthritis that causes pain, swelling, stiffness, and loss of function in joints due to inflammation caused by an autoimmune disease. See Figure 13.16[14] for an illustration of RA in the hands causing inflammation and a common deformity of the fingers. It often starts in middle age and is more common in women. RA is different from osteoarthritis because it is an autoimmune disease, meaning it is caused by the immune system attacking the body’s own tissues.[15] In rheumatoid arthritis, the joint capsule and synovial membrane become inflamed. As the disease progresses, the articular cartilage is severely damaged, resulting in joint deformation, loss of movement, and potentially severe disability. There is no known cure for RA, so treatments are aimed at alleviating symptoms. Medications such as nonsteroidal anti-inflammatory drugs (NSAIDS), corticosteroids, and antirheumatic drugs such as methotrexate are commonly used to treat rheumatoid arthritis.[16]
Gout
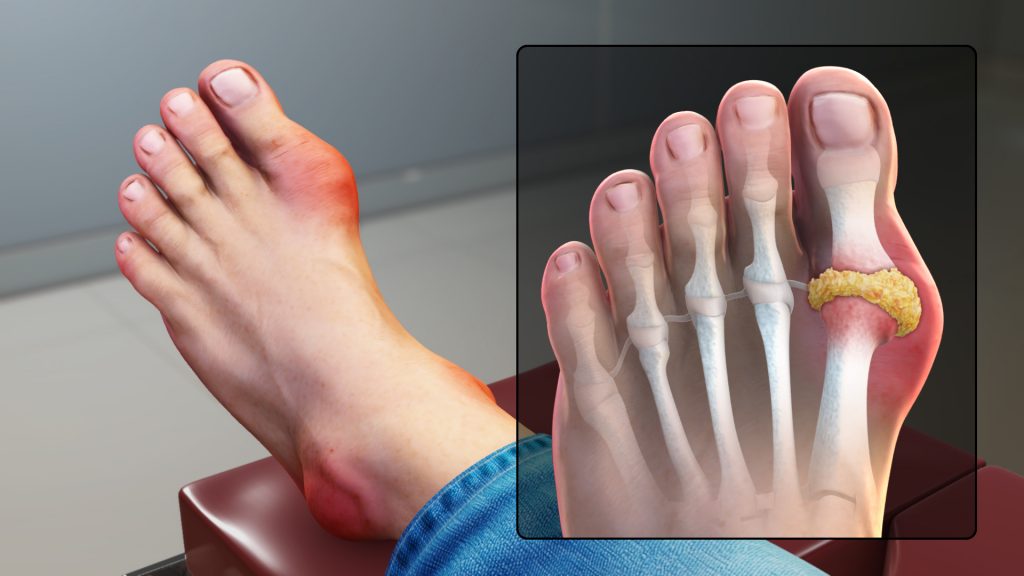
Gout is a type of arthritis that causes swollen, red, hot, and stiff joints due to the buildup of uric acid. It typically first attacks the big toe. See Figure 13.17[17] for an illustration of gout in the joint of the big toe. Uric acid usually dissolves in the blood, passes through the kidneys, and is eliminated in urine, but gout occurs when uric acid builds up in the body and forms painful, needle-like crystals in joints. Gout is treated with lifestyle changes such avoiding alcohol and food high in purines, as well as administering antigout medications, such as allopurinol and colchicine.[18]
Vertebral Disorders
The spine is composed of many vertebrae stacked on top of one another, forming the vertebral column. There are several disorders that can occur in the vertebral column causing curvature of the spine such as kyphosis, lordosis, and scoliosis. See Figure 13.18[19] for an illustration of kyphosis, lordosis, and scoliosis.
Kyphosis is a curving of the spine that causes a bowing or rounding of the back, often referred to as a “buffalo hump” that can lead to a hunchback or slouching posture. Kyphosis can be caused by osteoarthritis, osteoporosis, or other conditions. Pain in the middle or lower back is the most common symptom. Treatment depends upon the cause, the severity of pain, and the presence of any neurological symptoms.[20]
Lordosis is the inward curve of the lumbar spine just above the buttocks. A small degree of lordosis is normal, especially during the third trimester of pregnancy. Too much curving of the lower back is often called swayback. Most of the time, lordosis is not treated if the back is flexible because it is not likely to progress or cause problems.[21]
Scoliosis causes a sideways curve of the spine. It commonly develops in late childhood and the early teens when children grow quickly. Symptoms of scoliosis include leaning to one side and having uneven shoulders and hips. Treatment depends on the patient’s age, the amount of expected additional growth, the degree of curving, and whether the curve is temporary or permanent. Patients with mild scoliosis might only need checkups to monitor if the curve is getting worse, whereas others may require a brace or have surgery.[22]

Dislocation
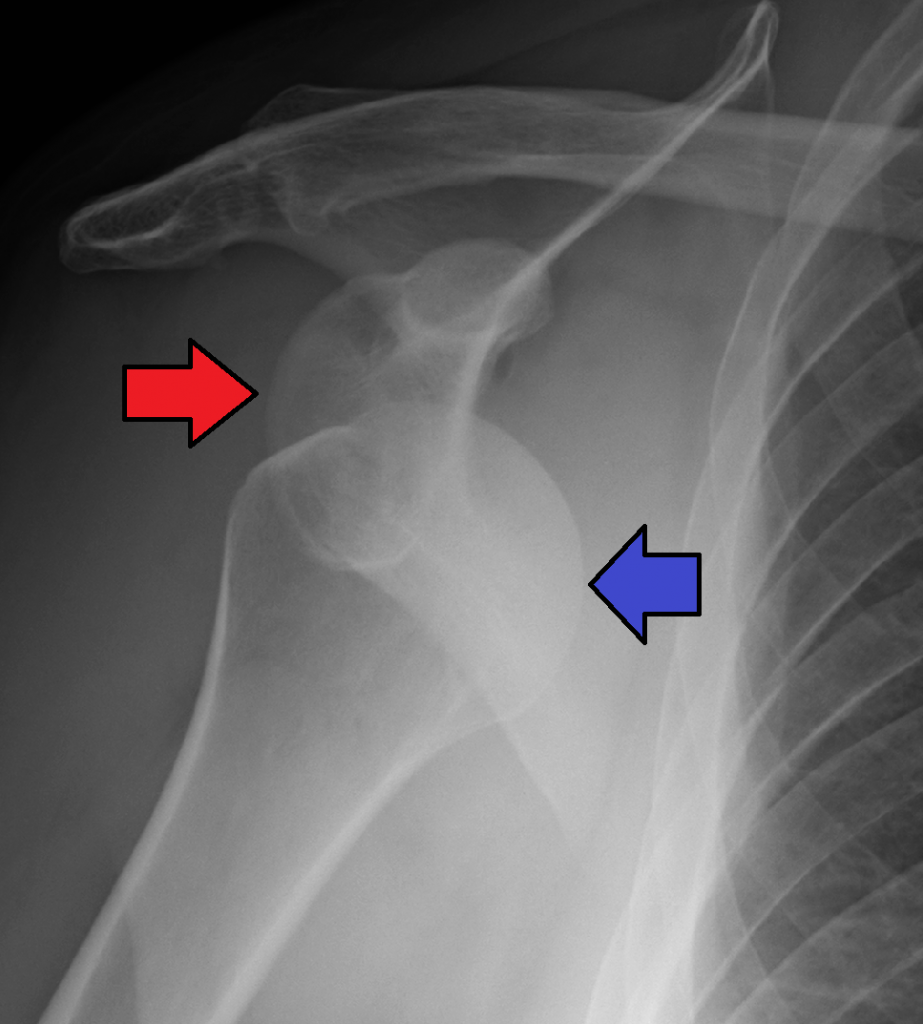
A dislocation is an injury, often caused by a fall or a blow to the joint, that forces the ends of bones out of position. Dislocated joints are typically very painful, swollen, and visibly out of place. The patient may not be able to move the affected extremity. See Figure 13.19[23] for an X-ray image of an anterior dislocation of the right shoulder where the ball (i.e., head of the humerus) has popped out of the socket (i.e., the glenoid cavity of the scapula). A dislocated joint requires immediate medical attention. Treatment depends on the joint and the severity of the injury and may include manipulation to reposition the bones, medication, a splint or sling, or rehabilitation. When properly repositioned, a joint will usually function and move normally again in a few weeks; however, once a joint is dislocated, it is more likely to become dislocated again. Instructing patients to wear protective gear during sports may help to prevent future dislocations.[24]
Clubfoot
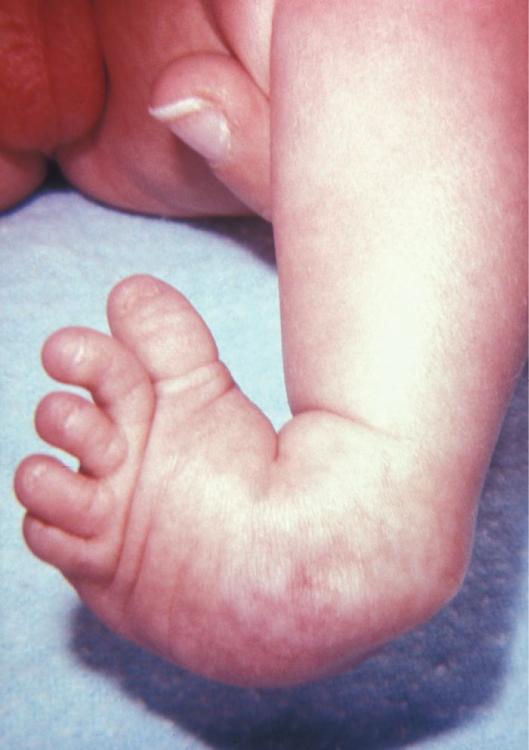
Clubfoot is a congenital condition that causes the foot and lower leg to turn inward and downward. A congenital condition means it is present at birth. See Figure 13.20[25] for an image of an infant with a clubfoot. It can range from mild and flexible to severe and rigid. Treatment by an orthopedic specialist involves using repeated applications of casts beginning soon after birth to gradually moving the foot into the correct position. Severe cases of clubfoot require surgery. After the foot is in the correct position, the child typically wears a special brace for up to three years.[26]
Sprains and Strains
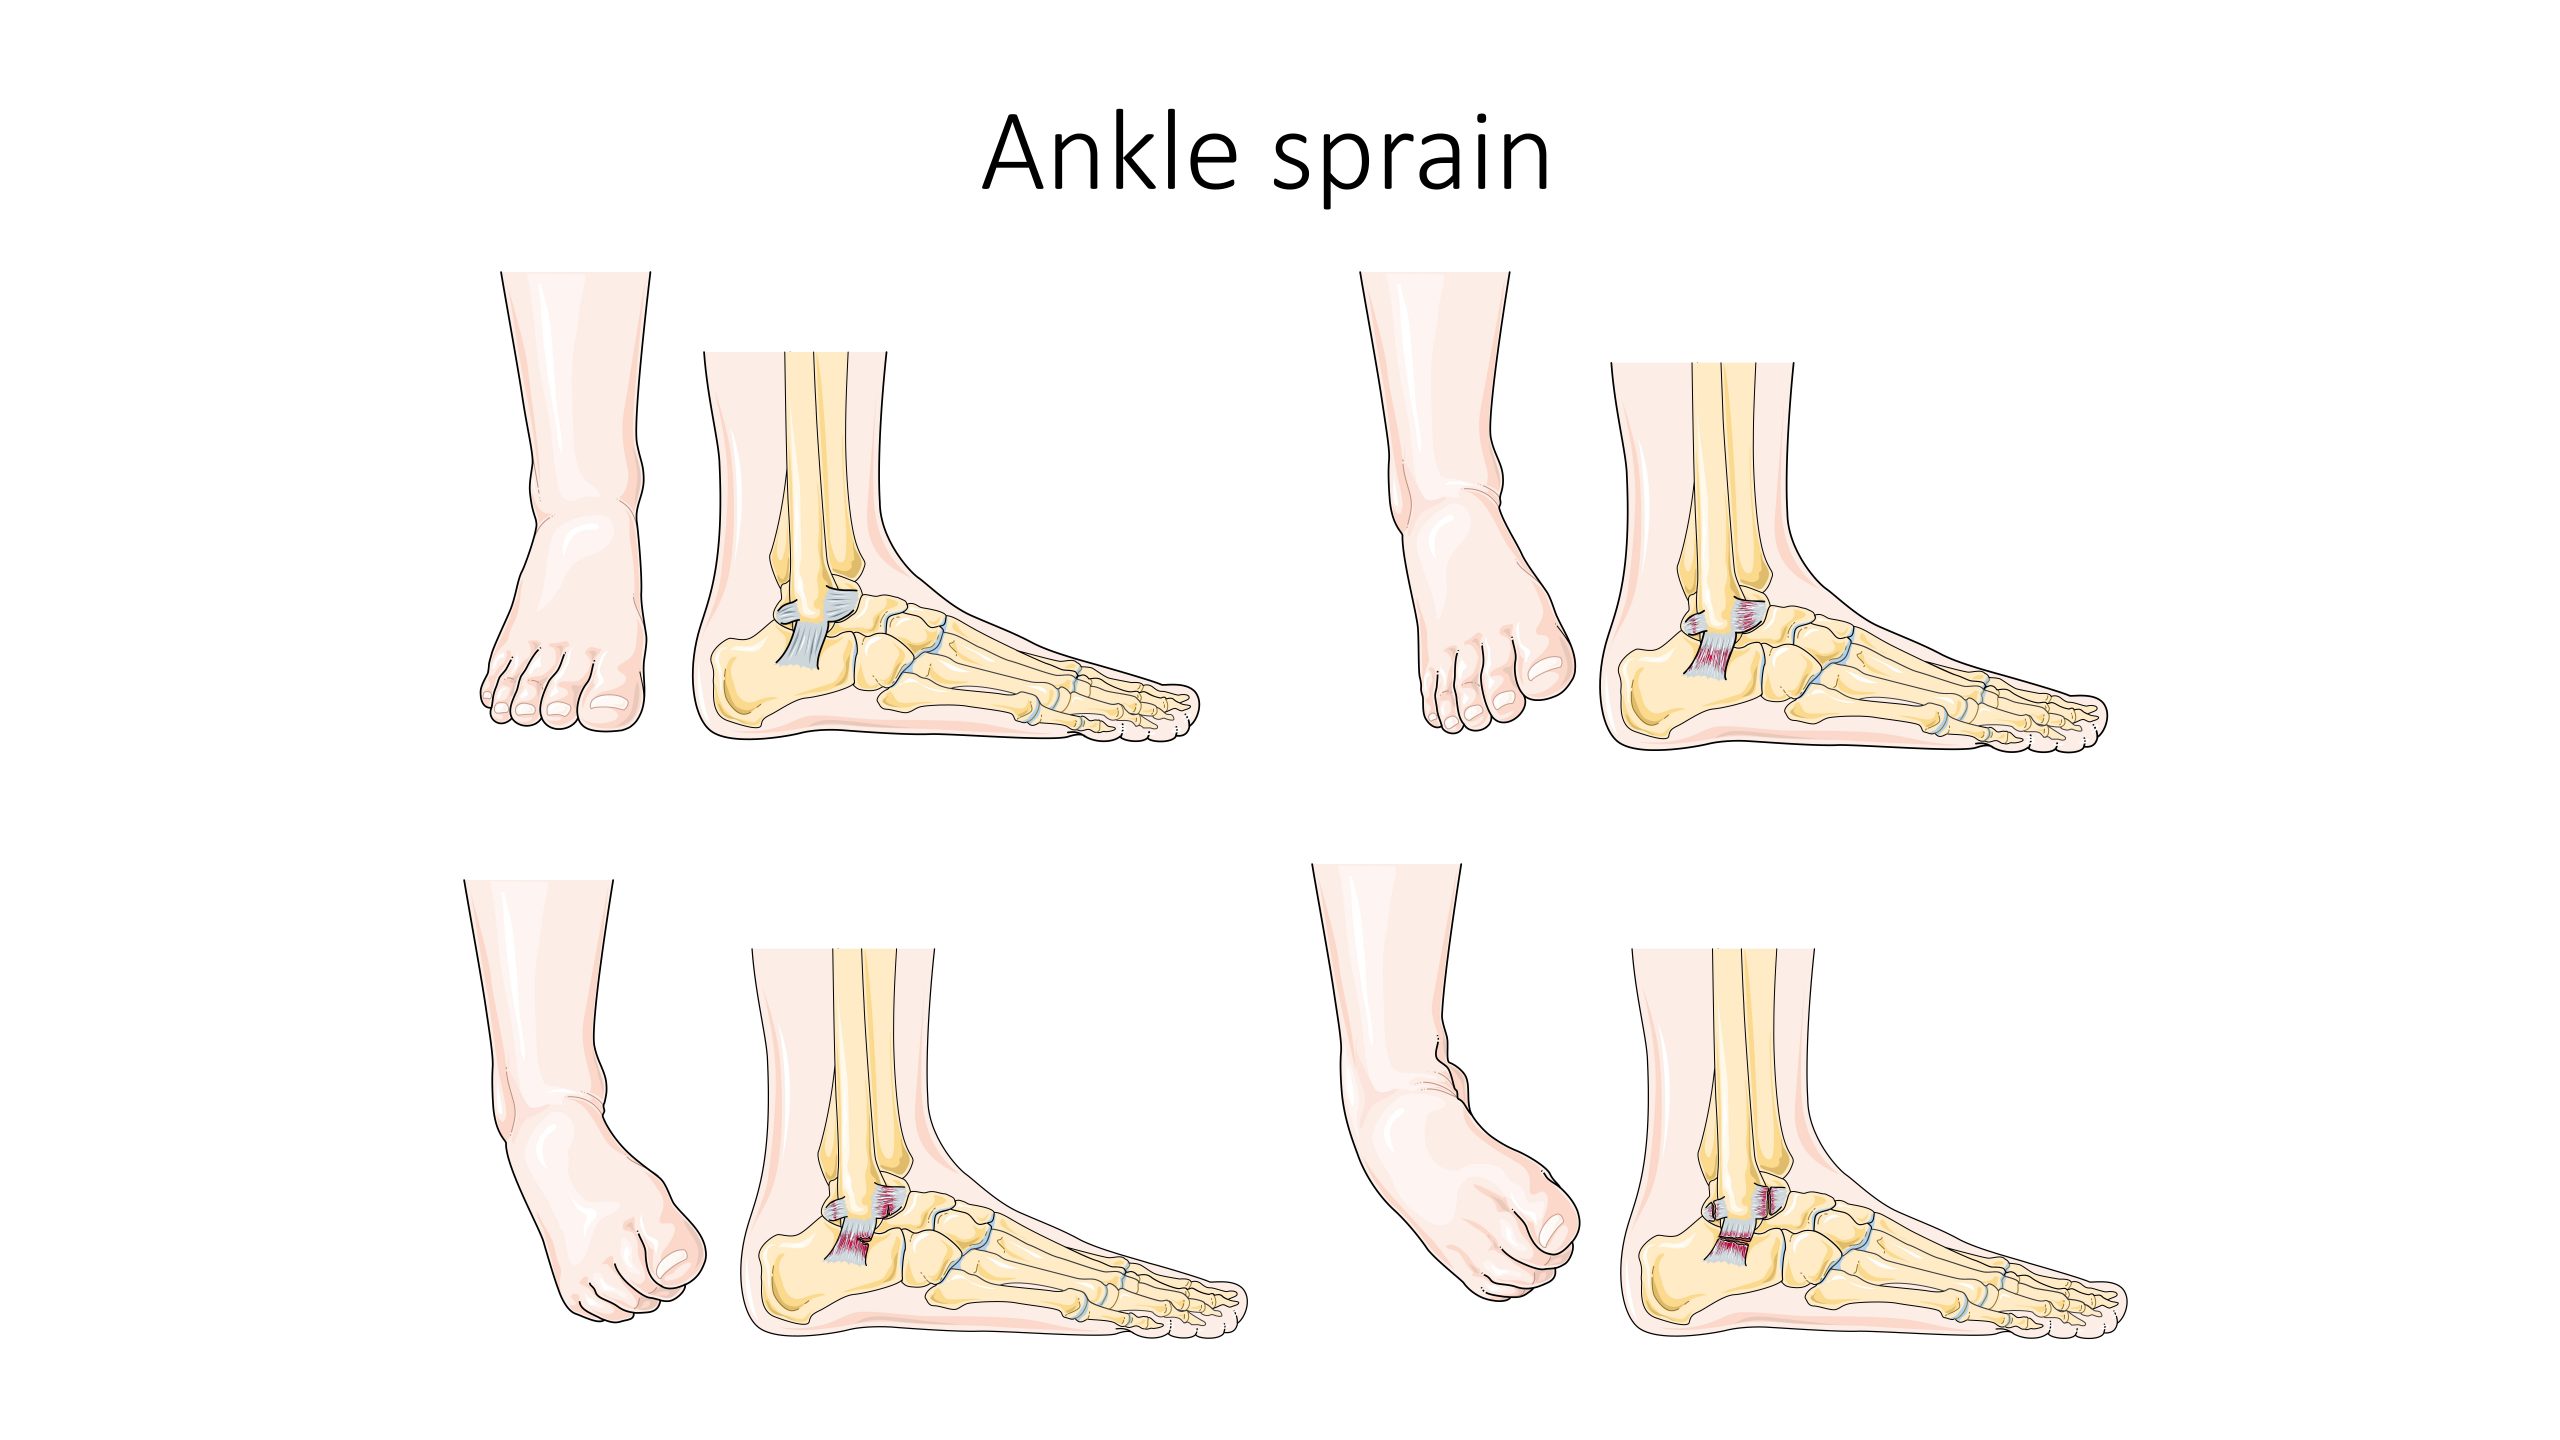
A sprain is a stretched or torn ligament caused by an injury. Ligaments are tissues that attach bones at a joint. Ankle and wrist sprains are very common, especially due to falls or participation in sports. See Figure 13.21[27] for an illustration of an ankle sprain caused by eversion or inversion of the ankle. Symptoms include pain, swelling, bruising, and the inability to move the joint. The patient may also report feeling a pop when the injury occurred.
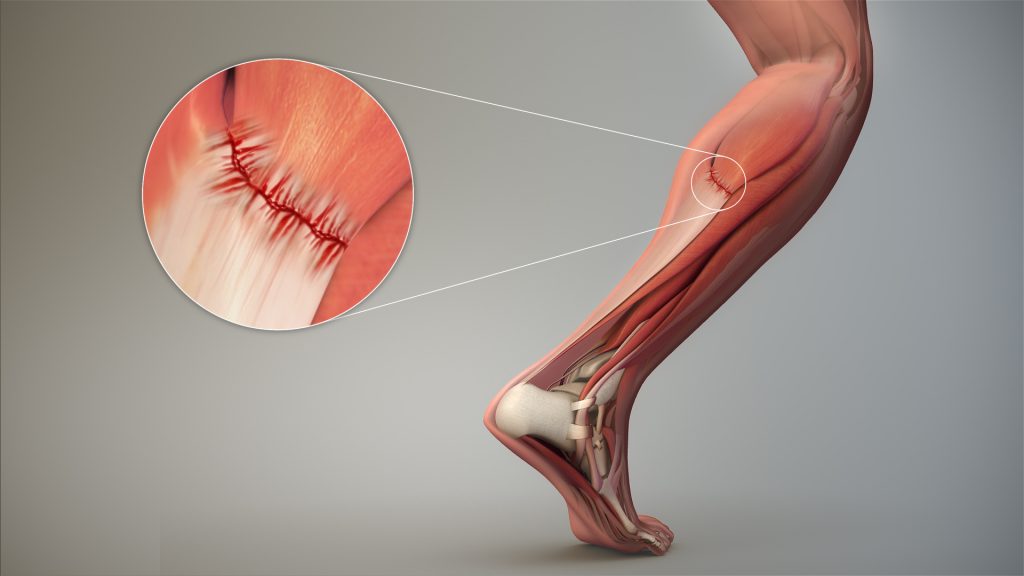
A strain is a stretched or torn muscle or tendon. Tendons are tissues that connect muscle to bone. See Figure 13.22[28] for an image of a strained tendon. Strains can happen suddenly from an injury or develop over time due to chronic overuse. Symptoms include pain, muscle spasms, swelling, and trouble moving the muscle.
Treatment of sprains and strains is often referred to with the mnemonic RICE that stands for Resting the injured area, Icing the area, Compressing the area with an ACE bandage or other device, and Elevating the affected limb. Medications such as acetaminophen or nonsteroidal anti-inflammatory drugs (NSAIDs) may also be used.[29]
Knee Injuries and Arthroscopic Surgery
Knee injuries are common. Because the knee joint is primarily supported by muscles and ligaments, injuries to any of these structures will result in pain or knee instability. Arthroscopic surgery has greatly improved the surgical treatment of knee injuries and reduced subsequent recovery times. This procedure involves a small incision and the insertion of an arthroscope, a pencil-thin instrument that allows for visualization of the joint interior. Small surgical instruments are inserted via additional incisions to remove or repair ligaments and other joint structures.[30]
Contracture
A contracture develops when the normally elastic tissues are replaced by inelastic, fiber-like tissue. This inelastic tissue makes it difficult to stretch the area and prevents normal movement.
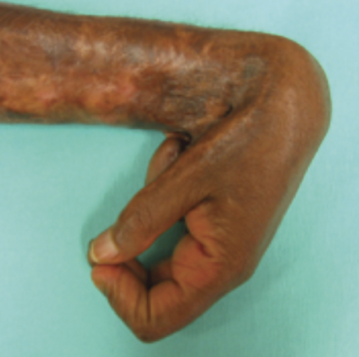
Contractures occur in the skin, the tissues underneath, and the muscles, tendons, and ligaments surrounding a joint. They affect the range of motion and function in a specific body part and can be painful. See Figure 13.23[31] for an image of severe contracture of the wrist that occurred after a burn injury.
Contracture can be caused by any of the following:
- Brain and nervous system disorders, such as cerebral palsy or stroke
- Inherited disorders, such as muscular dystrophy
- Nerve damage
- Reduced use (for example, from lack of mobility)
- Severe muscle and bone injuries
- Scarring after traumatic injury or burns
Treatments may include exercises, stretching, or applying braces and splints.[32]
Foot Drop
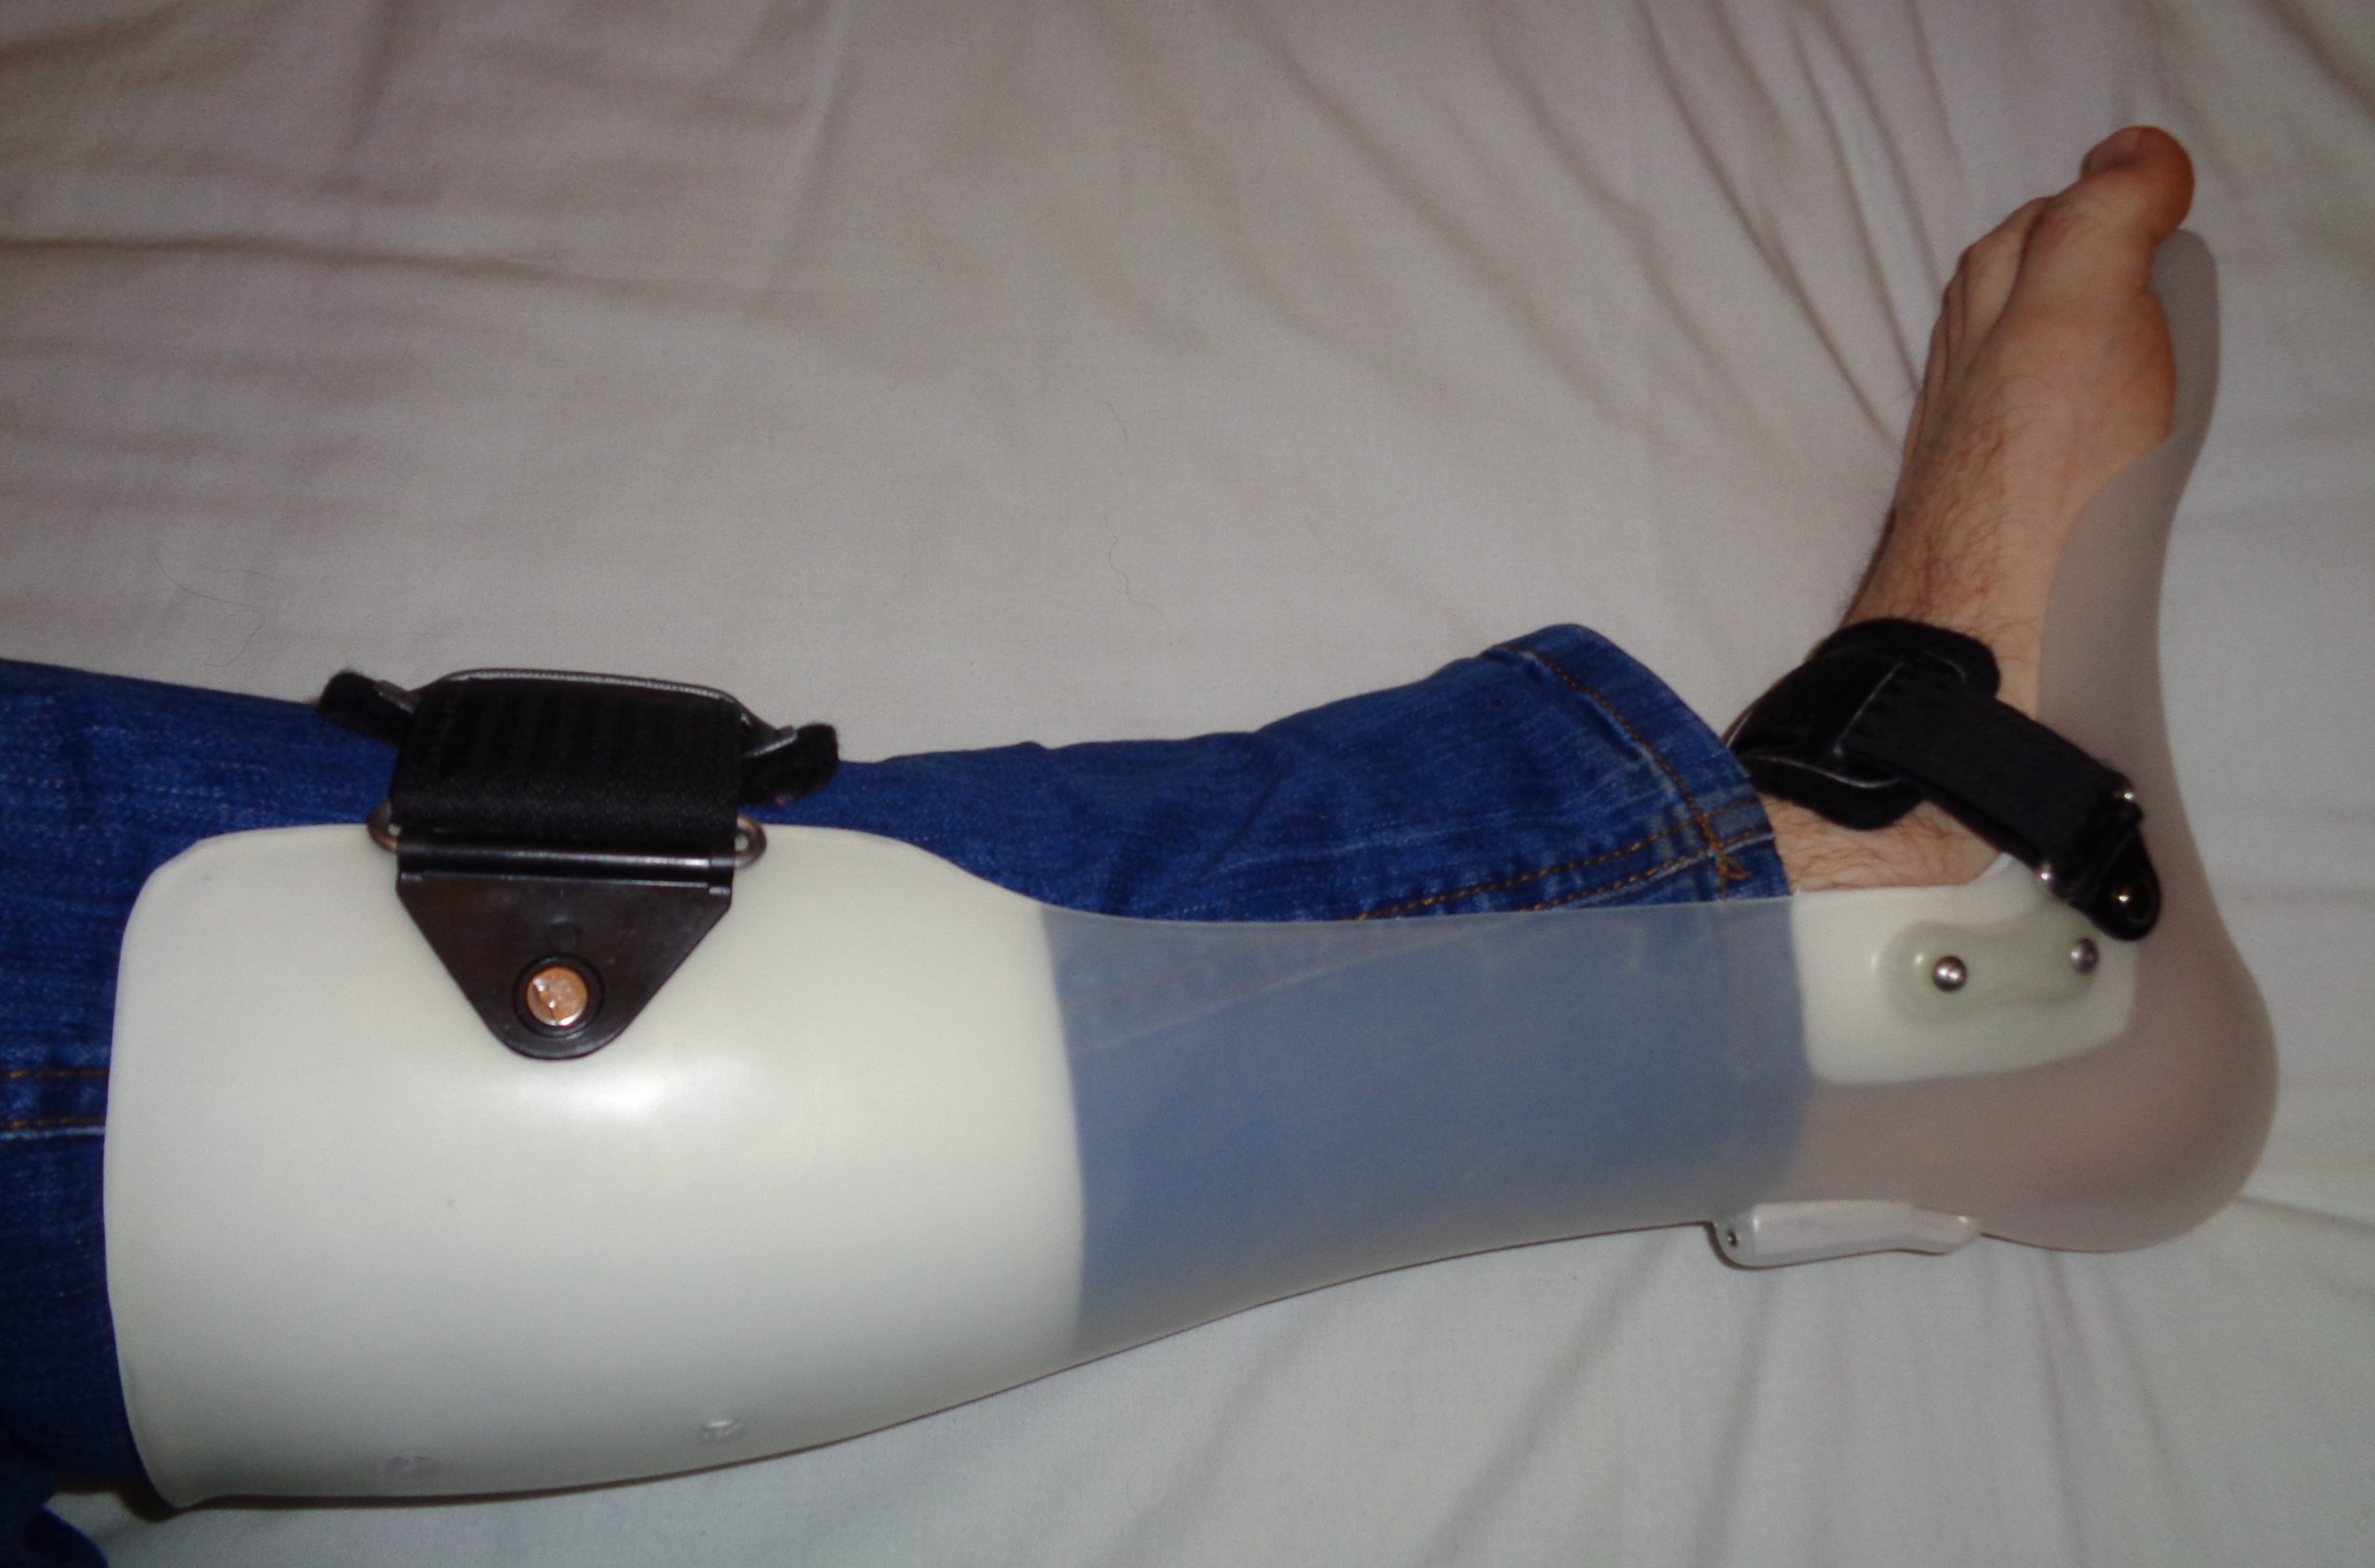
Foot drop is the inability to raise the front part of the foot due to weakness or paralysis of the muscles that lift the foot. As a result, individuals with foot drop often scuff their toes along the ground when walking or bend their knees to lift their foot higher than usual to avoid the scuffing. Foot drop is a symptom of an underlying problem and can be temporary or permanent, depending on the cause. The prognosis for foot drop depends on the cause. Foot drop caused by trauma or nerve damage usually shows partial or complete recovery, but in progressive neurological disorders, foot drop will be a symptom that is likely to continue as a lifelong disability. Treatment depends on the specific cause of foot drop. The most common treatment is to support the foot with lightweight leg braces. See Figure 13.24[33] for an image of a patient with foot drop treated with a leg brace. Exercise therapy to strengthen the muscles and maintain joint motion also helps to improve a patient’s gait.[34]
- “Osteoporosis Effect and Locations.jpg” by BruceBlaus is licensed under CC BY-SA 4.0 ↵
- MedlinePlus [Internet]. Bethesda (MD): National Library of Medicine (US); [updated 2020, Aug 14]. Osteoporosis; [reviewed 2017, Mar 15; cited 2020, Sep 18]. https://medlineplus.gov/osteoporosis.html ↵
- “612 Types of Fractures.jpg” by OpenStax is licensed under CC BY 4.0 ↵
- MedlinePlus [Internet]. Bethesda (MD): National Library of Medicine (US); [updated 2020, Apr 20]. Fractures; [reviewed 2016, Mar 15; cited 2020, Sep 18]. https://medlineplus.gov/fractures.html ↵
- “Cdm hip fracture 343.jpg” by Booyabazooka is licensed under CC BY-SA 3.0 ↵
- NHS (UK). (2019, October 3). Hip fracture. https://www.nhs.uk/conditions/hip-fracture/ ↵
- This work is a derivative of Anatomy & Physiology by OpenStax and is licensed under CC BY 4.0. Access for free at https://openstax.org/books/anatomy-and-physiology/pages/1-introduction ↵
- This work is a derivative of Anatomy & Physiology by OpenStax and is licensed under CC BY 4.0. Access for free at https://openstax.org/books/anatomy-and-physiology/pages/1-introduction ↵
- “Osteoarthritis and rheumatoid arthritis - Normal joint Osteoarthr -- Smart-Servier.jpg” by Laboratoires Servier is licensed under CC BY-SA 3.0 ↵
- “Replacement surgery - Shoulder total hip and total knee replacement -- Smart-Servier.jpg” by Laboratoires Servier is licensed under CC BY-SA 3.0 ↵
- This work is a derivative of Anatomy & Physiology by OpenStax and is licensed under CC BY 4.0. Access for free at https://openstax.org/books/anatomy-and-physiology/pages/1-introduction ↵
- MedlinePlus [Internet]. Bethesda (MD): National Library of Medicine (US); [updated 2020, Aug 21]. Hip replacement; [reviewed 2016, Aug 31; cited 2020, Sep 18]. https://medlineplus.gov/hipreplacement.html ↵
- A.D.A.M. Medical Encyclopedia [Internet]. Atlanta (GA): A.D.A.M., Inc.; c1997-2020. Taking care of your new hip joint; [updated 2020, Sep 16; cited 2020, Sep 18]. https://medlineplus.gov/ency/patientinstructions/000171.htm ↵
- “Rheumatoid arthritis -- Smart- Servier (cropped).jpg” by Laboratoires Servier is licensed under CC BY-SA 3.0 ↵
- MedlinePlus [Internet]. Bethesda (MD): National Library of Medicine (US); [updated 2020, Aug 14]. Rheumatoid arthritis; [reviewed 2018, May 2; cited 2020, Sep 18]. https://medlineplus.gov/rheumatoidarthritis.html ↵
- This work is a derivative of Anatomy & Physiology by OpenStax and is licensed under CC BY 4.0. Access for free at https://openstax.org/books/anatomy-and-physiology/pages/1-introduction ↵
- “Gout Signs and Symptoms.jpg” by www.scientificanimations.com/ is licensed under CC BY 4.0 ↵
- This work is a derivative of Anatomy and Physiology by Boundless.com and is licensed under CC BY-SA 4.0 ↵
- “Vertebral column disorders - Normal Scoliosis Lordosis Kyphosis -- Smart-Servier.jpg” by Laboratoires Servier is licensed under CC BY-SA 3.0 ↵
- A.D.A.M. Medical Encyclopedia [Internet]. Atlanta (GA): A.D.A.M., Inc.; c1997-2020. Kyphosis; [updated 2020, Sep 16; cited 2020, Sep 18]. https://medlineplus.gov/ency/article/001240.htm ↵
- A.D.A.M. Medical Encyclopedia [Internet]. Atlanta (GA): A.D.A.M., Inc.; c1997-2020. Lordosis - lumbar; [updated 2020, Sep 16; cited 2020, Sep 18]. https://medlineplus.gov/ency/article/003278.htm ↵
- MedlinePlus [Internet]. Bethesda (MD): National Library of Medicine (US); [updated 2020, Apr 29]. Scoliosis; [reviewed 2016, Oct 18; cited 2020, Sep 18]. https://medlineplus.gov/scoliosis.html ↵
- “AnterDisAPMark.png” by James Heilman, MD is licensed under CC BY-SA 4.0 ↵
- MedlinePlus [Internet]. Bethesda (MD): National Library of Medicine (US); [updated 2019, Feb 7]. Dislocations; [reviewed 2016, Oct 26; cited 2020, Sep 18]. https://medlineplus.gov/dislocations.html ↵
- “813 Clubfoot.jpg” by OpenStax is licensed under CC BY 3.0 ↵
- A.D.A.M. Medical Encyclopedia [Internet]. Atlanta (GA): A.D.A.M., Inc.; c1997-2020. Club foot; [updated 2020, Sep 16; cited 2020, Sep 18]. https://medlineplus.gov/ency/article/001228.htm ↵
- “Ankle sprain -- Smart-Servier.jpg” by Laboratoires Servier is licensed under CC BY-SA 3.0 ↵
- “3D Medical Animation Depicting Strain-Tendon.jpg” by https://www.scientificanimations.com is licensed under CC BY-SA 4.0 ↵
- A.D.A.M. Medical Encyclopedia [Internet]. Atlanta (GA): A.D.A.M., Inc.; c1997-2020. Sprains and strains; [updated 2020, Jun 17; reviewed 2017, Jan 3; cited 2020, Sep 18]. https://medlineplus.gov/sprainsandstrains.html ↵
- This work is a derivative of Anatomy & Physiology by OpenStax and is licensed under CC BY 4.0. Access for free at https://openstax.org/books/anatomy-and-physiology/pages/1-introduction ↵
- “Complications of Hypertrophic Scarring.png” by Aarabi, S., Longaker, M. T., & Gurtner, G. C. is licensed under CC BY 3.0 ↵
- A.D.A.M. Medical Encyclopedia [Internet]. Atlanta (GA): A.D.A.M., Inc.; c1997-2020. Contracture deformity; [updated 2020, Sep 16; cited 2020, Sep 18]. https://medlineplus.gov/ency/article/003185.htm ↵
- “AFO brace for foot drop.JPG” by Pagemaker787 is licensed under CC BY-SA 4.0 ↵
- National Institute of Neurological Disorders and Stroke. (2019, March 27). Foot drop information page. https://www.ninds.nih.gov/Disorders/All-Disorders/Foot-Drop-Information-Page ↵
Learning Activities
(Answers to "Learning Activities" can be found in the "Answer Key" at the end of the book. Answers to interactive activity elements will be provided within the elements as immediate feedback.)
1. You are caring for an elderly patient who is complaining of pain, severe nausea, and who has difficulty swallowing. In addition to intravenous medication administration, what route of medication delivery might be beneficial for this patient? Please provide rationale for your selection.
2. Which of the following transdermal medication administration actions are correct? (Select all that apply).
- The nurse may apply heat to all medication patches to help aid absorption of the medication.
- When placing a patch, the nurse should press the patch firmly to the skin to ensure adequate adherence.
- Gloves are required for patch application and removal.
- Transdermal patches may be placed directly into the trash.
- Date and location of patch application should be promptly documented in the medication administration record (MAR).
Learning Activities
(Answers to "Learning Activities" can be found in the "Answer Key" at the end of the book. Answers to interactive activity elements will be provided within the element as immediate feedback.)
1. An older, frail patient is prescribed a flu vaccine that is an aqueous or water-based solution. The patient’s deltoid muscle is not very prominent, and the patient has very little fat over the deltoid. The needles available are 23 G 5⁄8 inch, 22 G 1 inch, and 20 G 1 1⁄2 inch.
- What needle size/length would work best for this particular medication and patient? Give the reason for your selection.
2. A patient is hospitalized on the surgical floor. Pain medication is prescribed to be given by intramuscular route. After calculating, the volume to be administered is 2 mL. The patient has a large amount of adipose tissue around her hips and buttocks region and weighs 253 pounds. The needle sizes available include 27 G 3⁄8 inch, 25 G 5⁄8 inch, 22 G 1 inch, 21 G 1 1⁄2 inch, and 20 G 2 inches.
- What needle size/length and injection site would work best for this particular medication and patient? Give the reason for your selection.
3. The nurse is teaching a patient how to mix 5 units of regular insulin and 15 units of NPH insulin in the same syringe. The nurse determines further instruction is needed if the patient does which of the following?
- Injects 5 units of air into the regular insulin vial first and withdraws 5 units of regular insulin
- Injects 15 units of air into the NPH insulin vial but does not withdraw the medication
- Withdraws 5 units of regular insulin before withdrawing 15 units of NPH insulin
- Calculates the combined total insulin dose as 20 units after withdrawing the regular insulin from the vial
Learning Activities
(Answers to "Learning Activities" can be found in the "Answer Key" at the end of the book. Answers to interactive activity elements will be provided within the element as immediate feedback.)
Learning Activities
(Answers to "Learning Activities" can be found in the "Answer Key" at the end of the book. Answers to interactive activity elements will be provided within the element as immediate feedback.)
Mr. Jones is a 76-year-old patient admitted to the medical surgical floor with complications of a nonhealing foot ulcer. Mr. Jones has a history of diabetes, hypertension, and COPD. He has a BMI of 29. His daily medications include metformin, Lisinopril, and prednisone. His wife has recently passed away and he lives alone.
- Based upon what is known about Mr. Jones, what factors might be contributing to his nonhealing wound?
- What other factors that influence wound healing might be important to assess with Mr. Jones?
Learning Activities
(Answers to “Learning Activities” can be found in the “Answer Key” at the end of the book. Answers to interactive activity elements will be provided within the element as immediate feedback.)
1. Your patient complains of pain while you are inflating the balloon during a urinary catheter insertion. Describe your next steps.
2. Your patient is admitted with a fractured head of the right femur and is scheduled for surgery in the next six hours. You have a prescription to insert a Foley catheter. After you assess the patient’s ability for the recommended position to insert the catheter, you note that the patient is unable to move the right leg and should not move the leg. Describe how you will proceed with the procedure.
3. A patient with a new colostomy refuses to look at the stoma or participate in changing the pouching system. What are some suggestions to help your patient adjust to the stoma?
4. The nurse is caring for a female patient who is experiencing inadequate bladder emptying. The nurse obtains an order to determine post-void residual. Which catheter type would the nurse use to evaluate post-void residual?
- Coude catheter
- Indwelling catheter
- Straight catheter
- Foley catheter
5. The nurse is caring for a patient who had a colostomy placed two days earlier. The nurse notes that the stoma is moist and beefy red. Which action should the nurse be expected to take based on these findings?
- Notify the physician of the findings immediately.
- Remove the bag and apply pressure to the stoma.
- Document the assessment findings of the stoma.
- Change the appliance pouch and clean the skin.
6. The nurse is providing patient education on the care of an ostomy. Which of the following statements by the patient would indicate that further education is necessary?
- “I should plan to replace the pouch system every 8-10 days.”
- “Wafer should be cut 1/16 to 1/8 an inch larger than the stoma.”
- “It is important to chew all foods completely and slowly.”
- “I will keep a diary of the foods I eat and my stool pattern.”
Learning Activities
(Answers to “Learning Activities” can be found in the “Answer Key” at the end of the book. Answers to interactive activity elements will be provided within the element as immediate feedback.)
1. You are caring for a patient with a tracheostomy. What supplies should you ensure are in the patient's room when you first assess the patient?
2. Your patient with a tracheostomy puts on their call light. As you enter the room, the patient is coughing violently and turning red. Prioritize the action steps that you will take.
- Assess lung sounds
- Suction patient
- Provide oxygen via the trach collar if warranted
- Check pulse oximetry
Learning Activities
(Answers to “Learning Activities” can be found in the “Answer Key” at the end of the book. Answers to interactive activity elements will be provided within the element as immediate feedback.)
The patient's IV site is cool to the touch and swollen. The patient states “it hurts a little.” List in order the steps the nurse should take.
- Discontinue the IV
- Stop the IV infusion
- Elevate the affected site
- Document the findings
[latexpage]
In addition to calculating IV flow rates, nurses also commonly calculate when an infusion will be completed so they will know when to discontinue the infusion or hang another IV bag. Let’s practice calculating how long it will take an IV infusion to complete.
Practice Problem: IV Completion Time (Example 1)
Patient Information:
Name: Amanda Parks, DOB: 09/29/19xx, Allergies: NKDA, Weight: 70 kg
Prescription: 0.9% Sodium Chloride IV at 75 mL/hr
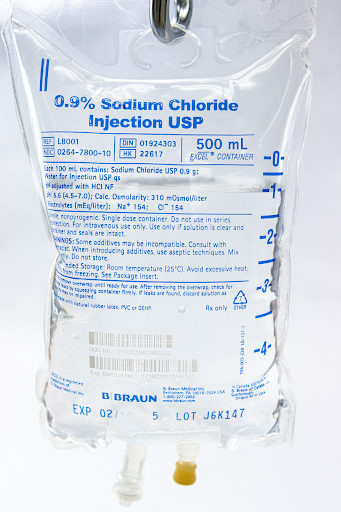
Fluid Supplied: See Figure 5.19[1] for the IV fluid bag supplied.
1. Begin by setting up the goal unit being solved for, which is an hour:
\[
Hour~=~?
\]
2. Set up the first fraction by matching the numerator to hour. Look at the information in the problem related to hours. The order states the IV should be administered at 75 mL per hour, so add 75 mL to the denominator:
\[
Hour~=~\frac{1~hour}{75~mL}
\]
3. Set up the second fraction with the intent to cancel out mL, so add mL to the numerator of the second fraction. Look at the information in the problem related to mL. By looking at the bag, we know there are 500 mL to infuse, so plug in 500 in the numerator and place 1 in the denominator with the intent to cross out units:
\[Hour~=~\frac{1~hour}{75~\cancel{mL}}~x~\frac{500~\cancel{mL}}{1}
\]
4. Cross off units then multiply across the numerators and denominators. Divide the final fraction for the final answer:
\[Hour~=~\frac{1~hour}{75~\cancel{mL}}~x~\frac{500~\cancel{mL}}{1}~=~\frac{1~hour~ x~500~}{75~x~1}~=~\frac{500~hour}{75}~=~6.666667~hours
\]
5. When performing calculations related to time, it is important to remember that anything after the decimal is a portion of an hour and needs to be converted to minutes. To finish the answer, multiply 60 minutes X 0.6667 = 40.02 minutes. The final answer is the infusion will be completed in 6 hours and 40 minutes.
Practice Problem: IV Completion Time (Example 2)
Now let’s add a start time to the above problem and calculate what time the infusion will end. We determined that the IV infusion will take 6.6667 hours to infuse 500 mL at 75 mL/hr.
Let’s assume the infusion started at 0800.
1. Add the total infusion time to the start time of the infusion, so add 6 hours to the start time of 0800. Use military time and put a “0” before the six for 6 hours:
\[
0800~+~0600~=~1400
\]
2. Add the minutes to the time:
\[
1400~+~40~=~1440
\]
3. Answer: Our infusion will be complete at 1440.
Video Review of Calculating IV Infusion Times[2]:
Please practice IV completion rates with the interactive learning activity below.
[latexpage]
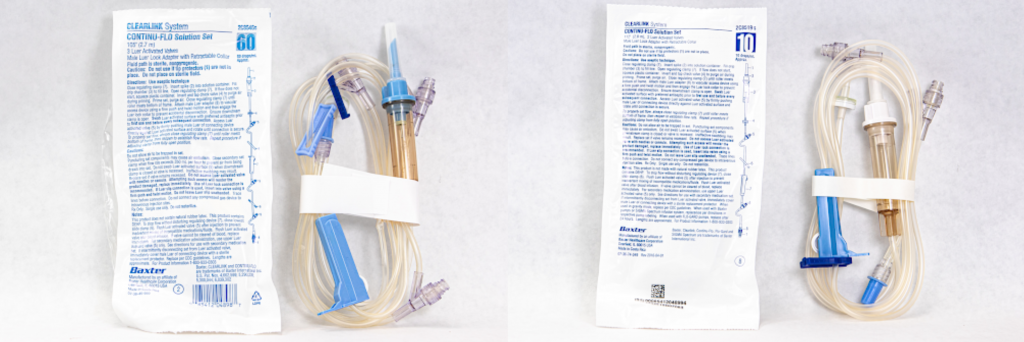
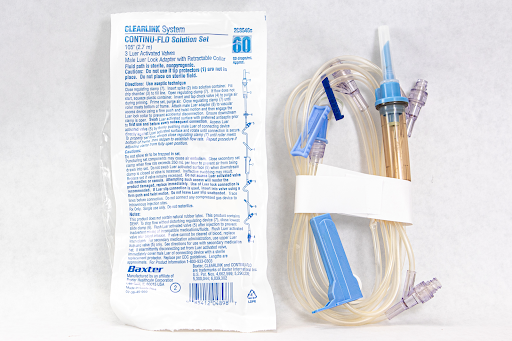
IV drip tubing comes in a variety of sizes called drop factors. The drop factor is the number of drops in one mL of solution using gravity IV tubing. The drop factor is printed on the IV tubing package. Macrodrip tubing includes tubing with drop factors of 10, 15, or 20 drops per mililiter and is typically used to deliver general IV solutions to adults. Microdrip tubing includes tubing with a drop factor of 60 drops per milliliter. It is typically used to deliver precise amounts of medication in small drops to children and infants. See Figure 5.13[3] for an image of macrodrip and microdrip tubing.
Video Review of Micro Tubing Drip Chamber[4]
In the sample problems below, you will be calculating the number of drops needed per minute to achieve the quantity of fluid to be used per hour in the provider order.
Practice Problem: IV Infusion (Example 1)
Let’s practice calculating the rate of IV infusion by gravity using macrodrip tubing.
Patient Information:
Name: Elaina Dimas, DOB: 12/09/19xx, Age 6, Allergies: NKDA, Weight: 15 kg
Diagnosis: Dehydration
Prescription: 0.9% Sodium Chloride 500 mL IV bolus over four hours
See Figure 5.14[5] for the IV fluid supplied.
See Figure 5.15[6] for IV tubing supplied.

Solve using dimensional analysis.
1. To set up the problem, begin by identifying the goal unit(s) for which we are solving. When calculating infusion rates by gravity, we need to calculate how many drops (gtts) of the solution will be infused each minute. This will allow us to count the actual drops dripping from the tubing and regulate the rate so the volume of infusion is delivered in the time ordered. Set up the problem by identifying the goal unit to solve, but instead of solving for one unit, we will be solving for two units: drops (gtts) and minutes:
\[ \frac{gtts}{min}~=~?
\]
2. Set up the first fraction by matching drops (gtts) in the numerator to the goal unit. Review the tubing provided to determine how many drops per minute are administered with this type of tubing. In this example, the tubing is labelled as 60 gtts/mL. Plug in 60 in the numerator for how many drops are administered by the tubing in 1 mL, and then add 1 mL to the denominator:
\[\frac{gtts}{min}~=~\frac{60~gtts}{1~mL}
\]
3. Set up the second fraction with the intent to cross off mL, so place mL in the numerator. Look for information provided in the problem related to mL. The prescription is for 500 mL of solution over four hours. Plug in 500 into the numerator, and place 4 hours in the denominator, and then cross off the mL units:
\[
\frac{gtts}{min}~=~\frac{60~gtts}{1~\cancel{mL}}~x~\frac{500~\cancel{mL}}{4~hours}
\]
4. Calculate the minutes to achieve our goal unit of drops per minute. Create the third fraction with hour in the numerator with the intent to cross off hour units. Using equivalencies, we know that 1 hour is equivalent to 60 minutes, so plug in 60 minutes in the denominator. Cancel out hours. Evaluate if we have reached our goal units. This equation now matches the goal of units/min and can be solved:
\[
\frac{gtts}{min}~=~\frac{60~gtts}{1~\cancel{mL}}~x~\frac{500~\cancel{mL}}{4~\cancel{hours}}~x~\frac{1~\cancel{hour}}{60~min}
\]
5. Multiply across the numerators and denominators, and then divide the final fraction.
\[
\frac{gtts}{min}~=~\frac{60~gtts}{1~\cancel{mL}}~x~\frac{500~\cancel{mL}}{4~\cancel{hours}}~x~\frac{1~\cancel{hour}}{60~min}~=~\frac{60~gtts~x~500~x~1}{1~x~4~x~60~min}~=~{125~gtts/min}
\]
6. The final answer is 125 drops/minute.
Practice Problem: IV Infusion (Example 2)
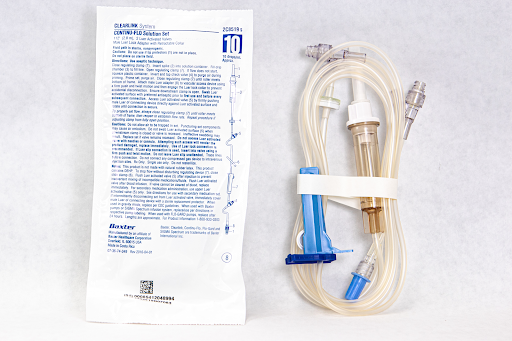
Let’s practice a second problem using different types of IV drip tubing and a different time to be infused.
Patient Information:
Name: Amber Gomez, DOB: 08/26/19xx, Age 26, Allergies: NKDA, Weight: 50 kg
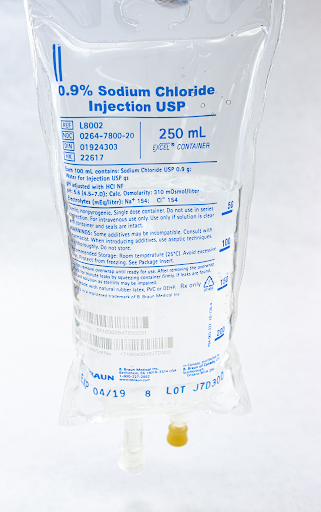
Provider Order: Lactated Ringers 250 mL IV bolus over 2 hours
Fluid Supplied: See Figure 5.16[7] for the fluid supplied.
Tubing Supplied: See Figure 5.17[8] for the tubing available.
Solve using dimensional analysis:
\[\frac{gtts}{min}~x~\frac{10~gtts}{1~\cancel{mL}}~x~\frac{250~\cancel{mL}}{2~\cancel{hour}}~x~\frac{1~\cancel{hour}}{60~min}~=~\frac{10~gtts~x~250~x~1}{1~x~2~x~60~min}~=~{20.83~gtts/min}
\]
Round drops to the nearest whole number for a final answer of 21 drops/minute.
Video Review of Solving IV Drip Factor Problems[9]
Module 1.11
Please practice flow rate calculations with the interactive activity below.
[latexpage]
Sometimes multi-step calculations are required, especially for medications used in critical care. There are many different ways to solve multi-step calculations, so it is important to select a method that works for you that is consistently accurate. Let’s practice a multi-step calculation for a medication supplied in mg/mL but is prescribed based on micrograms (mcg) per kilogram (kg) per minute, and the patient’s weight is provided in pounds.
Practice Problem: Multi-Step Calculations
Patient Information:
Name: Ideen Hanson, DOB: 09/29/19xx, Allergies: NKDA, Weight: 180 lbs
Diagnosis: Hypertension
Prescription: Begin initial infusion of Nipride at 0.5 mcg/kg/min
Medication Supplied: See Figure 5.20[10] for the drug label of the medication supplied.

Problem: What rate (in mL/hr) should the nurse set the pump to begin the infusion?
1. Set up the goal units to solve for, which is mL/hr.
\[
\frac{mL}{hr}~=
\]
2. Review the problem. The prescription is based on mcg/kg/min. Having three elements can create confusion when setting up the equation using dimensional analysis, so it can be easier to eliminate one element by doing some preliminary steps. First convert the patient weight to kilograms (kg) by dividing 180 pounds/2.2= 81.8181 kg. Now multiplying the micrograms (mcg) ordered by weight in kg to determine the amount of medication to administer per minute: 81.8181 x 0.5 mcg = 40.9090 mcg/minute. Use this information as you set up your problem.
3. Start by identifying the unit you are solving for, which is mL/hour. Then set up the first fraction. Match the numerator to mL. Look to the problem for information related to mL. On the drug label, we see that 50 mg of Nipride is supplied in 250 mL of D5W. Plug in 250 in the numerator, and then 50 mg in the denominator:
\[
mL~=~\frac{250~mL}{50~mg}
\]
4. Set up the second fraction with the intent to cross off mg by placing 1 mg in the numerator. Based on the known equivalency that 1000 mcg are equal to 1 mg, place 1000 mcg in the denominator:
\[
mL~=~\frac{250~mL}{50~mg}~x~\frac{1~mg}{1000~mcg}
\]
5. Cross off mg diagonally. Set up the third equation with the intent to cross off mcg by placing it in the numerator. Plug in the information previously calculated, which was 40.9090 mcg/minute:
\[
mL~=~\frac{250~mL}{50~\cancel{mg}}~x~\frac{1~\cancel{mg}}{1000~mcg}~x~\frac{40.9090~mcg}{1~min}
\]
6. Cross off mcg diagonally. Set up the fourth fraction with the intent to cross off minutes. Based on the known equivalency of 60 minutes in 1 hour, plug in 60 in the numerator and 1 hour in the denominator:
\[
mL~=~\frac{250~mL}{50~\cancel{mg}}~x~\frac{1~\cancel{mg}}{1000~\cancel{mcg}}~x~\frac{40.9090~\cancel{mcg}}{1~min}~x~\frac{60~min}{1~hour}~=~12.2727
\]
7. Cross off min diagonally. Review the equation to ensure the goal unit has been met. It has been met, so multiply across the numerators and the denominators, and then divide the final fraction:
\[
\frac{mL}{Hr}~x~\frac{250~mL}{50~\cancel{mg}}~x~\frac{1~\cancel{mg}}{1000~\cancel{mcg}}~x~\frac{40.9090~\cancel{mcg}}{1~\cancel{min}}~x~\frac{60~\cancel{min}}{1~hour}~=~12.2727
\]
8. Depending on the agency policy and available pump settings, round to 12.27 mL/hour.
Video Reviews of Multiple-Step Calculations that Commonly Occur with Heparin and Dopamine drips:
Heparin Drip[11]
Dopamine Drip[12]
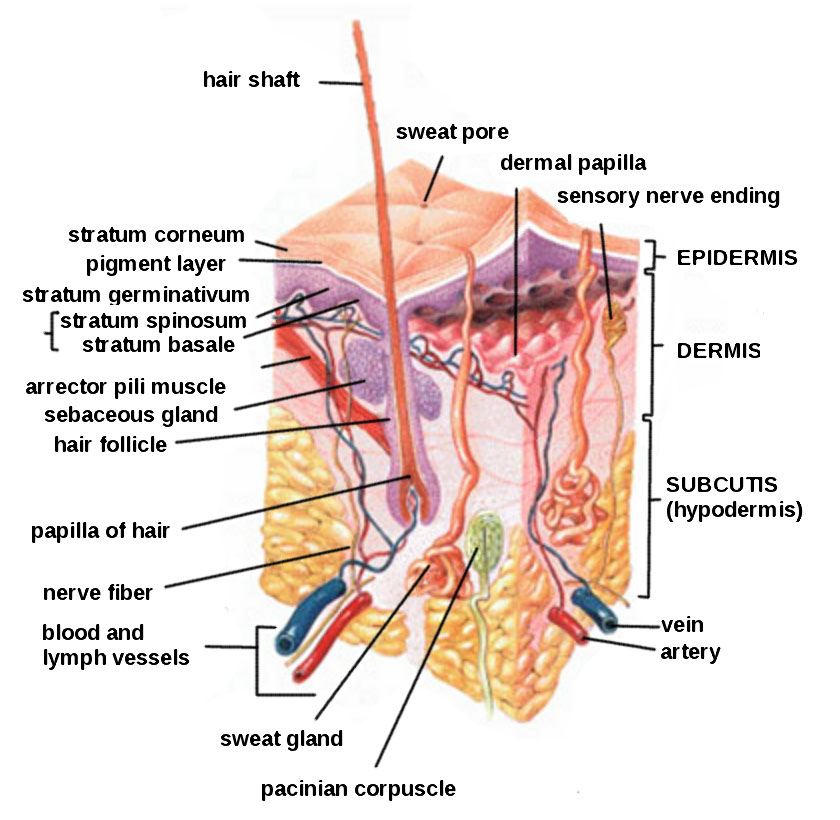
Subcutaneous injections are administered into the adipose tissue layer called “subcutis” below the dermis. See an image of the subcutis (hypodermis) layer in Figure 18.20.[13] Medications injected into the subcutaneous layer are absorbed at a slow and steady rate.
Anatomic Sites
Sites for subcutaneous injections include the outer lateral aspect of the upper arm, the abdomen (from below the costal margin to the iliac crest and more than two inches from the umbilicus), the anterior upper thighs, the upper back, and the upper ventral gluteal area.[14] See Figure 18.21[15] for an illustration of commonly used subcutaneous injection sites. These areas have large surface areas that allow for rotation of subcutaneous injections within the same site when applicable.
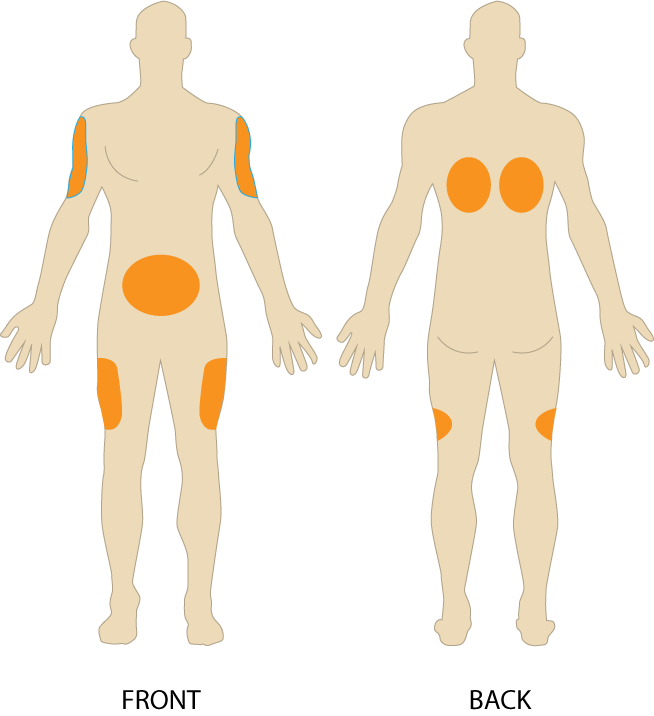
Prior to injecting the medication, inspect the skin area. Avoid skin areas that are bruised, open, scarred, or over bony prominences. Medical conditions that impair the blood flow to a tissue area contraindicate the use of subcutaneous injections in that area. For example, if a patient has an infection in an area of their skin called “cellulitis,” then subcutaneous injections should not be given in that area.
Description of Procedure
Nurses select the appropriate needle size for subcutaneous injection based on patient size. Subcutaneous needles range in gauge from 25-31 and in length from ½ inch to ⅝ inch. Prior to administering the injection, determine the amount of subcutaneous tissue present and use this information to select the needle length. A 45- or 90-degree angle is used for a subcutaneous injection. A 90-degree angle is used for normal-sized adult patients or obese patients, and a 45-degree angle is used for patients who are thin or have with less adipose tissue at the injection site. The volume of solution in a subcutaneous injection should be no more than 1 mL for adults and 0.5 mL for children. Larger amounts may not be absorbed appropriately and may cause increased discomfort for the patient.[16]
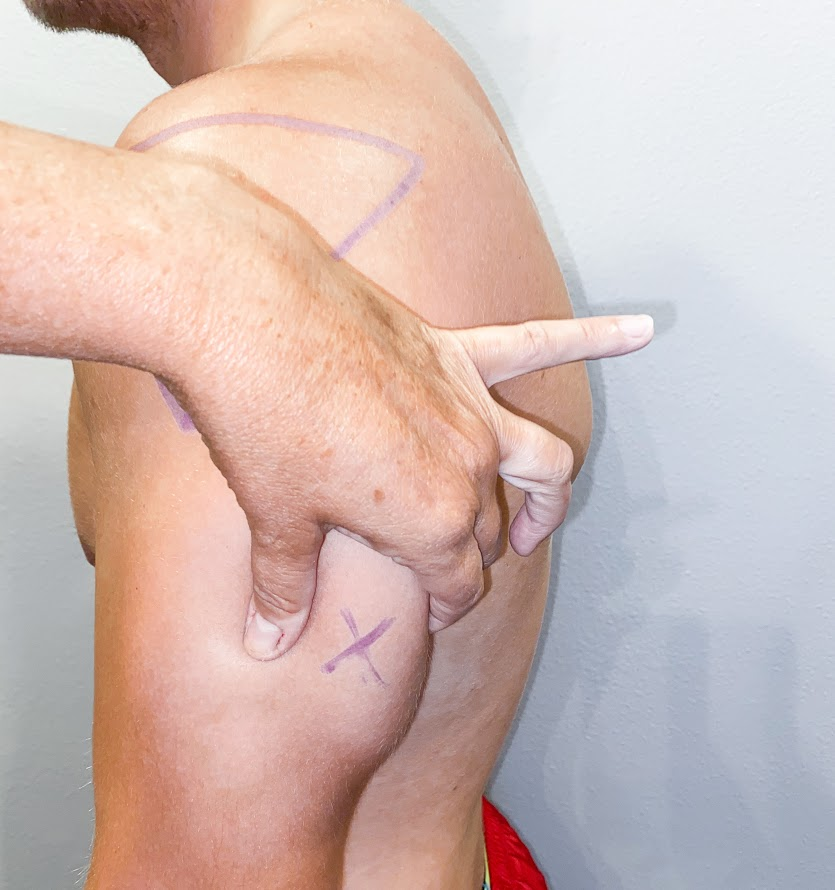
When administering a subcutaneous injection, assess the patient for any contraindications for receiving the medication. Apply nonsterile gloves after performing hand hygiene to reduce your risk of exposure to blood. Position the patient in a comfortable position and select an appropriate site for injection. Cleanse the site with an alcohol swab or antiseptic swab for 30 seconds using a firm, circular motion, and then allow the site to dry. Allowing the skin to dry prevents introducing alcohol into the tissue, which can be irritating and uncomfortable. Remove the needle cap with the nondominant hand, pulling it straight off to avoid needlestick injury. Grasp and pinch the area selected as an injection site.[17] See Figure 18.22[18] for an image of a nurse grasping the back of a patient’s upper arm with the nondominant hand in preparation of a subcutaneous injection at the anatomical site indicted with an “X.”
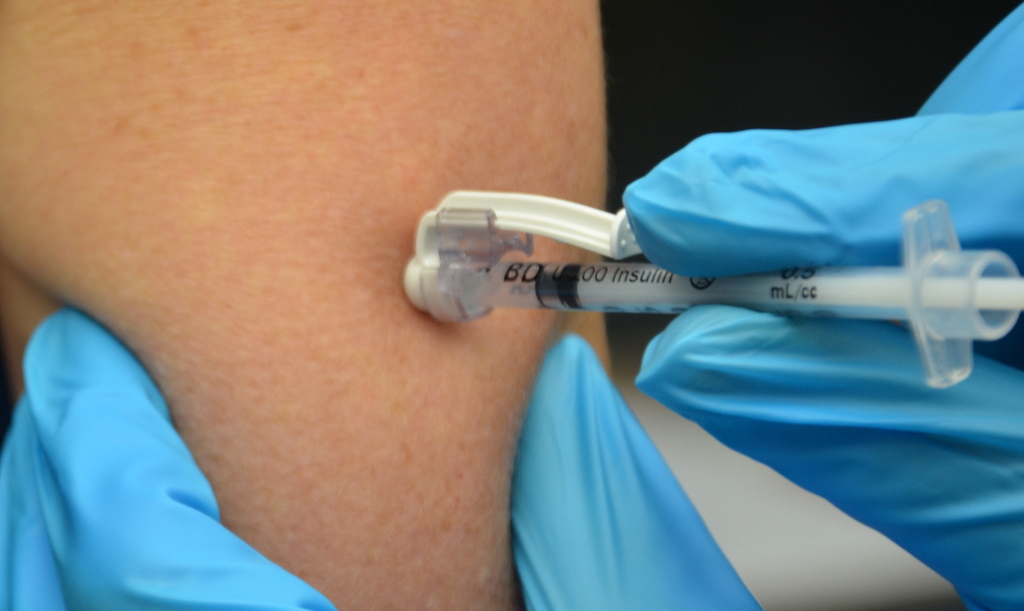
Hold the syringe in the dominant hand between the thumb and forefinger like a dart. Insert the needle quickly at a 45- to 90-degree angle, depending on the size of the patient and the amount of adipose tissue. After the needle is in place, release the tissue with your nondominant hand. With your dominant hand, inject the medication at a rate of 10 seconds per mL. Avoid moving the syringe.[19] See Figure 18.23[20] for an image of a subcutaneous injection.
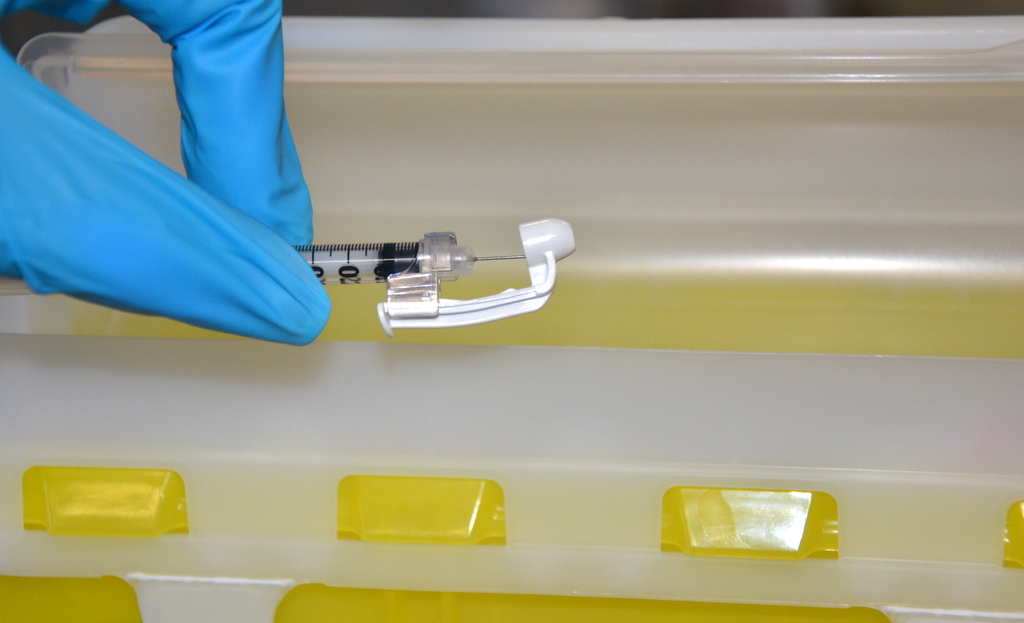
Withdraw the needle quickly at the same angle at which it was inserted. Using a sterile gauze, apply gentle pressure at the site after the needle is withdrawn. Do not massage the site. Massaging after a heparin injection can contribute to the formation of a hematoma. Do not recap the needle to avoid puncturing oneself. Apply the safety shield and dispose of the syringe/needle in a sharps container. See Figure 18.24[21] for an image of a needle after the safety shield has been applied. Remove gloves and perform hand hygiene.[22]
Examples of common medications administered via subcutaneous injection include insulin and heparin. Special considerations for each of these medications are discussed below.
Insulin Injections
Insulin is considered a high-alert medication requiring special care to prevent medication errors. Care must be taken to ensure the correct type and amount of insulin are administered at the correct time. It is highly recommended to have insulin dosages double-checked by another nurse before administration because of the potential for life-threatening adverse effects that can occur due to medication errors. Some agencies require this second safety check.
Only insulin syringes should be used to administer insulin injection. Insulin syringes are supplied in 30-, 50-, or 100-unit measurements, so read the barrel increments (calibration) carefully. Insulin is always ordered and administered in unit dosage. Insulin dosage may be based on the patient’s pre-meal blood sugar reading and a sliding scale protocol that indicates the number of units administered based on the blood sugar reading.[23],[24]
There are rapid-, short-, intermediate-, and long-acting insulins. For each type of insulin, it is important to know the onset, peak, and duration of the insulin so that it can be timed appropriately with the patient’s food intake. It is essential to time the administration of insulin with food intake to avoid hypoglycemia. When administering insulin before a meal, always ensure the patient is not nauseated and is able to eat. Short- or rapid-acting insulin may be administered up to 15-30 minutes before meals. Intermediate insulin is typically administered twice daily, at breakfast and dinner, and long-acting insulin is typically administered in the evening.[25],[26]
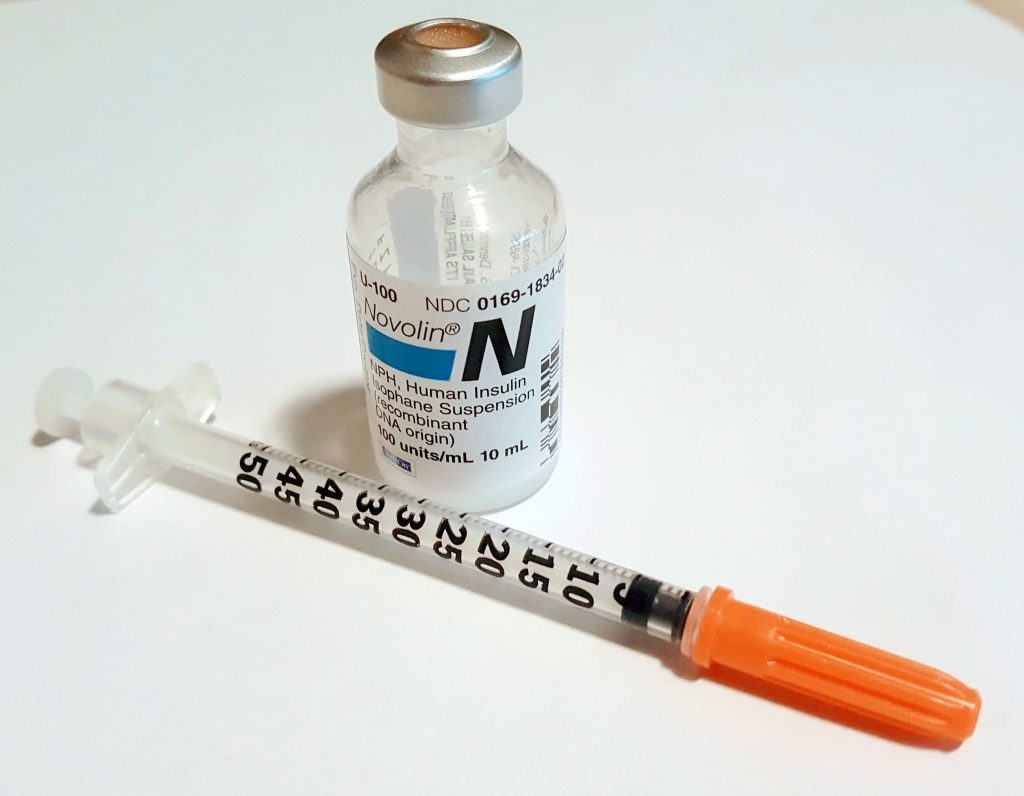
When administering cloudy insulin preparations such as NPH insulin (Humulin-N), gently roll the vial between the palms of your hands to resuspend the medication before withdrawing it from the vial.[27],[28] See Figure 18.25[29] for an image of insulin NPH that is cloudy in color.
Preparing Insulin in a Syringe
When withdrawing insulin from a vial, check the insulin vial to make sure it is the right kind of insulin and that there are no clumps or particles in it. Also, make sure the insulin is not past its expiration date. Pull air into the syringe to match the amount of insulin you plan to remove. Hold the syringe like a pencil and insert the needle into the rubber stopper on the top of the vial. Push the plunger down until all of the air is in the bottle. This helps to keep the right amount of pressure in the bottle and makes it easier to draw up the insulin. With the needle still in the vial, turn the bottle and syringe upside down (vial above syringe). Pull the plunger to fill the syringe to the desired amount. Check the syringe for air bubbles. If you see any large bubbles, push the plunger until the air is purged out of the syringe. Pull the plunger back down to the desired dose. Remove the needle from the bottle. Be careful to not let the needle touch anything until you are ready to inject.[30]
Mixing Two Types of Insulin
If a patient is ordered two types of insulin, some insulins may be mixed together in one syringe. For example, insulin NPH (Novolin-N) can be mixed with insulin regular (Humulin-R), insulin aspart (Novolog), or insulin lispro (Humalog). However, some types of insulin cannot be mixed with other insulin, such as insulin glargine (Lantus) or insulin detemir (Levemir).[31],[32]
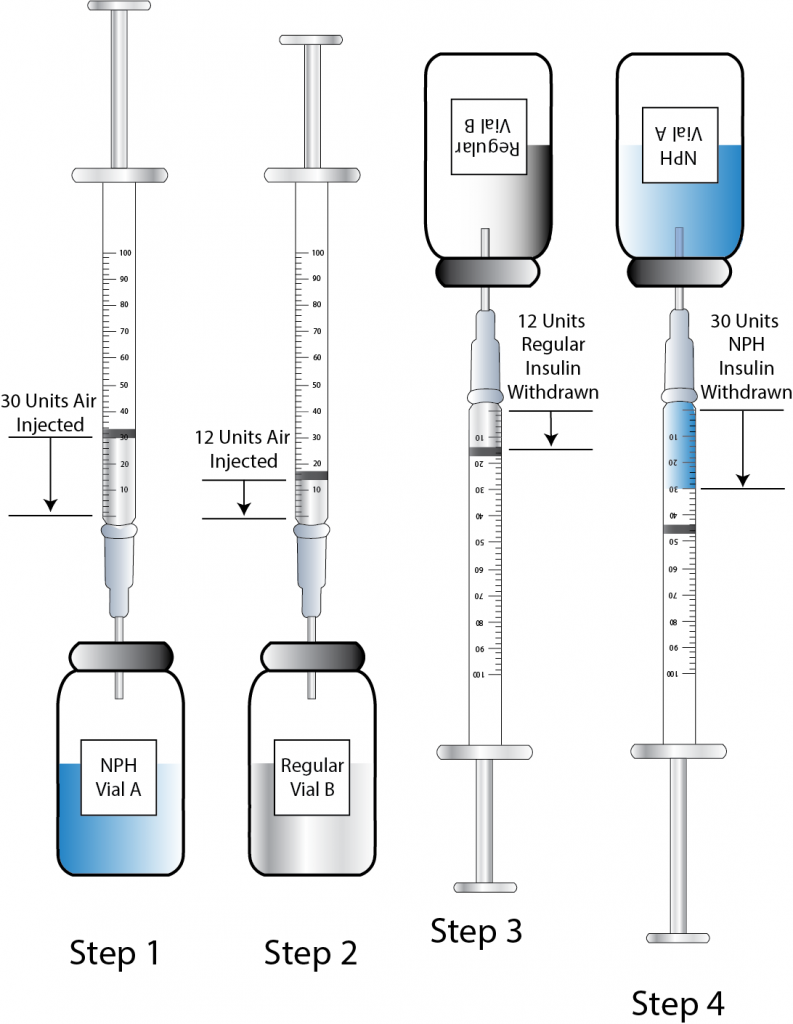
When mixing insulin, gather your insulin supplies. Check the insulin vials to make sure they are the right kinds of insulin, there are no clumps or particles in them, and the expiration dates have not passed. Gently mix intermediate or premixed insulin by turning the vial on its side and rolling it between the palms of your hands. Prepare the insulin vials by injecting air into the intermediate insulin vial. Remove the cap from the needle. With the vial of insulin below the syringe, inject an amount of air equal to the dose of intermediate insulin that you will be taking. Do not draw out the insulin into the syringe yet. Remove the needle from the vial. Inject air into the rapid-acting insulin vial equal to the rapid-acting insulin dose. With the needle still in the vial, turn the vial upside down (vial above the syringe) and pull the plunger to fill the syringe with the desired dose. Check the syringe for air bubbles. If you see any large bubbles, push the plunger until the air is purged out of the syringe. Pull the plunger back down to the desired dose. Remove the needle from the vial and recheck your dose. Insert the needle into the vial of cloudy insulin. Turn the vial upside down (vial above syringe) and pull the plunger to draw the dose of intermediate-acting insulin. Because the short-acting insulin is already in the syringe, pull the plunger to the total number of units you need. Do not inject any of the insulin back into the vial because the syringe now contains a mixture of intermediate- and rapid-acting insulin. Remove the needle from the vial and be careful to not let the needle touch anything until you are ready to inject.[33]
When mixing insulin, it is important to always draw up the short-acting insulin first to prevent it from being contaminated with the long-acting insulin. See Figure 18.26[34] for an illustration of the order to follow when mixing insulin.
One anatomic region should be selected for a patient’s insulin injections to maintain consistent absorption, and then sites should be rotated within that region. The abdomen absorbs insulin the fastest, followed by the arms, thighs, and buttocks. It is no longer necessary to rotate anatomic regions, as was once done, because newer insulins have a lower risk for causing hypertrophy of the skin.[35],[36]
Video Review of Mixing Insulin:[37]
Insulin Pens
Insulin pens are a newer technology designed to be used multiple times for a single person, using a new needle for each injection. See Figure 18.27[38] for an image of an insulin pen. Insulin pens must never be used for more than one person. Regurgitation of blood into the insulin cartridge can occur after injection, creating a risk of blood-borne pathogen transmission if the pen is used for more than one person, even when the needle is changed.[39] Prefilled insulin pens consist of a prefilled cartridge of insulin to which a special, single-use needle is attached. When using an insulin pen for subcutaneous insulin administration, a few additional steps must be taken according to manufacturer guidelines. The needle should be primed with two units of insulin, and then the dosage should be dialed in the dose window. The pen should be held with the hand using four fingers so that the thumb can be used to fully depress the plunger button. The pen should be left in place for ten seconds after the insulin is injected to aid in absorption.[40]
Insulin pens are often prescribed for home use because of their ease of use. Patients and family members must be educated on how to correctly use an insulin pen before discharge. To evaluate a patient’s knowledge of how to correctly administer insulin, ask them to “return demonstrate” the procedure to you.[41],[42]

Special Considerations for Insulin
- Insulin vials are stored in the refrigerator until they are opened. When removed, it should be labelled with an open date and expiration date according to agency policy. When a vial is in use, it should be at room temperature. Do not inject cold insulin because this can cause discomfort.
- Patients who take insulin should monitor their blood sugar (glucose) levels as prescribed by their health care provider.
- Vials of insulin should be inspected prior to use. Any change in appearance may indicate a change in potency. Check the expiration date and do not use it if it has expired.
- All health care workers should be aware of the signs and symptoms of hypoglycemia. Signs and symptoms of hypoglycemia include fruity breath, restlessness, agitation, confusion, slurring of words, clammy skin, inability to concentrate or follow commands, hunger, and nausea. Follow agency policy regarding hypoglycemic reactions.[43]
Insulin Injection Know-HowFor additional details about different types of insulin, hypoglycemia, and safety considerations when administering insulin, visit the "Antidiabetics" section of the "Endocrine" chapter in Open RN Nursing Pharmacology.
Video Review of Mixing Insulin[44]
Heparin Injections
Heparin is an anticoagulant medication used to treat or prevent blood clots. It comes in various strengths and can be administered subcutaneously or intravenously. Heparin is also considered a high-alert medication because of the potential life-threatening harm that can result from a medication error. See Figure 18.28[45] for an image of a prefilled syringe of enoxaparin (Lovenox), a low-molecular weight heparin, that is typically dispensed in prefilled syringes. Review specific guidelines regarding heparin administration in Table 18.5.[46]
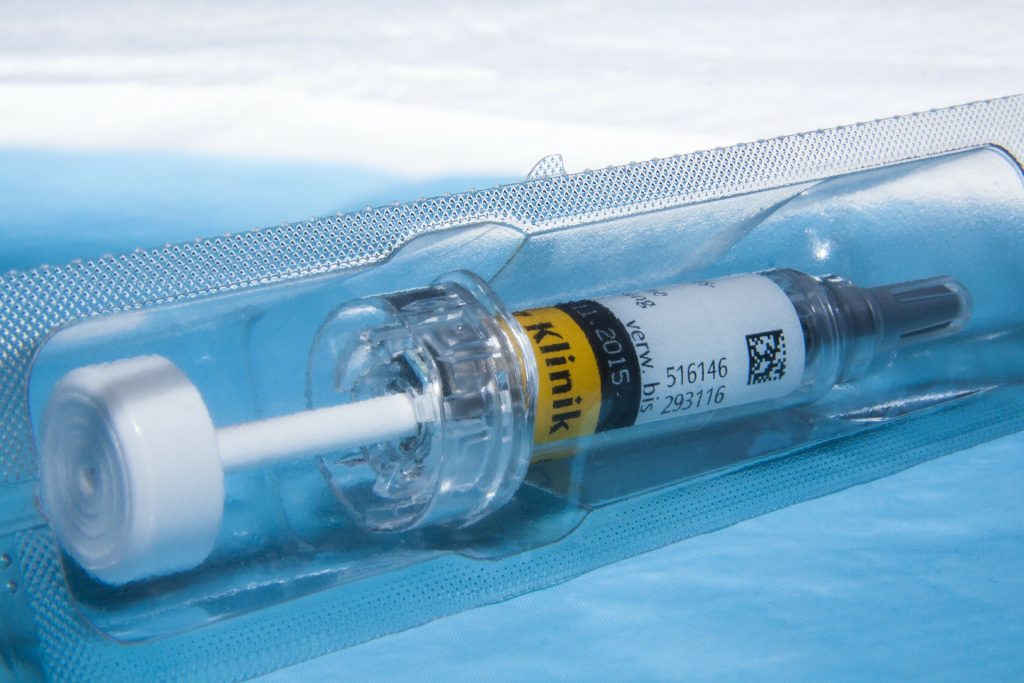
Table 18.5 Specific Guidelines for Administering Heparin[47]
| Guidelines | Additional Information |
|---|---|
| Remember that heparin is considered a high-alert medication. | Heparin is available in vials and prefilled syringes in a variety of concentrations. Because of the dangerous adverse effects of the medication, it is considered a high-alert medication. Always follow agency policy regarding the preparation and administration of heparin. |
| Rotate heparin injection sites. | It is important to rotate heparin sites to avoid bruising in one location. Heparin is absorbed best in the abdominal area, at least 2 inches (5 cm.) away from the umbilicus. |
| Know the risks associated with heparin. | There are many risks associated with the administration of heparin, including bleeding, hematuria, hematemesis, bleeding gums, and melena. Monitor, document, and report these side effects when a patient is receiving heparin. |
| Review lab values. | Review lab values (PTT and aPTT) before and after heparin administration. If injecting low-molecular weight heparin (enoxaparin), review platelet count because heparin can cause thrombocytopenia. |
| Follow administration standards for prepackaged heparin and enoxaparin syringes. | Many agencies use prepackaged heparin and enoxaparin syringes. Always follow the standards for safe medication administration when using prefilled syringes. |
| Assess patient conditions prior to administration. | Some medical conditions increase the patient’s risk for hemorrhage (severe bleeding), such as recent childbirth, severe kidney and liver disease, cerebral or aortic aneurysm, and cerebral vascular accidents (CVA). |
| Assess other medications and diet. | Over-the-counter (OTC) herbal medications, such as garlic, ginger, and horse chestnut, may interact with heparin. Additional medications that may interact or cause increased risk of bleeding include aspirin, NSAIDs, cephalosporins, antithyroid agents, thrombolytics, and probenecids. Foods like green leafy vegetables can alter the therapeutic effect of heparin. |
Device Technology
A jet injector is a medical device used for vaccinations and other subcutaneous injections that uses a high-pressure, narrow stream of fluid to penetrate the skin instead of a hypodermic needle. An example of a flu vaccine approved for administration to adults aged 18-64 is AFLURIA © Quadrivalent. The most common injection-site adverse reactions of the jet injector flu vaccine up to seven days post-vaccination were tenderness, swelling, pain, redness, itching, and bruising.[48] Insulin can also be successfully administered via a jet injector, with research demonstrating improved glucose control because the insulin is spread out over a larger area of tissue and enters the bloodstream faster than when administered by an insulin pen or needle. Patients have indicated preference for insulin delivered by the jet injector compared to the insulin pen or syringe because it is needle-free with less tissue injury and pain as compared to the needle injection.[49] See Figure 18.29[50] for an image comparing insulin delivery devices.

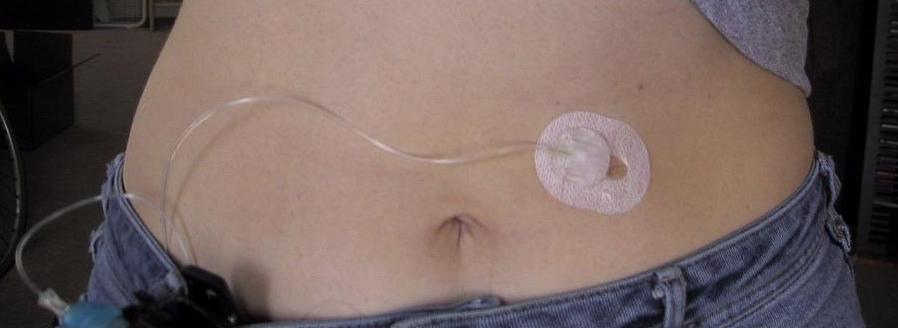
Another type of new technology used to continuously deliver subcutaneous insulin is the insulin pump. Pumps are a computerized device attached to the body, either with tubing or attached to the skin. They are programmed to release small doses of insulin (continuously or as a surge bolus dose) close to mealtime to control the rise in blood sugar after a meal. They work by closely mimicking the body's normal release of insulin. Insulin doses are delivered through a flexible plastic tube called a catheter. With the aid of a small needle, the catheter is inserted through the skin into the fatty tissue and is taped in place.[51] See Figure 18.30[52] for an image of an insulin pump infusion set attached to a patient.
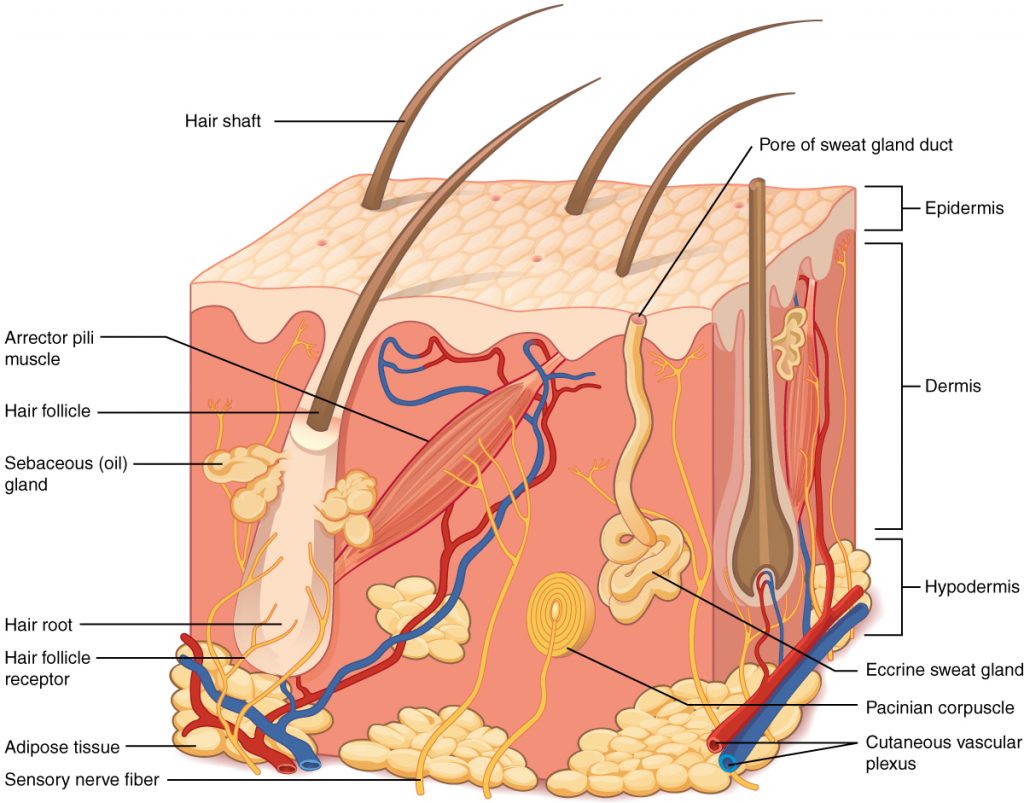
Intradermal injections (ID) are administered into the dermis just below the epidermis. See Figure 18.14[53] for an image of the layers of the skin. Intradermal (ID) injections have the longest absorption time of all parenteral routes because there are fewer blood vessels and no muscle tissue. These types of injections are used for sensitivity testing because the patient’s reaction is easy to visualize and the degree of reaction can be assessed. Examples of intradermal injections include tuberculosis (TB) and allergy testing.[54]
Anatomic Sites
The most common anatomical sites used for intradermal injections are the inner surface of the forearm and the upper back below the scapula. The nurse should select an injection site that is free from lesions, rashes, moles, or scars that may alter the visual inspection of the test results. See Figure 18.15[55] for an image of the nurse inspecting a patient’s forearm site prior to injection.

Description of Procedure
Clean the site with an alcohol swab or antiseptic swab for 30 seconds using a firm, circular motion. Allow the site to dry. Allowing the skin to dry prevents introducing alcohol into the tissue, which can be irritating and uncomfortable.[56]
Use a tuberculin syringe, calibrated in tenths and hundredths of a milliliter, with a needle length of 1/4 inches to 1/2 inches and a gauge of 26 or 27.[57] See Figure 18.16[58] for an image of a tuberculin syringe. Remove the cap from the needle by pulling it off in a straight motion. A straight motion helps prevent needlestick injury.

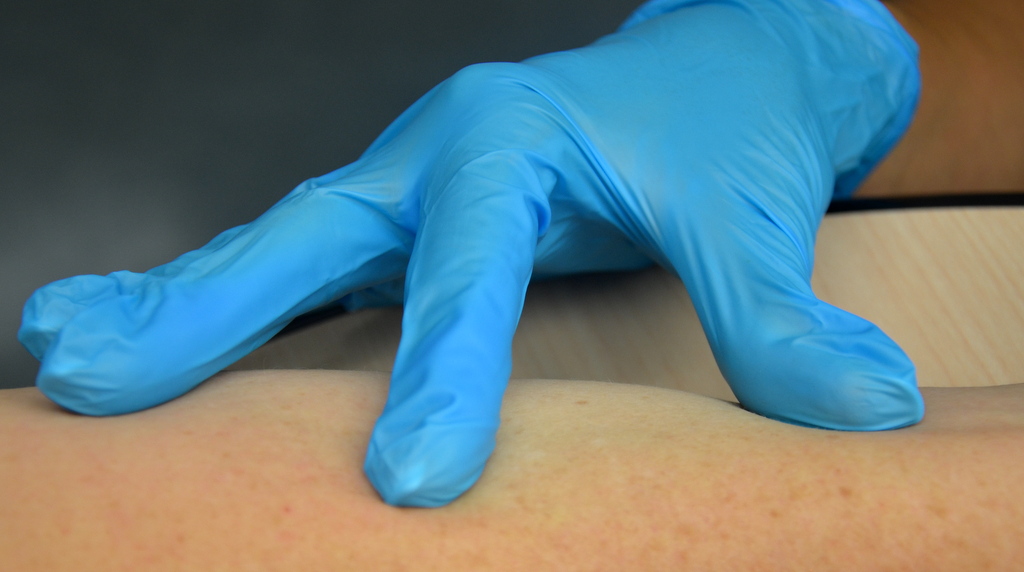
The dosage of an intradermal injection is usually under 0.5 mL, and the angle of administration for an ID injection is 5 to 15 degrees. Using your nondominant hand, spread the skin taut over the injection site. Taut skin provides easy entrance for the needle and is also important to do for older adults, whose skin is less elastic. See Figure 18.17[59] of an image of a nurse holding the skin taut prior to injection.[60]
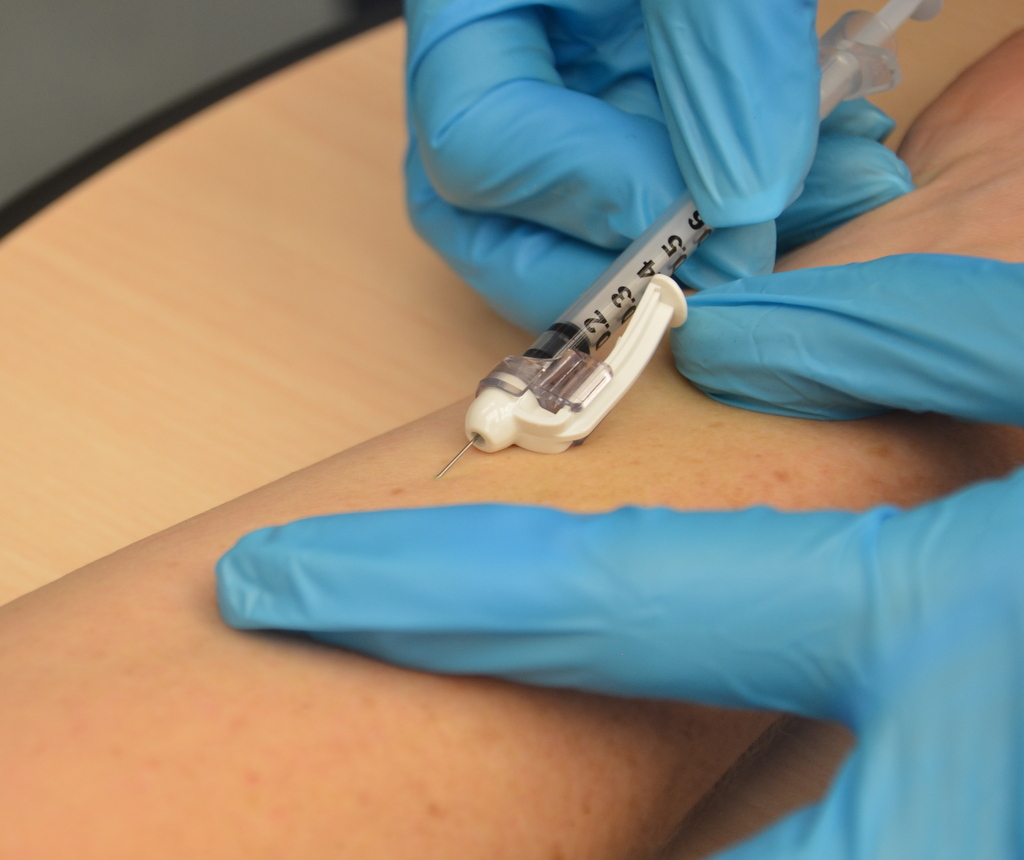
Hold the syringe in the dominant hand between the thumb and forefinger, with the bevel of the needle up at a 5- to 15-degree angle at the selected site. Place the needle almost flat against the patient’s skin, bevel side up, and insert the needle into the skin. Keeping the bevel side up allows for smooth piercing of the skin and induction of the medication into the dermis. Advance the needle no more than an eighth of an inch to cover the bevel. Once the syringe is in place, use the thumb of the nondominant hand to push on the plunger to slowly inject the medication.[61] See Figure 18.18[62] for an image of a nurse administering an intradermal injection.
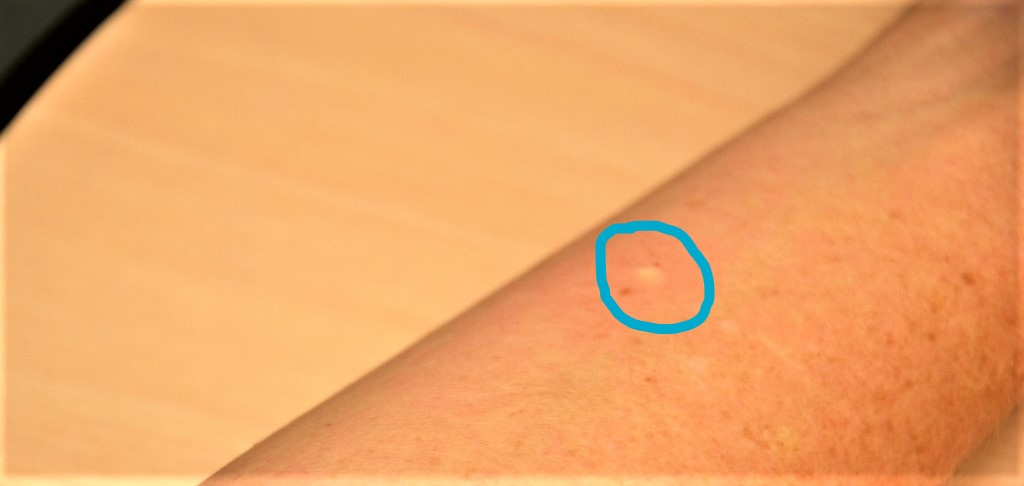
After the ID injection is completed, a bleb (small blister) should appear under the skin. The presence of the bleb indicates that the medication has been correctly placed in the dermis. See Figure 18.19[63] for an image of a bleb.
Carefully withdraw the needle out of the insertion site using the same angle it was placed so as not to disturb the bleb. Withdrawing at the same angle as insertion also minimizes discomfort to the patient and damage to the tissue. Do not massage or cover the site. Massaging the area may spread the solution to the underlying subcutaneous tissue. Discard the syringe in the sharps container. If administering a TB test, advise the patient to return for a reading in 48-72 hours. Discard used supplies, remove gloves, perform hand hygiene, and document.[64]
The neurological aspect of motor function is based on the activities of the cerebellum. The cerebellum is responsible for equilibrium, coordination, and the smoothness of movement. Specific tests used to evaluate cerebellar function include assessment of gait and balance, pronator drift, the finger-to-nose test, rapid alternating action, and the heel-to-shin test.
Gait and Balance
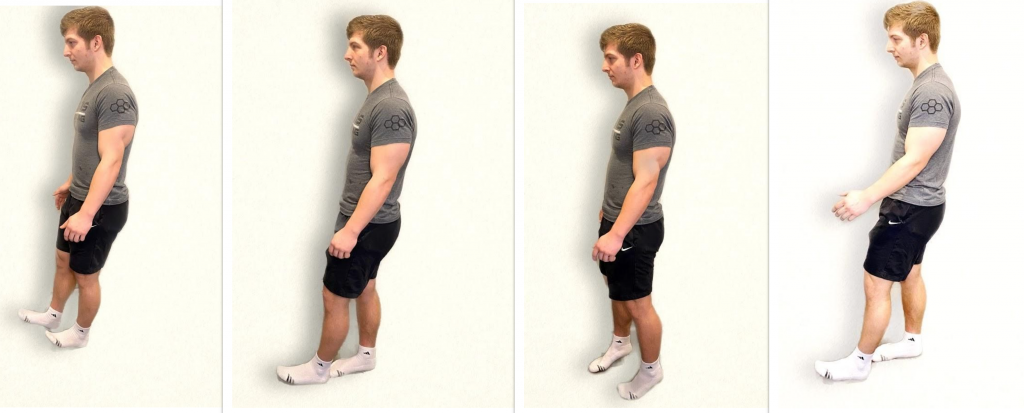
When assessing gait and balance, ask the patient to perform the following actions, using an assistive device if needed:
- Walk 10 feet, pivot, and walk back
- Look straight ahead and walk heel to toe
- Walk on tiptoes
- Walk on heels
Steps should be equal with a regular pace while arms are swinging and coordinated with walking. Balance should be maintained. A change in gait, weakness, shuffling, jerky movements, loss of balance, or incoordination of arm swing can indicate a neurological dysfunction. See Figure 6.32[65] for an image of assessing gait and balance.
Pronator Drift
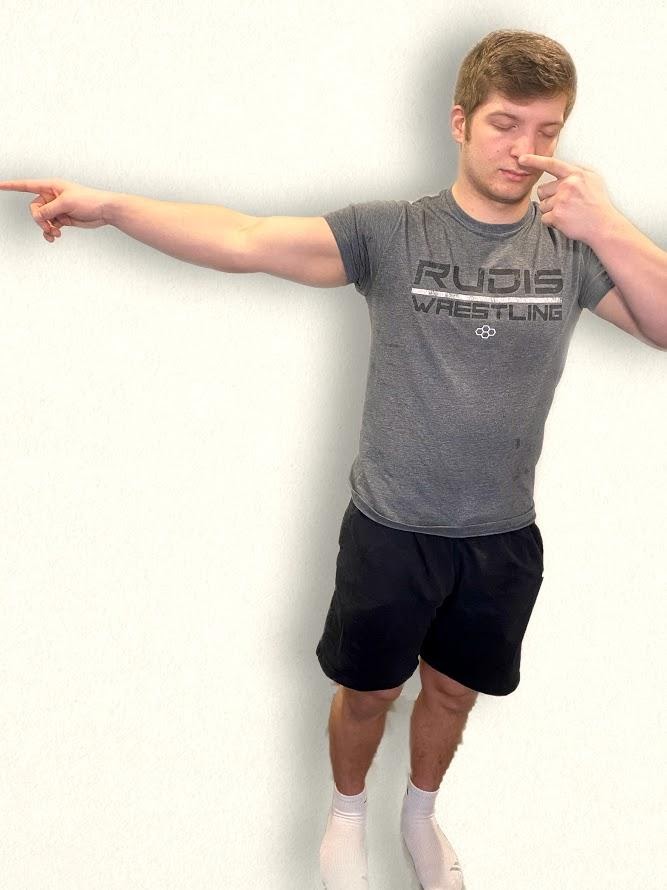
Assessing for pronator drift helps to detect mild upper limb weakness. Ask the patient to close their eyes and extend both arms at 90 degrees at shoulder level with the palms facing upwards. The patient should try to maintain this position for 20 to 30 seconds. Closing the eyes accentuates the effect because the brain is deprived of visual information about the position of the body and must rely on proprioception. Proprioception is the awareness of body position and movement. The expected finding is both arms will maintain this position equally. If the patient is unable to maintain the position, the result is referred to as a positive pronator drift test. Patients with weakness in one arm will not be able to keep the affected arm raised, and ultimately the palm may begin to pronate (palm facing down). In some patients, the arm may remain supinated but will drop lower than the unaffected arm.
Finger-to-Nose Test
The finger-to-nose test assesses equilibrium and coordination. Place the patient in a seated or standing position and ask them to close their eyes. Instruct the patient to extend their arms outward from the sides of the body, and then touch the tip of the nose with the right index finger and return the arm to extended position. Repeat with the left side and continue to repeat touching the nose with alternating movements by both arms.
The expected finding is the patient will smoothly touch the nose with alternating left and right index fingers and return their arms to an extended position repeatedly. An abnormal result occurs when the patient is unable to alternate fingers or demonstrates the inability to touch the nose. For example, the patient may touch the cheek or other part of the face, or movement may be clumsy with stops and restarts. See Figure 6.33[66] for an image of a finger-to-nose test.
Rapid Alternating Action
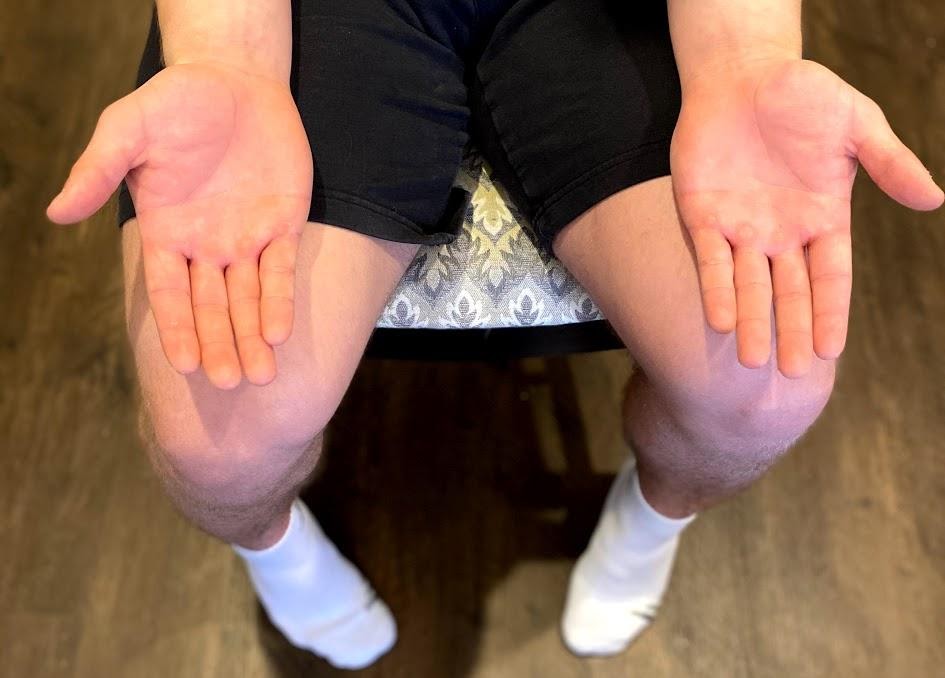
To perform a rapid alternating action test, place the patient in a seated position with palms down on thighs. Ask the patient to turn their hands so their palms face upwards and then quickly return them to a downward position and repeat. Instruct the patient to alternate this movement at a fast pace. The expected finding is the rhythm, rate, and movement are smooth and coordinated as pace increases. An abnormal finding is when the patient is unable to alternate movements or can only do so at a slow pace. See Figure 6.34[67] for an example of the rapid alternating action test.
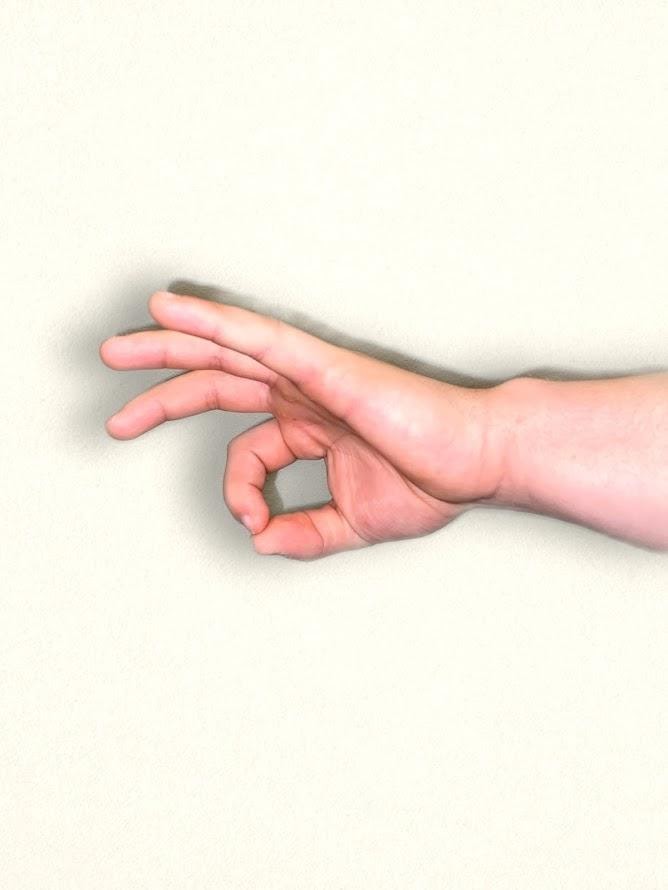
An alternative test is to have the patient touch the thumb to each finger on their hand in sequence and gradually increase the pace. Repeat this test on the other hand. See Figure 6.35[68] for an alternative finger touch test.
Heel-to-Shin Test
To perform a heel-to-shin test, place the patient in a supine position. Ask the patient to place the heel of the right foot just below their left kneecap, and then slide the right heel in a straight line down the shin bone to the ankle. Ask them to repeat this procedure on the left leg. The expected action is a smooth and straight movement of both legs. An abnormal finding is if the heel falls off the lower leg or the patient is not able to complete the movement smoothly in a straight motion. See Figure 6.36[69] for an image of the heel-to-shin test.

Visit Stanford Medicine 25's "Cerebellum Exam" video on YouTube for a review of cerebellar exam.[70]

