9.3 Cardiovascular Assessment
Open Resources for Nursing (Open RN)
A thorough assessment of the heart provides valuable information about the function of a patient’s cardiovascular system. Understanding how to properly assess the cardiovascular system and identifying both normal and abnormal assessment findings will allow the nurse to provide quality, safe care to the patient.
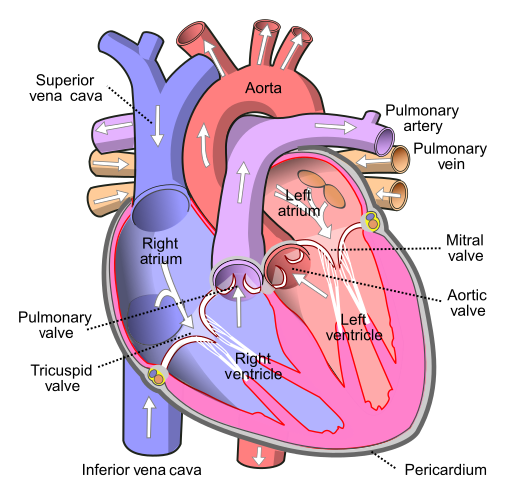
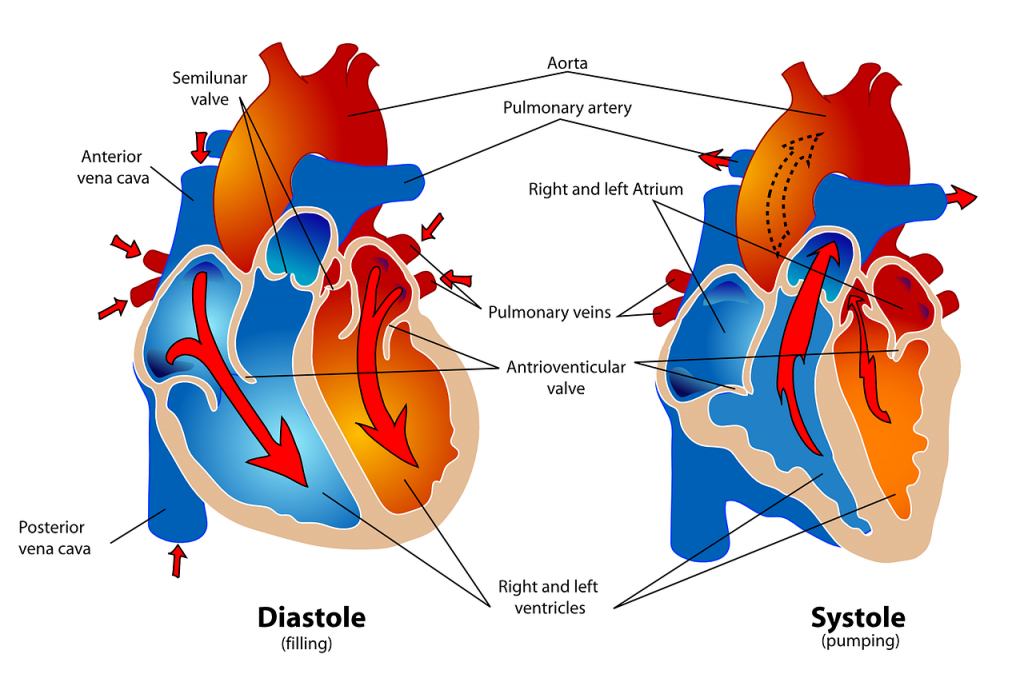
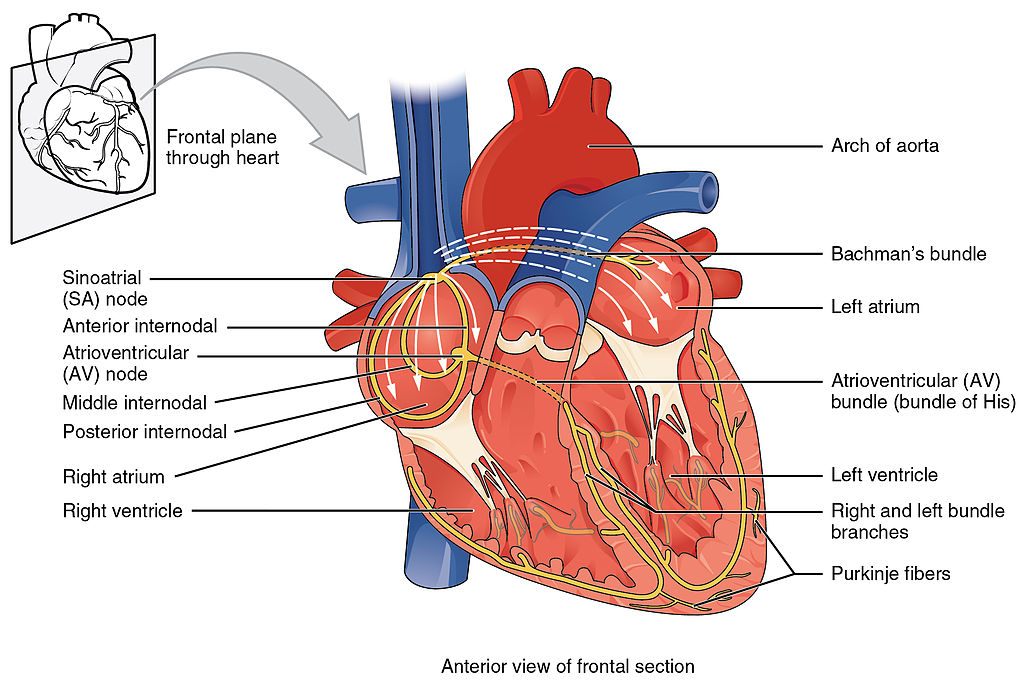
Before assessing a patient’s cardiovascular system, it is important to understand the various functions of the cardiovascular system. In addition to the information provided in the “Review of Cardiac Basics” section, the following images provide an overview of the cardiovascular system. Figure 9.1[1] provides an overview of the structure of the heart. Note the main cardiac structures are the atria, ventricles, and heart valves. Figure 9.2[2] demonstrates blood flow through the heart. Notice the flow of deoxygenated blood from the posterior and superior vena cava into the right atria and ventricle during diastole (indicated by blue coloring of these structures). The right ventricle then pumps deoxygenated blood to the lungs via the pulmonary artery during systole. At the same time, oxygenated blood from the lungs returns to the left atria and ventricle via the pulmonary veins during diastole (indicated by red coloring of these structures) and then is pumped out to the body via the aorta during systole. Figure 9.3[3] demonstrates the conduction system of the heart. This image depicts the conduction pathway through the heart as the tissue responds to electrical stimulation. Figure 9.4[4] illustrates the arteries of the circulatory system, and Figure 9.5[5] depicts the veins of the circulatory system. The purpose of these figures is to facilitate understanding of the electrical and mechanical function of the heart within the cardiovascular system.


Assessing the cardiovascular system includes performing several subjective and objective assessments. At times, assessment findings are modified according to life span considerations.
Subjective Assessment
The subjective assessment of the cardiovascular and peripheral vascular system is vital for uncovering signs of potential dysfunction. To complete the subjective cardiovascular assessment, the nurse begins with a focused interview. The focused interview explores past medical and family history, medications, cardiac risk factors, and reported symptoms. Symptoms related to the cardiovascular system include chest pain, peripheral edema, unexplained sudden weight gain, shortness of breath (dyspnea), irregular pulse rate or rhythm, dizziness, or poor peripheral circulation. Any new or worsening symptoms should be documented and reported to the health care provider.
Table 9.3a outlines questions used to assess symptoms related to the cardiovascular and peripheral vascular systems. Table 9.3b outlines questions used to assess medical history, medications, and risk factors related to the cardiovascular system. Information obtained from the interview process is used to tailor future patient education by the nurse.[6],[7],[8]
Table 9.3a Interview Questions for Cardiovascular and Peripheral Vascular Systems[9]
| Symptom | Question |
Follow-Up Safety Note: If findings indicate current severe symptoms suggestive of myocardial infarction or another critical condition, suspend the remaining cardiovascular assessment and obtain immediate assistance according to agency policy or call 911. |
|---|---|---|
| Chest Pain | Have you had any pain or pressure in your chest, neck, or arm? | Review how to assess a patient’s chief complaint using the PQRSTU method in the “Health History” chapter.
|
| Shortness of Breath
(Dyspnea) |
Do you ever feel short of breath with activity?
Do you ever feel short of breath while sleeping? Do you feel short of breath when lying flat? |
What level of activity elicits shortness of breath?
How long does it take you to recover? Have you ever woken up from sleeping feeling suddenly short of breath How many pillows do you need to sleep, or do you sleep in a chair (orthopnea)? Has this recently changed? |
| Edema | Have you noticed swelling of your feet or ankles?
Have you noticed your rings, shoes, or clothing feel tight at the end of the day? Have you noticed any unexplained, sudden weight gain? Have you noticed any new abdominal fullness? |
Has this feeling of swelling or restriction gotten worse?
Is there anything that makes the swelling better (e.g., sitting with your feet elevated)? How much weight have you gained? Over what time period have you gained this weight? |
| Palpitations | Have you ever noticed your heart feels as if it is racing or “fluttering” in your chest?
Have you ever felt as if your heart “skips” a beat? |
Are you currently experiencing palpitations?
When did palpitations start? Have you previously been treated for palpitations? If so, what treatment did you receive? |
| Dizziness
(Syncope) |
Do you ever feel light-headed?
Do you ever feel dizzy? Have you ever fainted? |
Can you describe what happened?
Did you have any warning signs? Did this occur with position change? |
| Poor Peripheral Circulation | Do your hands or feet ever feel cold or look pale or bluish?
Do you have pain in your feet or lower legs when exercising? |
What, if anything, brings on these symptoms?
How much activity is needed to cause this pain? Is there anything, such as rest, that makes the pain better? |
| Calf Pain | Do you currently have any constant pain in your lower legs? | Can you point to the area of pain with one finger? |
Table 9.3b Interview Questions Exploring Cardiovascular Medical History, Medications, and Cardiac Risk Factors
| Topic | Questions |
|---|---|
| Medical History | Have you ever been diagnosed with any heart or circulation conditions, such as high blood pressure, coronary artery disease, peripheral vascular disease, high cholesterol, heart failure, or valve problems?
Have you had any procedures done to improve your heart function, such as ablation or stent placement? Have you ever had a heart attack or stroke? |
| Medications | Do you take any heart-related medications, herbs, or supplements to treat blood pressure, chest pain, high cholesterol, cardiac rhythm, fluid retention, or the prevention of clots? |
| Cardiac Risk Factors | Have your parents or siblings been diagnosed with any heart conditions?
Do you smoke or vape?
If you do not currently smoke, have you smoked in the past?
Are you physically active during the week?
What does a typical day look like in your diet?
Do you drink alcoholic drinks?
Would you say you experience stress in your life?
How many hours of sleep do you normally get each day?
|
Objective Assessment
The physical examination of the cardiovascular system involves the interpretation of vital signs, inspection, palpation, and auscultation of heart sounds as the nurse evaluates for sufficient perfusion and cardiac output.
Equipment needed for a cardiovascular assessment includes a stethoscope, penlight, centimeter ruler or tape measure, and sphygmomanometer.[10]
Evaluate Vital Signs and Level of Consciousness
Interpret the blood pressure and pulse readings to verify the patient is stable before proceeding with the physical exam. Assess the level of consciousness; the patient should be alert and cooperative.
Inspection
- Skin color to assess perfusion. Inspect the face, lips, and fingertips for cyanosis or pallor. Cyanosis is a bluish discoloration of the skin, lips, and nail beds and indicates decreased perfusion and oxygenation. Pallor is the loss of color, or paleness of the skin or mucous membranes, as a result of reduced blood flow, oxygenation, or decreased number of red blood cells. Patients with light skin tones should be pink in color. For those with darker skin tones, assess for pallor on the palms, conjunctiva, or inner aspect of the lower lip.
- Jugular Vein Distension (JVD). Inspect the neck for JVD that occurs when the increased pressure of the superior vena cava causes the jugular vein to bulge, making it most visible on the right side of a person’s neck. JVD should not be present in the upright position or when the head of bed is at 30-45 degrees.
- Precordium for abnormalities. Inspect the chest area over the heart (also called precordium) for deformities, scars, or any abnormal pulsations the underlying cardiac chambers and great vessels may produce.
- Extremities:
- Upper Extremities: Inspect the fingers, arms, and hands bilaterally noting Color, Warmth, Movement, Sensation (CWMS). Alterations or bilateral inconsistency in CWMS may indicate underlying conditions or injury. Assess capillary refill by compressing the nail bed until it blanches and record the time taken for the color to return to the nail bed. Normal capillary refill is less than 3 seconds.[11]
- Lower Extremities: Inspect the toes, feet, and legs bilaterally, noting CWMS, capillary refill, and the presence of peripheral edema, superficial distended veins, and hair distribution. Document the location and size of any skin ulcers.
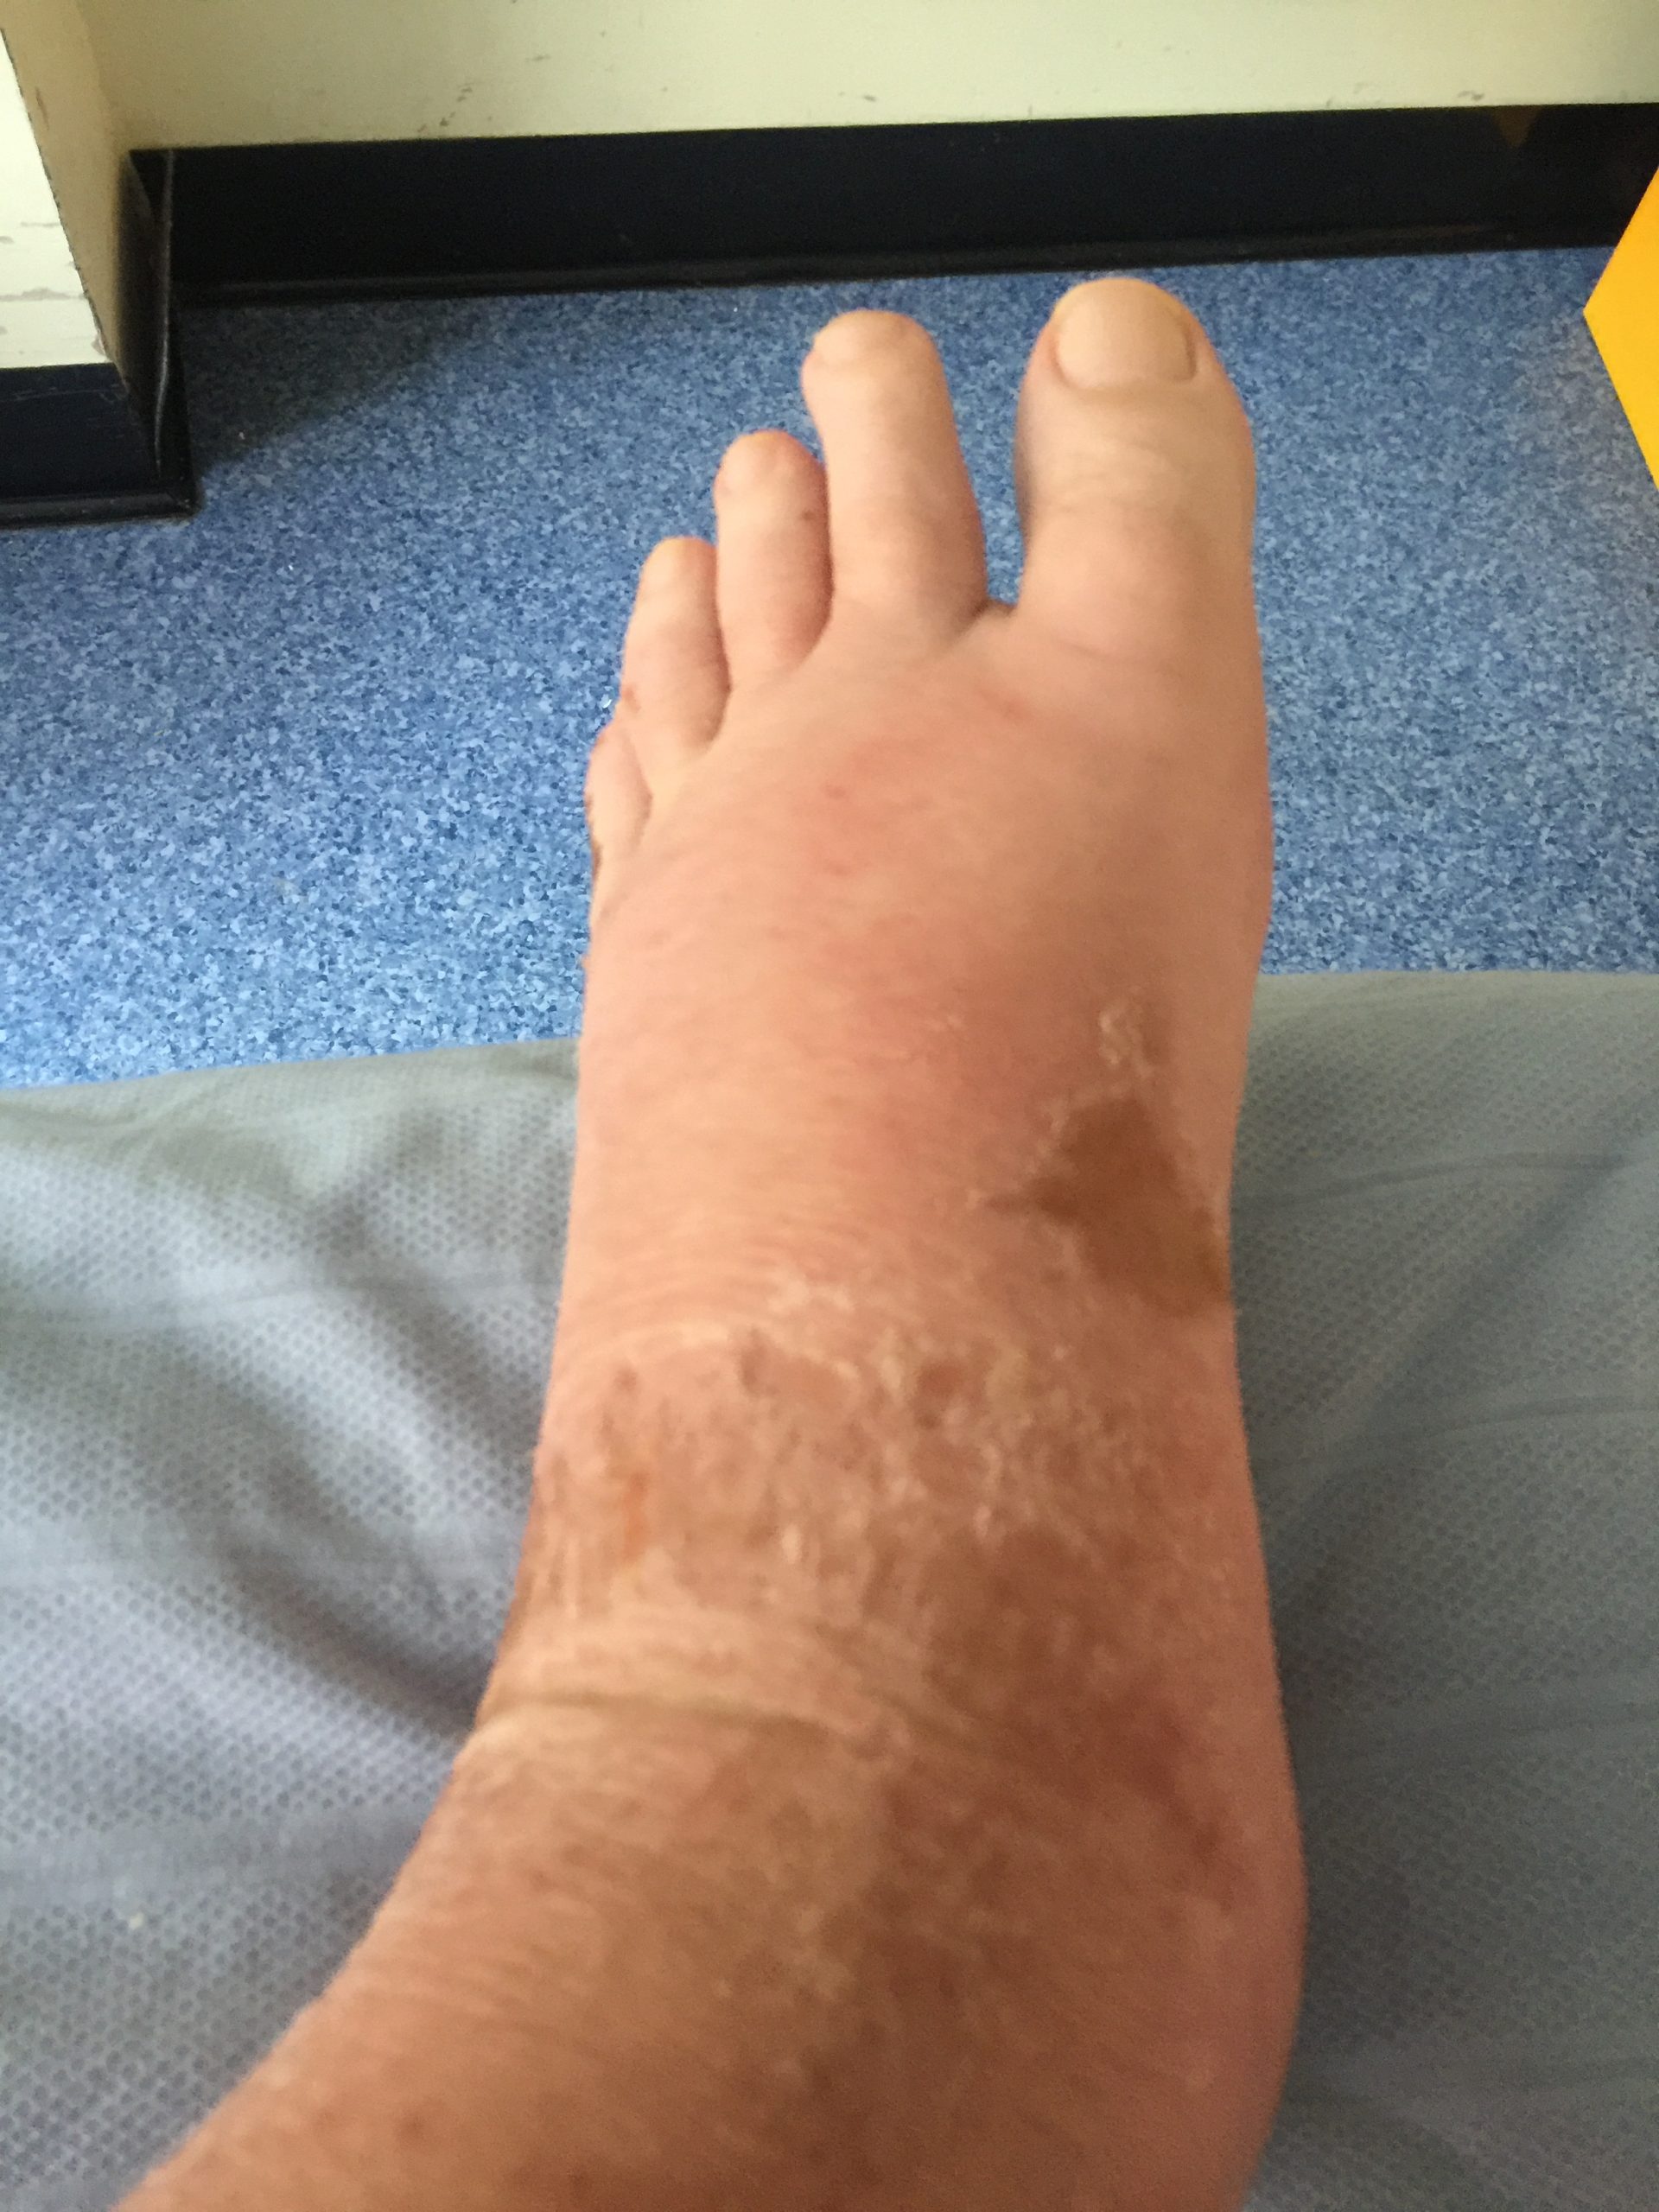
- Edema: Note any presence of edema. Peripheral edema is swelling that can be caused by infection, thrombosis, or venous insufficiency due to an accumulation of fluid in the tissues. (See Figure 9.6[12] for an image of pedal edema.)[13]
- Deep Vein Thrombosis (DVT): A deep vein thrombosis (DVT) is a blood clot that forms in a vein deep in the body. DVT requires emergency notification of the health care provider and immediate follow-up because of the risk of developing a life-threatening pulmonary embolism.[14] Inspect the lower extremities bilaterally. Assess for size, color, temperature, and for presence of pain in the calves. Unilateral warmth, redness, tenderness, swelling in the calf, or sudden onset of intense, sharp muscle pain that increases with dorsiflexion of the foot is an indication of a deep vein thrombosis (DVT).[15] See Figure 9.7[16] for an image of a DVT in the patient’s right leg, indicated by unilateral redness and edema.

Auscultation
Heart Sounds
Auscultation is routinely performed over five specific areas of the heart to listen for corresponding valvular sounds. These auscultation sites are often referred to by the mnemonic “APE To Man,” referring to Aortic, Pulmonic, Erb’s point, Tricuspid, and Mitral areas (see Figure 9.8[17] for an illustration of cardiac auscultation areas). The aortic area is the second intercostal space to the right of the sternum. The pulmonary area is the second intercostal space to the left of the sternum. Erb’s point is directly below the aortic area and located at the third intercostal space to the left of the sternum. The tricuspid (or parasternal) area is at the fourth intercostal space to the left of the sternum. The mitral (also called apical or left ventricular area) is the fifth intercostal space at the midclavicular line.
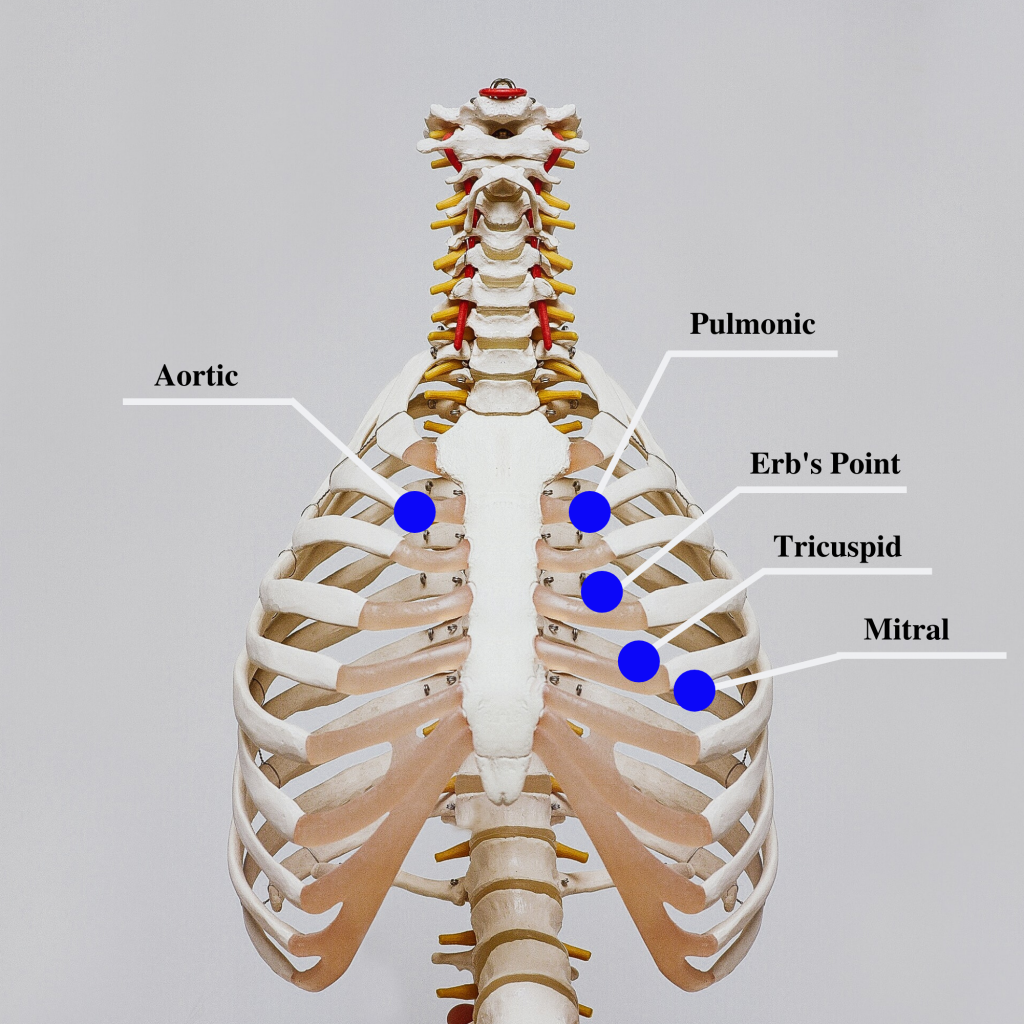
Auscultation usually begins at the aortic area (upper right sternal edge). Use the diaphragm of the stethoscope to carefully identify the S1 and S2 sounds. They will make a “lub-dub” sound. Note that when listening over the area of the aortic and pulmonic valves, the “dub” (S2) will sound louder than the “lub” (S2). Move the stethoscope sequentially to the pulmonic area (upper left sternal edge), Erb’s point (left third intercostal space at the sternal border), and tricuspid area (fourth intercostal space. When assessing the mitral area for female patients, it is often helpful to ask them to lift up their breast tissue so the stethoscope can be placed directly on the chest wall. Repeat this process with the bell of the stethoscope. The apical pulse should be counted over a 60-second period. For an adult, the heart rate should be between 60 and 100 with a regular rhythm to be considered within normal range. The apical pulse is an important assessment to obtain before the administration of many cardiac medications.
The first heart sound (S1) identifies the onset of systole, when the atrioventricular (AV) valves (mitral and tricuspid) close and the ventricles contract and eject the blood out of the heart. The second heart sound (S2) identifies the end of systole and the onset of diastole when the semilunar valves close, the AV valves open, and the ventricles fill with blood. When auscultating, it is important to identify the S1 (“lub”) and S2 (“dub”) sounds, evaluate the rate and rhythm of the heart, and listen for any extra heart sounds.
![]() Auscultating Heart Sounds
Auscultating Heart Sounds
- To effectively auscultate heart sounds, patient repositioning may be required. Ask the patient to lean forward if able, or position them to lie on their left side.
- It is common to hear lung sounds when auscultating the heart sounds. It may be helpful to ask the patient to briefly hold their breath if lung sounds impede adequate heart auscultation. Limit the holding of breath to 10 seconds or as tolerated by the patient.
- Environmental noise can cause difficulty in auscultating heart sounds. Removing environmental noise by turning down the television volume or shutting the door may be required for an accurate assessment.
- Patients may try to talk to you as you are assessing their heart sounds. It is often helpful to explain the procedure such as, “I am going to take a few minutes to listen carefully to the sounds of blood flow going through your heart. Please try not to speak while I am listening, so I can hear the sounds better.”
Extra Heart Sounds
Extra heart sounds include clicks, murmurs, S3 and S4 sounds, and pleural friction rubs. These extra sounds can be difficult for a novice to distinguish, so if you notice any new or different sounds, consult an advanced practitioner or notify the provider. A midsystolic click, associated with mitral valve prolapse, may be heard with the diaphragm at the apex or left lower sternal border.
A click may be followed by a murmur. A murmur is a blowing or whooshing sound that signifies turbulent blood flow often caused by a valvular defect. New murmurs not previously recorded should be immediately communicated to the health care provider. In the aortic area, listen for possible murmurs of aortic stenosis and aortic regurgitation with the diaphragm of the stethoscope. In the pulmonic area, listen for potential murmurs of pulmonic stenosis and pulmonary and aortic regurgitation. In the tricuspid area, at the fourth and fifth intercostal spaces along the left sternal border, listen for the potential murmurs of tricuspid regurgitation, tricuspid stenosis, or ventricular septal defect.
S3 and S4 sounds, if present, are often heard best by asking the patient to lie on their left side and listening over the apex with the bell of the stethoscope. An S3 sound, also called a ventricular gallop, occurs with fluid overload or heart failure when the ventricles are filling. It occurs after the S2 and sounds like “lub-dub-dah,” or a sound similar to a horse galloping. The S4 sound, also called atrial gallop, occurs immediately before the S1 and sounds like “ta-lub-dub.” An S4 sound can occur with decreased ventricular compliance or coronary artery disease.[18]
A pleural friction rub is caused by inflammation of the pericardium and sounds like sandpaper being rubbed together. It is best heard at the apex or left lower sternal border with the diaphragm as the patient sits up, leans forward, and holds their breath.
Carotid Sounds
The carotid artery may be auscultated for bruits. Bruits are a swishing sound due to turbulence in the blood vessel and may be heard due to atherosclerotic changes.
Palpation
Palpation is used to evaluate peripheral pulses, capillary refill, and for the presence of edema. When palpating these areas, also pay attention to the temperature and moisture of the skin.
Pulses
Compare the rate, rhythm, and quality of arterial pulses bilaterally, including the carotid, radial, brachial, posterior tibialis, and dorsalis pedis pulses. Review additional information about obtaining pulses in the “General Survey” chapter. Bilateral comparison for all pulses (except the carotid) is important for determining subtle variations in pulse strength. Carotid pulses should be palpated on one side at a time to avoid decreasing perfusion of the brain. The posterior tibial artery is located just behind the medial malleolus. It can be palpated by scooping the patient’s heel in your hand and wrapping your fingers around so that the tips come to rest on the appropriate area just below the medial malleolus. The dorsalis pedis artery is located just lateral to the extensor tendon of the big toe and can be identified by asking the patient to flex their toe while you provide resistance to this movement. Gently place the tips of your second, third, and fourth fingers adjacent to the tendon, and try to feel the pulse.
The quality of the pulse is graded on a scale of 0 to 3, with 0 being absent pulses, 1 being decreased pulses, 2 is within normal range, and 3 being increased (also referred to as “bounding”). If unable to palpate a pulse, additional assessment is needed. First, determine if this is a new or chronic finding. Second, if available, use a doppler ultrasound to determine the presence or absence of the pulse. Many agencies use doppler ultrasound to document if a nonpalpable pulse is present. If the pulse is not found, this could be a sign of an emergent condition requiring immediate follow-up and provider notification. See Figures 9.9[19] and 9.10[20] for images of assessing pedal pulses.


Capillary Refill
The capillary refill test is performed on the nail beds to monitor perfusion, the amount of blood flow to tissue. Pressure is applied to a fingernail or toenail until it pales, indicating that the blood has been forced from the tissue under the nail. This paleness is called blanching. Once the tissue has blanched, pressure is removed. Capillary refill time is defined as the time it takes for the color to return after pressure is removed. If there is sufficient blood flow to the area, a pink color should return within 2 to 3 seconds after the pressure is removed.[21]
Edema
Edema occurs when one can visualize visible swelling caused by a buildup of fluid within the tissues. If edema is present on inspection, palpate the area to determine if the edema is pitting or nonpitting. Press on the skin to assess for indentation, ideally over a bony structure, such as the tibia. If no indentation occurs, it is referred to as nonpitting edema. If indentation occurs, it is referred to as pitting edema. See Figure 9.11[22] for images demonstrating pitting edema.
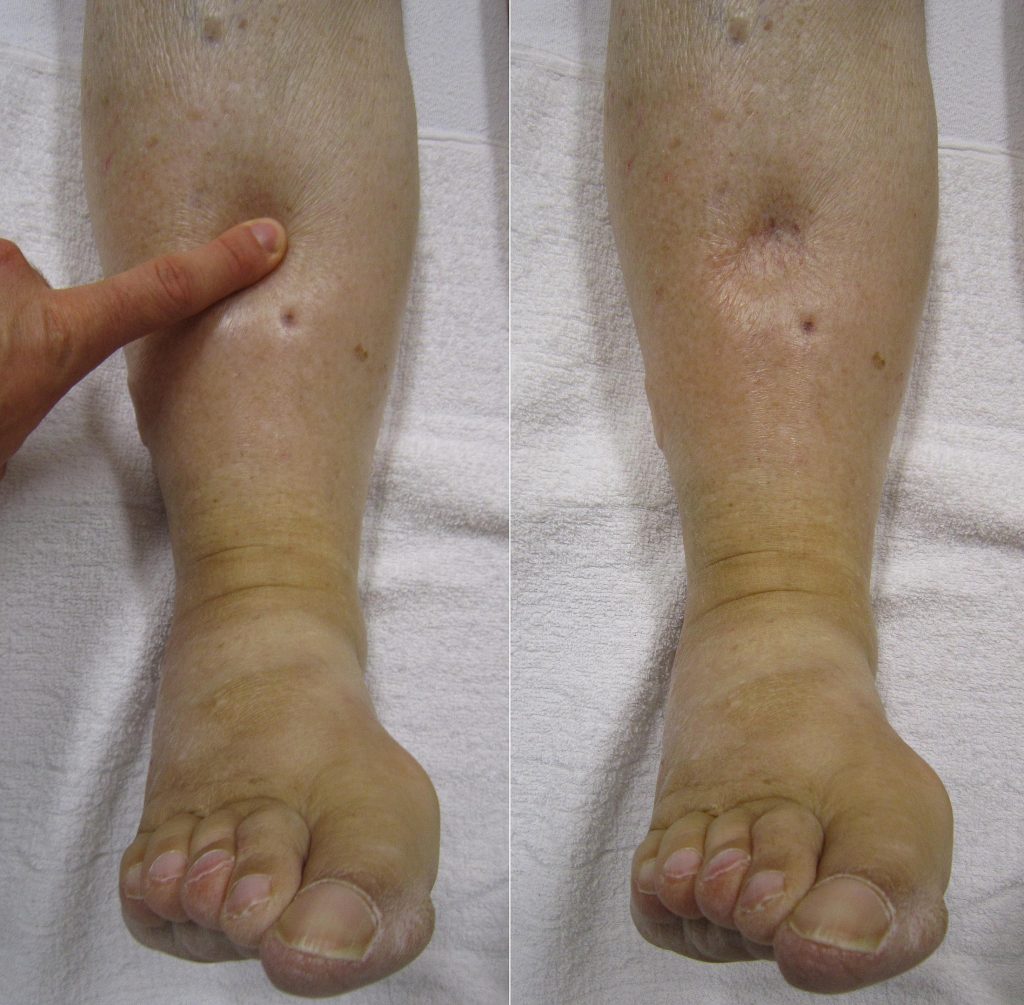
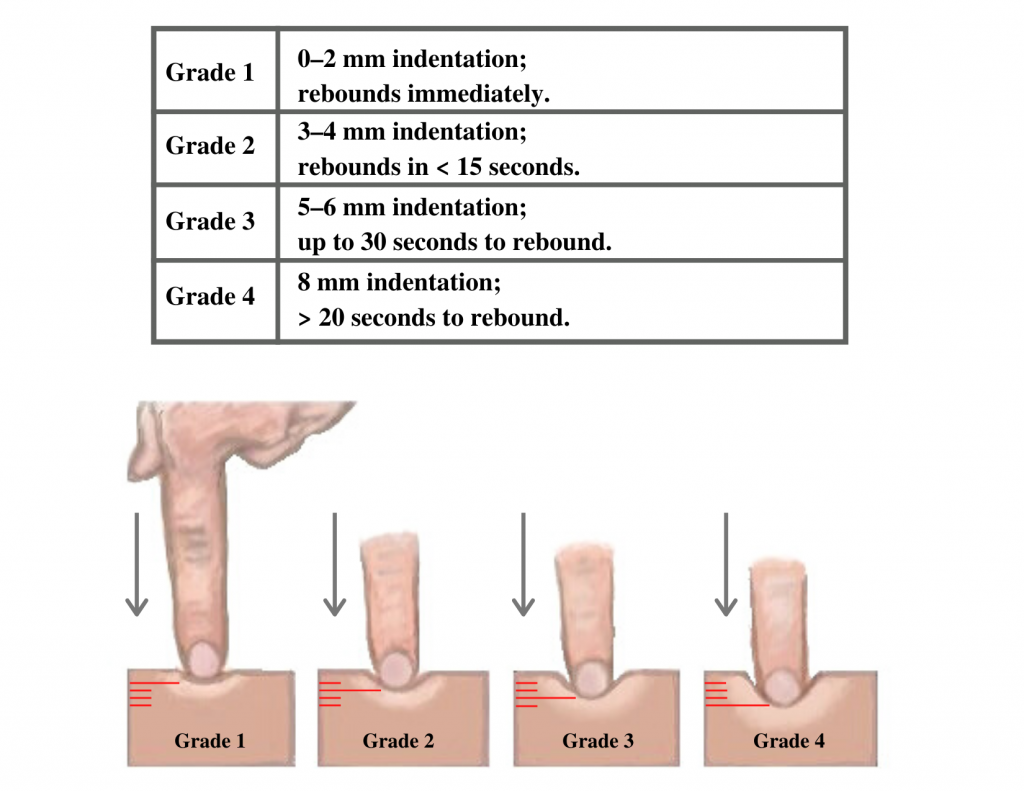
Note the depth of the indention and how long it takes for the skin to rebound back to its original position. The indentation and time required to rebound to the original position are graded on a scale from 1 to 4. Edema rated at 1+ indicates a barely detectable depression with immediate rebound, and 4+ indicates a deep depression with a time lapse of over 20 seconds required to rebound. See Figure 9.12[23] for an illustration of grading edema. Additionally, it is helpful to note edema may be difficult to observe in larger patients. It is also important to monitor for sudden changes in weight, which is considered a probable sign of fluid volume overload.
Heaves or Thrills
You may observe advanced practice nurses and other health care providers palpating the anterior chest wall to detect any abnormal pulsations the underlying cardiac chambers and great vessels may produce. Precordial movements should be evaluated at the apex (mitral area). It is best to examine the precordium with the patient supine because if the patient is turned on the left side, the apical region of the heart is displaced against the lateral chest wall, distorting the chest movements.[24] A heave or lift is a palpable lifting sensation under the sternum and anterior chest wall to the left of the sternum that suggests severe right ventricular hypertrophy. A thrill is a vibration felt on the skin of the precordium or over an area of turbulence, such as an arteriovenous fistula or graft.
Life Span Considerations
The cardiovascular assessment and expected findings should be modified according to common variations across the life span.
Infants and Children
A murmur may be heard in a newborn in the first few days of life until the ductus arteriosus closes.
When assessing the cardiovascular system in children, it is important to assess the apical pulse. Parameters for expected findings vary according to age group. After a child reaches adolescence, a radial pulse may be assessed. Table 9.3c outlines the expected apical pulse rate by age.
Table 9.3c Expected Apical Pulse by Age
| Age Group | Heart Rate |
|---|---|
| Preterm | 120-180 |
| Newborn (0 to 1 month) | 100-160 |
| Infant (1 to 12 months) | 80-140 |
| Toddler (1 to 3 years) | 80-130 |
| Preschool (3 to 5 years) | 80-110 |
| School Age (6 to 12 years) | 70-100 |
| Adolescents (13 to 18 years) | 60-90 |
Older Adults
In adults over age 65, irregular heart rhythms and extra sounds are more likely. An “irregularly irregular” rhythm suggests atrial fibrillation, and further investigation is required if this is a new finding. See the hyperlink in the box below for more information about atrial fibrillation.
Expected Versus Unexpected Findings
After completing a cardiovascular assessment, it is important for the nurse to use critical thinking to determine if any findings require follow-up. Depending on the urgency of the findings, follow-up can range from calling the health care provider to calling the rapid response team. Table 9.3d compares examples of expected findings, meaning those considered within normal limits, to unexpected findings, which require follow-up. Critical conditions are those that should be reported immediately and may require notification of a rapid response team.
Table 9.3d Expected Versus Unexpected Findings on Cardiac Assessment
| Assessment | Expected Findings | Unexpected Findings (Document and notify the provider if this is a new finding*) |
|---|---|---|
| Inspection | Apical impulse may or may not be visible | Scars not previously documented that could indicate prior cardiac surgeries
Heave or lift observed in the precordium Chest anatomy malformations |
| Palpation | Apical pulse felt over midclavicular fifth intercostal space | Apical pulse felt to the left of the midclavicular fifth intercostal space
Additional movements over precordium such as a heave, lift, or thrill |
| Auscultation | S1 and S2 heart sounds in a regular rhythm | New irregular heart rhythm
Extra heart sounds such as a murmur, S3, or S4 |
| *CRITICAL CONDITIONS to report immediately | Symptomatic tachycardia at rest (HR>100 bpm)
Symptomatic bradycardia (HR<60 bpm) New systolic blood pressure (<100 mmHg) Orthostatic blood pressure changes (see “Blood Pressure” chapter for more information) New irregular heart rhythm New extra heart sounds such as a murmur, S3, or S4 New abnormal cardiac rhythm changes Reported chest pain, calf pain, or worsening shortness of breath |
See Table 9.3e for a comparison of expected versus unexpected findings when assessing the peripheral vascular system.
Table 9.3e Expected Versus Unexpected Peripheral Vascular Assessment Findings
| Assessment | Expected Findings | Unexpected Findings (Document or notify provider if new finding*) |
|---|---|---|
| Inspection | Skin color uniform and appropriate for race bilaterally
Equal hair distribution on upper and lower extremities Absence of jugular vein distention (JVD) Absence of edema Sensation and movement of fingers and toes intact |
Cyanosis or pallor, indicating decreased perfusion
Decreased or unequal hair distribution Presence of jugular vein distention (JVD) in an upright position or when head of bed is 30-45 degrees New or worsening edema Rapid and unexplained weight gain Impaired movement or sensation of fingers and toes |
| Palpation | Skin warm and dry
Pulses present and equal bilaterally Absence of edema Capillary refill less than 2 seconds |
Skin cool, excessively warm, or diaphoretic
Absent, weak/thready, or bounding pulses New irregular pulse New or worsening edema Capillary refill greater than 2 seconds Unilateral warmth, redness, tenderness, or edema, indicating possible deep vein thrombosis (DVT) |
| Auscultation | Carotid pulse | Carotid bruit |
| *CRITICAL CONDITIONS to report immediately | Cyanosis
Absent pulse (and not heard using Doppler device) Capillary refill time greater than 3 seconds Unilateral redness, warmth, and edema, indicating a possible deep vein thrombosis (DVT) |
“Sternum_composition.png” by Anatomography is licensed under CC BY-SA 2.1 Japan
“Sternum_composition.png” by Anatomography is licensed under CC BY-SA 2.1 Japan
- “Diagram of the human heart” by Wapcaplet is licensed under CC BY-SA 3.0 ↵
- “Diagram of the human heart” by Wapcaplet is licensed under CC BY-SA 3.0 ↵
- “2018 Conduction System of Heart.jpg” by OpenStax is licensed under CC-BY-3.0. ↵
- “Arterial System en.svg” by LadyofHats, Mariana Ruiz Villarreal is in the Public Domain ↵
- “Venous system en.svg” by Lady of Hats Mariana Ruiz Vilarreal is in the Public Domain ↵
- This work is a derivative of Clinical Procedures for Safer Patient Care by British Columbia Institute of Technology licensed under CC BY 4.0 ↵
- Felner, J. M. (1990). An overview of the cardiovascular system. In Walker, H. K., Hall, W. D., & Hurst, J. W. (Eds.), Clinical methods: The history, physical, and laboratory examinations (3rd ed., Chapter 7). Butterworths. https://www.ncbi.nlm.nih.gov/books/NBK393/ ↵
- Scott, C. & MacInnes, J. D. (2013, September 27). Cardiac patient assessment: putting the patient first. British Journal of Nursing, 15(9). https://doi.org/10.12968/bjon.2006.15.9.21091 ↵
- Scott, C. & MacInnes, J. D. (2013, September 27). Cardiac patient assessment: putting the patient first. British Journal of Nursing, 15(9). https://doi.org/10.12968/bjon.2006.15.9.21091 ↵
- Felner, J. M. (1990). An overview of the cardiovascular system. In Walker, H. K., Hall, W. D., & Hurst, J. W. (Eds.), Clinical methods: The history, physical, and laboratory examinations (3rd ed., Chapter 7). Butterworths. https://www.ncbi.nlm.nih.gov/books/NBK393/ ↵
- This work is a derivative of Clinical Procedures for Safer Patient Care by British Columbia Institute of Technology licensed under CC BY 4.0 ↵
- “Swollen feet at Harefield Hospital edema.jpg” by Ryaninuk is licensed under CC BY-SA 4.0 ↵
- Simon, E. C. (2014). Leg edema assessment and management. MEDSURG Nursing, 23(1), 44-53. ↵
- This work is a derivative of Clinical Procedures for Safer Patient Care by British Columbia Institute of Technology licensed under CC BY 4.0 ↵
- This work is a derivative of Clinical Procedures for Safer Patient Care by British Columbia Institute of Technology licensed under CC BY 4.0 ↵
- “Deep vein thrombosis of the right leg.jpg” by James Heilman, MD is licensed under CC BY-SA 3.0 ↵
- “Cardiac Auscultation Areas” by Meredith Pomietlo for Chippewa Valley Technical College is licensed under CC BY 4.0 ↵
- Felner, J. M. (1990). An overview of the cardiovascular system. In Walker, H. K., Hall, W. D., & Hurst, J. W. (Eds.), Clinical methods: The history, physical, and laboratory examinations (3rd ed., Chapter 7). Butterworths. https://www.ncbi.nlm.nih.gov/books/NBK393/ ↵
- “DSC_2277.jpg” by British Columbia Institute of Technology is licensed under CC BY 4.0. Access for free at https://opentextbc.ca/clinicalskills/chapter/2-5-focussed-respiratory-assessment/ ↵
- “DSC_2314.jpg” by British Columbia Institute of Technology is licensed under CC BY 4.0. Access for free at https://opentextbc.ca/clinicalskills/chapter/2-5-focussed-respiratory-assessment/ ↵
- A.D.A.M. Medical Encyclopedia [Internet]. Atlanta (GA): A.D.A.M., Inc.; c1997-2020. Capillary nail refill test; [updated 2020, Aug 9] https://medlineplus.gov/ency/article/003247.htm ↵
- “Combinpedal.jpg” by James Heilman, MD is licensed under CC BY-SA 3.0 ↵
- “Grading of Edema” by Meredith Pomietlo for Chippewa Valley Technical College is licensed under CC BY 4.0 ↵
- Felner, J. M. (1990). An overview of the cardiovascular system. In Walker, H. K., Hall, W. D., & Hurst, J. W. (Eds.), Clinical methods: The history, physical, and laboratory examinations (3rd ed., Chapter 7). Butterworths. https://www.ncbi.nlm.nih.gov/books/NBK393/ ↵
Use the checklist below to review the steps for completion of "Hand Hygiene with Alcohol-Based Hand Sanitizer."
Steps
Disclaimer: Always review and follow agency policy regarding this specific skill.
- Gather supplies (antiseptic hand rub).
- Remove jewelry according to agency policy; push your sleeves above your wrists.
- Apply enough product into the palm of one hand and enough to cover your hands thoroughly, per product directions.
- Rub your hands together, covering all surfaces of your hands and fingers with antiseptic until the alcohol is dry (a minimum of 30 seconds):
- Rub hands palm to palm
- Back of right and left hand (fingers interlaced)
- Palm to palm with fingers interlaced
- Rotational rubbing of left and right thumbs
- Rub your fingertips against the palm of your opposite hand
- Rub your wrists
- Repeat hand sanitizing sequence a minimum of two times.
- Repeat hand sanitizing sequence until the product is dry.
Use the checklist below to review the steps for completion of "Applying and Removing Personal Protective Equipment."[1]
Steps
Disclaimer: Always review and follow agency policy regarding this specific skill.
- Check the provider's order for the type of precautions.
- Ensure that all supplies are available before check-off begins: isolation cart, gowns, gloves, mask, eye/face shields, shoes, and head cover.
- Perform hand hygiene.
- Apply PPE in the correct order:
- 1st (GOWN): Gown should cover all outer garments. Pull the sleeves down to the wrists, and tie at neck & waist.
- 2nd (MASK/RESPIRATOR): Apply surgical mask or N95 respirator if indicated by transmission-based precaution. Fit the mask around the nose and chin, securing bands around ears or tie straps at top of head and base of neck.
- 3rd (EYE PROTECTION): Apply goggles/face shield if indicated for patient condition or transmission-based precautions.
- 4th (CLEAN GLOVES): Pull on gloves to cover the wrist of the gown.
- Remove PPE in the correct order:
- 1st REMOVE GLOVES: REMEMBER: GLOVE TO GLOVE; SKIN TO SKIN. Do not touch contaminated gloves to your skin. Take off the contaminated glove with your gloved hand, wrapping the contaminated glove in the palm of your gloved hand. Take off the glove with your bare hand to the skin of your wrist, moving inside of the glove to remove the contaminated glove inside out over the other glove. Note: If the gown is tied in front, untie it prior to removing your glove.
- 2nd REMOVE GOWN: Untie all ties (or unsnap all buttons). Some gown ties can be broken rather than untied. Do so in a gentle manner, avoiding a forceful movement. Reach up to the shoulders and carefully pull the gown down and away from the body. Rolling the gown down is an acceptable approach. Dispose in trash receptacle.
- 3rd PERFORM HAND HYGIENE.
- 4th REMOVE FACE SHIELD or GOGGLES: Carefully remove face shield or goggles by grabbing the strap and pulling upwards and away from head. Do not touch the front of face shield or goggles.
- 5th REMOVE MASK or RESPIRATOR: Do not touch the front of the face shield or goggles.
- Respirator: Remove the bottom strap by touching only the strap and bringing it carefully over the head. Grasp the top strap and bring it carefully over the head, and then pull the respirator away from the face without touching the front of the respirator.
- Face mask: Carefully untie (or unhook from the ears) and pull it away from the face without touching the front.
- 6th PERFORM HAND HYGIENE after removing the mask.
When tablets are prescribed for a patient, the dosage of the tablets supplied is often different from the prescription, and nurses must calculate the number of tablets to administer. Dimensional analysis can be used to calculate the number of tablets to administer. Let’s practice using dimensional analysis using a practice problem.
Practice Problem: Tablet Dosage
Jane Doe recently had her prescription changed by her provider from Carvedilol 6.25 mg twice daily to Carvedilol 25 mg once daily. Jane shows you her prescription bottle (see Figure 5.7[2]) and asks, “How many pills can I take every day so I can use up what I have before purchasing another refill?” How many 6.25 mg tablets will you instruct Jane to take based on the new prescribed dose of Carvedilol 25 mg once daily?
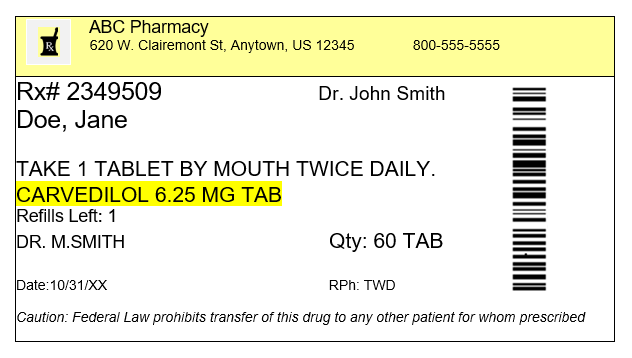
Solve this question by using dimensional analysis.
1. Start by identifying the goal unit for which you are solving, which is a tablet (tab) in this scenario:
[latex]{Tab}~=[/latex]
2. Set up the first fraction with tab in the numerator to match the goal unit. From the prescription bottle, we know that one of the supplied tablets has a concentration of 6.25 mg, so plug in 1 in the numerator and 6.25 mg in the denominator:
[latex]{Tab}~=~\frac{1~tab}{6.25~mg}[/latex]
3. Set up the second fraction with the intent to cross out mg, so place mg in the numerator. By reviewing the prescription, we know the new dosage prescribed is 25 mg, so plug in 25 in the numerator, and 1 in the denominator to cross off units:
[latex]{Tab}~=~\frac{1~tab}{6.25~mg}~x~\frac{25~mg}{1}[/latex]
4. Cross out mg diagonally:
[latex]{Tab}~=~\frac{1~tab}{6.25~\cancel{mg}}~x~\frac{25~\cancel{mg}}[/latex]
5. Multiply across the numerators and denominators, and then divide the final fraction to solve the problem:
[latex]{Tab}~=~\frac{1~tab}{6.25~\cancel{mg}}~x~\frac{25~\cancel{mg}}{1}~=~{4~tabs}[/latex]
Modules 1.5 - 1.7
Please practice tablet dosage calculations with the following interactive learning activity.
Use the checklist below to review the steps for completion of "Applying and Removing Sterile Gloves.”
Video Review of Applying Sterile Gloves:[7]
Steps
Disclaimer: Always review and follow agency policy regarding this specific skill.
- Gather the supplies: hand sanitizer and sterile gloves.
- Perform hand hygiene.
- Open the sterile gloves on a dry, flat, clean work surface.
- Remove the outer package by separating and peeling apart the sides of the package.
- Grasp the inner package and lay it on a clean, dry, flat surface at waist level.
- Open the top flap away from your body; open the bottom flap toward your body.
- Open the side flaps without contaminating the inside of the wrapper or allowing it to close.
- With your nondominant hand, use your thumb and index finger to only grasp the inside surface of the cuff of the glove for your dominant hand.
- Lift out the glove, being careful to not touch any surfaces and holding the glove no more than 12-18" above the table without contaminating the sterile glove; carefully pull the glove over your hand.
- Use your nondominant, nonsterile hand to grasp the flap of the package, and hold the package steady. With the sterile glove on your dominant hand, hold 4 fingers together of the gloved hand to reach in the outer surface of the cuff of the sterile glove, reaching under the folded cuff and with the thumb outstretched to not touch the second sterile glove. Lift the glove off the package without breaking sterility.
- While holding the fingers of the nondominant hand outstretched and close together, tuck your thumb into the palm, and use the sterile dominant hand to pull the second sterile glove over the fingers of the nondominant hand.
- After the second sterile glove is on, interlock the fingers of your sterile gloved hands, being careful to keep your hands above your waist.
- Do not touch the inside of the package or the sterile part of the gloves with your bare hands during the process.
- Maintain sterility throughout the procedure of donning sterile gloves.
Removing Sterile Gloves
- Grasp the outside of one cuff with the other gloved hand. Avoid touching your skin.
- Pull the glove off, turning it inside out and gather it in the palm of the gloved hand.
- Tuck the index finger of your bare hand inside the remaining glove cuff and peel the glove off inside out and over the previously removed glove.
- Dispose of contaminated wastes appropriately.
- Perform hand hygiene.
Airborne precautions: Infection prevention and control interventions to be used in addition to standard precautions for diseases spread by airborne transmission, such as measles and tuberculosis.
Asepsis: A state of being free of disease-causing microorganisms.
Aseptic non-touch technique: A standardized technique, supported by evidence, to maintain asepsis and standardize practice.
Aseptic technique (medical asepsis): The purposeful reduction of pathogen numbers while preventing microorganism transfer from one person or object to another. This technique is commonly used to perform invasive procedures, such as IV starts or urinary catheterization.
Contact precautions: Infection prevention and control interventions to be used in addition to standard precautions for diseases spread by contact with the patient, their body fluids, or their surroundings, such as C-diff, MRSA, VRE, and RSV.
Doff: To take off or remove personal protective equipment, such as gloves or a gown.
Don: To put on equipment for personal protection, such as gloves or a gown.
Droplet precautions: Infection prevention and control interventions to be used in addition to standard precautions; used for diseases spread by large respiratory droplets such as influenza, COVID-19, or pertussis.
Five moments of hand hygiene: Hand hygiene should be performed during the five moments of patient care: immediately before touching a patient; before performing an aseptic task or handling invasive devices; before moving from a soiled body site to a clean body site on a patient; after touching a patient or their immediate environment; after contact with blood, body fluids, or contaminated surfaces (with or without glove use); and immediately after glove removal.
Hand hygiene: A way of cleaning one’s hands to substantially reduce the number of pathogens and other contaminants (e.g., dirt, body fluids, chemicals, or other unwanted substances) to prevent disease transmission or integumentary harm, typically using soap, water, and friction. An alcohol-based hand rub solution may be appropriate hand hygiene for hands not visibly soiled.
Healthcare-Associated Infections (HAIs): Unintended infections caused by care received in a health care setting.
Key part: Any sterile part of equipment used during an aseptic procedure, such as needle hubs, syringe tips, dressings, etc.
Key site: The site contacted during an aseptic procedure, such as nonintact skin, a potential insertion site, or an access site used for medical devices connected to the patients. Examples of key sites include the insertion or access site for intravenous (IV) devices, urinary catheters, and open wounds.
Personal Protective Equipment (PPE): Personal protective equipment, such as gloves, gowns, face shields, goggles, and masks, used to prevent transmission of disease from patient to patient, patient to health care provider, and health care provider to patient.
Standard precautions: The minimum infection prevention practices that apply to all patient care, regardless of suspected or confirmed infection status of the patient, in any setting where health care is delivered.
Sterile technique (surgical asepsis): Techniques used to eliminate every potential microorganism in and around a sterile field while maintaining objects and areas as free from microorganisms as possible. This technique is the standard of care for surgical procedures, invasive wound management, and central line care.
Learning Objectives
- Accurately perform calculations using decimals, fractions, percentages, ratios, and/or proportions
- Convert between the metric and household systems
- Use military time
- Use dimensional analysis
- Accurately solve calculations related to conversions, dosages, liquid concentrations, reconstituted medications, weight-based medications, and intravenous infusions and evaluate final answer to ensure safe medication administration
The Institute of Medicine (IOM) has estimated that the average hospitalized patient experiences at least one medication error each day. Nurses are the last step in the medication administration process before the medication reaches the patient, so they bear the final responsibility to ensure the medication is safe. To safely prepare and administer medications, the nurse performs a variety of mathematical calculations, such as determining the number of tablets, calculating the amount of solution, and setting the rate of an intravenous infusion.[8]
Dosage calculation in clinical practice is more than just solving a math problem. Nurses must perform several tasks during drug calculations, such as reading drug labels for pertinent information, determining what information is needed to set up the math calculation, performing the math calculations, and then critically evaluating the answer to determine if it is within a safe dosage range for that specific patient. Finally, the nurse selects an appropriate measurement device to accurately measure the calculated dose or set the rate of administration.[9] This chapter will explain how to perform these tasks related to dosage calculations using authentic problems that a nurse commonly encounters in practice.
[latexpage]
When tablets are prescribed for a patient, the dosage of the tablets supplied is often different from the prescription, and nurses must calculate the number of tablets to administer. Dimensional analysis can be used to calculate the number of tablets to administer. Let’s practice using dimensional analysis using a practice problem.
Practice Problem: Tablet Dosage
Jane Doe recently had her prescription changed by her provider from Carvedilol 6.25 mg twice daily to Carvedilol 25 mg once daily. Jane shows you her prescription bottle (see Figure 5.7[10]) and asks, “How many pills can I take every day so I can use up what I have before purchasing another refill?” How many 6.25 mg tablets will you instruct Jane to take based on the new prescribed dose of Carvedilol 25 mg once daily?

Solve this question by using dimensional analysis.
1. Start by identifying the goal unit for which you are solving, which is a tablet (tab) in this scenario:
\[
{Tab}~=
\]
2. Set up the first fraction with tab in the numerator to match the goal unit. From the prescription bottle, we know that one of the supplied tablets has a concentration of 6.25 mg, so plug in 1 in the numerator and 6.25 mg in the denominator:
\[
{Tab}~=~\frac{1~tab}{6.25~mg}
\]
3. Set up the second fraction with the intent to cross out mg, so place mg in the numerator. By reviewing the prescription, we know the new dosage prescribed is 25 mg, so plug in 25 in the numerator, and 1 in the denominator to cross off units:
\[
{Tab}~=~\frac{1~tab}{6.25~mg}~x~\frac{25~mg}{1}
\]
4. Cross out mg diagonally:
\[
{Tab}~=~\frac{1~tab}{6.25~\cancel{mg}}~x~\frac{25~\cancel{mg}}
\]
5. Multiply across the numerators and denominators, and then divide the final fraction to solve the problem:
\[
{Tab}~=~\frac{1~tab}{6.25~\cancel{mg}}~x~\frac{25~\cancel{mg}}{1}~=~{4~tabs}
\]
Modules 1.5 - 1.7
Please practice tablet dosage calculations with the following interactive learning activity.
Ounces to Milliliters
When caring for patients, nurses often need to convert between ounces and milliliters. Although these equivalencies are typically memorized, let’s start with a simple problem of converting ounces to milliliters to demonstrate the technique of dimensional analysis.
Practice Problem #1: Ounces to Millileters
A patient drank an 8 ounce can of juice. The nurse must document the intake in milliliters. How many milliliters of juice did the patient drink?
Here is an example of how to solve this conversion problem using dimensional analysis.
1. Identify the unit being solved for as the goal. In this example, we want to convert the patient’s oral intake from ounces to milliliters, so we are solving for milliliters (mL):
[latex]mL~=~?[/latex]
2. Set up the numerator in the first fraction to match the desired unit to be solved. In this case, we want to know how many milliliters should be documented, so mL is placed in the numerator. To complete the fraction, we add information already known. In this example, we know that 30 mL is equivalent to 1 ounce, so 30 mL is added to the numerator and 1 ounce is added to the denominator:
[latex]mL~=~\frac{30~mL}{1~ounce}[/latex]
3. Add the second fraction to the equation. When using dimensional analysis, fractions are set up so the same units are diagonal from each other so they cancel each other out, leaving the desired unit. For this problem, the second fraction is set up to include ounces in the numerator so that it will cancel out ounces in the denominator of the first fraction. “8” is then added to the numerator because we know from the problem that the patient consumed 8 ounces. “1” is then added to the denominator because the purpose of the second fraction is to cancel out units:
[latex]ml~=~\frac{30~mL}{1~ounce}~x~\frac{8~ounces}{1}[/latex]
4. Cancel out similar units that are diagonal to each other. After canceling out ounces, we are left with our desired units of mL:
[latex]ml~=~\frac{30~mL}{1~ounce}~x~\frac{8~ounces}{1}[/latex]
5. Multiply across the numerators and then multiply across the denominators:
[latex]mL~=~\frac{30~mL}{1~\cancel{ounce}}~x~\frac{8~\cancel{ounces}}{1}~=~\frac{30~mL~x~8}{1~x~1~=~1}~=~{240~mL}[/latex]
6. Divide the numerator by the denominator to get the final answer with the desired goal unit:
[latex]\frac{240~mL}{1}~=~{240~mL}[/latex]
Practice Problem #2: Ounces to Millileters
In a similar manner, dimensional analysis can be used to calculate a patient’s total liquid intake on their meal tray. See Figure 5.6[15] for an example of a patient’s meal tray in a hospital setting.

Sample scenario: Your patient consumed 8 ounces of coffee, 4 ounces of orange juice, and 4 ounces of milk. How many milliliters of intake will you document?
Calculate using dimensional analysis.
1. Add up the total intake in ounces: [latex]{8~+~4~+~4}~=~{16~ounces}[/latex]
2. Start by identifying mL as the goal unit for which you are solving. In this case, we want to know the number of milliliters:
[latex]mL~=~?[/latex]
3. Create the first fraction by matching milliliters in the numerator. Then, using known equivalency that 30 mL is equal to 1 ounce, place 30 in the numerator and 1 ounce in the denominator:
[latex]mL~=~\frac{30~ml}{1~ounce}[/latex]
4. Create the second fraction to cross out units. You know you want to cross out ounces, so place ounces in the numerator. Then, add the known amount of ounces consumed, which was 16:
[latex]mL~=~\frac{30~mL}{1~ounce}~x~\frac{16~ounces}{1}[/latex]
5. Multiply across the numerators and then the denominators. Divide the numerator by the denominator of 1 for the final answer in mL:
[latex]mL~=~\frac{30~mL}{1~\cancel{ounce}}~x~\frac{16~\cancel{ounces}}{1}~=~{30~x~16}~=~{480~mL}[/latex]
Video Review of Calculating Intake and Output[16]
Pounds to Kilograms
Converting pounds to kilograms is typically memorized as an equivalency, but let’s practice using the technique of dimensional analysis.
Sample problem: The patient entered their weight as 137 pounds on their intake form. Convert the patient’s weight to kilograms to document it in the electronic medical record. Round your answer to the nearest tenth. Calculate using dimensional analysis.
- Start by identifying kg as the goal unit for which you are solving. Then, set up the first fraction so that the numerator matches the goal unit of kg. For the denominator, add 2.2 lbs because the known equivalency is 1 kg is equivalent to 2.2 pounds. Set up the second fraction with pounds in the numerator so that pounds will cross out diagonally to eliminate this unit. Then, add the patient’s known weight (137 lb) in the numerator, with 1 in the denominator because the function of this fraction is to cross out units. Multiply across the numerators and then the denominators. Finally, divide the final fraction to solve the problem.
[latex]kg~=~\frac{1~kg}{2.2~\cancel{lb}}~x~\frac{137~\cancel{lb}}{1}~=~\frac{137~kg}{2.2~}}=~{62.2727~=~62.3~kg}[/latex]
Modules 1.0 - 1.4
Measuring Devices
Depending on the type and amount of medication that is being administered, there are several devices used for measuring and administering medications.
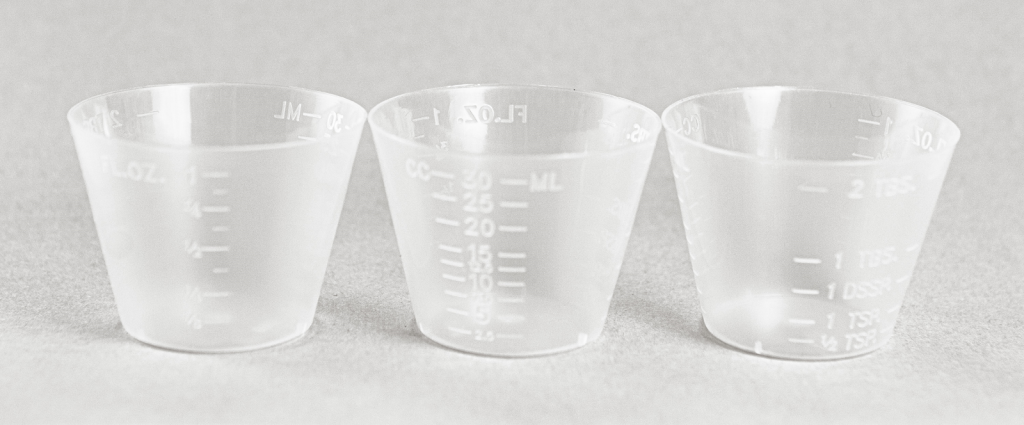
A medication cup that is composed of plastic or paper is used to hold and dispense oral medications to a patient. A paper cup is used to administer nonliquid medications, such as tablets or capsules. A plastic medication cup is used to dispense both liquid and nonliquid medications, and calibrated cups are also used to measure liquid medications prior to administration. Calibrated medication cups have labelled measurements such as ounces (oz), cubic centimeters (cc), milliliters (mL), teaspoons (tsp), and tablespoons (Tbs). See Figure 5.1[17] for an image of a calibrated medication cup.
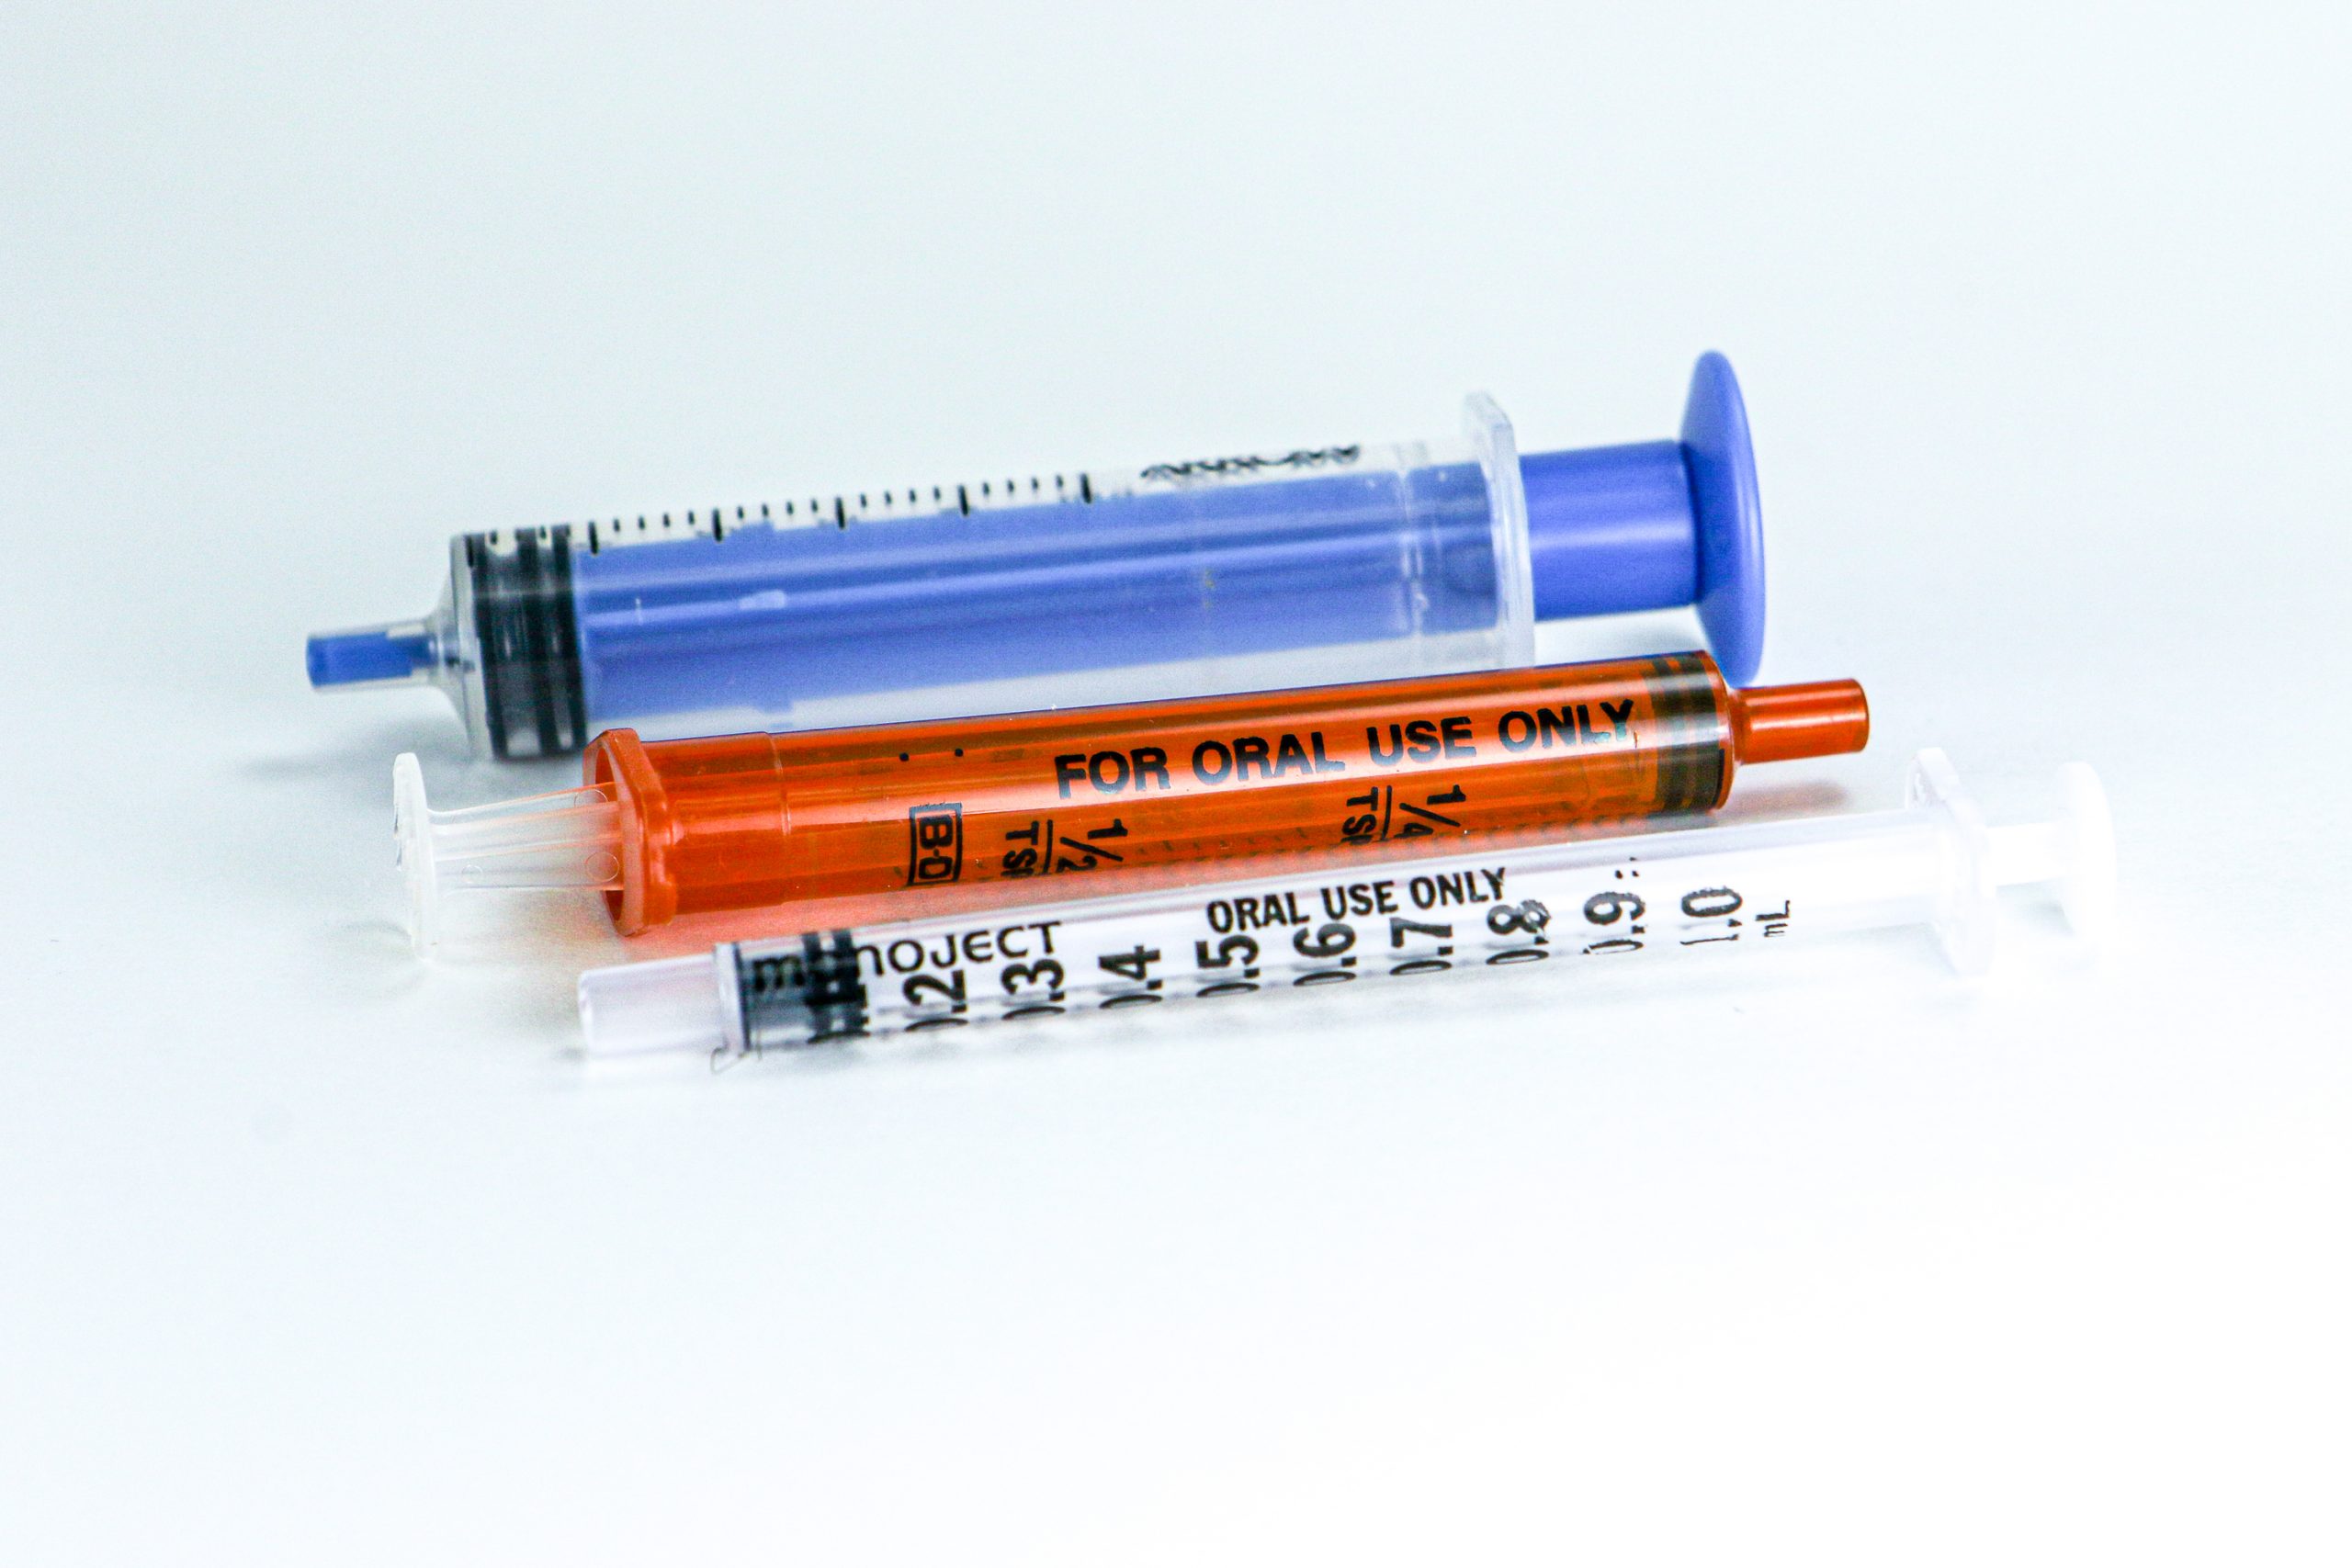
Oral syringes are used to administer liquid medications via the oral route, especially to children, because they allow for precise measurement of small doses. See Figure 5.2[18] for an image of an oral syringe. Oral syringes have different tips than syringes used for injections.
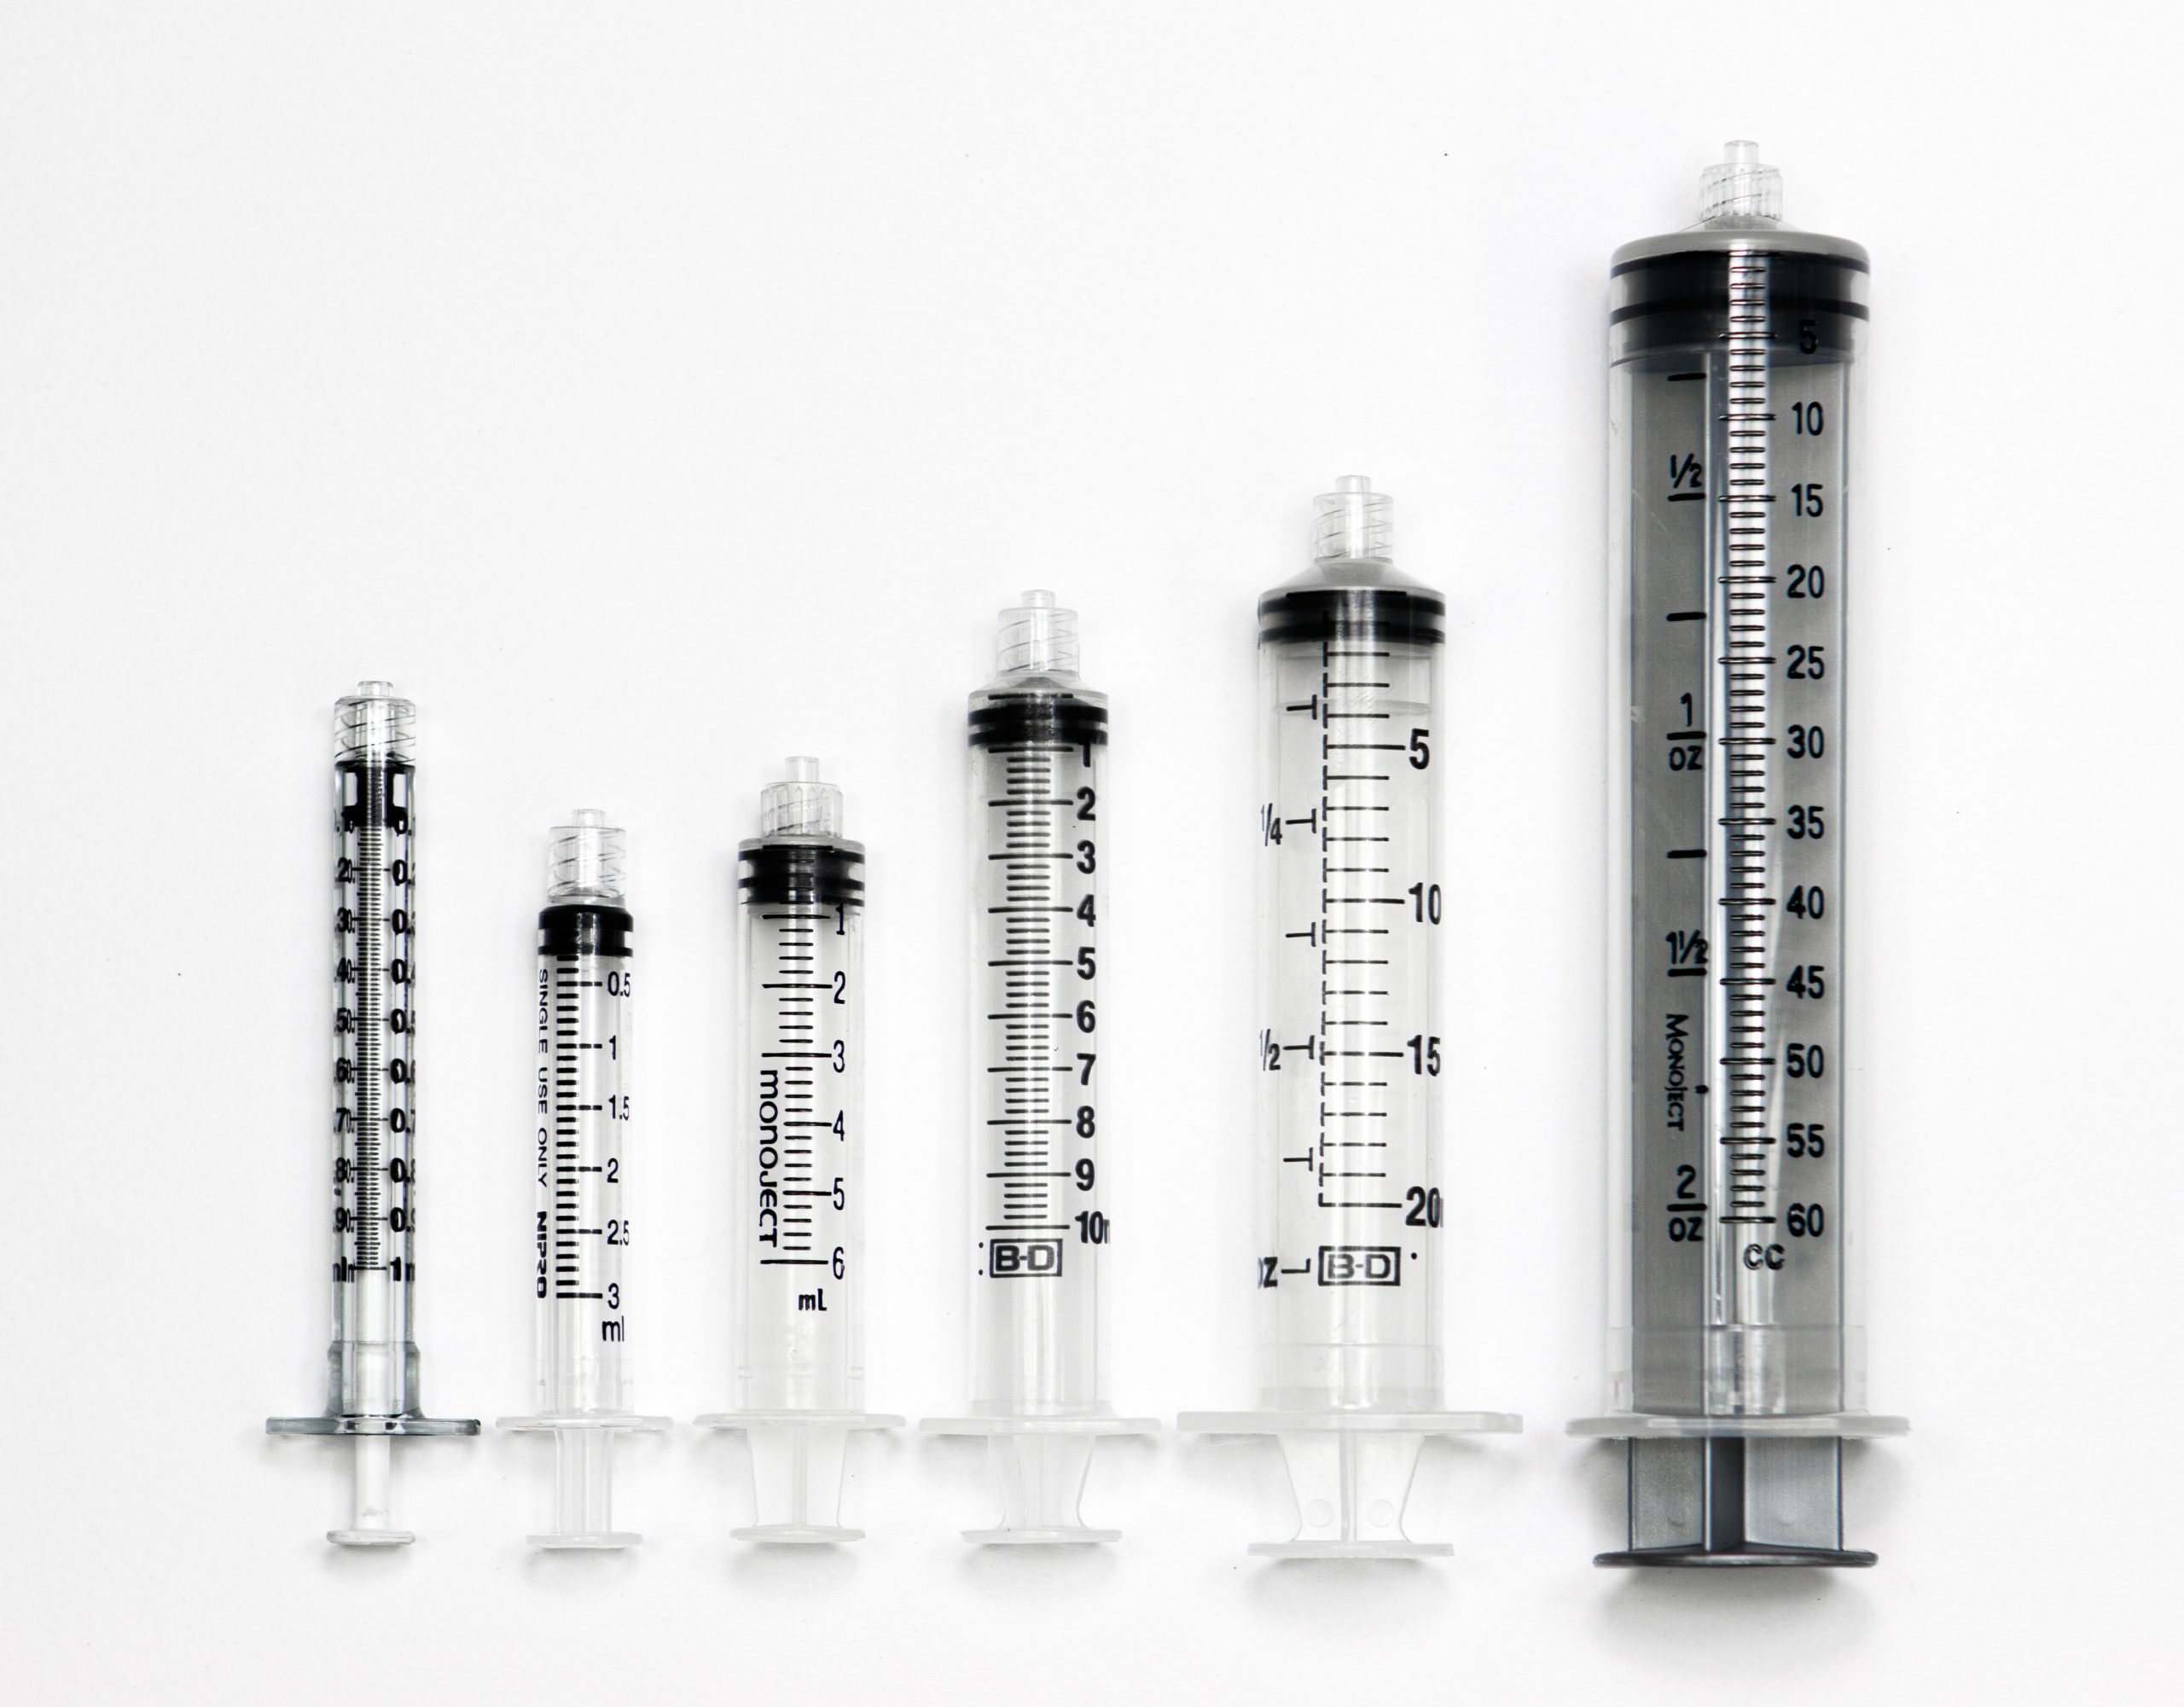
Syringes are used when administering medications through the parenteral route (i.e., intradermally, subcutaneously, intramuscularly, or intravenously). Syringes used for injections are available in many sizes and are selected by the nurse based on the type of injection and the type of medication administered. Common syringe sizes range from 1 mL to 60 mL. See Figure 5.3[19] for an image comparing various sizes of syringes. Syringes are calibrated based on the volume they hold. For example, a 1-mL syringe is calibrated in hundredths and a 3-mL syringe is calibrated in tenths. Syringes that hold larger volumes, such as 5-, 10-, and 12-mL syringes are usually calibrated in fifths (two tenths). Large syringes, such as 60-mL syringes, are calibrated in whole numbers.
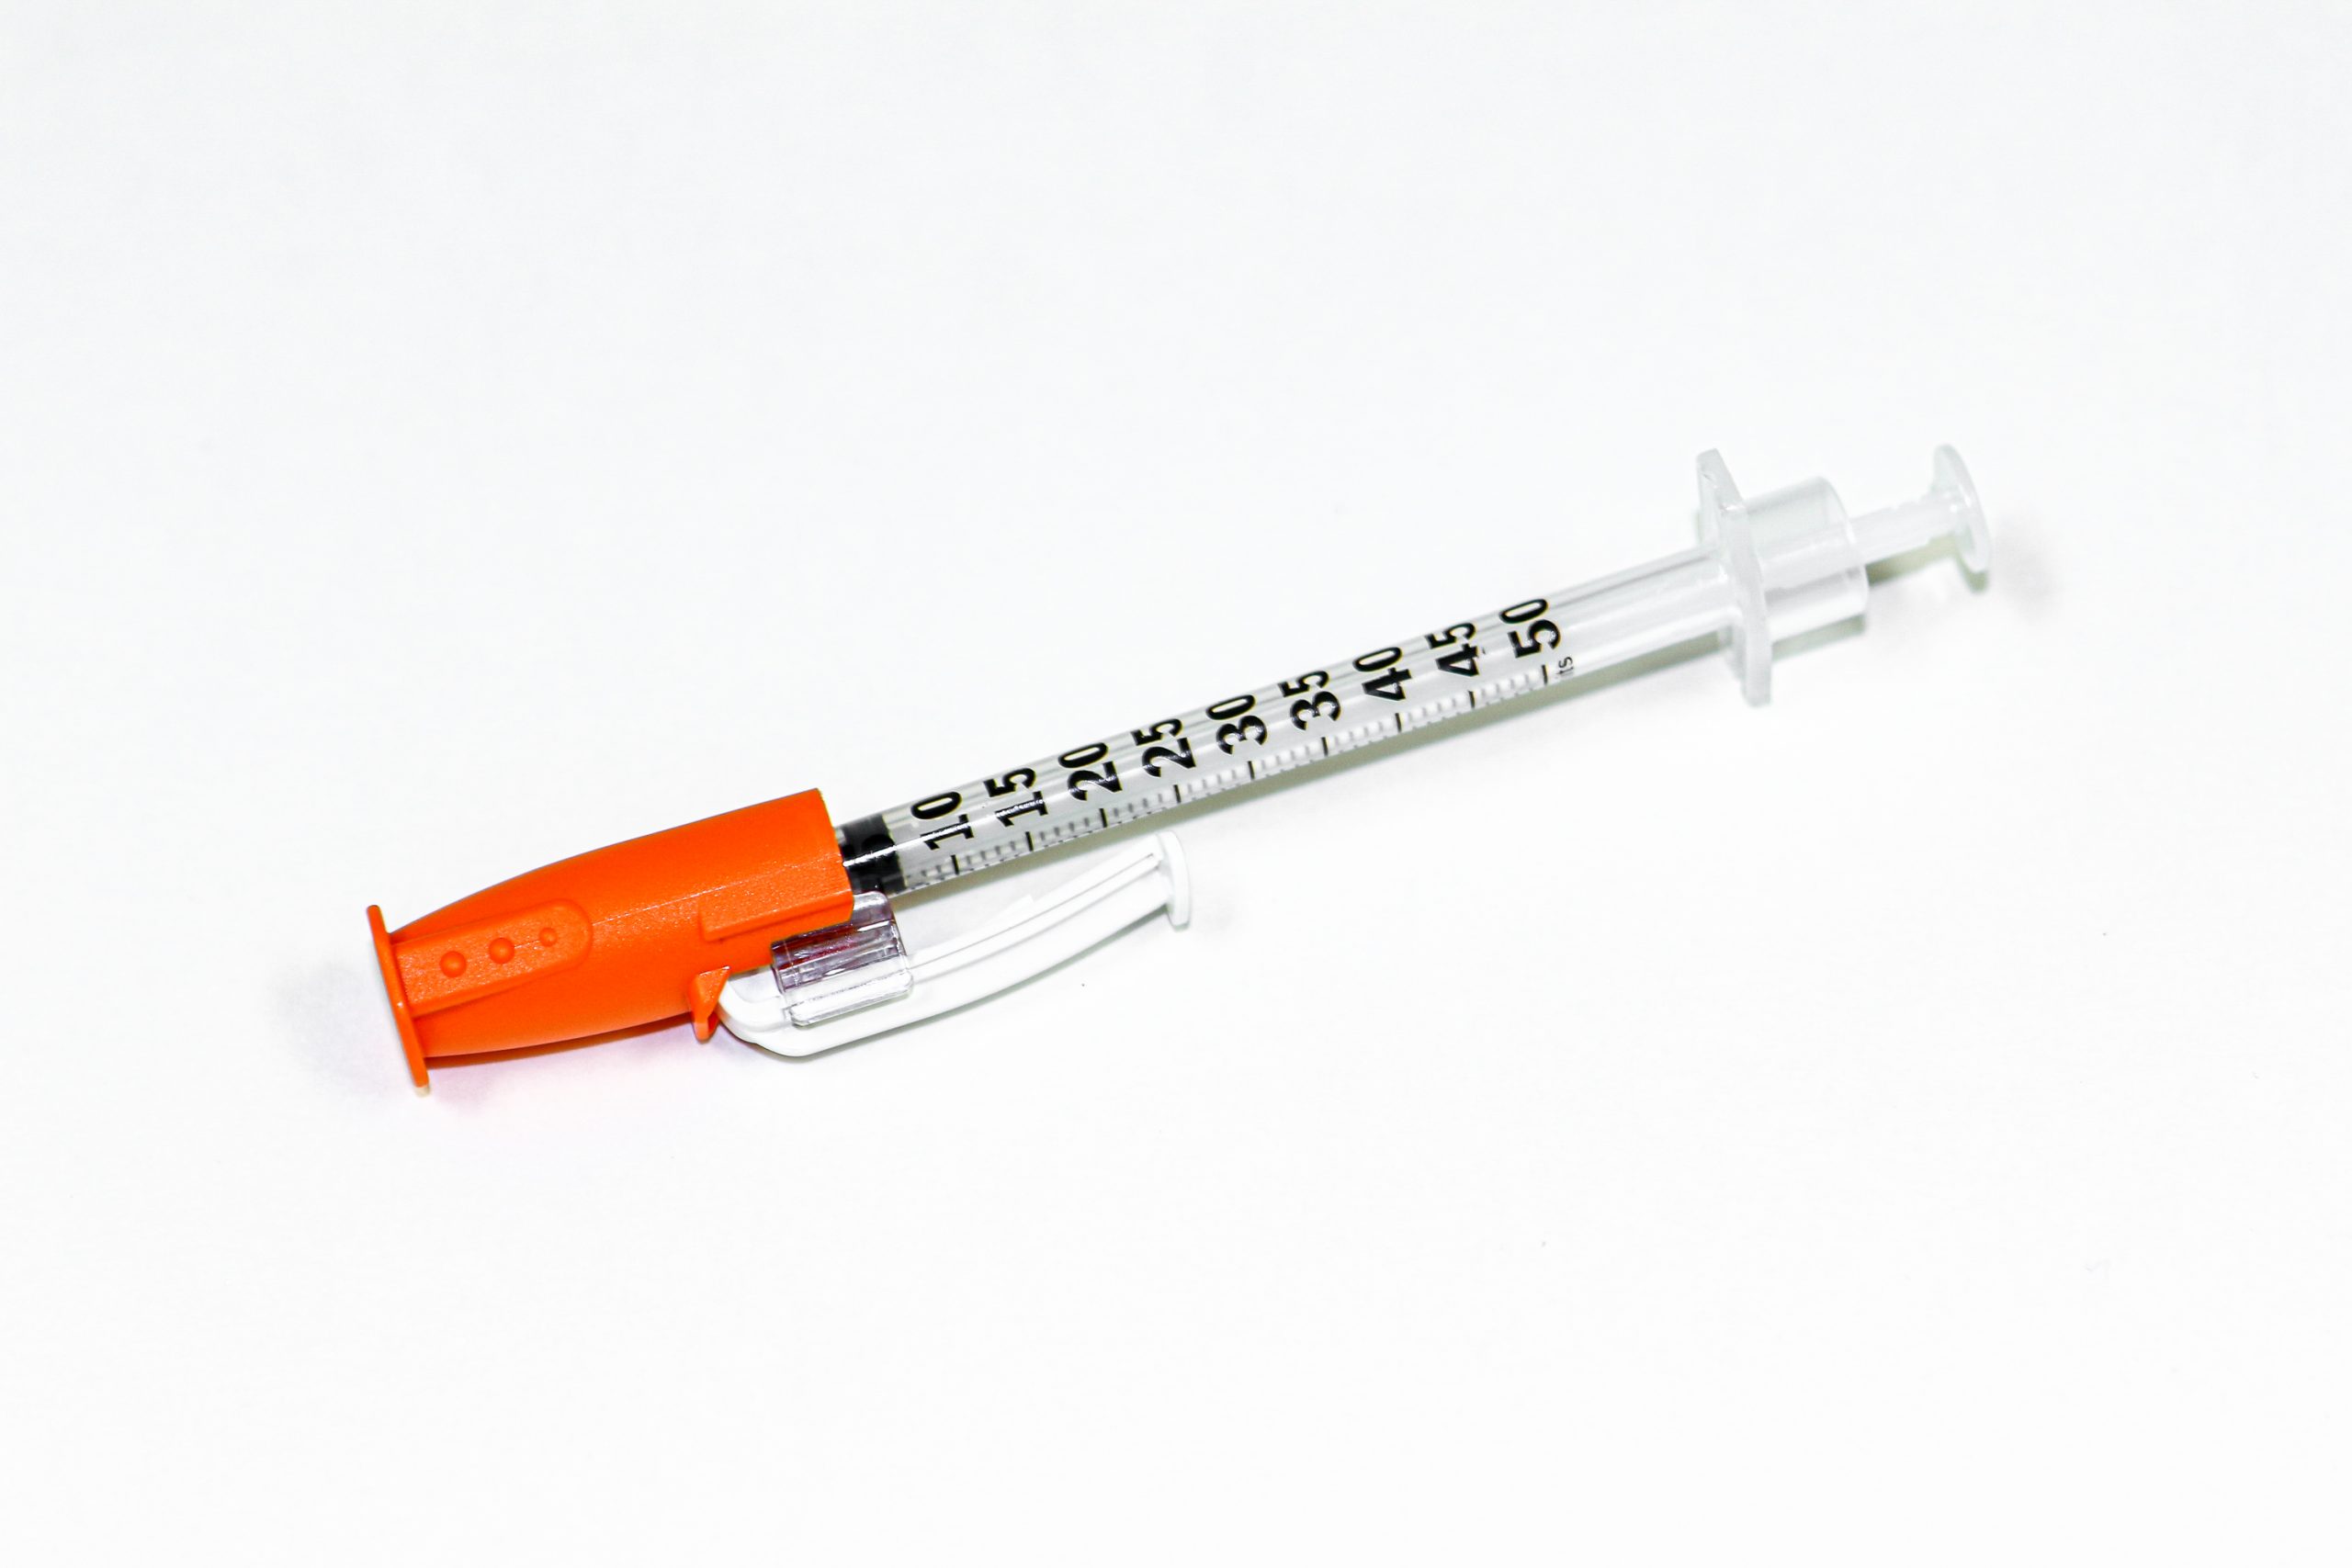
Special syringes are used to administer insulin and are calibrated in units. See Figure 5.4[20] for an image of an insulin syringe. Insulin syringes are easily identified by a standard orange cap.
Measuring Devices
Depending on the type and amount of medication that is being administered, there are several devices used for measuring and administering medications.
A medication cup that is composed of plastic or paper is used to hold and dispense oral medications to a patient. A paper cup is used to administer nonliquid medications, such as tablets or capsules. A plastic medication cup is used to dispense both liquid and nonliquid medications, and calibrated cups are also used to measure liquid medications prior to administration. Calibrated medication cups have labelled measurements such as ounces (oz), cubic centimeters (cc), milliliters (mL), teaspoons (tsp), and tablespoons (Tbs). See Figure 5.1[21] for an image of a calibrated medication cup.

Oral syringes are used to administer liquid medications via the oral route, especially to children, because they allow for precise measurement of small doses. See Figure 5.2[22] for an image of an oral syringe. Oral syringes have different tips than syringes used for injections.

Syringes are used when administering medications through the parenteral route (i.e., intradermally, subcutaneously, intramuscularly, or intravenously). Syringes used for injections are available in many sizes and are selected by the nurse based on the type of injection and the type of medication administered. Common syringe sizes range from 1 mL to 60 mL. See Figure 5.3[23] for an image comparing various sizes of syringes. Syringes are calibrated based on the volume they hold. For example, a 1-mL syringe is calibrated in hundredths and a 3-mL syringe is calibrated in tenths. Syringes that hold larger volumes, such as 5-, 10-, and 12-mL syringes are usually calibrated in fifths (two tenths). Large syringes, such as 60-mL syringes, are calibrated in whole numbers.

Special syringes are used to administer insulin and are calibrated in units. See Figure 5.4[24] for an image of an insulin syringe. Insulin syringes are easily identified by a standard orange cap.

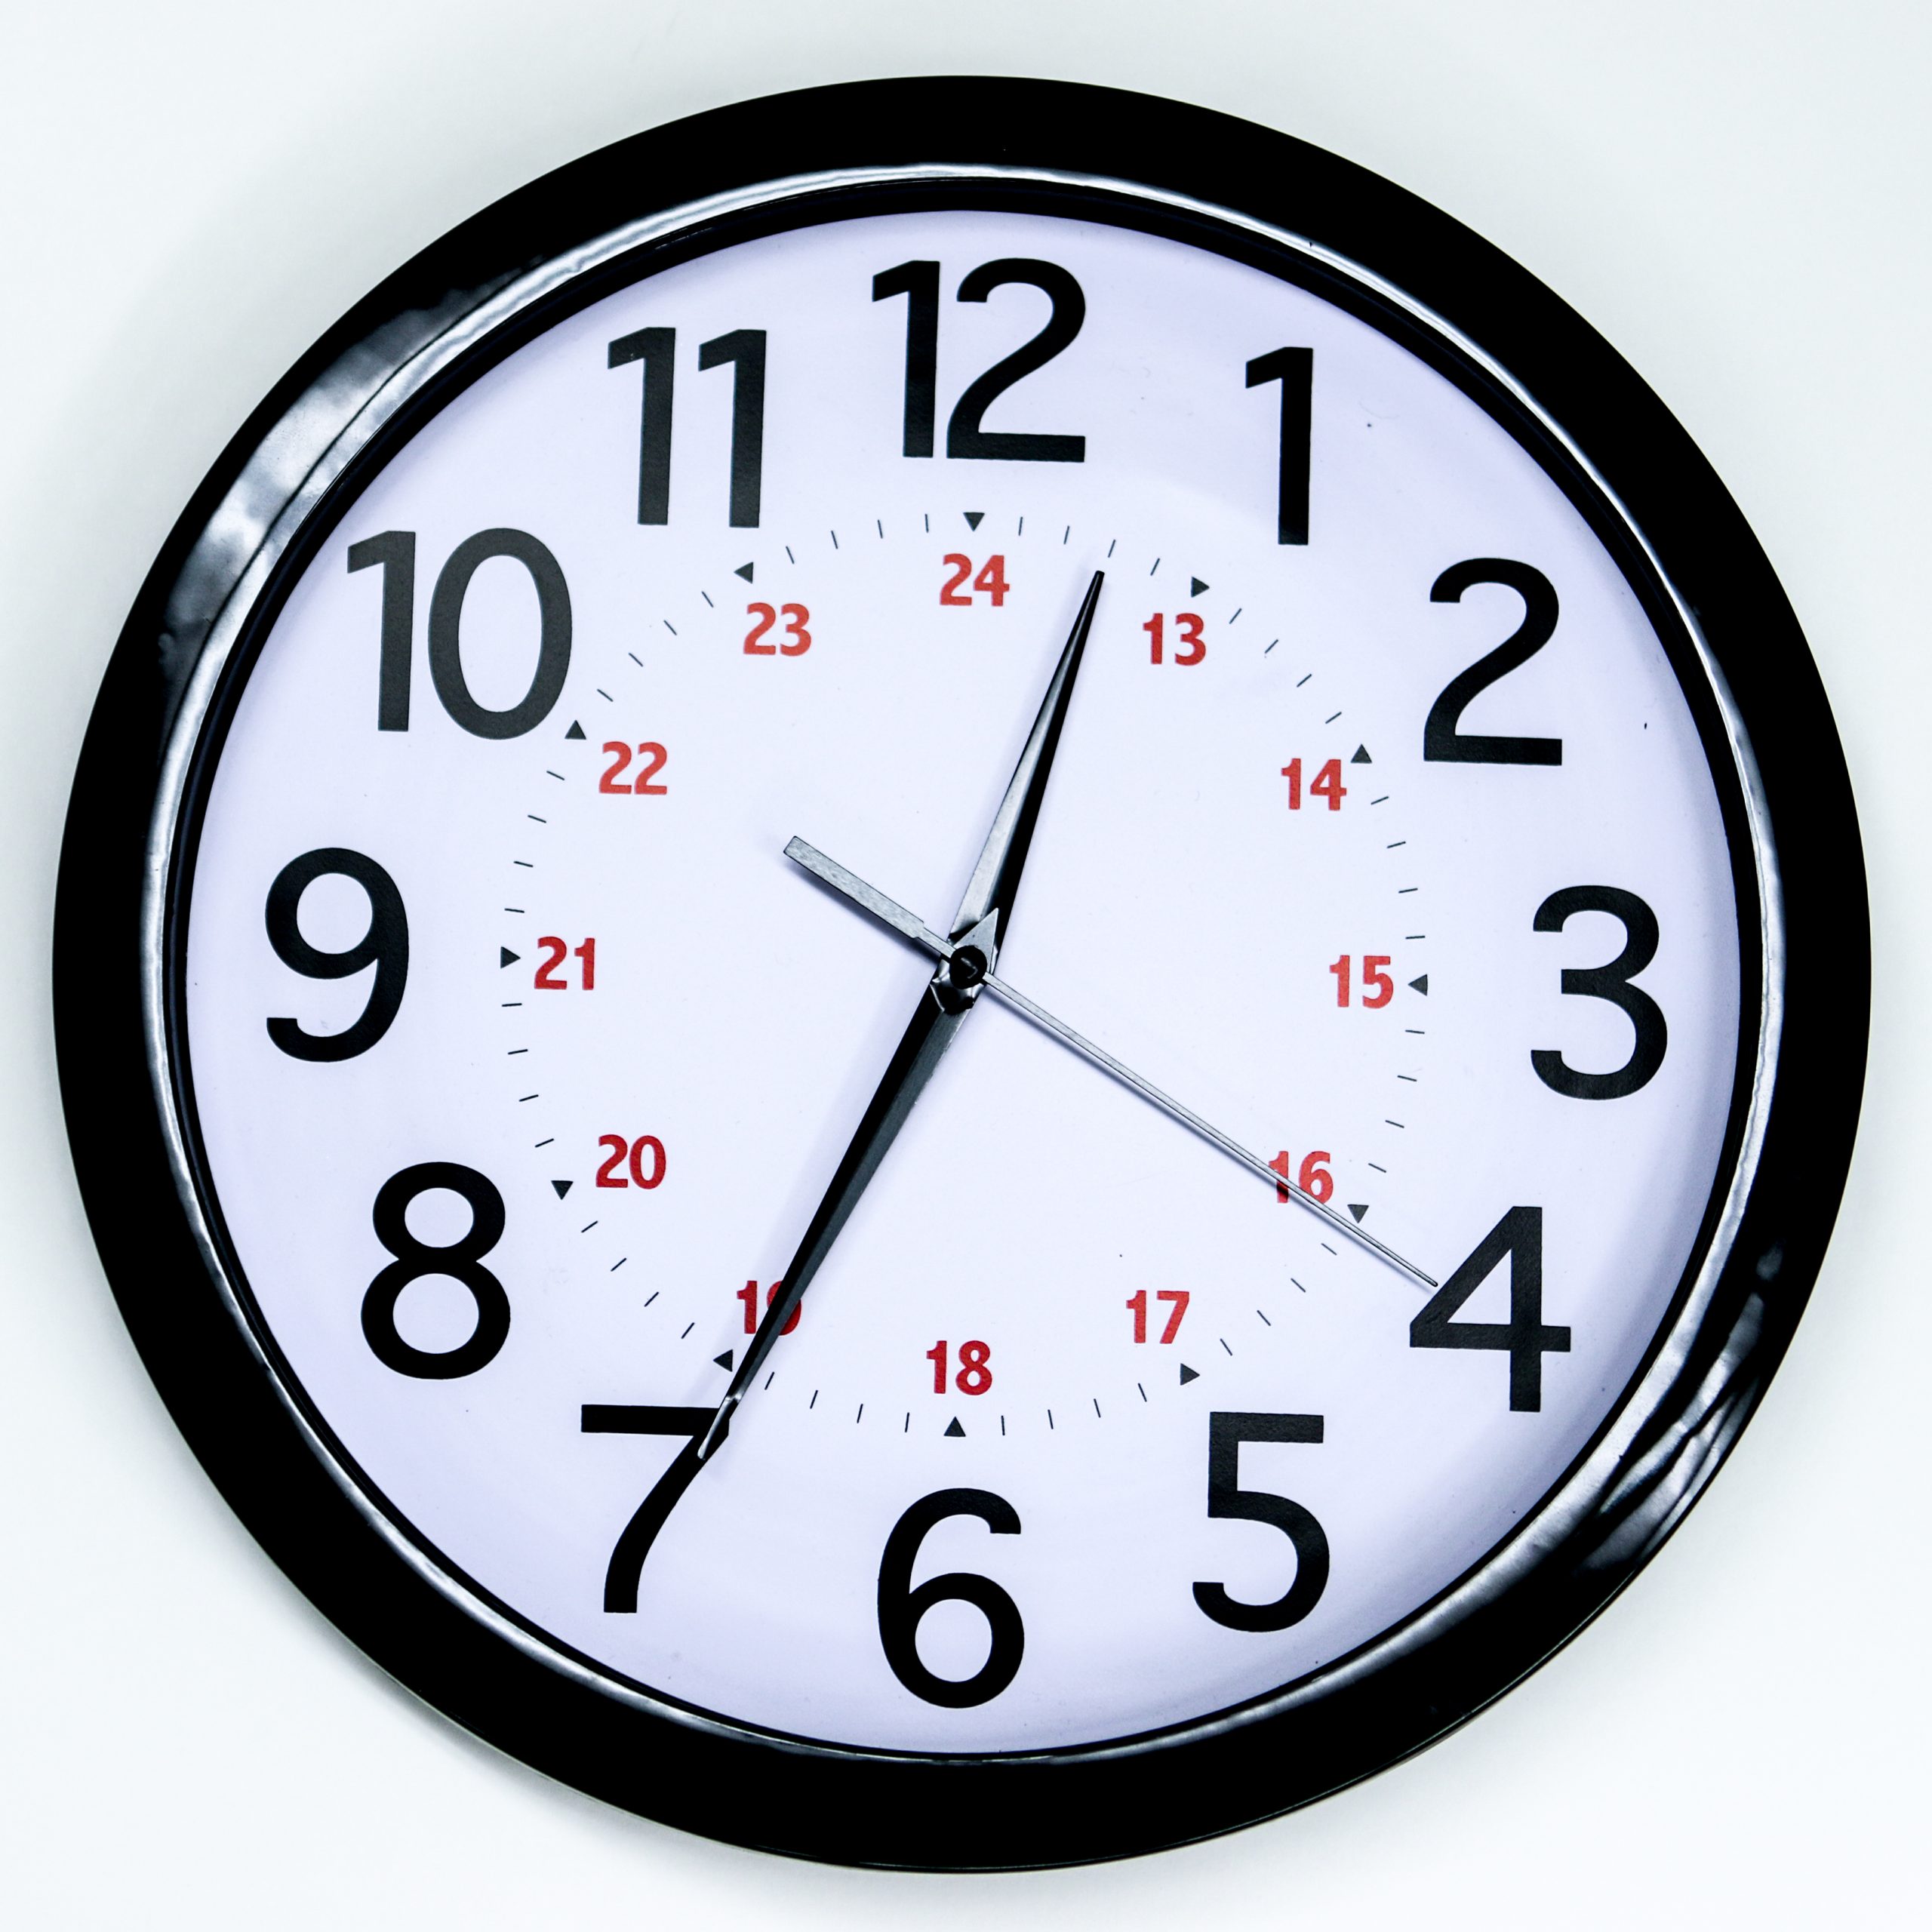
Military time is a method of measuring the time based on the full 24 hours of the day rather than two groups of 12 hours indicated by AM and PM. It is also referred to as using a 24-hour clock. Using military time is the standard method used to indicate time for medication administration. The use of military time reduces potential confusion that may be caused by using AM and PM and also avoids potential duplication when giving scheduled medications. For example, instead of stating medication is due at 7 AM and 7 PM, it is documented on the medication administration record (MAR) as due at 0700 and 1900. See Figure 5.5[25] for an example clock and Table 5.3 for a military time conversion chart.
- Conversion of an AM time to military time simply involves removing the colon and adding a zero to the time. For example, 6:30 AM becomes 0630.
- Conversion of a PM time to military time involves removing the colon and adding 1200 to the time. For example, 7:15 PM becomes 1915.
Table 5.3 Military Time Conversion Chart
| Normal Time | Military Time | Normal Time | Military Time |
|---|---|---|---|
| 12:00 AM | 0000 | 12:00 PM | 1200 |
| 1:00 AM | 0100 | 1:00 PM | 1300 |
| 2:00 AM | 0200 | 2:00 PM | 1400 |
| 3:00 AM | 0300 | 3:00 PM | 1500 |
| 4:00 AM | 0400 | 4:00 PM | 1600 |
| 5:00 AM | 0500 | 5:00 PM | 1700 |
| 6:00 AM | 0600 | 6:00 PM | 1800 |
| 7:00 AM | 0700 | 7:00 PM | 1900 |
| 8:00 AM | 0800 | 8:00 PM | 2000 |
| 9:00 AM | 0900 | 9:00 PM | 2100 |
| 10:00 AM | 1000 | 10:00 PM | 2200 |
| 11:00 AM | 1100 | 11:00 PM | 2300 |
Practice Problems: Military Time
Practice converting military time using the following problems. The answers are found in the Answer Key (Math Calculations Chapter section) at the end of the book.
- A patient has a medication scheduled for 1930. What time does this indicate? Include AM or PM.
- As you prepare to administer a PRN dose of pain medication, you notice the previous dose was administered at 0030. What time does this indicate? Include AM or PM.
- You administer medication to a patient at 9 AM. How should this be documented in military time?
- You administer medication to a patent at 10 PM. How should this be documented in military time?
Military time is a method of measuring the time based on the full 24 hours of the day rather than two groups of 12 hours indicated by AM and PM. It is also referred to as using a 24-hour clock. Using military time is the standard method used to indicate time for medication administration. The use of military time reduces potential confusion that may be caused by using AM and PM and also avoids potential duplication when giving scheduled medications. For example, instead of stating medication is due at 7 AM and 7 PM, it is documented on the medication administration record (MAR) as due at 0700 and 1900. See Figure 5.5[26] for an example clock and Table 5.3 for a military time conversion chart.

- Conversion of an AM time to military time simply involves removing the colon and adding a zero to the time. For example, 6:30 AM becomes 0630.
- Conversion of a PM time to military time involves removing the colon and adding 1200 to the time. For example, 7:15 PM becomes 1915.
Table 5.3 Military Time Conversion Chart
| Normal Time | Military Time | Normal Time | Military Time |
|---|---|---|---|
| 12:00 AM | 0000 | 12:00 PM | 1200 |
| 1:00 AM | 0100 | 1:00 PM | 1300 |
| 2:00 AM | 0200 | 2:00 PM | 1400 |
| 3:00 AM | 0300 | 3:00 PM | 1500 |
| 4:00 AM | 0400 | 4:00 PM | 1600 |
| 5:00 AM | 0500 | 5:00 PM | 1700 |
| 6:00 AM | 0600 | 6:00 PM | 1800 |
| 7:00 AM | 0700 | 7:00 PM | 1900 |
| 8:00 AM | 0800 | 8:00 PM | 2000 |
| 9:00 AM | 0900 | 9:00 PM | 2100 |
| 10:00 AM | 1000 | 10:00 PM | 2200 |
| 11:00 AM | 1100 | 11:00 PM | 2300 |
Practice Problems: Military Time
Practice converting military time using the following problems. The answers are found in the Answer Key (Math Calculations Chapter section) at the end of the book.
- A patient has a medication scheduled for 1930. What time does this indicate? Include AM or PM.
- As you prepare to administer a PRN dose of pain medication, you notice the previous dose was administered at 0030. What time does this indicate? Include AM or PM.
- You administer medication to a patient at 9 AM. How should this be documented in military time?
- You administer medication to a patent at 10 PM. How should this be documented in military time?
The nurse performs a variety of calculations in the clinical setting including intake and output conversions, weight conversions, dosages, volumes, and rates. The metric system is typically used when documenting and performing calculations in the clinical setting. Dosages may be calculated and converted into micrograms (mcg), milligrams (mg), milliequivalents (mEq), and grams (gm); volumes may be calculated in cubic centimeters (cc), milliliters (mL), and liters (L); and rates may be calculated in drops per minute (gtt/min), milliliters per hour (mL/hr), or units per hour (units/hr). Each of these types of calculations will be described in the following sections. Let’s begin by discussing equivalencies.
Equivalency is a mathematical term that refers to two values or quantities that are the same amount. For example, one cup is equivalent to eight ounces. Nurses must memorize common household and metric equivalents to perform drug calculations and convert quantities easily.
Household Equivalencies
The household system of measurement is familiar to patients and includes drops, teaspoons, tablespoons, ounces, cups, and pounds. See Table 5.4a for common household measurement conversions and abbreviations that must be memorized by nurses.
Table 5.4a Common Household Conversions
| Measurement and Abbreviation | Common Conversions |
|---|---|
| drop (gtt) | 15 -20 gtt = 1 mL |
| teaspoon (tsp) | 1 tsp = 5 mL |
| tablespoon (Tbs) | 1 Tbs = 3 tsp = 15 mL |
| ounce (oz) | 1 oz = 30 mL |
| pound (lb) | 1 lb = 16 oz |
| cup (C) | 1 C = 8 oz = 240 mL |
| pint (pt) | 1 pt = 2 C |
| quart (qt) | 1 qt = 4 C |
| gallon (gal) | 1 gal = 4 qt |
Metric Equivalencies
The metric system is organized by units of 10. The basic units of measurement in the metric system include meter for length, liter for volume, and gram for weight. The decimal point is easily moved either to the right or left with multiplication or division in units of 10. For example, there are 1,000 mL in 1 liter, and 0.5 liters is the same as 500 mL. See Table 5.4b for a metric equivalency chart.
When converting to a smaller unit, the decimal moves to the right →→→→→→→→→→
When converting to a larger unit, the decimal moves to the left. ←←←←←←←←←←←
Table 5.4b Common Metric Equivalencies in Health Care
| Kilo-
1000 units |
Hecto-
100 units |
Deca-
10 units |
1
Unit |
Deci-
0.1 units |
Centi-
0.01 units |
Milli-
0.001 units |
|---|
Nurses often need to convert household measurements to metric equivalents or vice versa. See Table 5.4c for common metric conversions that nurses must memorize.
Table 5.4c Common Metric Conversions in Health Care
| Metric Measurement | Common Conversions |
|---|---|
| 1 kilogram (kg) | 1 kg = 2.2 pounds = 1000 grams |
| 1 centimeter (cm) | 1 in = 2.54 cm = 25.4 mm |
| 37 degrees Celsius | 97.8 degrees F |
| 1 liter | 1000 mL = 1000 cc |
| 1 gram | 1000 mg |
| 1 mg | 1000 mcg |
Other Measurements
The nurse encounters other miscellaneous measurements in practice, such as:
- Units (U): Units are used in insulin and heparin dosages.
- International Units (IU): International units are used for vitamins, such as Vitamin D 600 IU.
- Milliequivalents (mEq): Milliequivalents are used in electrolyte replacement, such as Potassium 40 mEq.
- Percentages: Percentages are used in intravenous (IV) fluids, such as 0.9% Normal Saline IV fluid, meaning 9 g of NaCl are diluted in 1000 mL water.
- Ratios: Ratios are used in medications such as Epinephrine 1:1000, meaning 1 gram of Epinephrine is diluted in 1000 mL of fluid (equivalent to 1 mg/mL).
Practice Problems: Household and Metric Equivalents
Practice converting household and metric equivalents using the following problems and referencing Tables 5.4a-c. The answers are found in the Answer Key (Math Calculations Chapter section) at the end of the book.
- A prescription for a child is written as 1 teaspoon every 4 hours. How many milliliters (mL) will you draw up in an oral syringe?
- A patient’s prescription states to administer one ounce of medication. How many milliliters will you measure in the medication cup?
- A patient’s prescription states to administer 0.5 grams of medication. How many milligrams will you administer?
- A baby weighs 3.636 kilograms. How many grams does this convert to?
- A patient’s pupils are 7 mm in size. How many centimeters does this convert to?
Follow agency policy according to rounding. When performing calculations, do not round until calculating the final answer. Dosages of oral liquid medications for adults are typically rounded to the tenth for doses over 1 mL, with 0.05 and above rounding up and 0.04 and lower rounding down. For example, 17.276 rounds to 17.3, and 17.248 rounds to 17.2. For doses less than 1 mL, the dosage is rounded to the hundredth. For example, 0.0467 rounds to 0.05.
For pediatric patients, it is important to be as precise as possible to avoid medication errors. Oral liquid medications less than 1 mL should be rounded to the hundredth. For example, 0.276 rounds to 0.28, and 0.243 rounds to 0.24.
When rounding, it is also important to use critical thinking to evaluate your final answer. For example, a drop cannot be administered as a fraction of a drop, so drops are rounded to the nearest whole number.
Avoiding Medication Errors with Decimals
There are two very important standards of practice for documenting decimals to avoid medication errors:[31]
- Use leading zeros for decimals (i.e., use 0.6 mg)
- Do not use trailing zeros (i.e., do not use 6.0 mg)
Practice Problems: Rounding
Practice rounding using the following problems. The answers are found in the Answer Key (Math Caculations Chapter) at the end of the book.
- Round the liquid dose for an adult that is calculated as 6.5349.
- Round the liquid dose for a child that is calculated as 6.5349.
- Round the liquid dose for an adult that is calculated as 5.479.
- Round the liquid dose for a child that is calculated as 5.479.
- Round the liquid dose for an adult that is calculated as 0.1947.
- Round the liquid dose for a child that is calculated as 0.1947.
- Round the liquid dose for an adult that is calculated as 0.1968.
- Round the liquid dose for a child that is calculated as 0.1968.
Follow agency policy according to rounding. When performing calculations, do not round until calculating the final answer. Dosages of oral liquid medications for adults are typically rounded to the tenth for doses over 1 mL, with 0.05 and above rounding up and 0.04 and lower rounding down. For example, 17.276 rounds to 17.3, and 17.248 rounds to 17.2. For doses less than 1 mL, the dosage is rounded to the hundredth. For example, 0.0467 rounds to 0.05.
For pediatric patients, it is important to be as precise as possible to avoid medication errors. Oral liquid medications less than 1 mL should be rounded to the hundredth. For example, 0.276 rounds to 0.28, and 0.243 rounds to 0.24.
When rounding, it is also important to use critical thinking to evaluate your final answer. For example, a drop cannot be administered as a fraction of a drop, so drops are rounded to the nearest whole number.
Avoiding Medication Errors with Decimals
There are two very important standards of practice for documenting decimals to avoid medication errors:[32]
- Use leading zeros for decimals (i.e., use 0.6 mg)
- Do not use trailing zeros (i.e., do not use 6.0 mg)
Practice Problems: Rounding
Practice rounding using the following problems. The answers are found in the Answer Key (Math Caculations Chapter) at the end of the book.
- Round the liquid dose for an adult that is calculated as 6.5349.
- Round the liquid dose for a child that is calculated as 6.5349.
- Round the liquid dose for an adult that is calculated as 5.479.
- Round the liquid dose for a child that is calculated as 5.479.
- Round the liquid dose for an adult that is calculated as 0.1947.
- Round the liquid dose for a child that is calculated as 0.1947.
- Round the liquid dose for an adult that is calculated as 0.1968.
- Round the liquid dose for a child that is calculated as 0.1968.
A common method used to perform calculations with different units of measurement is called dimensional analysis. Dimensional analysis is a problem-solving technique where measurements are converted to equivalent units of measure by multiplying a given unit of measurement by a fractional form of 1 to obtain the desired unit of administration. This method is also referred to as creating proportions that state equivalent ratios. Equivalencies described in Section 5.7 are used to set up ratios with the fractional form of 1 to achieve the desired unit the problem is asking for. The units of measure that must be eliminated to solve the problem are set up on the diagonal so that they can be cancelled out. Lines are drawn during the problem-solving process to show that cancellation has occurred.[33]
When setting up a dosage calculation using dimensional analysis, it is important to begin by identifying the goal unit to be solved. After the goal unit is set, the remainder of the equation is set up using fractional forms of 1 and equivalencies to cancel out units to achieve the goal unit. It is important to understand that when using this problem-solving method, the numerator and denominator are interchangeable because they are expressing a relationship.[34] Let’s practice using dimensional analysis to solve simple conversion problems of ounces to milliliters in Section 5.7 "Conversions" to demonstrate the technique.

