7 Formatting Document Layout in Microsoft Word
Learning Objectives
By the end of this section, you will be able to:
- Format page setup and margins
- Create different types of sections and modify section formatting
At WorldCorp, each major division represents a product line. All these divisions have their own functional departments, such as finance, marketing, manufacturing, research and development (R&D), and logistics. To write your report on market trends, you will need to get information on the products from these different departments. For example, the marketing department might provide sales data for a particular product, while the finance department can provide the profit made for each product sold. Practically speaking, this means creating a document that is readable and easy to use for everyone.
Setting the page layout for your document in Microsoft Word allows you to present material in a way that maximizes ease of use. Page layout includes setting margins and page size, choosing the page orientation, introducing features like columns, and breaking up a document into sections so that different parts can have different formats applied. These functions can be accessed using the tools on the Layout tab (see Figure 3.6).

Figure 3.6 The Layout tab has clearly defined drop-down menus and buttons for its page layout tools. (Used with permission from Microsoft)
Page Setup
The Layout tab contains commands and tools for adjusting the overall page setup of your document, located within the Page Setup command group. Page setup typically includes adjusting the paper size, margins, and orientation, as well as adding features like section breaks and columns. There are accepted standards for document formatting, but these can vary by target audience and by industry. For business reports, such as your market trends report, a 12-point font for body text (Calibri, Times New Roman, and Cambria are some popular fonts), and one-inch margins on all sides (top, bottom, left, right) are typically standard. Most reports also have sections and section headings to help break up and organize the content. The line spacing in the reports can vary, but the most common spacing will be either single-spacing, 1.5-spacing, or double-spacing.
Each of these elements has an important role to play in presenting the document to its audience (e.g., business professionals), as well as an impact on readability. Some fonts are easier to read than others, or are more appropriate for a specific genre of document. You may use a style guide (a manual for consistent styling and editorial treatment) like the Chicago Manual of Style or the Modern Language Association (MLA) style for published corporate reports, but many businesses do not strictly follow a manual of style for internal reports. For reports like your market trends report, it is usually left up to the employee or the supervisor to determine the best formatting and style for the report. For reports that will be distributed externally, such as at a conference, you should ask colleagues in charge of these events if they have formatting and style requirements for documents. It is important to keep the intended audience in mind when setting up the document.
Real-World Application
Style Guides
Different industries will establish certain expectations around the types of documents that are typical of their field, as well as how these documents are formatted and presented. For instance, newspapers will use a certain type of font and use only certain types of formatting options. They will also define the paper size, margins, and how the content is laid out on the page. If you review a handful of different printed newspapers, you will find that each has a very specific style and that no two really look alike, although we recognize that they are newspapers because they share a subset of agreed-upon standards (such as page size). So too, will you find that your industry has a specific style, and in your studies, you will be asked to adopt different writing and formatting standards. These are known as style guides, or style manuals. Common ones you may encounter while in college are the APA (American Psychological Association) and MLA (Modern Language Association) style manuals; however, others exist, including ones used in specific industries, such as the CSE (Council of Science Editors) style used in biology and other sciences. These guides will define how documents should be formatted in their entirety, from font type to the general layout of pages, including margin width and line spacing. It is important to know that these styles are updated regularly. You will want to stay abreast of these updates. To make this easier, most major style guides, such as APA and Chicago, have websites that provide information about updates. To ensure that you stay informed, some of these websites offer subscriptions for information about updates.
While Word does not come preset with these formatting requirements, you can create your own style sets, which you will learn more about in later chapters. What’s more, there are many online resources that can help guide you in these formatting requirements. For instance, the reference or citation page tends to be a sticky spot for many students. There are several citation styles in the citation tool in Word. There are also many free online services that can help you create your reference list by inputting relevant information into guiding categories. They then generate your reference list for you. A word of caution: You should also review and verify if the produced content does align with the formatting requirements of that style. Styles do change and are updated, and these services do not always remain current.
Margins
All pages in a document have a margin, a blank area from the edge of each side of the page to the content. Margins make a page more readable, and in printed documents, allow space for bindings, notes, and so on. You may encounter projects that need different margins on different pages, or unconventional margins—that is, custom margins.
To adjust the margins of a page, go to the Layout tab. Select the Margins icon, and a drop-down menu will appear. The default margin is Normal (1 inch on all sides), but this can be adjusted via the prepopulated options, such as for different layouts with narrower margins. If you want to set your own margins, choose the Custom Margins option at the bottom of the drop-down menu. In the dialog box shown in Figure 3.7, notice how you can adjust the margins to be various measurements.
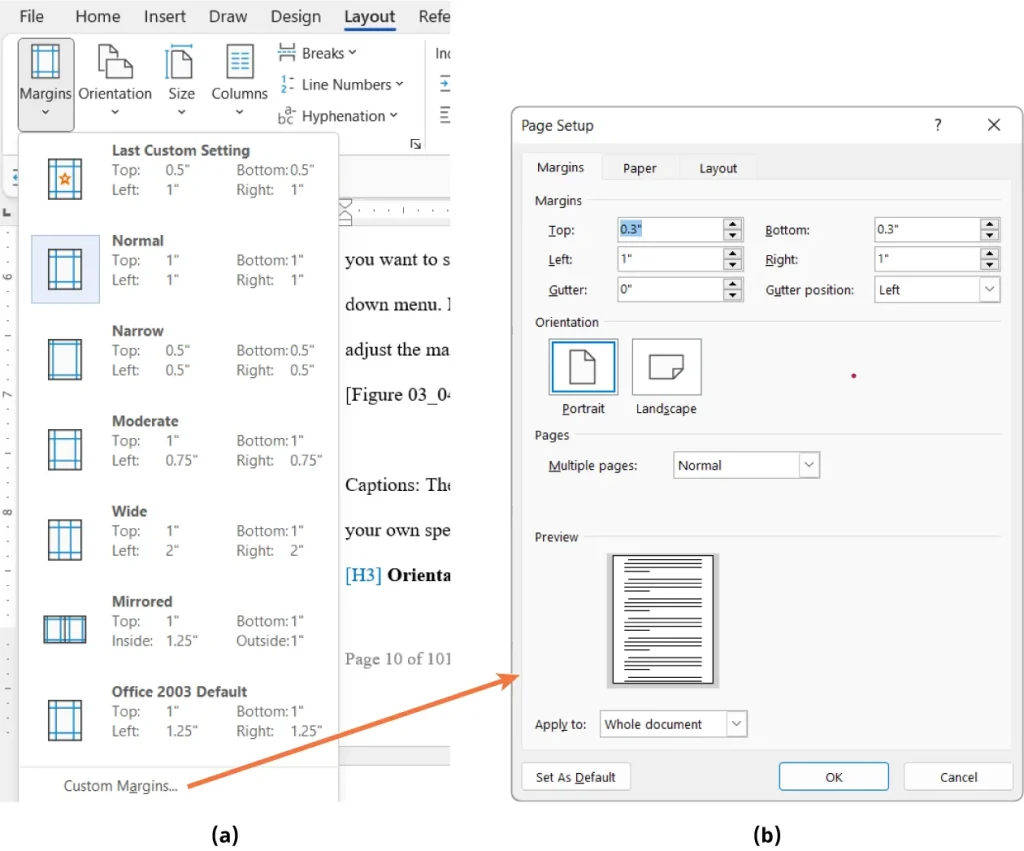
Figure 3.7 The Margins tab in the Page Setup dialog box lets you (a) choose from predetermined selections, or (b) create your own specifications through the custom margin dialog box. (Used with permission from Microsoft)
Orientation
Page orientation refers to whether the page is vertical or horizontal. The default in Word is the vertical layout, called portrait orientation. This layout works best for everyday text documents, such as business reports and correspondence. The horizontal layout is known as landscape orientation, and works best for documents with tables and graphs that otherwise would not fit well on a vertical page. Using the Orientation command in the Page Setup command group, you can alter the orientation of your entire document, or also limit the changes to certain pages or sections. Figure 3.8 shows the two layout options.
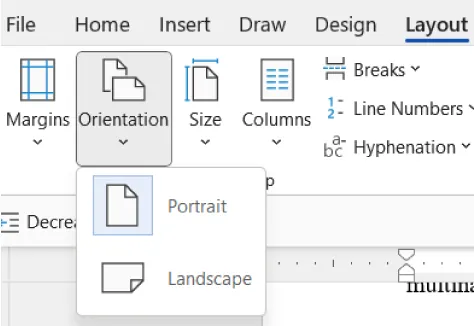
Figure 3.8 Inserting sections in your document allows you to change the page orientation between sections. (Used with permission from Microsoft)
Line Spacing
The space between lines of text as you move through the document is referred to as line spacing. You might be familiar with double-spacing, which is often required when creating documents for a class assignment. However, the default in Word is single-spacing. To change the line spacing, access the Line and Paragraph tool from the Paragraph command group on the Home tab (Figure 3.9). To change the spacing of text that has already been typed, select the text and change the line spacing to the desired spacing. You can also set the spacing before typing anything in the document.
The line spacing can vary throughout the document. It does not have to be consistent. You can, at any point, change the line spacing by selecting the text you want to apply the different spacing to, and then selecting the spacing from the Line Spacing tool on the Home tab. But keep in mind the professionalism of the document you are preparing. It is not advisable to vary the line spacing throughout the document, as that can impact the readability of the report. It can also look as if you did not take care to ensure consistency in formatting when preparing the report. However, if you have a few sentences that need to stand out for some reason—such as a table caption, or a block quote—having these elements set with a different line spacing might be appropriate.
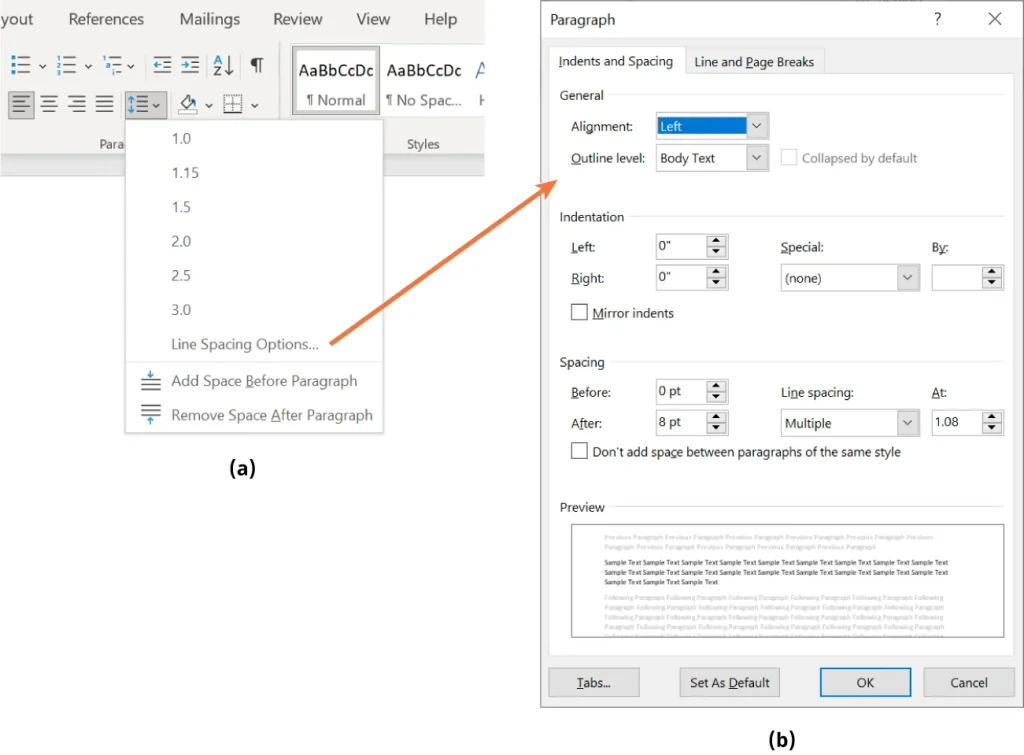
Figure 3.9 (a) You can change the line spacing of a document by using the tool in the Paragraph command group. (b) There are additional options for indentation and line spacing by selecting Line Spacing Options. (Used with permission from Microsoft)
Through the Line Spacing Options tool, you can change the spacing before and after lines of text, the spacing before and after paragraphs, and the indentation of lines of text.
Page Size
Understanding page size is particularly important when working at a global corporation like WorldCorp. Different countries use different standard page sizes, and it is helpful to know how documents might vary across various company locations. For example, the United States uses standard letter size (8.5 inches wide by 11 inches long), whereas Europe and East Asia typically use A4 size (8.25 inches wide by 11.75 inches long).
Similar to margin selection, when you select the Size command, there is a drop-down list of default pages sizes, as Figure 3.10 shows. You can select from these options or choose to create a custom page size. Note that the size selections include materials other than standard pages, such as envelopes.
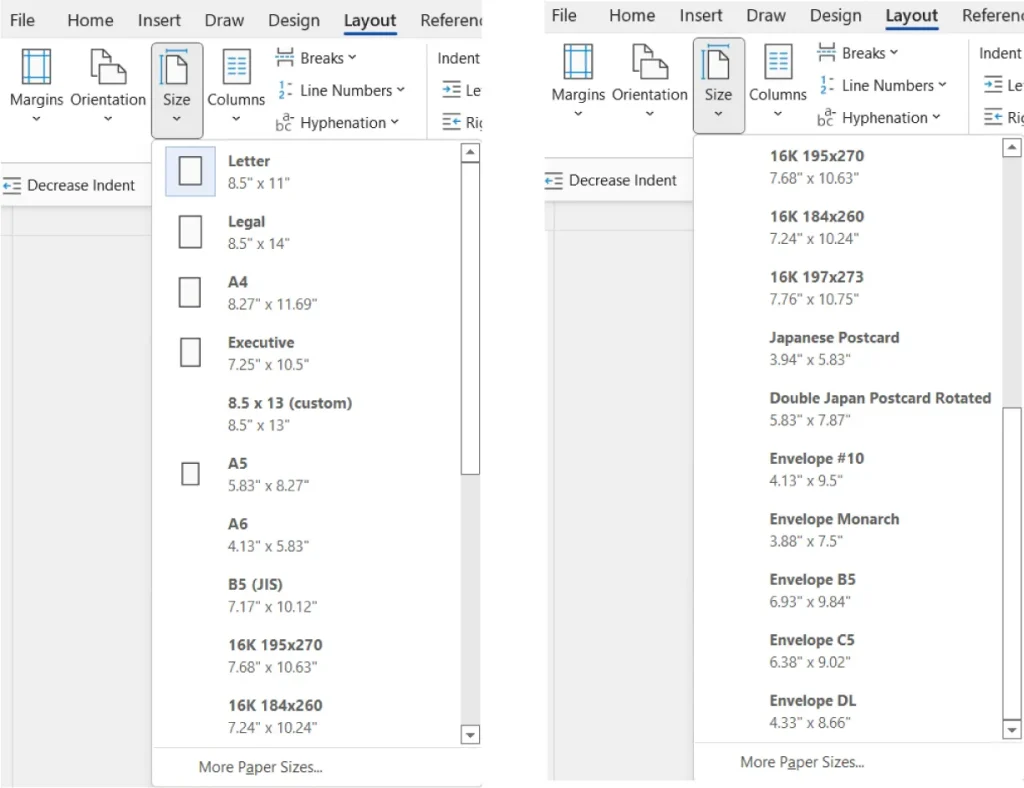
Figure 3.10 You can select from a variety of predetermined page sizes for your document, or create a custom paper size if desired, such as for a poster or invitation. This figure shows the entire drop-down list as two panels. (Used with permission from Microsoft)
Columns
You may be familiar with the column format in print media such as newspapers and magazines, where the text on a page is separated into multiple, vertical columns. Sometimes columns are desired in specific types of Word documents, such as newsletters or brochures. They can also be useful if you have a long list of short terms and want to optimize page space by utilizing columns instead of having a large expanse of white space.
Word has many options for creating columns. To do this, you can select a section of text, go to the Columns drop-down menu, and select from common column layouts. Menu options include columns of equal size, or options where there is one narrower column on the side of a wider column. If you want to customize a column to be of a specific width, or you want more than three columns in one page, choose More Columns. In Figure 3.11, you can see the options. The dialog box shows a preview of how the document will look. A line between the columns is possible, as seen in the dialog box.

Figure 3.11 (a) More Columns opens a window where you can (b) customize their width and spacing. Columns are common in certain types of documents, such as newsletters and brochures. (Used with permission from Microsoft)
Working with Section Breaks
Sections in Word are especially useful for long documents. A section allows the user to partition part of the document, such as front matter, body text, and back matter, and apply different styles and formatting to each section, while still maintaining all the text in one document. Sections are also important when creating a table of contents and assigning page numbers in a large report. These concepts will be covered in more detail in the chapter on Document Preparation.
The division of a document into front matter, body text, and back matter is more common in longer documents, such as extensive reports, booklets, and manuals. Front matter typically includes the title page, the table of contents, and prefaces or forewords. The body contains the main text of the document. The back matter may include appendixes, an index, a glossary, or references.
Regardless of how you partition a document, having sections allows you to apply different styles to each separately, including page numbering, page orientation, and formatting. Consider an example where your document has a title page and a table of contents, and the main text begins on the third page. You don’t want a page number to appear on the title page, but you would like the main content to start on page 1. You can achieve this with a section break.
First, go to the Insert tab, select Page Number, and add page numbers to your document. The market trends report is expected to be quite lengthy. Including page numbers in the WorldCorp market trends report will be essential to help readers navigate through the document to the areas that are of interest to their needs.
To insert a section break, go to the Layout tab, click on the Breaks drop-down menu, and select the Next Page section break, as Figure 3.12a shows. This will start a new section on the next page. Then, choose where you want your page number to appear. As Figure 3.12b shows, it will be on the bottom right. Then, right-click on the page number in that new section and choose “Start at 1” from the dialog box that appears. You can use this feature to apply different page numbering styles, such as using Roman numerals in front matter.
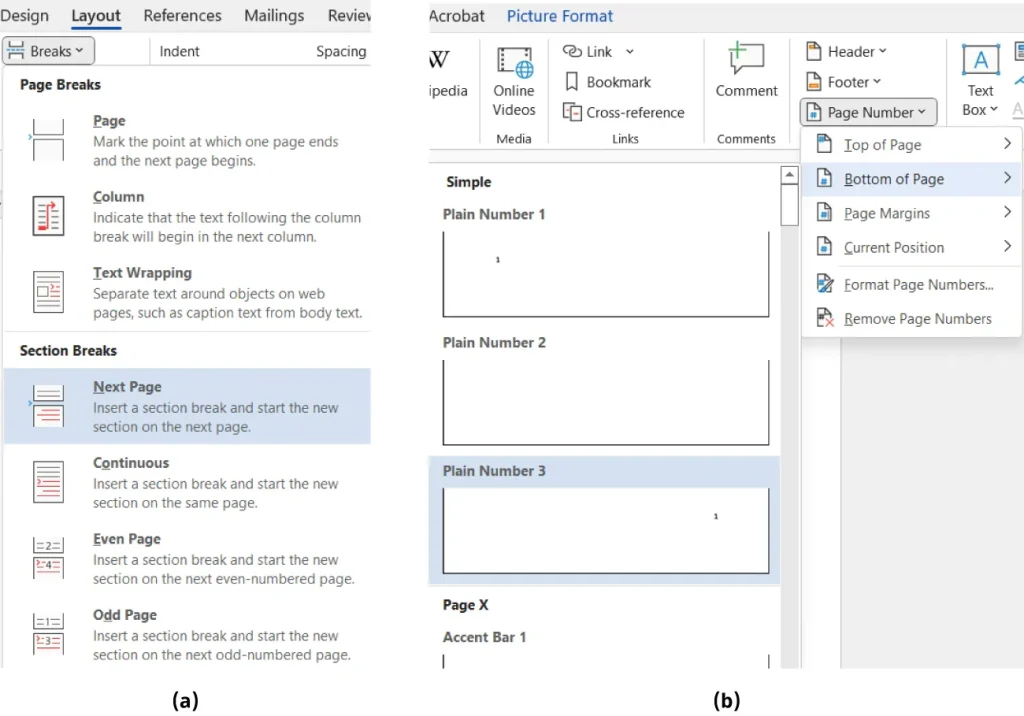
Figure 3.12 Section breaks (a) allow you to have different page formats for different areas of the document. Panel (b) shows that the number will be at the bottom of the page. (Used with permission from Microsoft)
Another advantage to having different sections in a document is that you can accommodate different graphics well. This can be helpful when working with graphics that are best suited for landscape orientation, for example. As with the page numbering, you can change the orientation for a specific section. Figure 3.13 shows successive pages of a document with different orientations.

Figure 3.13 Inserting sections in your document allows you to change the page orientation between sections. (Used with permission from Microsoft)
Media Attributions
- 3.6
- 3.7
- 3.8
- 3.9
- 3.10
- 3.11
- 3.12
- 3.13
